
Your Comprehensive User Guide
Step-by-Step Instructions for Application Usage
How to Configure Action Step
Introduction
- Purpose: This article explains how to configure an Action Step in the Workflow Builder. Action Steps are used to perform specific tasks like sending notifications, updating records, or executing predefined processes within a workflow. This guide is for users looking to add functionality and automation to their workflows.
Selecting Action to the Workflow
- Click Action to configure the action step type.
- Screenshot:
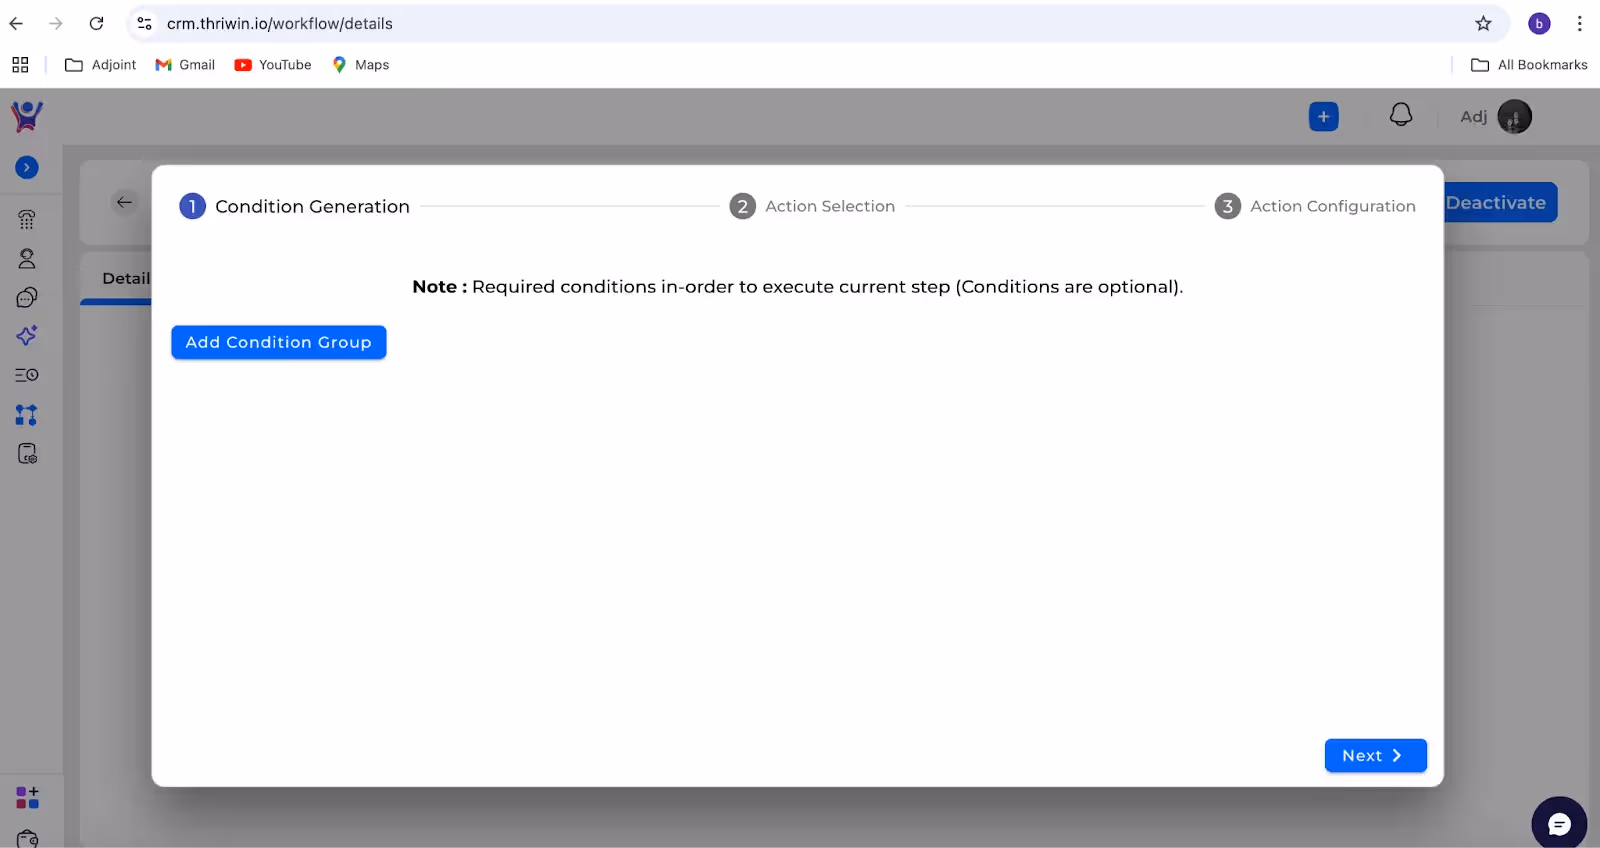
Configuring Conditions
- This step allows you to set the conditions under which the action will execute. You can define conditions based on fields, variables, or specific triggers within your workflow.
- Screenshot:
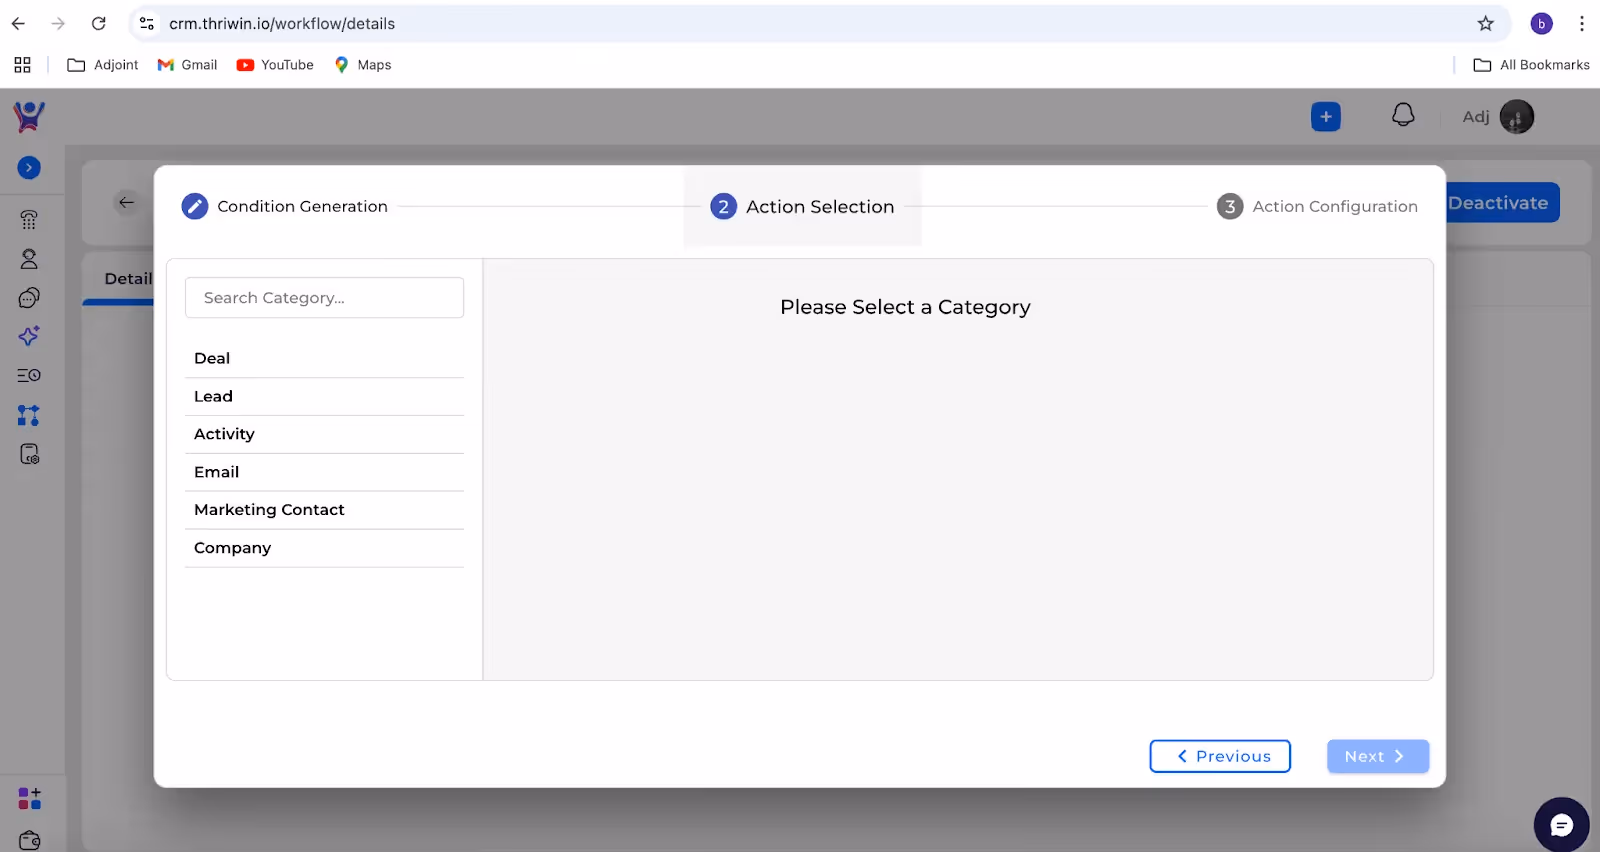
Action Selection
- After defining conditions, choose the specific action you want to configure. The options displayed will depend on the integrations available in your system.
- Screenshot:
Need More Help?
Contact Support: For further queries, reach out to our Support Team.

How to Configure the Action Step
Set up action steps like emails, creations or updates to make workflows impactful.
How to Configure Step
- Purpose: This article explains how to configure a Step in the Workflow Builder. A step determines the action or delay that occurs after a trigger is activated or a previous step is completed. This guide is for users looking to automate actions or add conditional logic to their workflows.
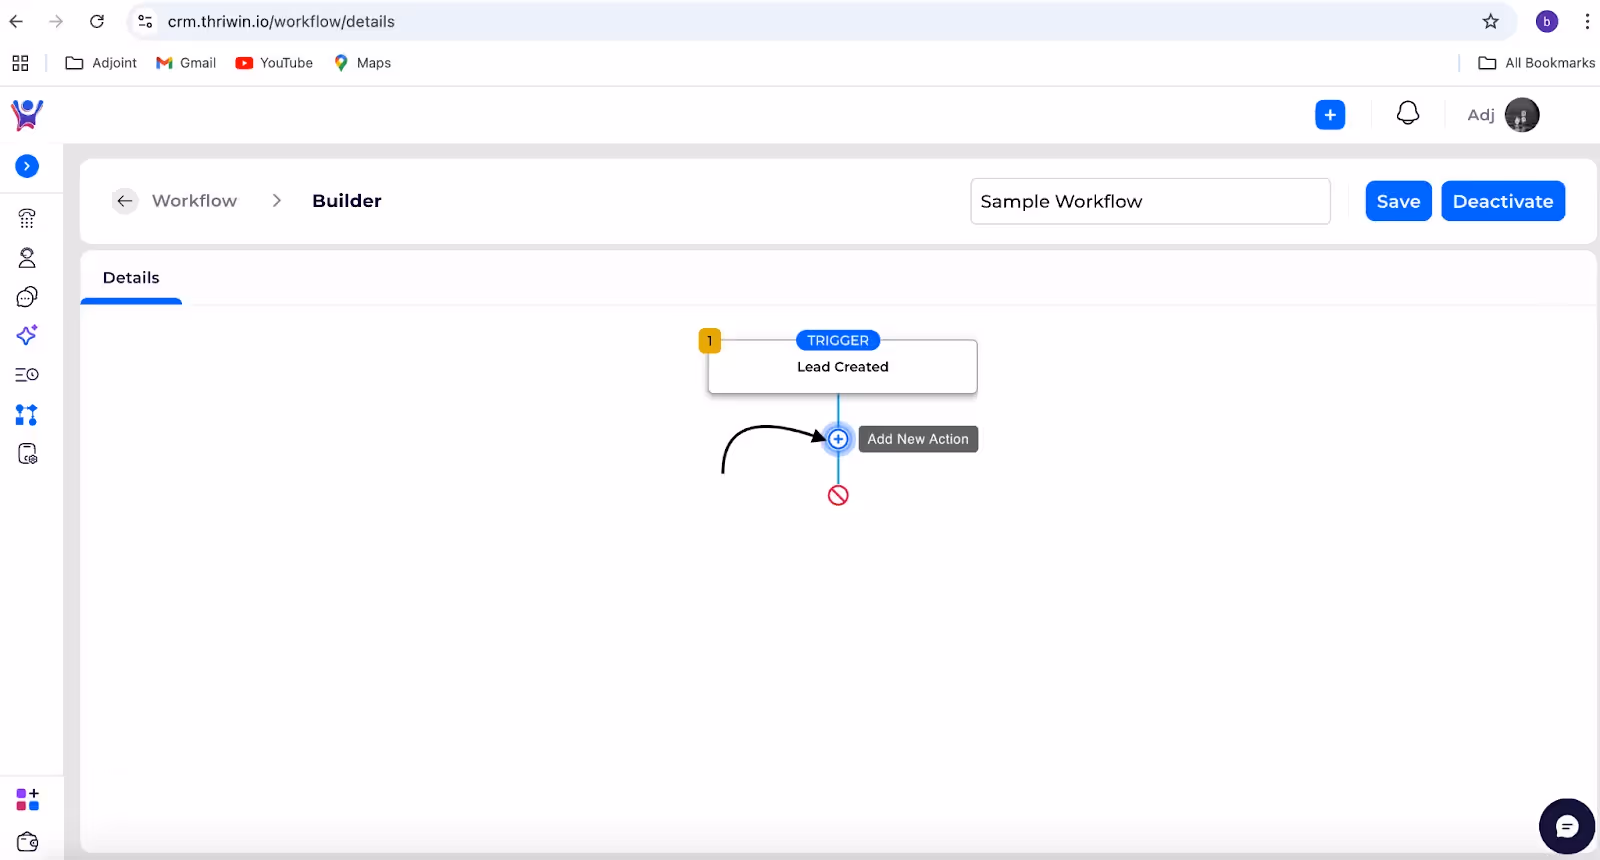
Add Step to the Workflow
- Below the trigger, you will see a + icon.
- Click the + icon to add an action or task that should execute after the trigger.
- Screenshot:
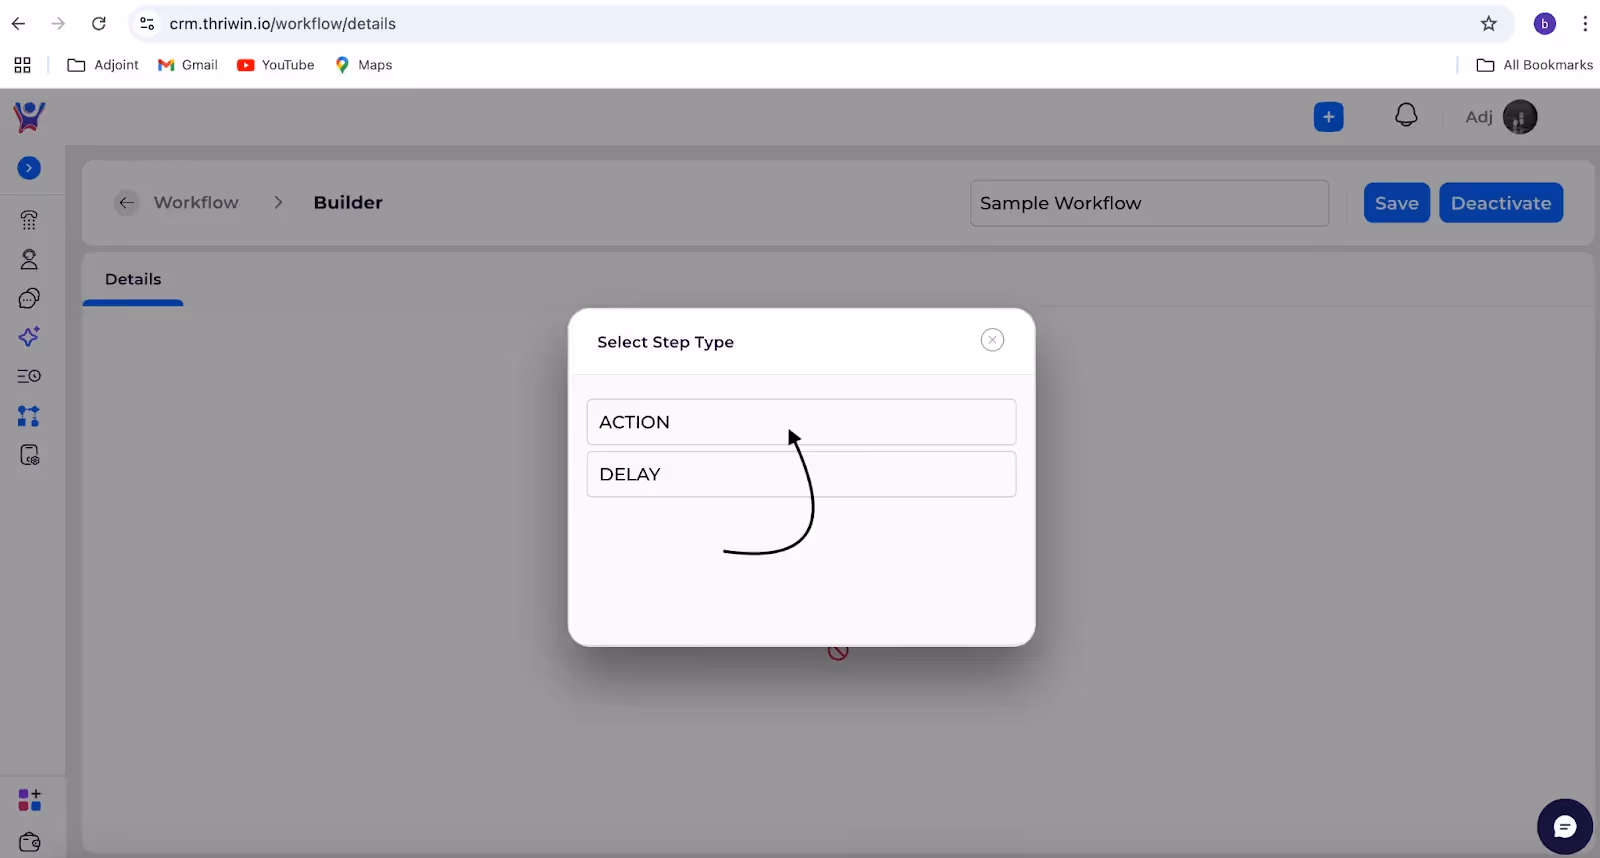
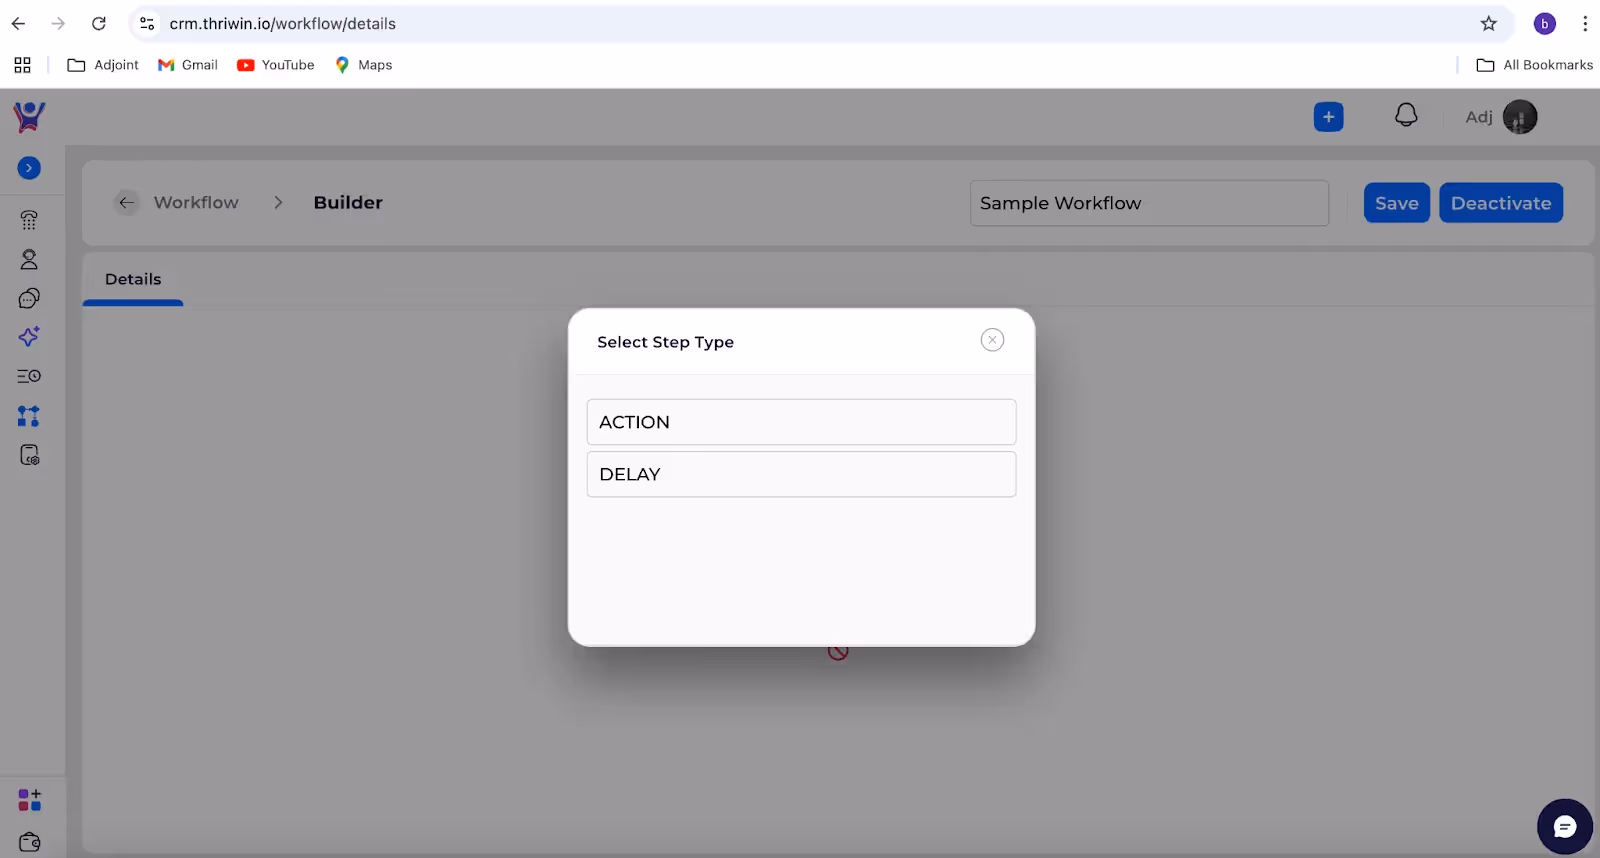
Select Step Type to the Workflow
- After configuring a trigger, click on the + (Add Step) icon in the builder interface. You will see a modal with two options
- Action: Add an immediate task such as sending an email or updating CRM data.
- Delay: Add a time gap between two steps in the workflow.
- Screenshot:
Need More Help?
Contact Support: For further queries, reach out to our Support Team.
Configure Workflow Steps
Add, edit, and reorder workflow steps to reflect your exact process
Introduction
- Purpose: This article explains how to configure a Trigger in the Workflow Builder. A trigger is the starting point of a workflow and defines the event that initiates the entire process. This guide is designed for users who want to automate specific actions in response to defined events like creating a lead, updating a record, or submitting a form.
Add a Trigger
- In the Builder section, you will see a box labeled Trigger.
- Screenshot:

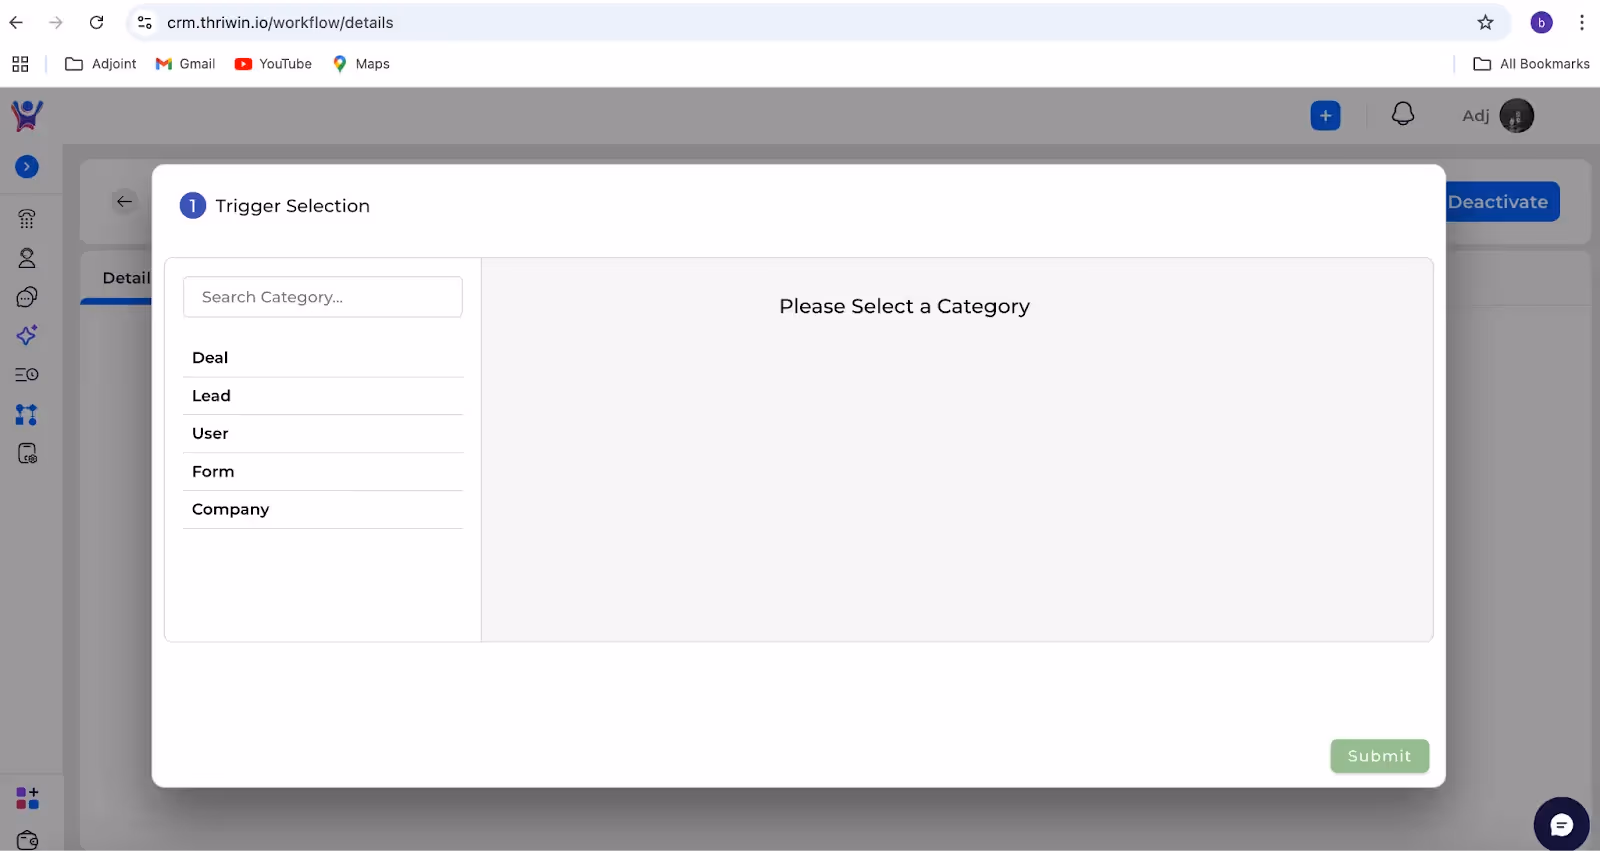
Search or Choose a Category
- Use the Search Category field at the top if you know the specific trigger category you're looking for.
- Alternatively, scroll through the categories and click on the relevant one.
- Screenshot:
Explore Available Triggers
- Once a category is selected, it will display the specific triggers associated with it in the right-hand panel.
- Screenshot:
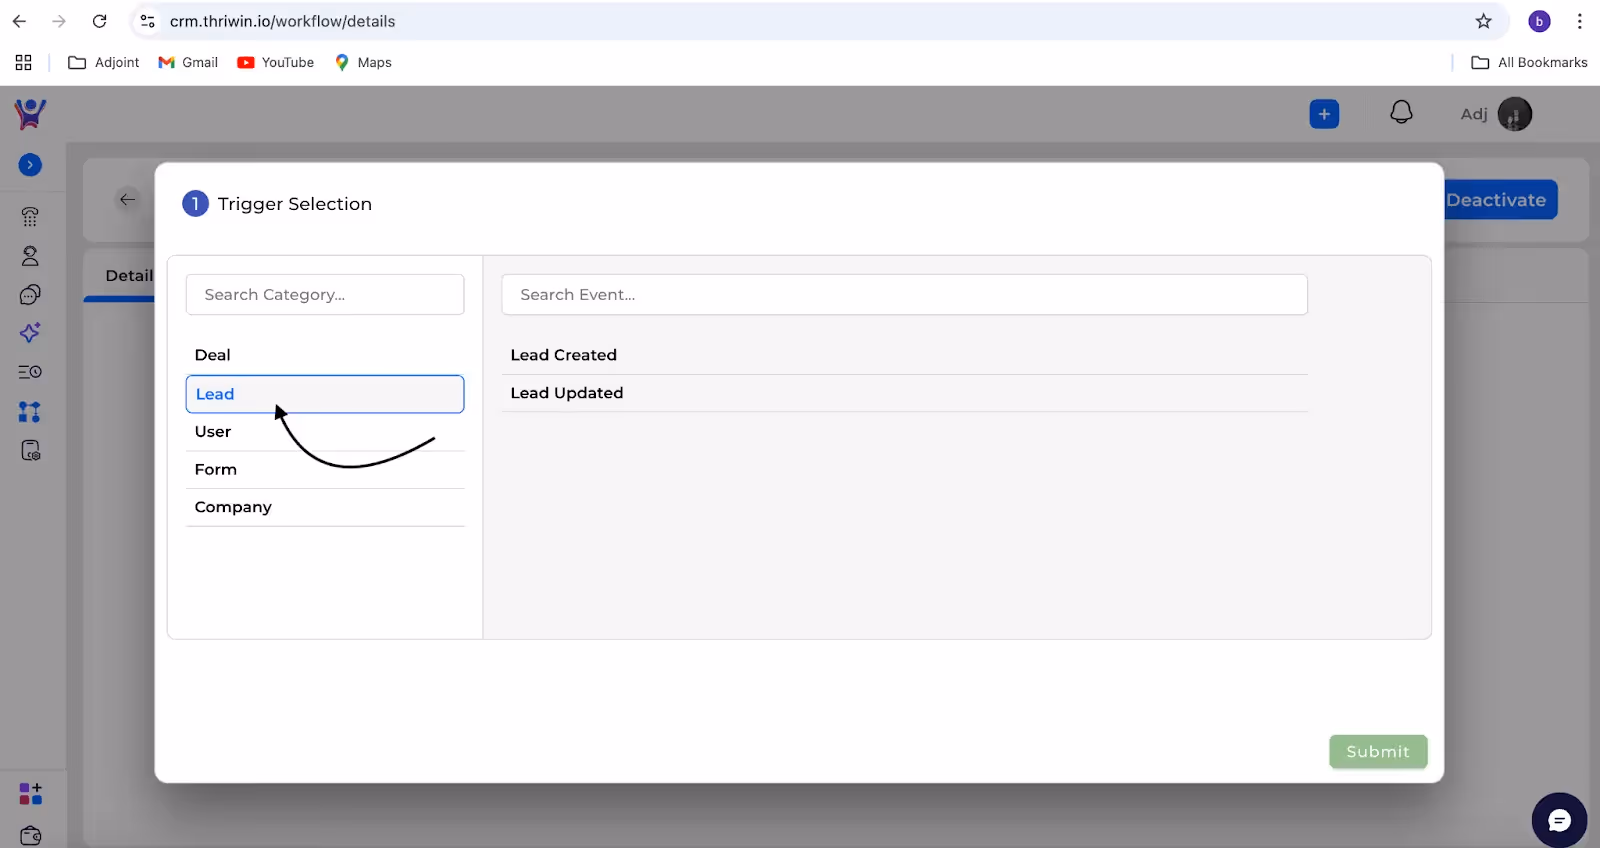
Select the Trigger
- Click on the desired trigger to choose it.
- The selected trigger will highlight or be marked for confirmation.
- Screenshot:

Submit the Trigger
- Click the Submit button in the bottom-right corner of the window to finalize your trigger selection.
- Screenshot:

Need More Help?
Contact Support: For further queries, reach out to our Support Team.
Configure Workflow Triggers
Define when and how your workflow should start using powerful triggers
Introduction
- Purpose: This guide will help you create a new workflow. Workflows enable you to streamline and automate tasks effectively. This guide is designed for all users who want to create their workflows efficiently.
To navigate to workflows, follow below step:
Navigation to Workflows
Step 1: Locate the CRM section: Look for the Landing pages module in the navigation menu.
Step 2 : Click on "workflow": Now click on the workflow icon inside the navbar, inorder to view and manage workflows.

Click the Create Button
- Description:
- Locate the + Create button on the top-right corner of the Workflow page.
- Click the button to open the workflow creation form
- Screenshot:

Define the Workflow Name
- Description:
- Locate the text field in the top-right corner labeled [Workflow Name].
- Enter or update the name of your workflow (e.g., "Sample Workflow").
- Screenshot:
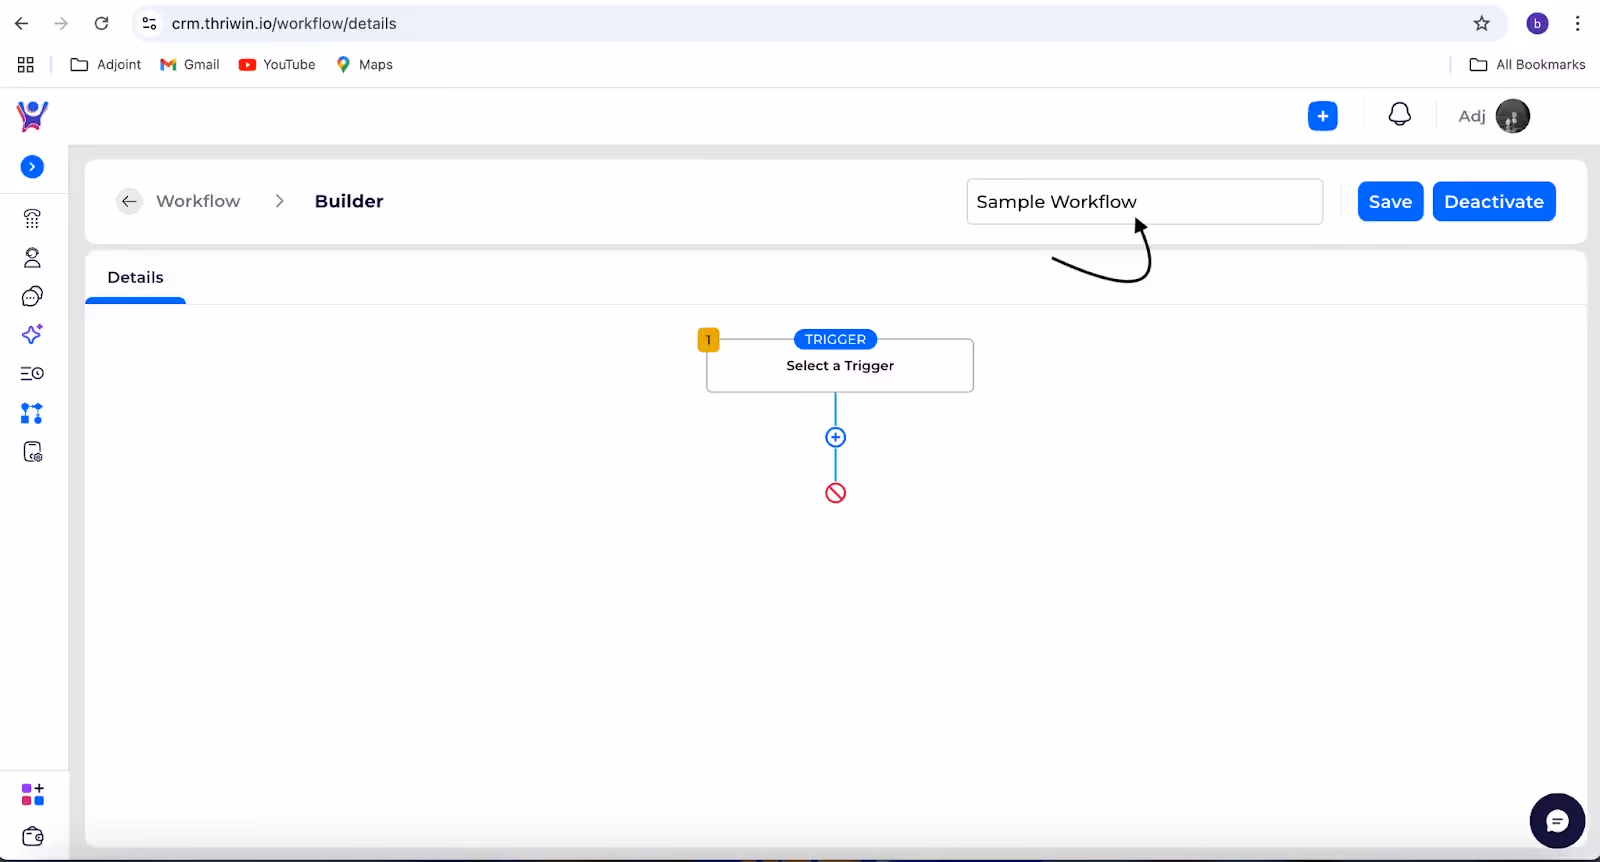
Access the Workflow Builder
- Now you can build the workflow builder, and automate flow effortlessly.
- Follow the steps mentioned in the steps article to get insights on how to configure steps, similarly follow action steps creation guide to get insights on how to configure actions.
- Screenshot:

Need More Help?
Contact Support: For further queries, reach out to our Support Team.
Create a Workflow
Start your automation journey by building a new workflow from scratch
Adding Non-Verified External Applications to Google Workspace
Steps:
- Access Google Admin Console:
- Go to https://admin.google.com/ and log in with your administrator account.
- Navigate to "Security" Settings:
- In the left-hand navigation, select "Security" > "Access And Data Control">”API Controls”.
- Find "Manage Third Party App Access" Section:
- Find the "Manage Third Party API Access" section.
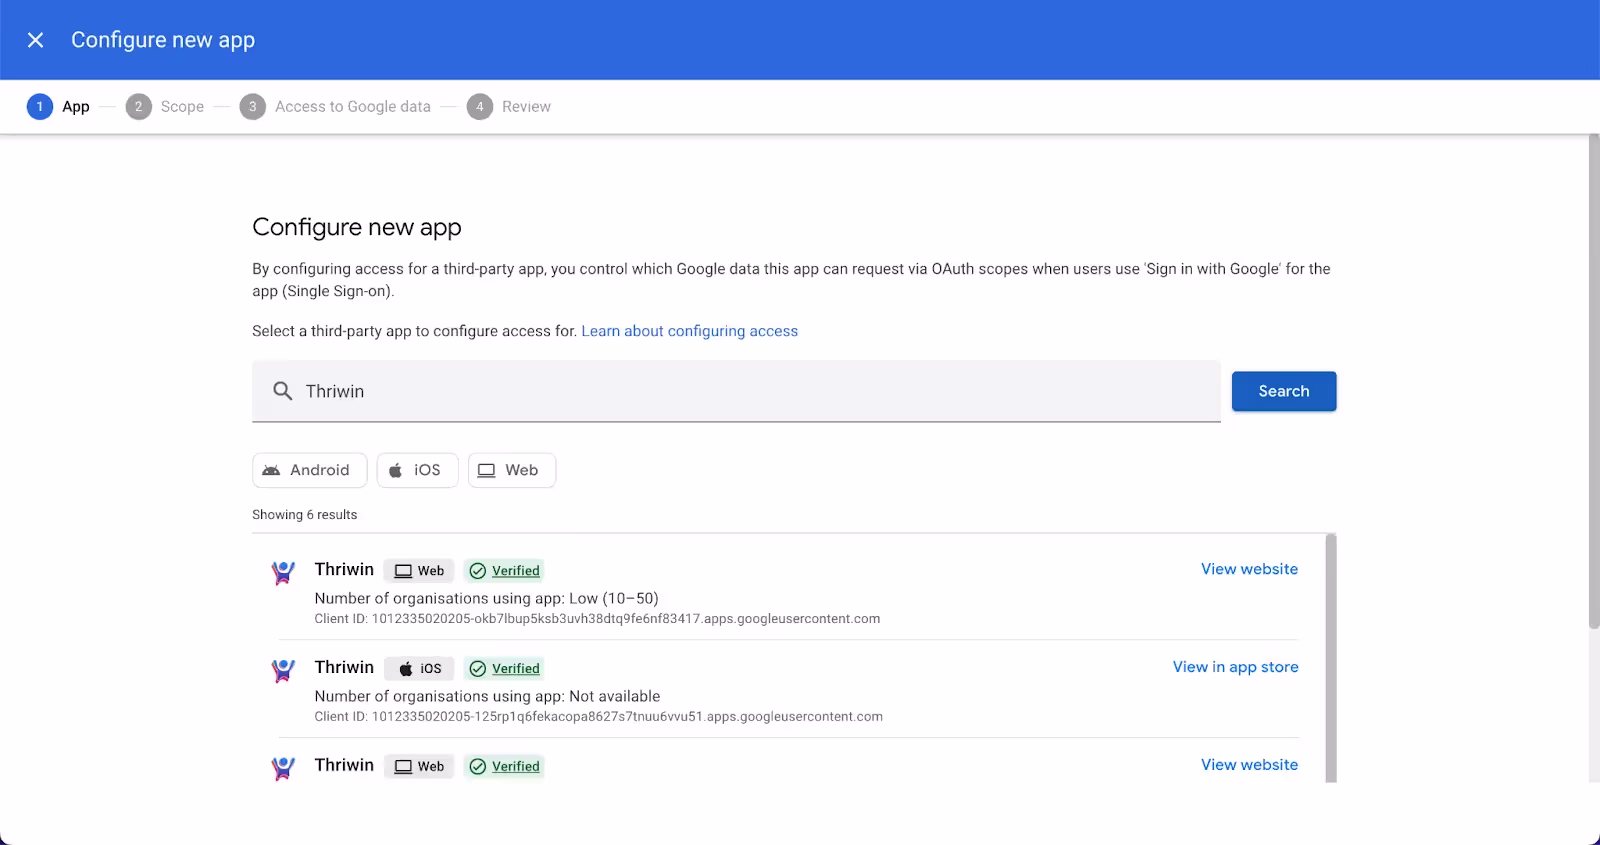
- Click "Configure New App":
- Click on configure new app.

- Search for THRIWIN:
- Search for Thriwin
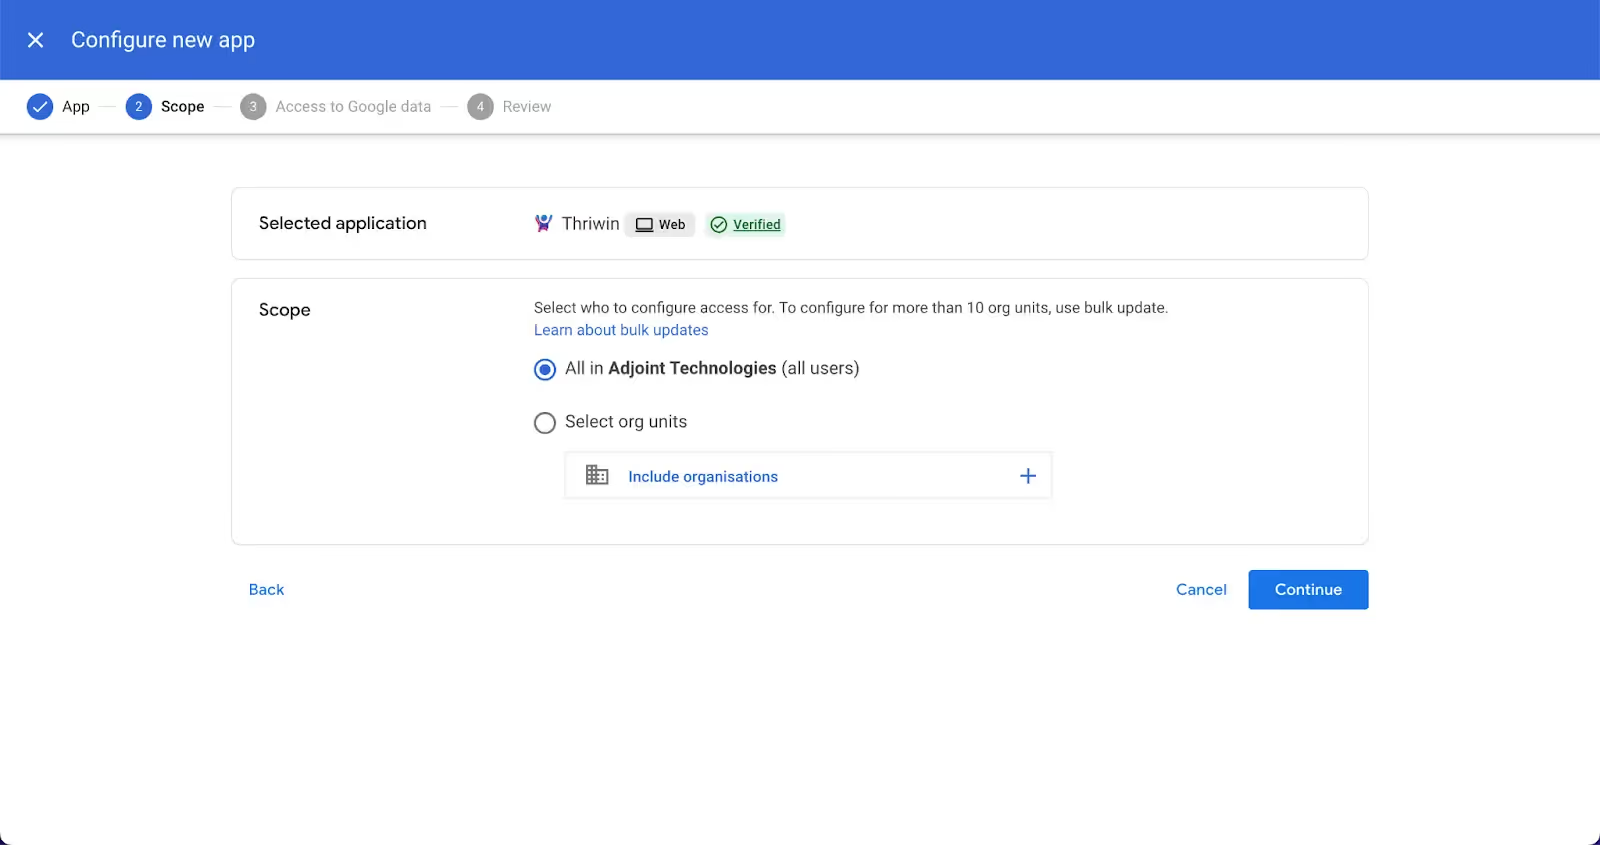
- Select All in Organisation:
- Select all option and click continue
- Select Trusted
- Select trusted and click continue

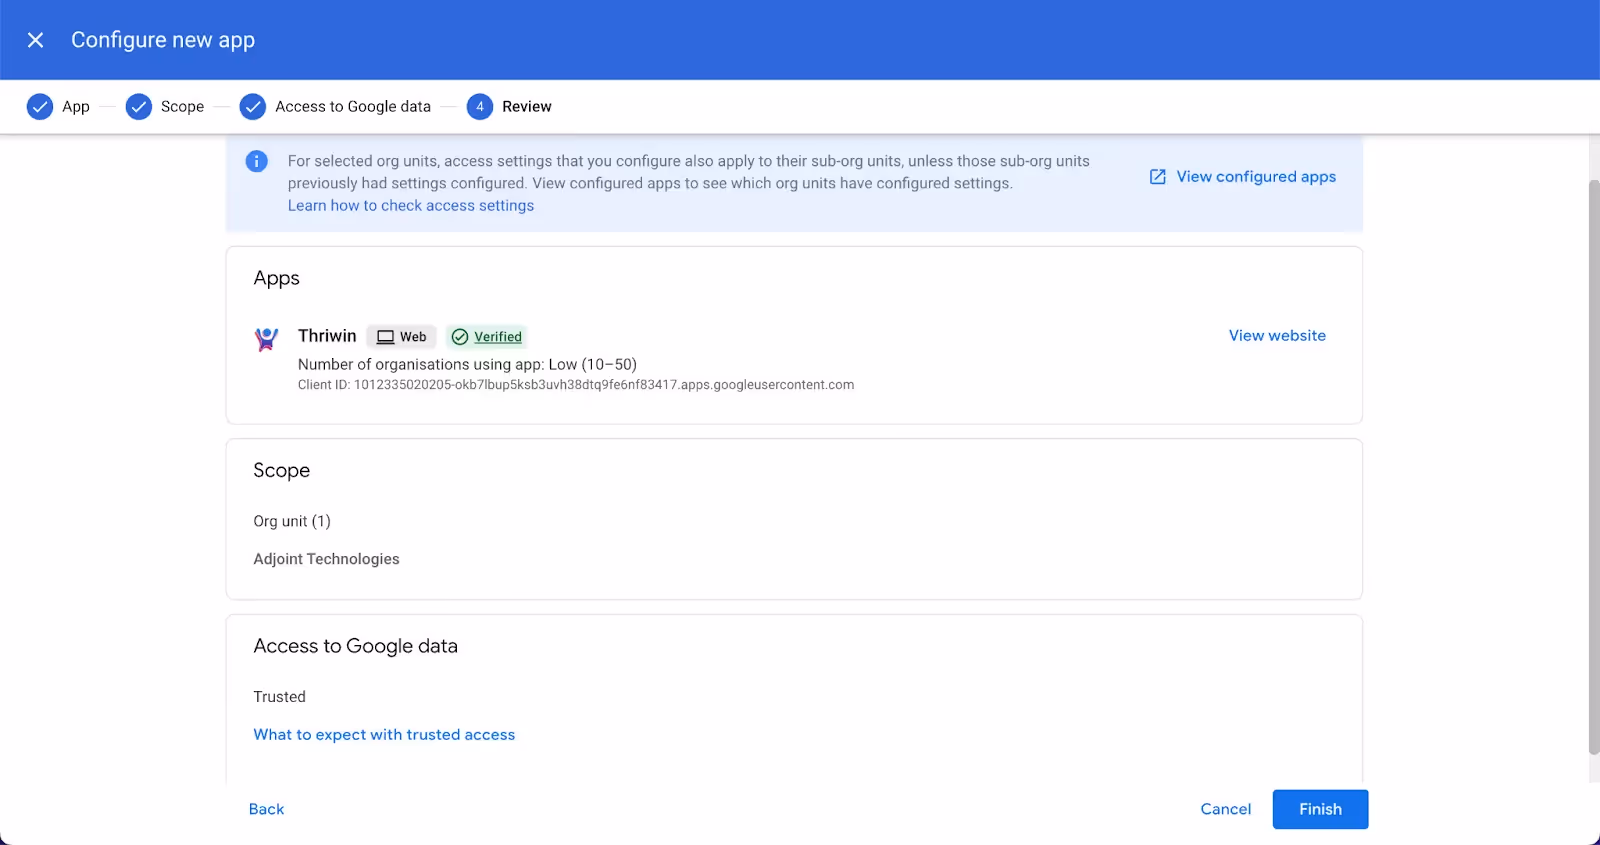
- Review and Finish
- Review changes and click finish
Thriwin Integration in Google Workspace
Step-by-Step Guide: Effortlessly enable Thriwin Integration in Google Workspace
Bulk update of Contacts through imports
Purpose: Update Contacts records using Excel or CSV files by referencing the system-generated ID.
Follow these steps:
To update lead records using Excel or CSV files, follow these steps:
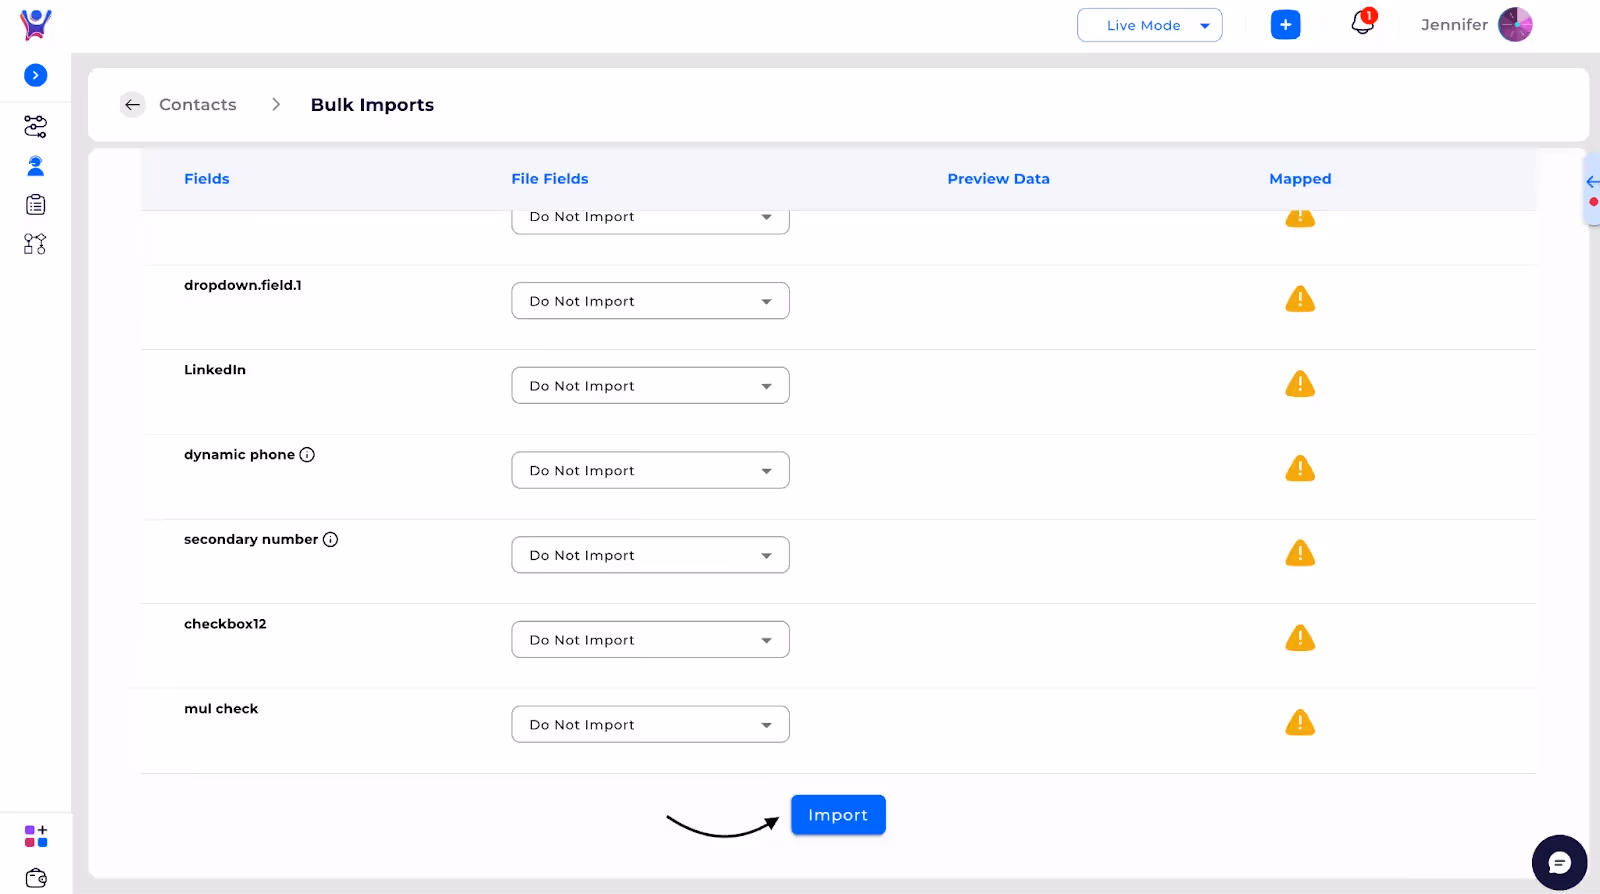
- Select the "Import" option and choose the "Update" mode.
- Map the columns in your file to the corresponding system field names.
- Click "Import" to start the update process.
- As this is a background task, wait for the acknowledgment email.
- If there are errors, the email will include an error message column with specific messages for each affected row, and rows with errors will be highlighted in orange.
Step 1: Select the "Import" option
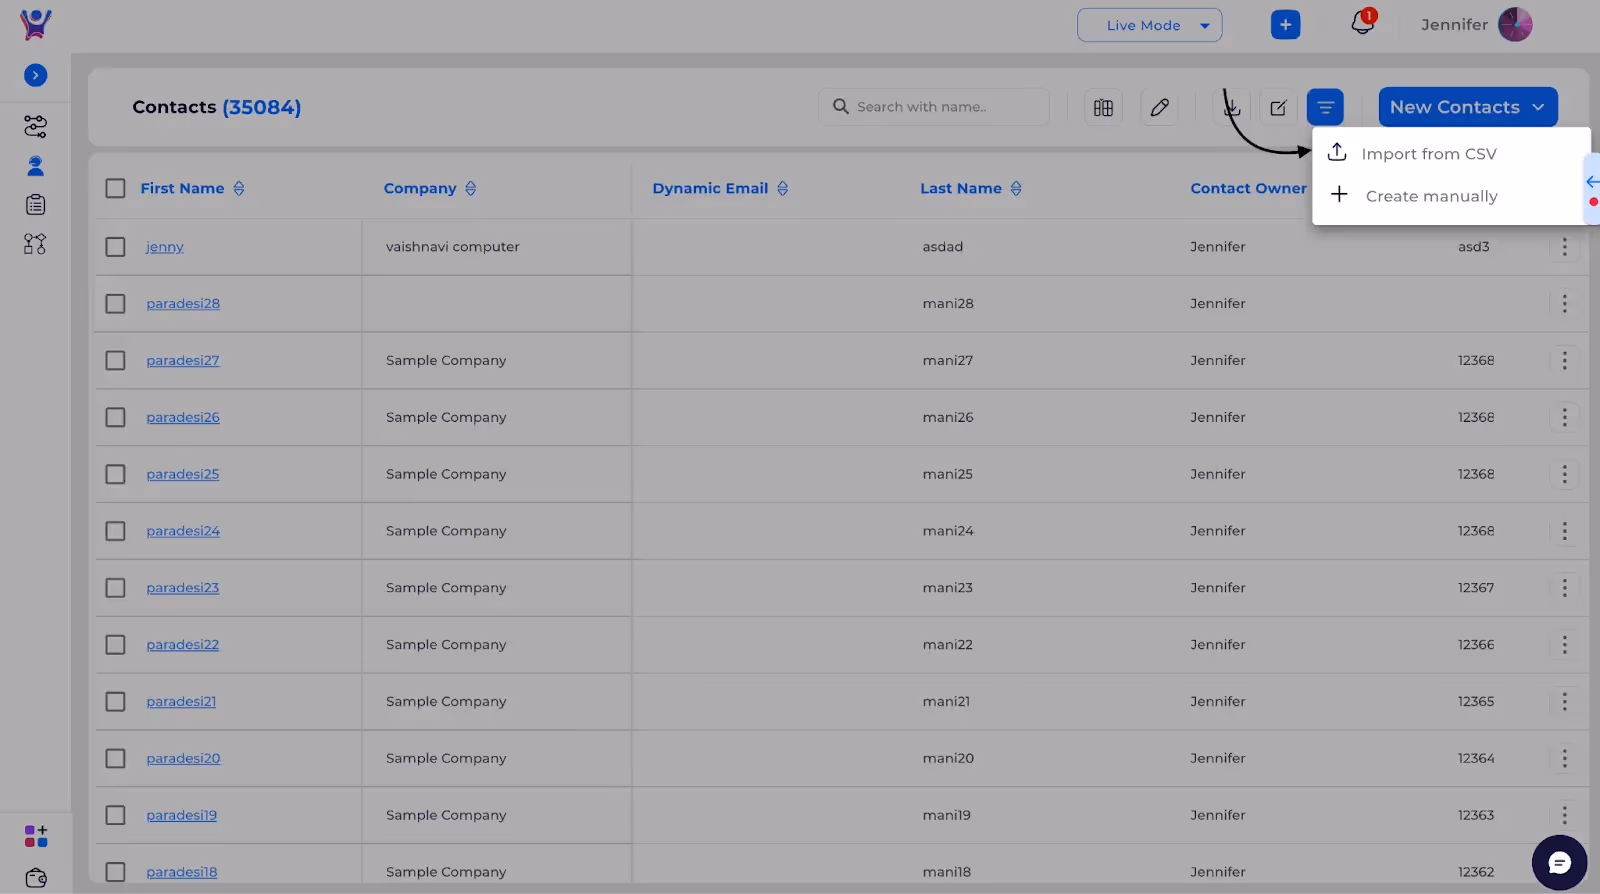
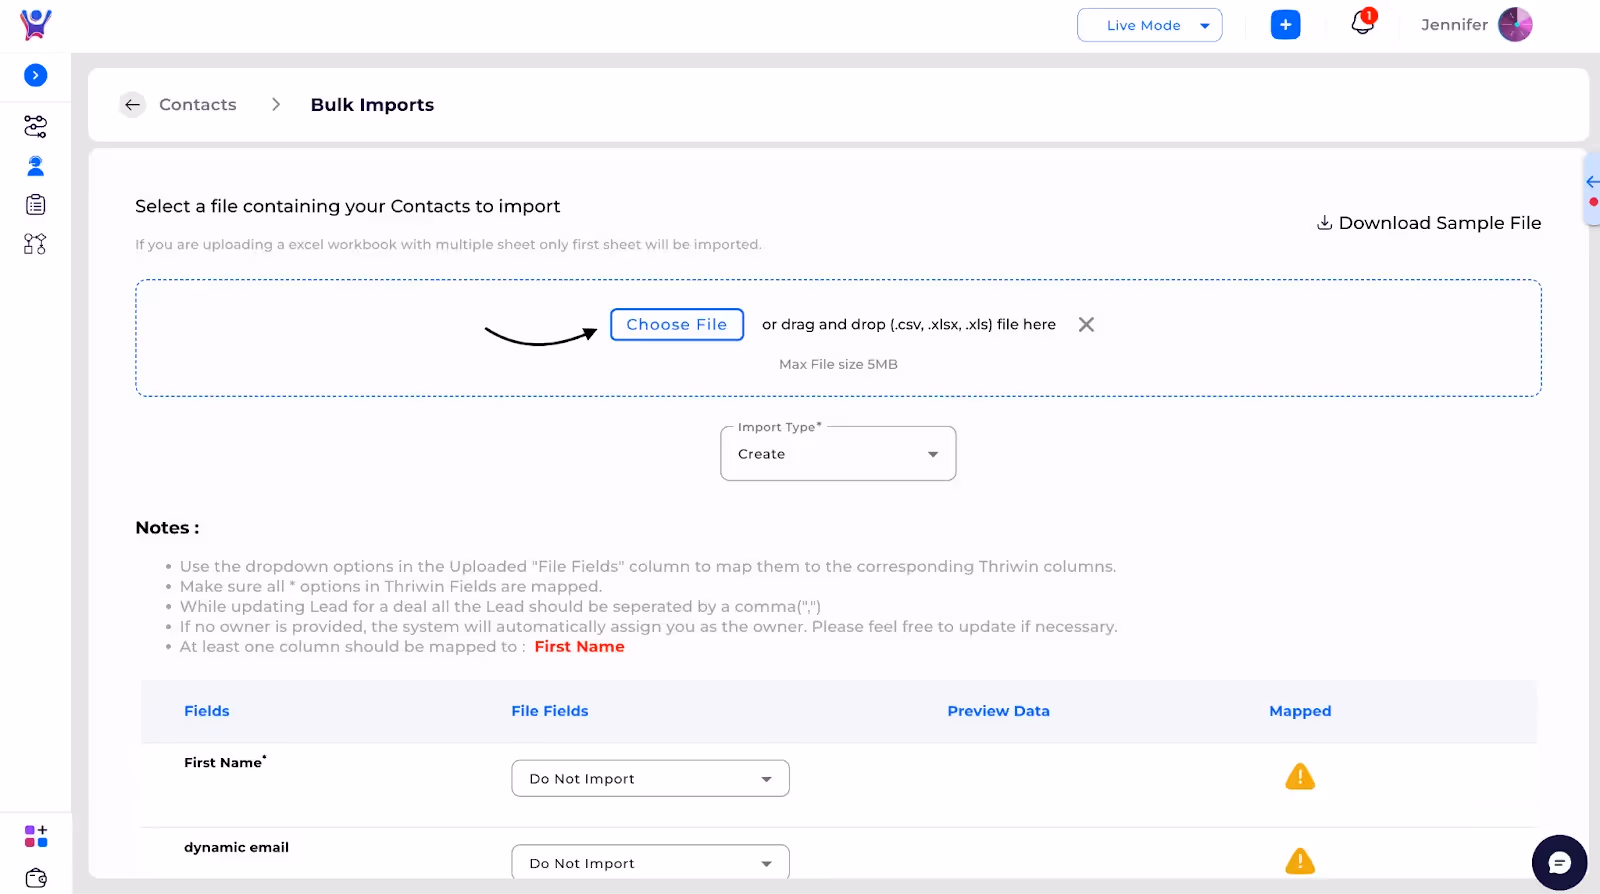
Step 2: Click on the "Choose File" button to open the file selection window. From there, select the desired Excel or CSV file from your device and click "Open"
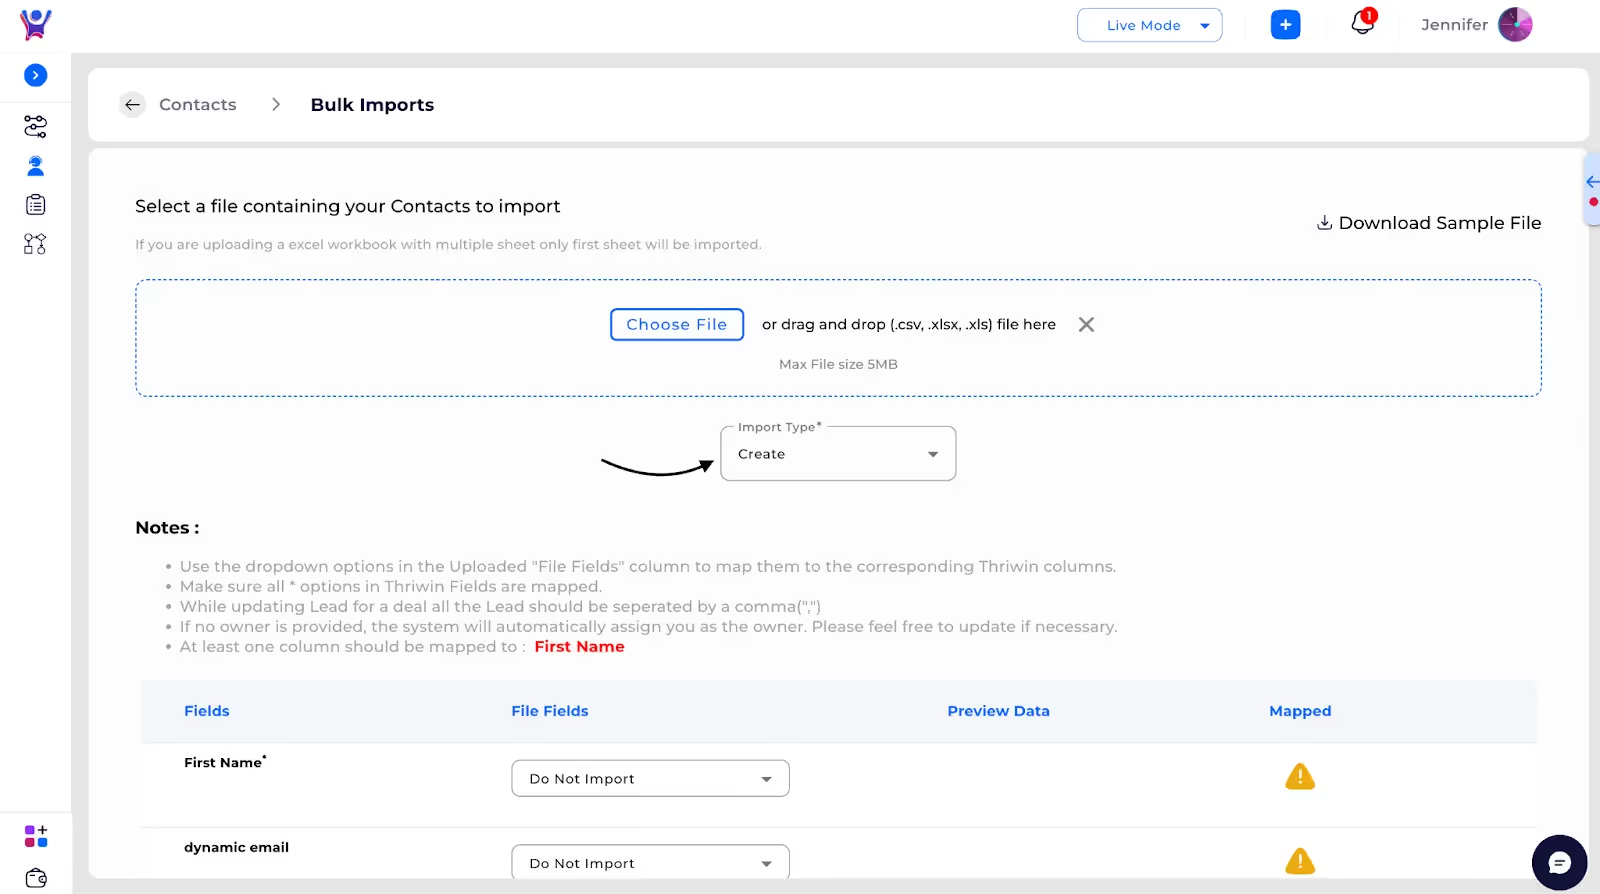
Step 3:Select import type as Update
Step 4:Map the file columns to the corresponding system fields. The "ID" field is mandatory for updating a contact, as the data will be updated based on this ID.
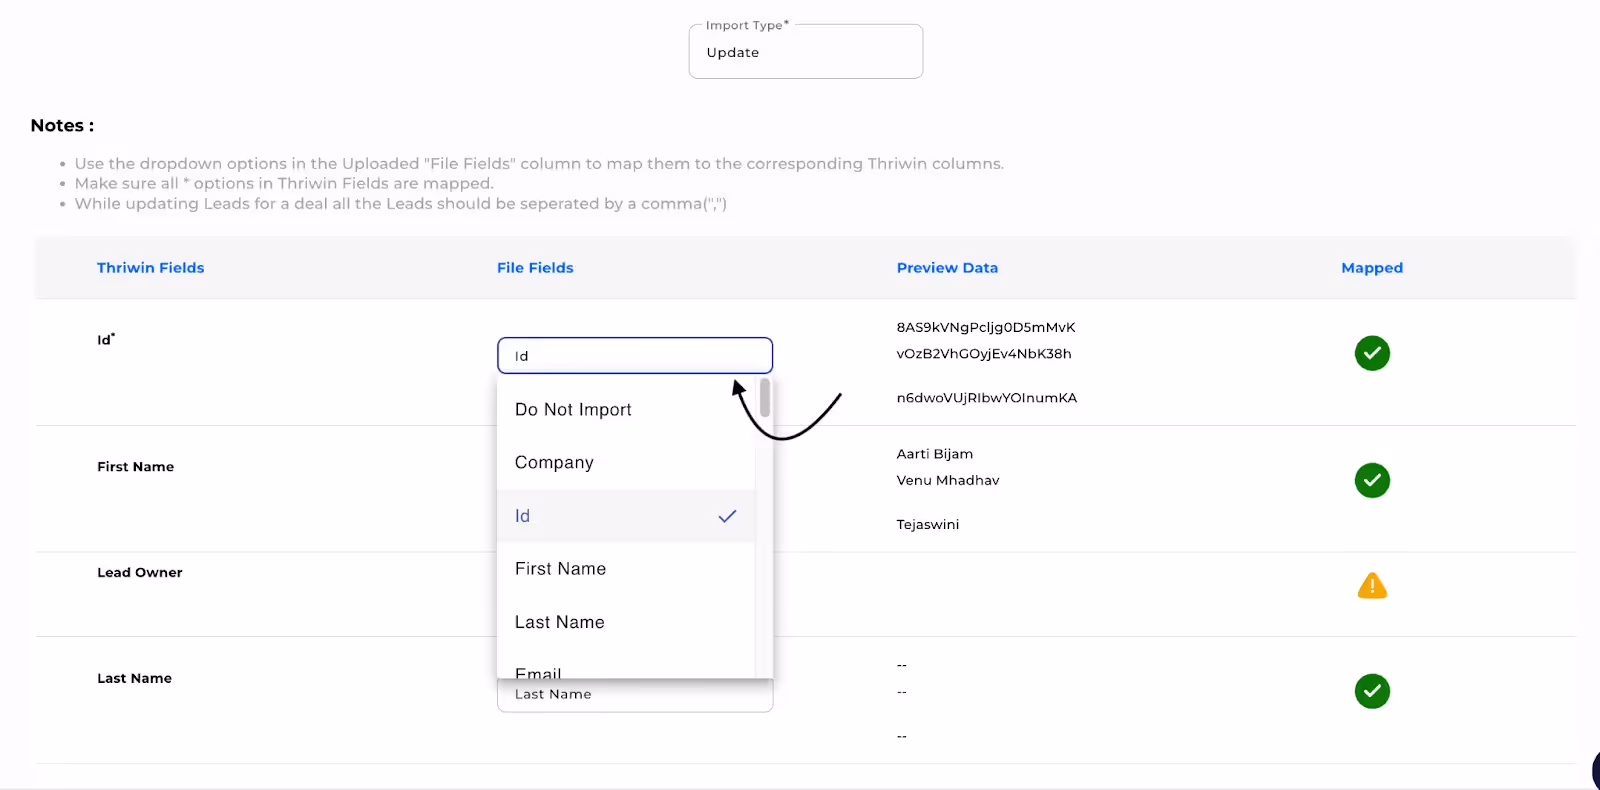
Step 5: Click on import button to start update of Contacts
Bulk update Contacts through Import
Effortlessly Manage and Update Lead Records in Bulk
Form Fields Customization
Scope: creation of new fields or update the form configuration of existing fields with various data types.
Here’s an explanation of each data type:
- Text Field: A single-line field used to enter short text, such as names or titles.
- Text Area: A multi-line field for longer text input, such as descriptions or comments.
- Number: A field that only accepts numeric values, used for entering quantities, prices, or any numeric data.
- Phone Number: A field designed specifically for phone numbers, typically formatted to handle country codes, area codes, and digits.
- Date: A field that allows users to select a date from a calendar or manually enter a date.
- Radio: A group of mutually exclusive options where the user can select only one value from the list.
- Checkbox: A field that allows users to select one or more options from a list of choices.
- Toggle: A binary field that can be switched between two states, such as “On” or “Off.”
- Range Slider: A slider that allows users to select a value within a specified range, useful for inputs like price ranges or ratings.
- Email: A field specifically for email addresses, with validation to ensure the input matches the format of an email.
- File: A field that allows users to upload files, such as documents, images, or other media.
- Dropdown: A field where users can select one option from a predefined list, presented as a dropdown menu.
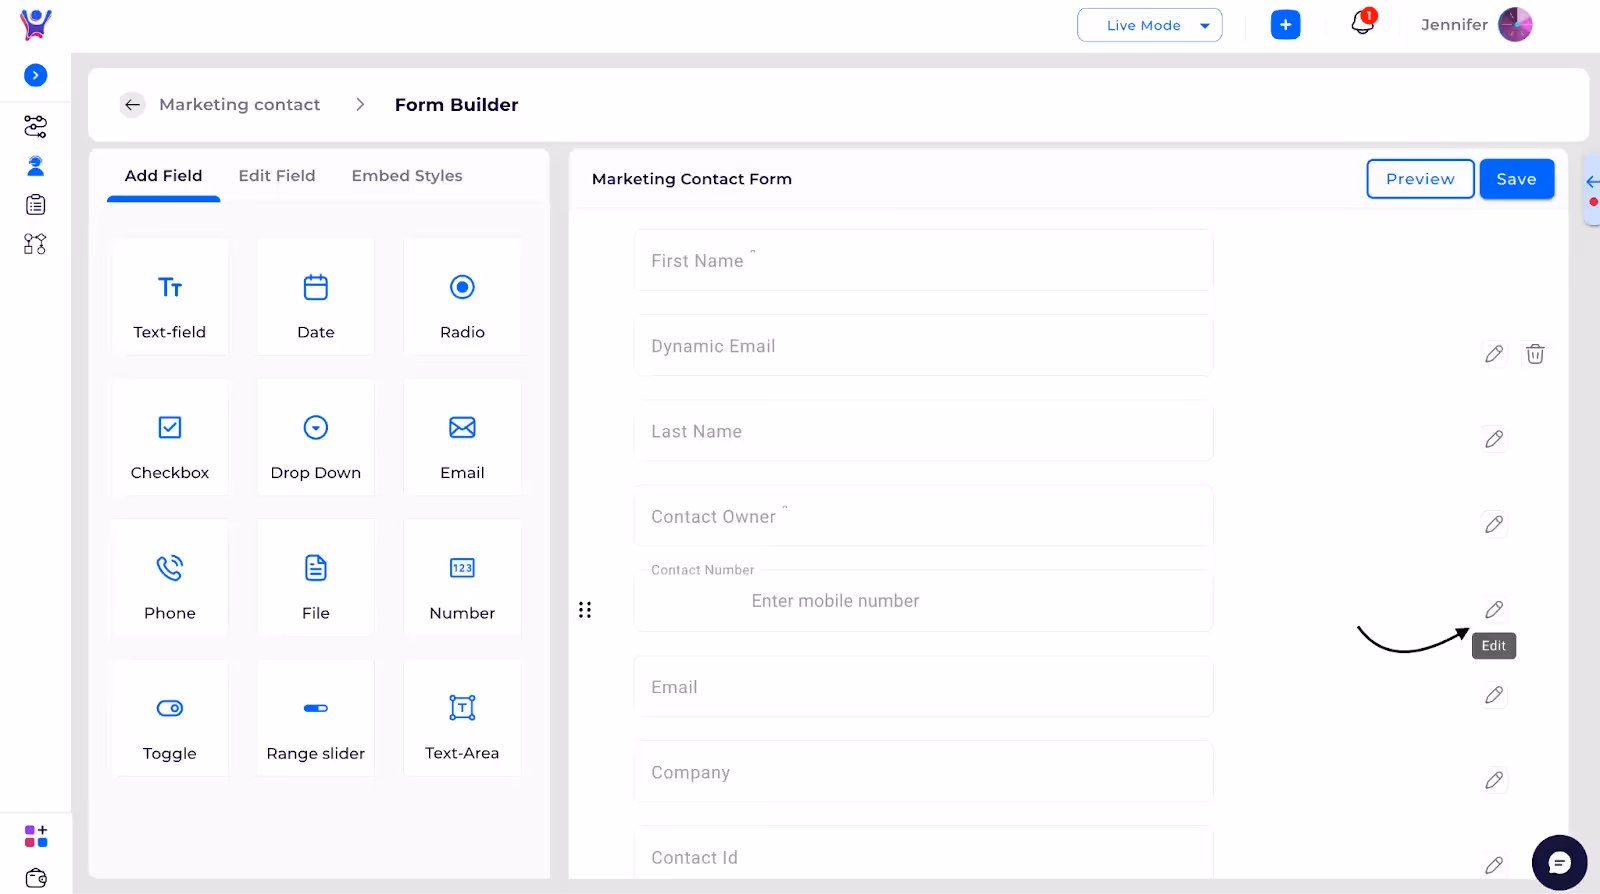
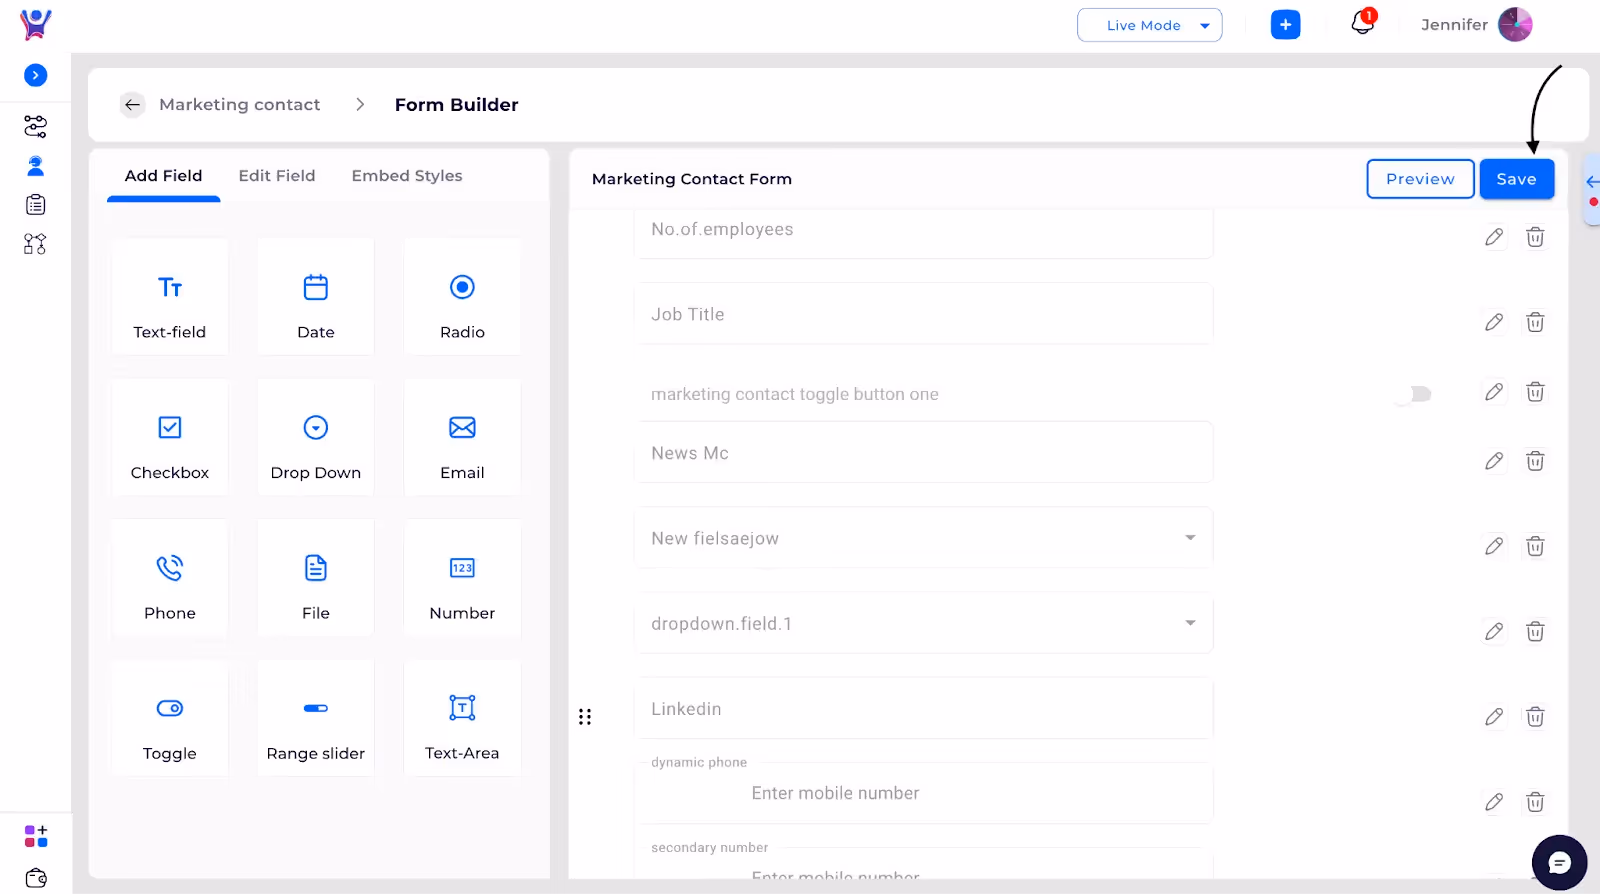
Preview and Save Configuration
- Preview Form: You can preview the form to see how it will appear after applying the changes.
- Save Configuration: Once you’ve created or edited the field configurations, use the respective actions to save your changes, ensuring the updates are applied to the form.
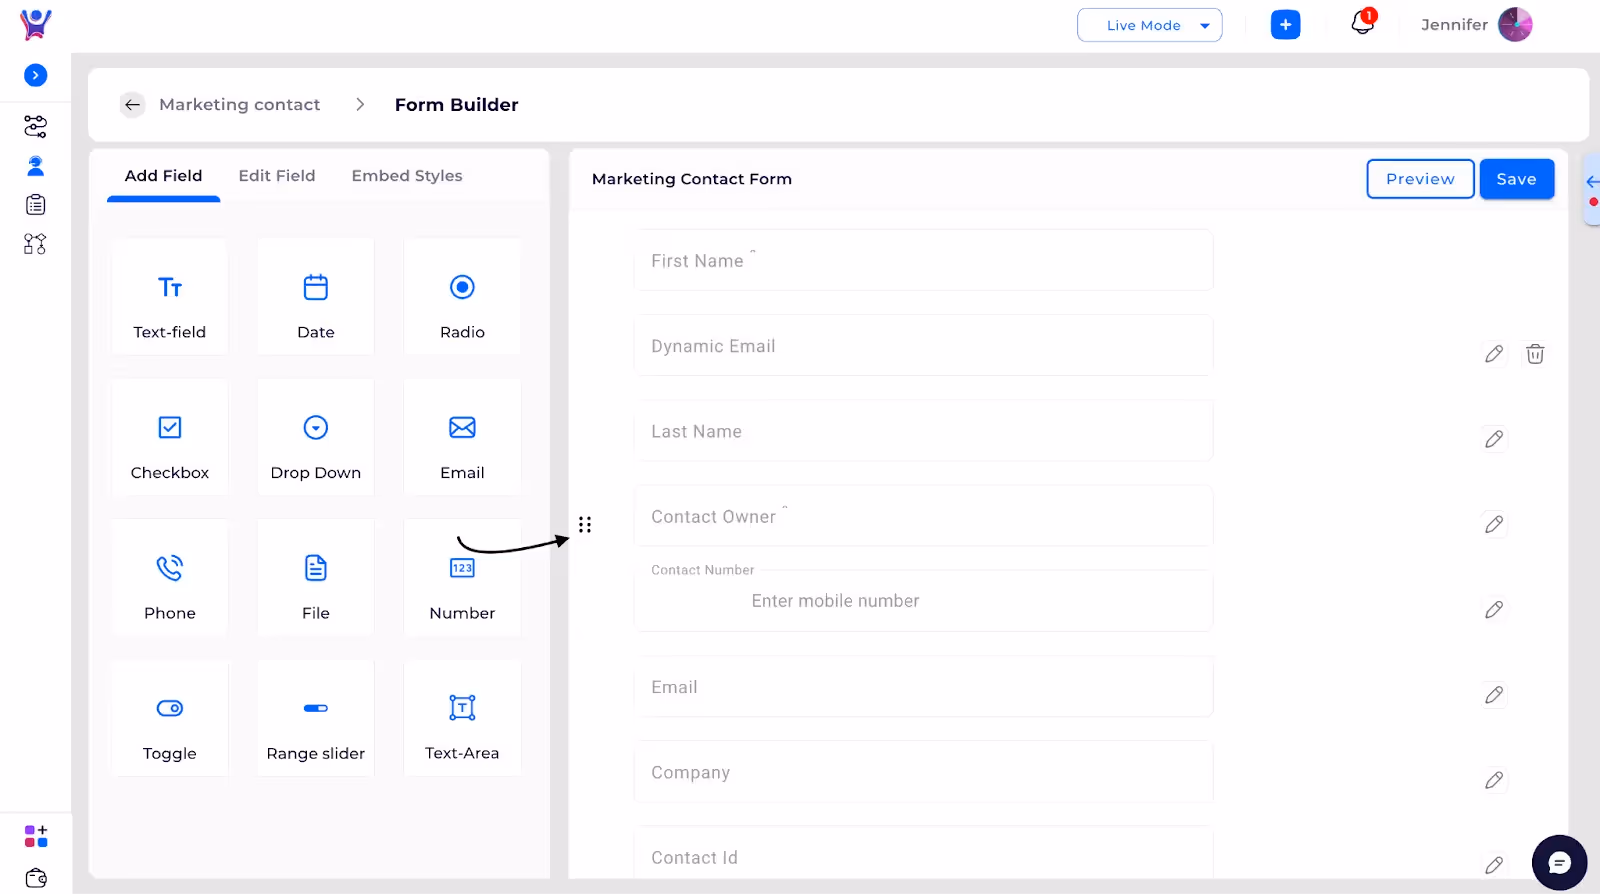
- You can change the order of the fields on the form by adjusting their sequence to suit your preferences.
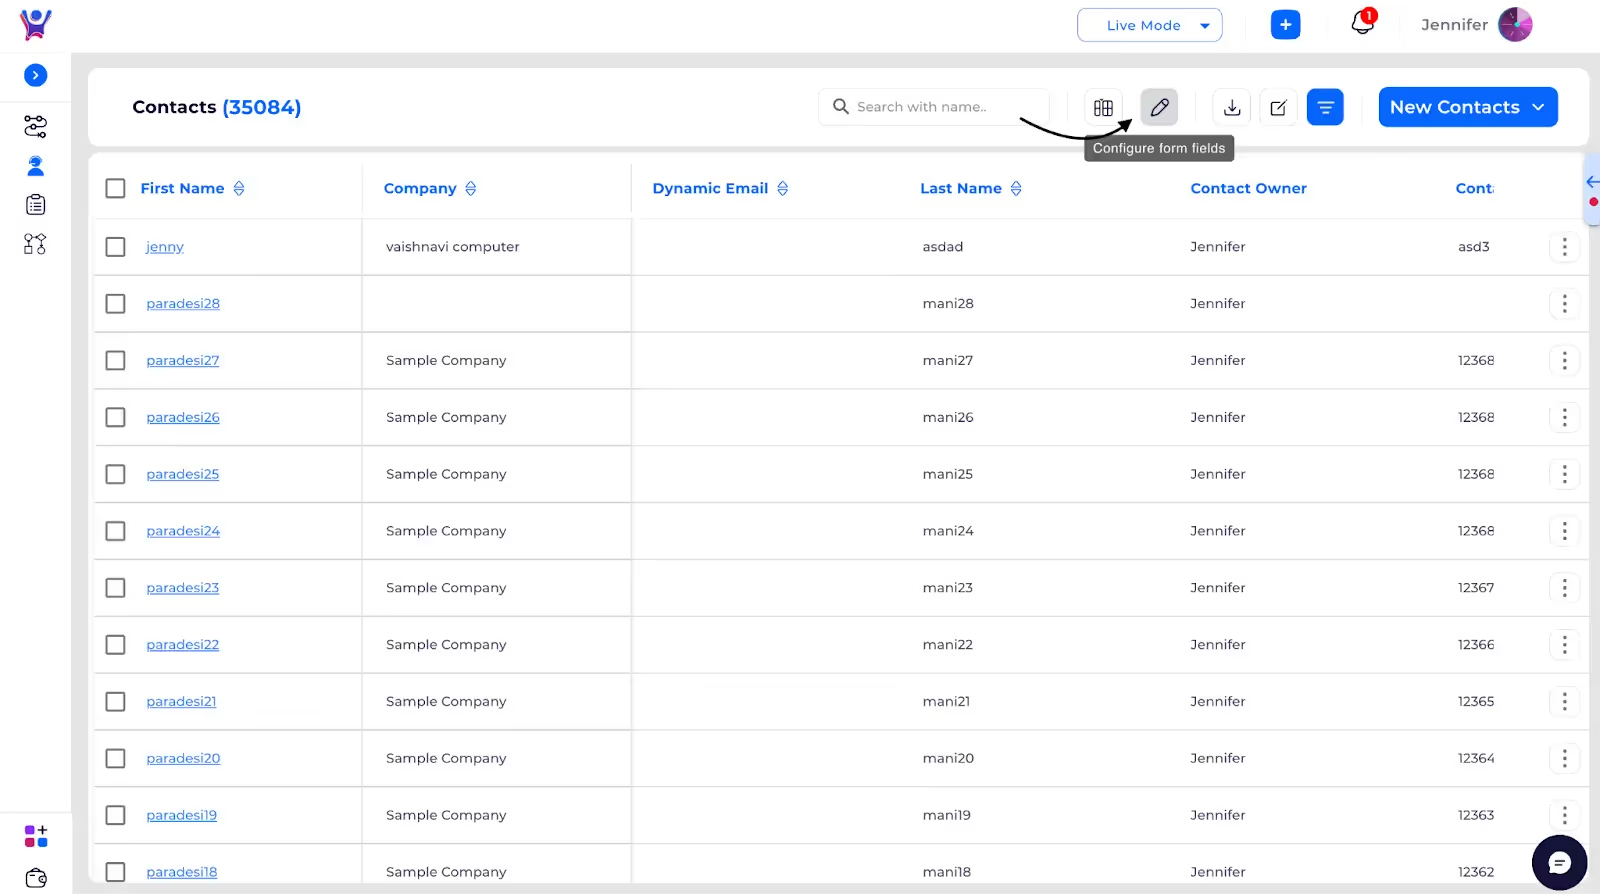
Step 1: Click on Form field
Step 2: Click on Edit icon to edit field
Step 3: Drag and change the sequence of the order of fields
Step 4: Click on delete icon to delete form field

Step 5: Click on preview to preview the form
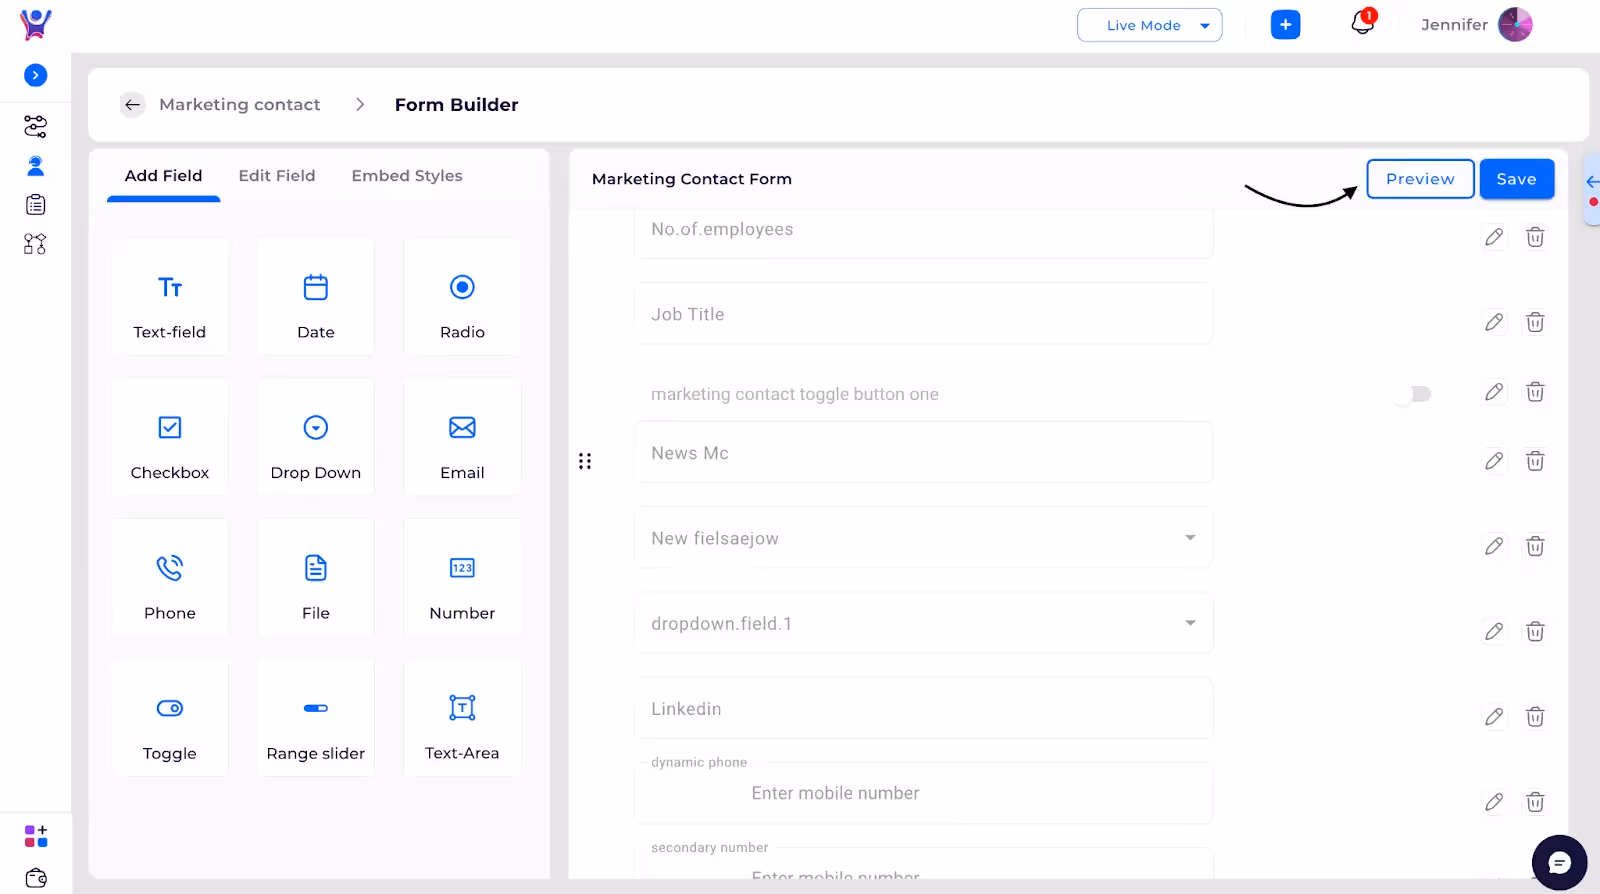
Step 6: Click any one of the icon under add field to create respective field For example:
Step 7: After making essential changes, click on save
Customizing Contact Form fields
Step-by-Step Guide to Customize Contacts Form fields
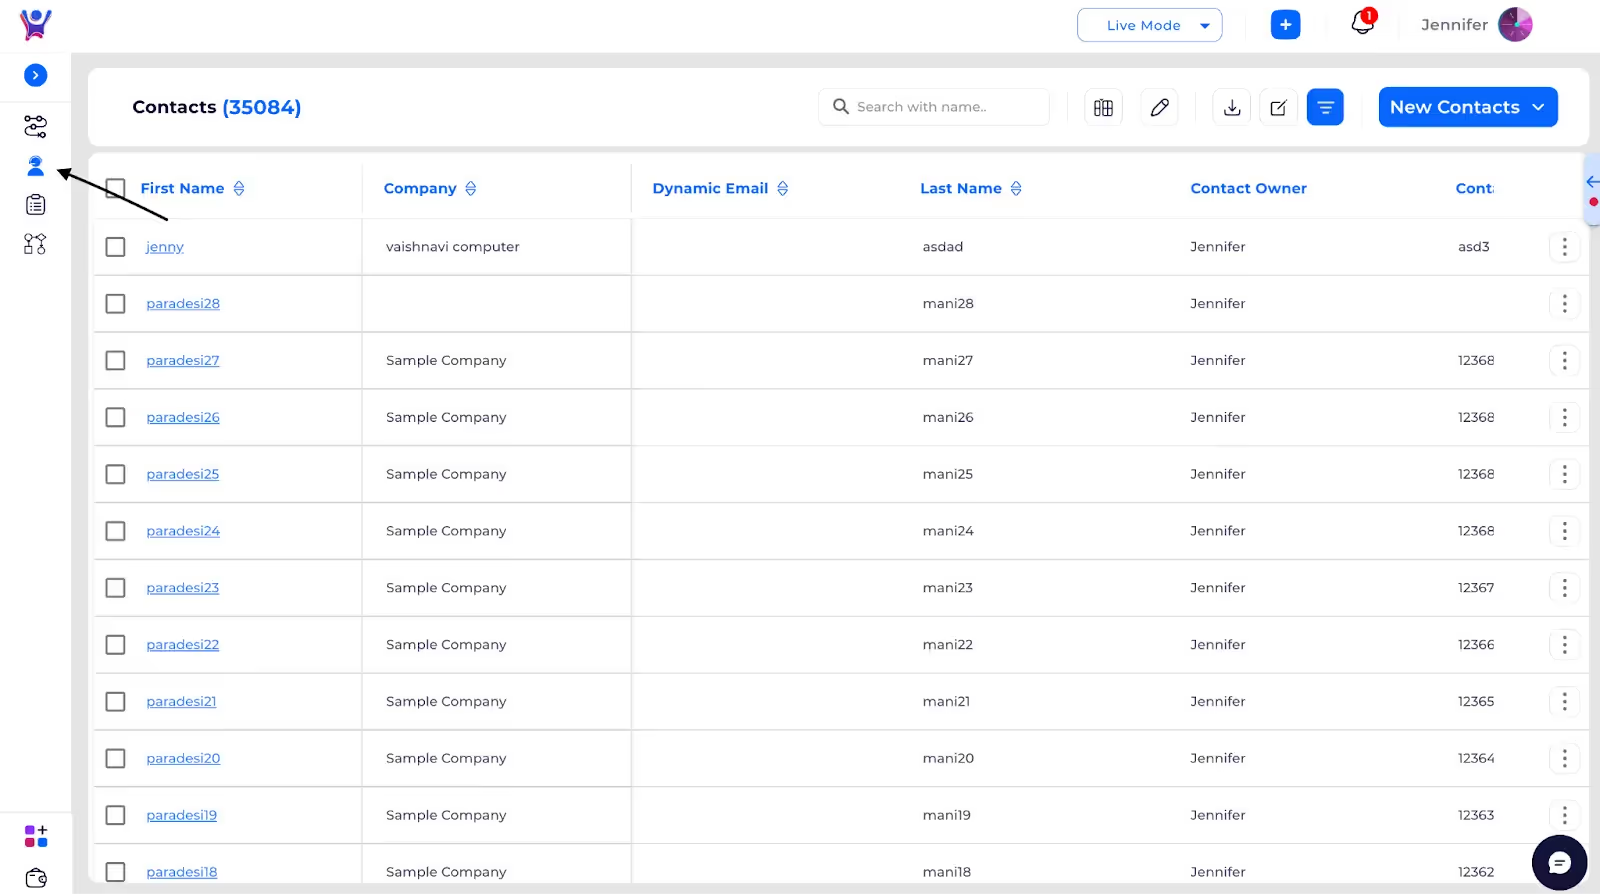
To navigate to Contacts, follow below steps:
Navigation to Contacts
Step 1: Locate the CRM section: Look for the CRM or Sales module in the navigation menu.
Step 2 : Click on "Contacts": Once inside the CRM section, select the "Contacts" option to view and manage contacts.

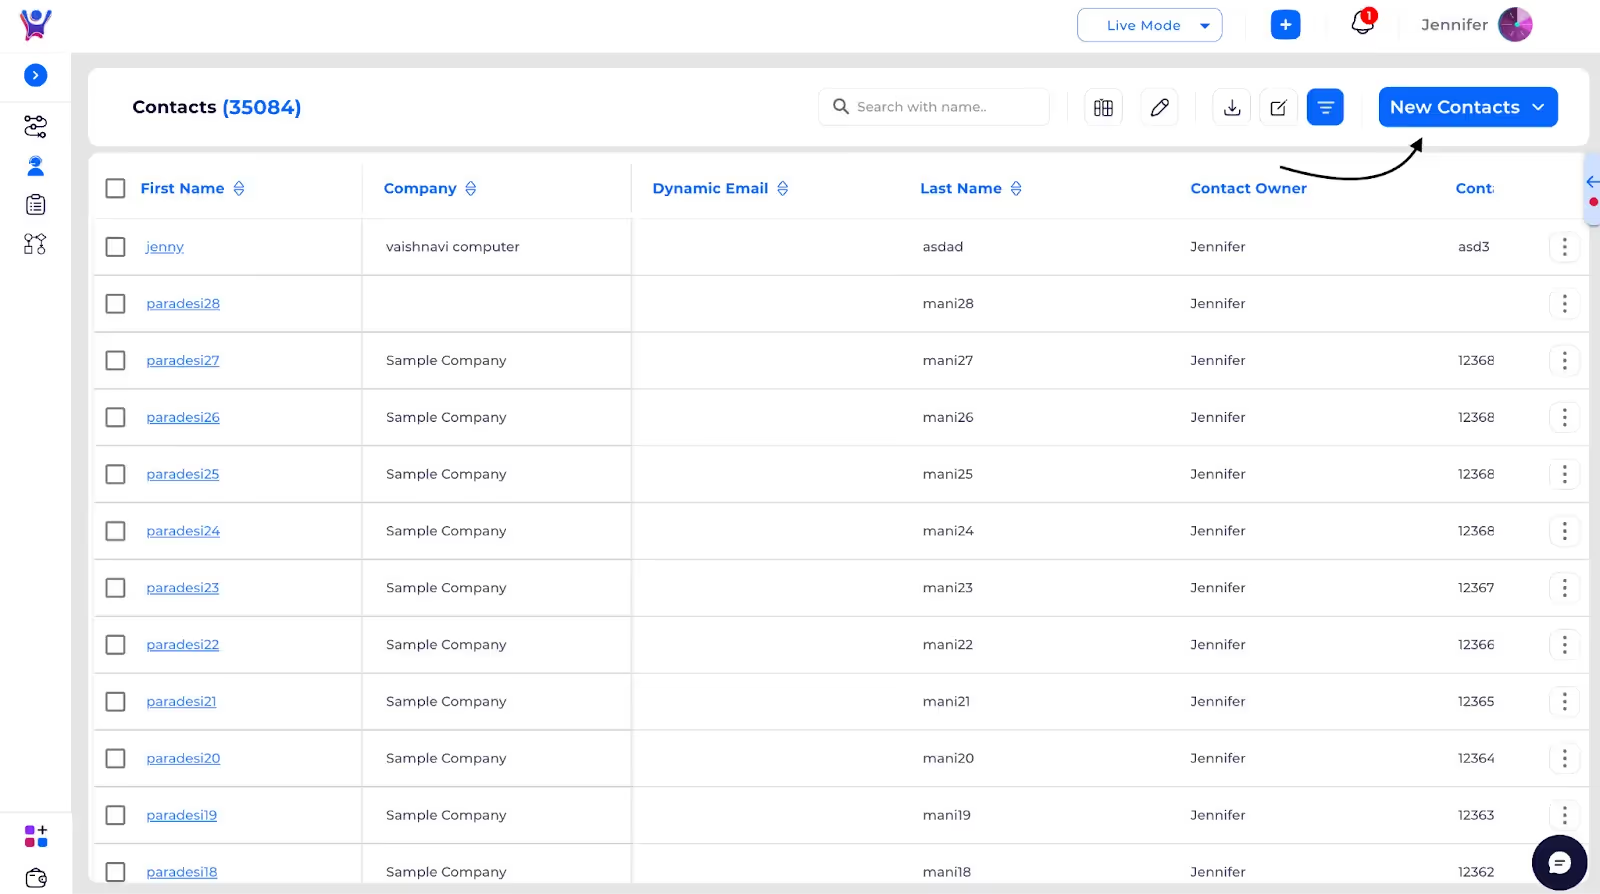
Addition of Contact
Addition of a single Contact
To add a contact, follow these steps:
- Click the "Add" button: This will open the form to add a new contact.
- Fill in the mandatory data fields: Ensure that all required fields are completed.
- Access optional data fields: Click on "View Optional" to reveal additional fields if needed.
- Submit the contact: Once the information is filled in, you can either:
- Submit: Save the contact and exit.
- Save and Add New: Save the current contact and open a new form to add another contact.
Step 1: Click the "Add" button
Step 2: It opens the initial contact form where you can fill in the mandatory details for the new contact

Step 3: Clicking on the "Optional Fields" link will expand the form to show additional fields
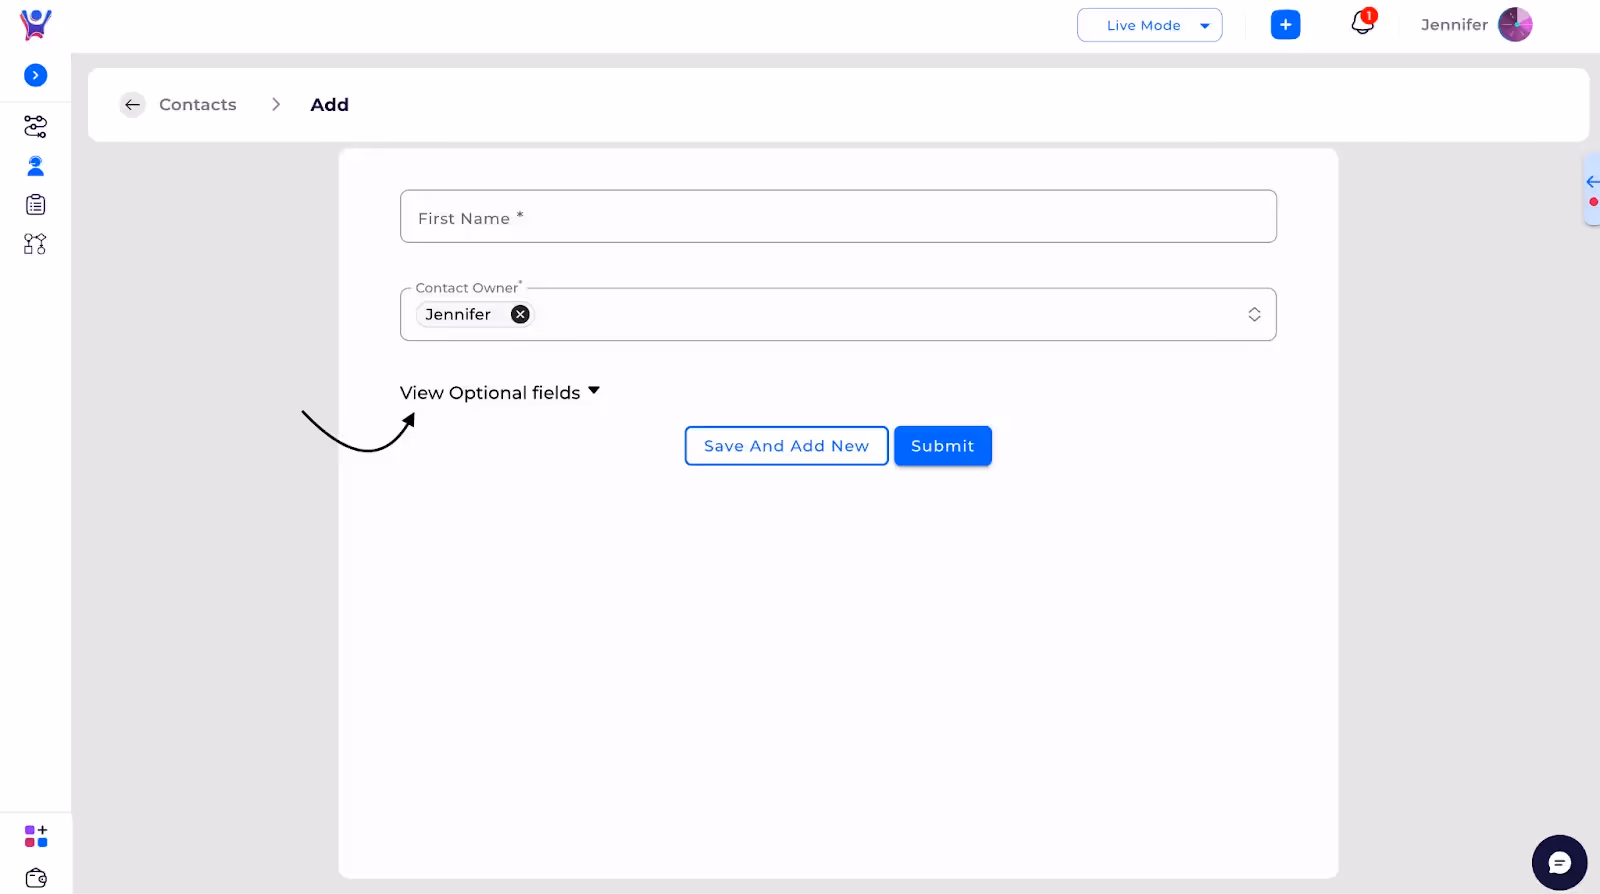
Step 4: Click on Submit: Save the contact.

Step 5: Click on Save and Add New: Save the current contact and open a new form to add another contact

Bulk addition of Contacts through Import
Purpose: To import contacts using Excel or CSV files.Steps:Here are the steps to import contacts:
- Select the "Import" option.
- Choose the "Create" mode to add new contacts.
- Map the columns in your file to the corresponding system fields to ensure proper alignment of the data.
- Click "Submit" to initiate the import process.
- Wait for the acknowledgment email, as the import is processed in the background and may take some time.
- Check the email for error messages. If any rows contain errors, they will be highlighted in orange, and the email will provide specific error details for correction.
Step 1: Select the "Import" option.
Step 2: Click on the "Choose File" button to open the file selection window. From there, select the desired Excel or CSV file from your device and click "Open"
Step 3: Choose the "Create" mode to add new contacts
Step 4: Map the columns in your file to the corresponding system fields to ensure proper alignment of the data.

Step 5: Click "Import" to initiate the import process.
How to add a new Contact
Step-by-Step Guide to Adding a Contact
This is a comprehensive guide to the Thriwin billing system, covering everything from accessing your billing dashboard to understanding your bill statements and managing payments efficiently.
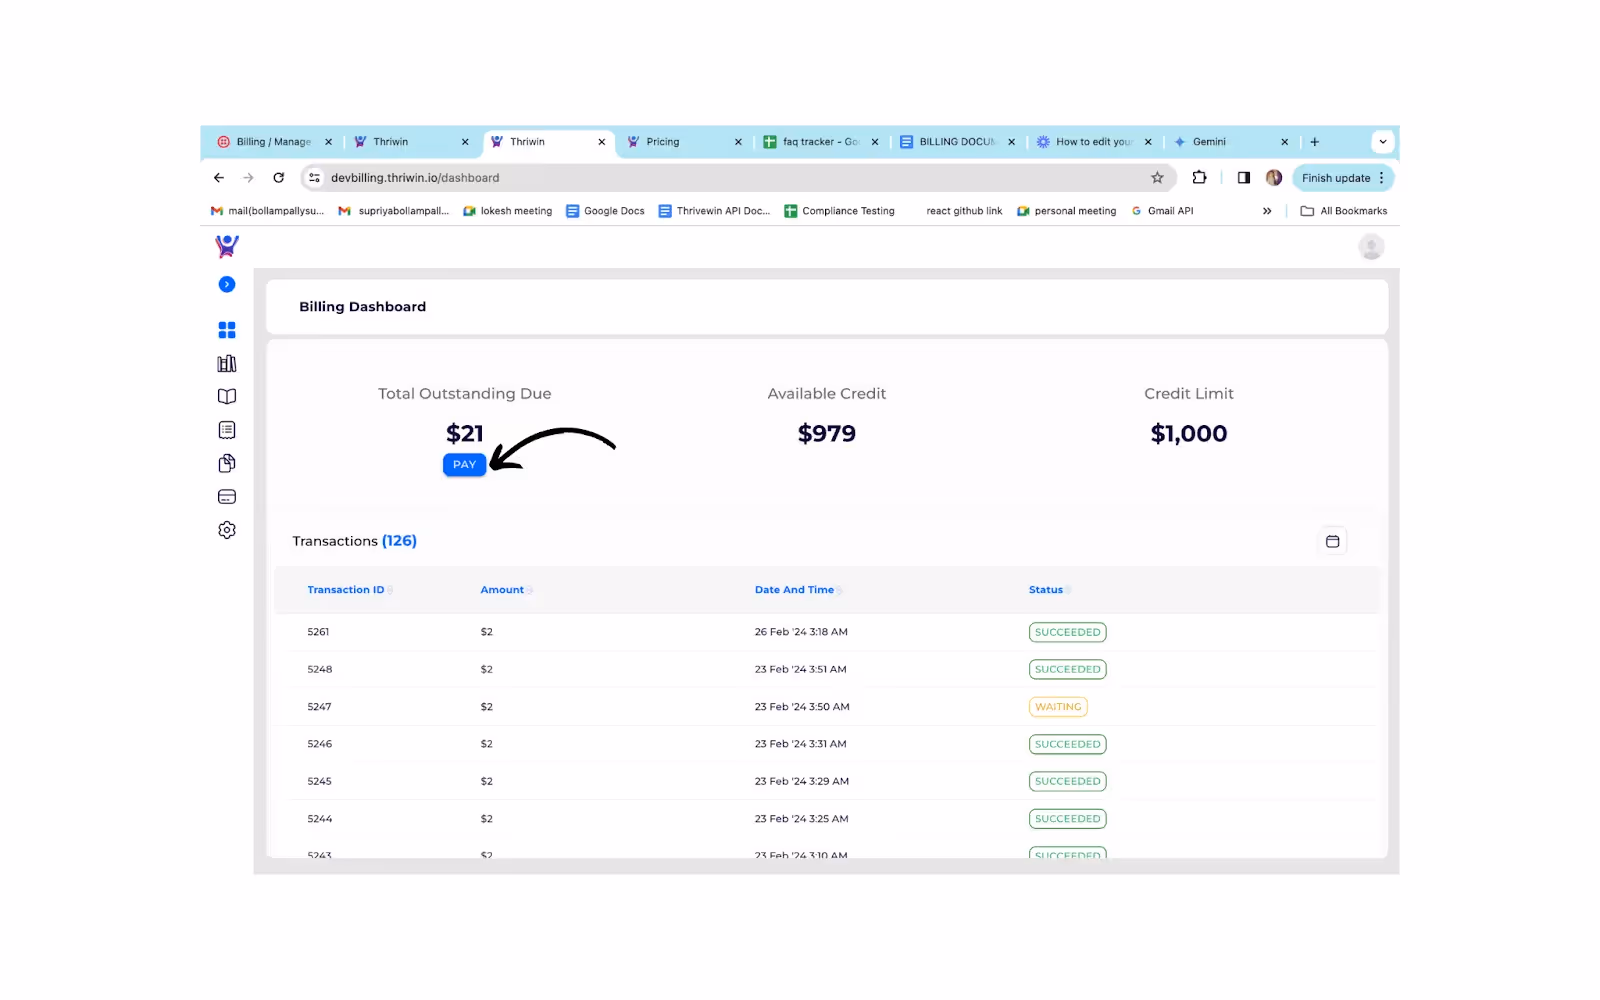
DASHBOARD
The Thriwin billing dashboard is a central location for managing your account's billing information. It offers a clear view of your current billing status, including:
Account Summary
This section provides a quick snapshot of your current billing cycle, including your total outstanding due, available credit (Amount remaining to use until you are prompted to make payment), and credit limit (Total Amount you can use for internal events without paying default amount).
Understanding Your Transaction History
This section details your payment history, including the date, amount, and description of each transaction.
- Filters : Wanna see the history based on a particular timeline. You can do so by accessing filters of the payment section.

Payments
Making Payments
The dashboard offers a functionality to make payments towards your outstanding balance. Look for a button labeled "Pay". This will likely redirect you to a secure payment gateway to complete the transaction.
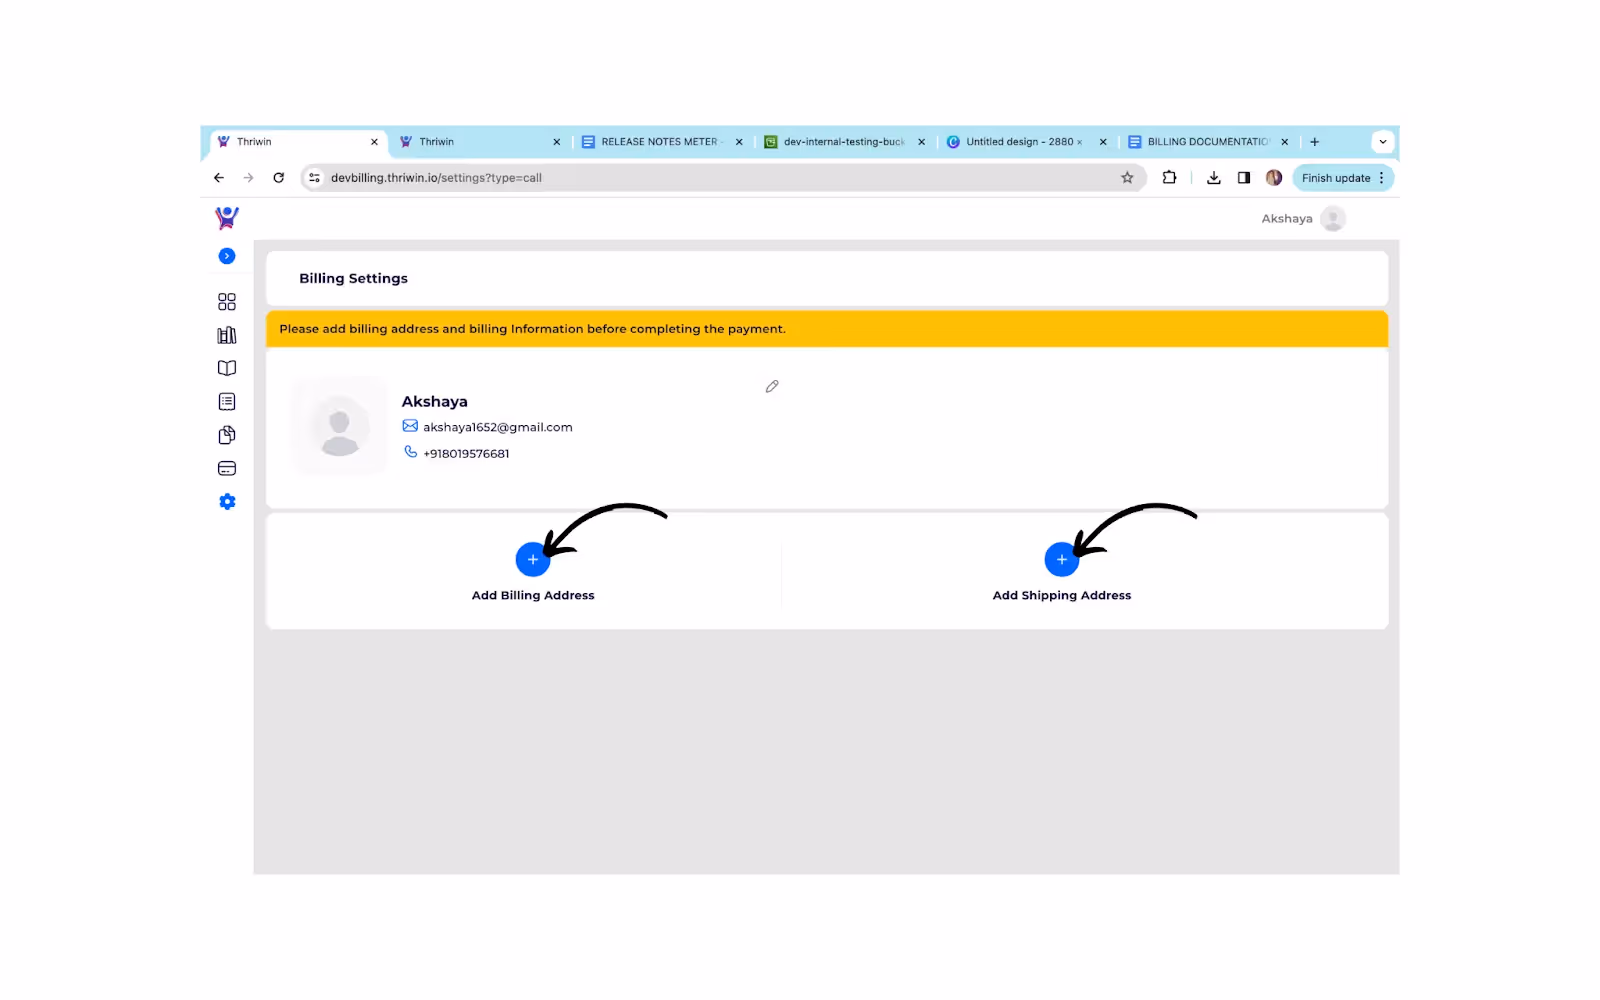
Manage Account Details
If billing address and billing information are not provided and you are trying to pay you will be redirected to settings screen where you can update your billing address and billing information. You can also update the same by directly going to settings page from navbar.
Make Payment by entering required information
Enter your card details and mark (save card for future usage) to save card for future payments if needed else proceed without marking the checkbox. Click on pay for processing your payment.

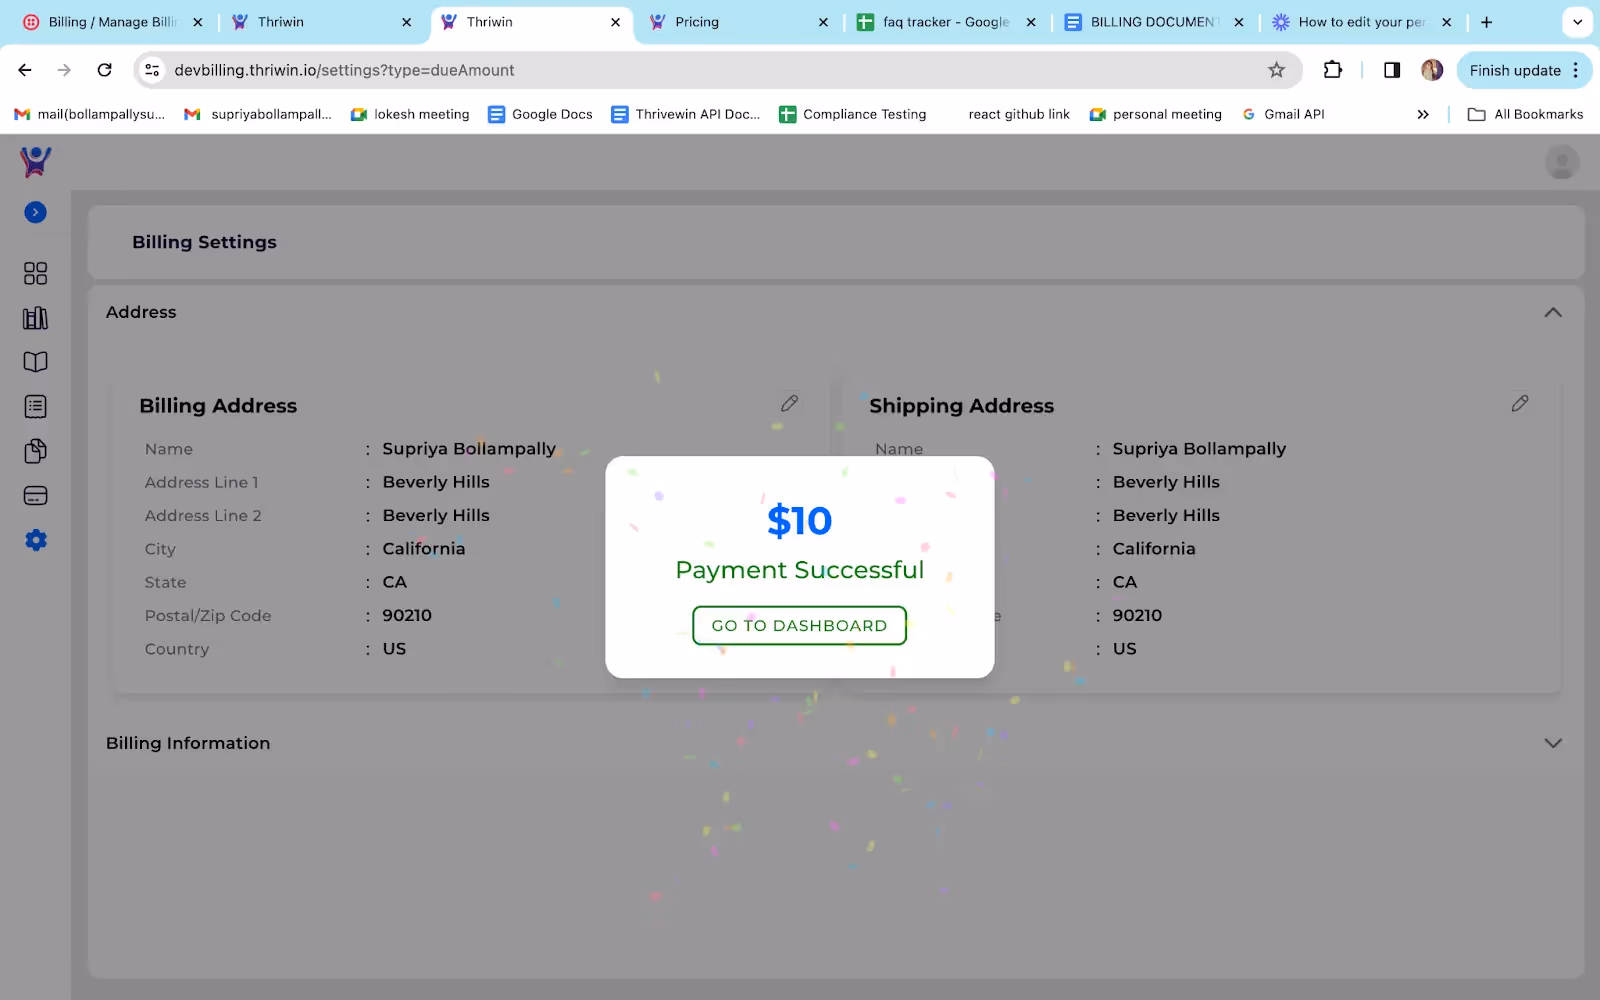
Success Screen after making payment
If you have entered all your details (billing details, billing information and card details) correctly then the payment gets succeeded. And you will see something like this stating that your payment is successful and you can also see the transaction in the transactions section of the dashboard.
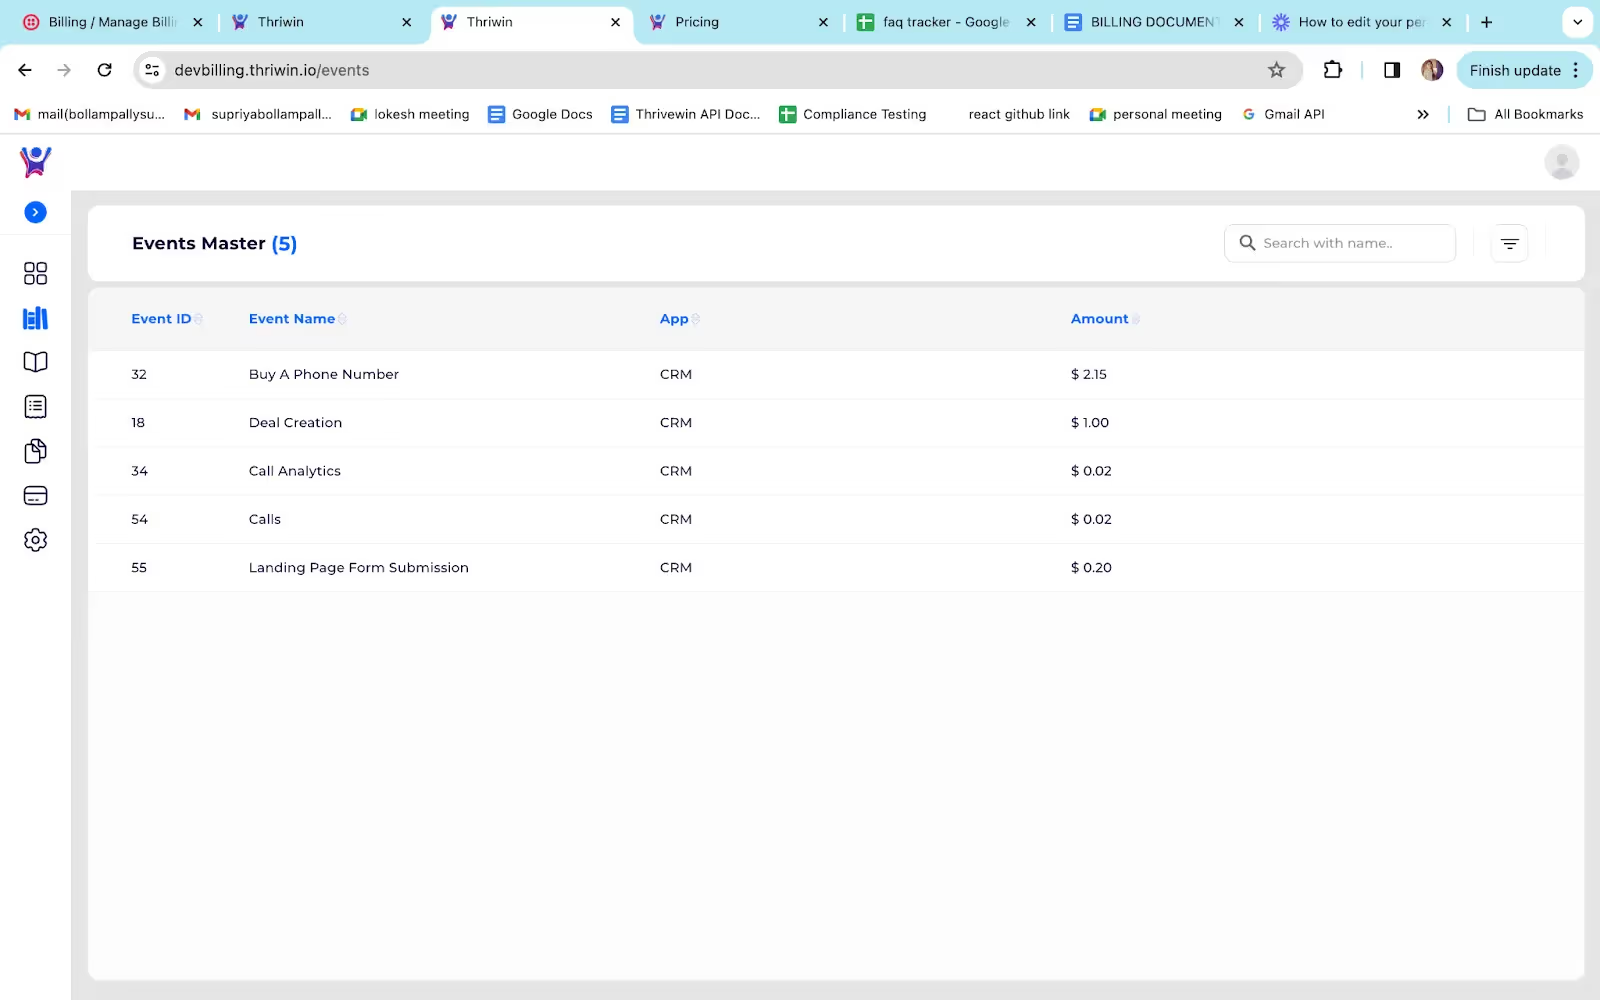
EVENT MASTER
Introducing Event Master, your one-stop shop for managing your billable events!
Here, you can conveniently:
- View all billable events in a single location.
- Access detailed information about each event, including pricing.
- Gain a clear understanding of your billing charges.
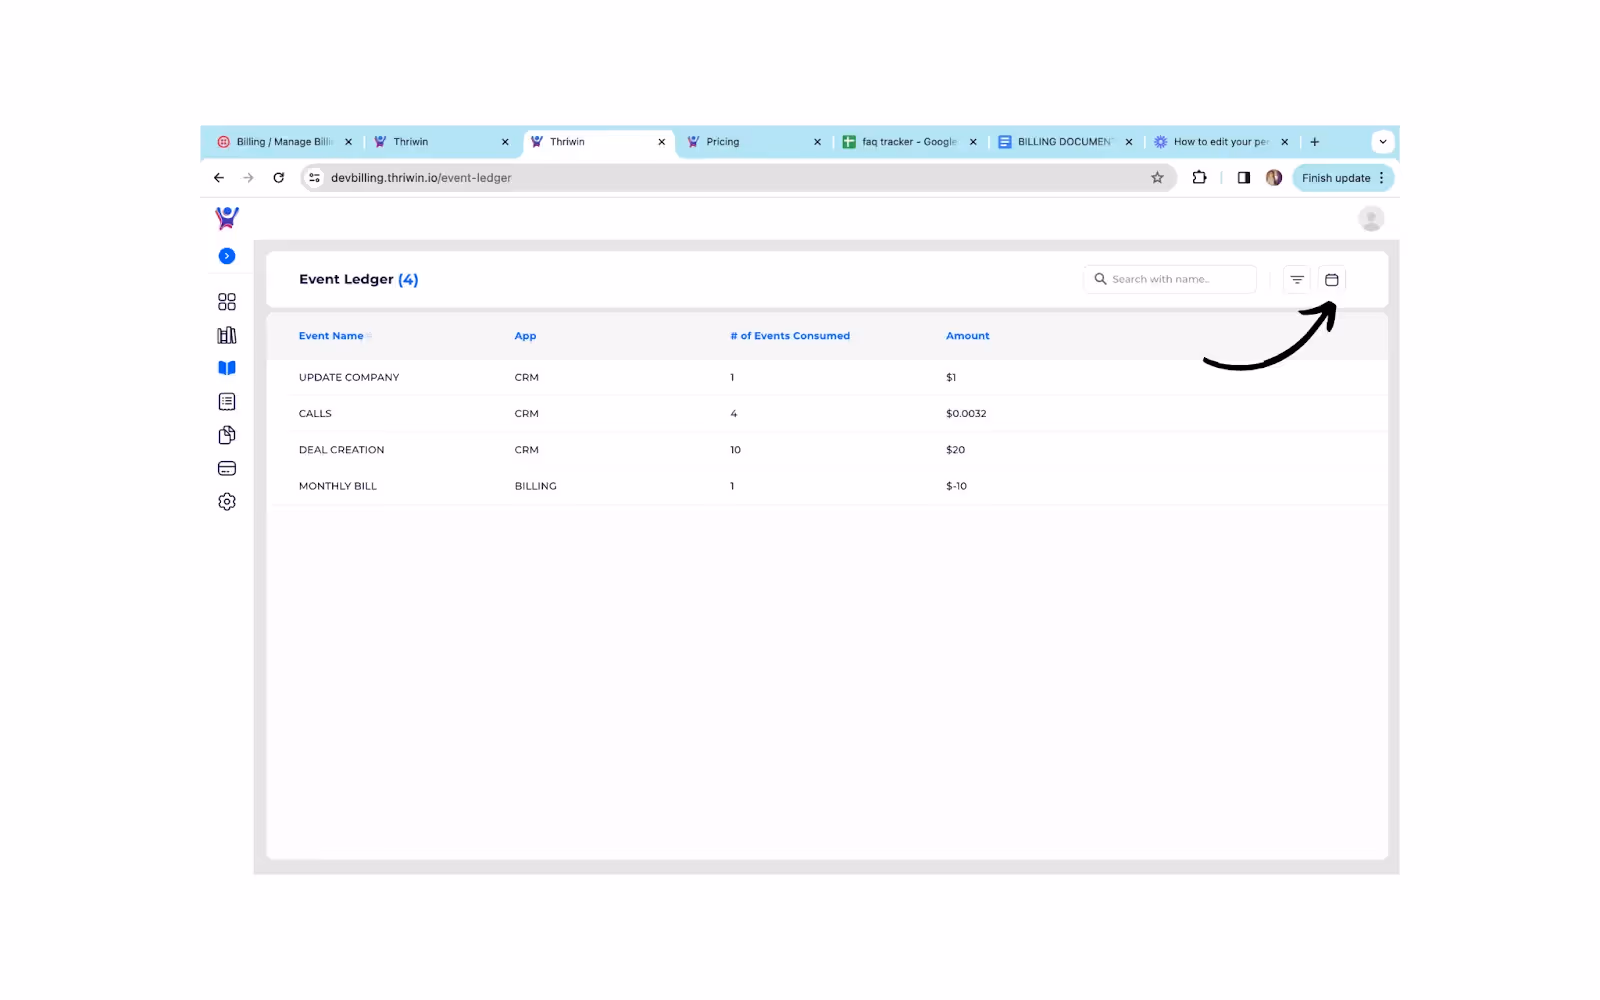
EVENT LEDGER
Never lose track of your usage. We've got you covered with our Event Ledger!
Ledger contains information about all the events information like no. of events consumed and total cost incurred for that particular event consumed in the current month by default.
- Filters :
You can track the usage for the mentioned time period. You can do so by applying a filter on dates on the top right corner of the ledger section.
INVOICE
Need a Payment Receipt? We've Got You Covered!
Easily access your invoices within our secure invoice section. Here, you can:
- View all invoices generated for your account.
- Track your payment history and outstanding balances (if any).
- Download copies of your invoices for your records.

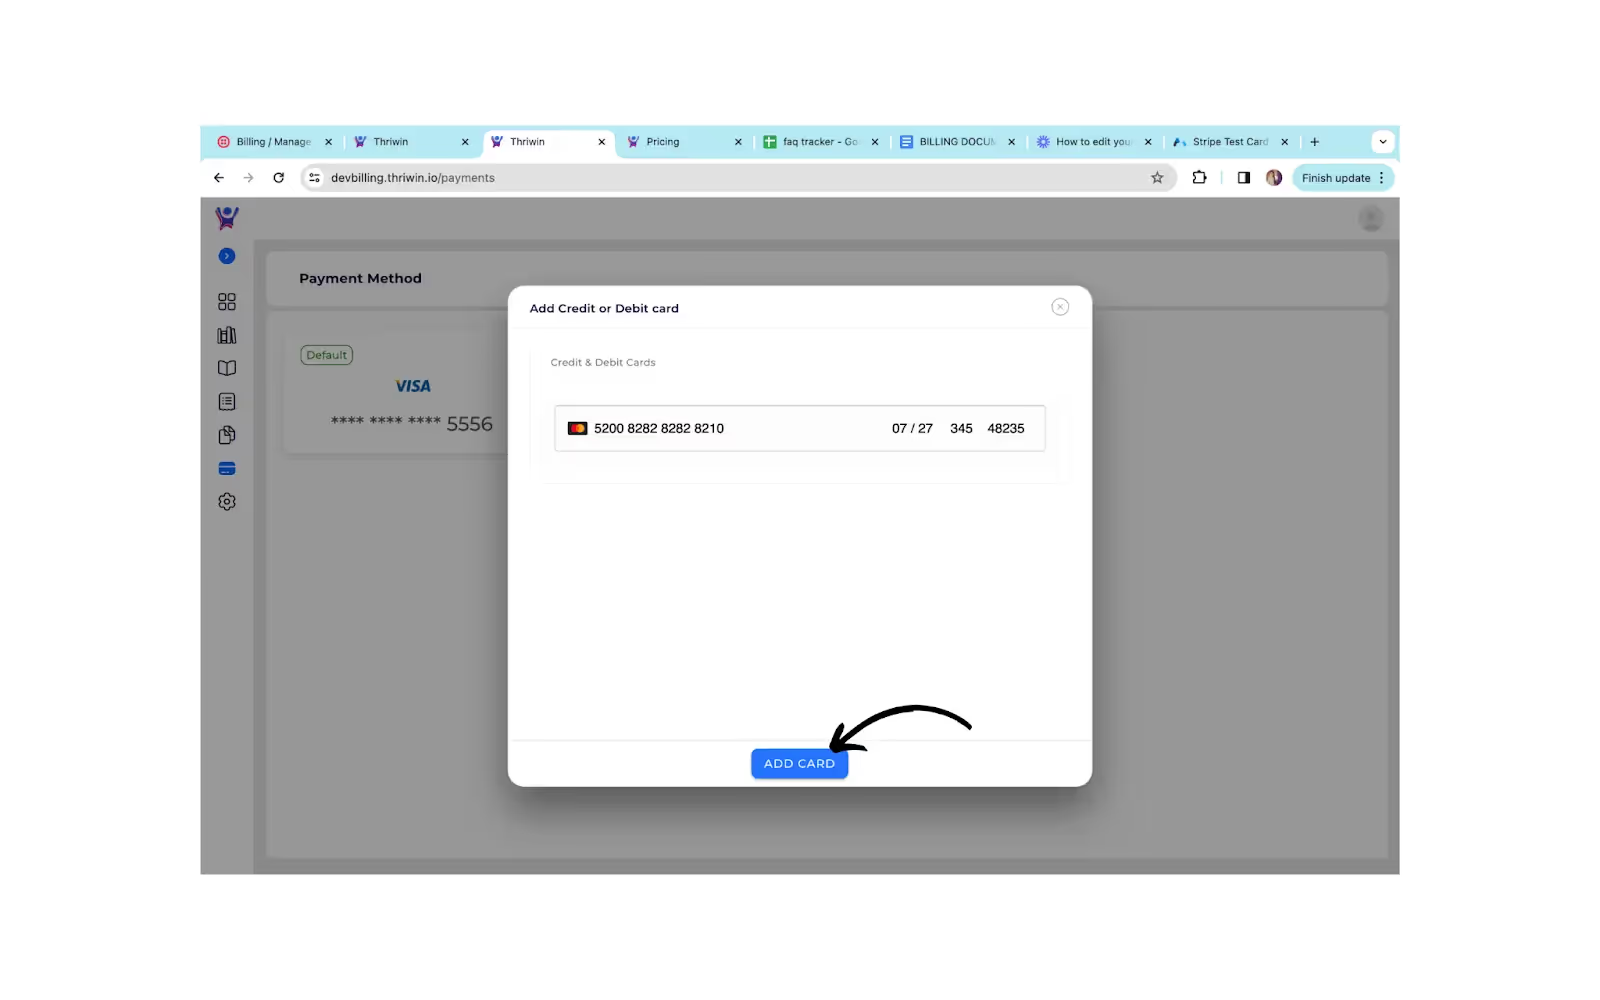
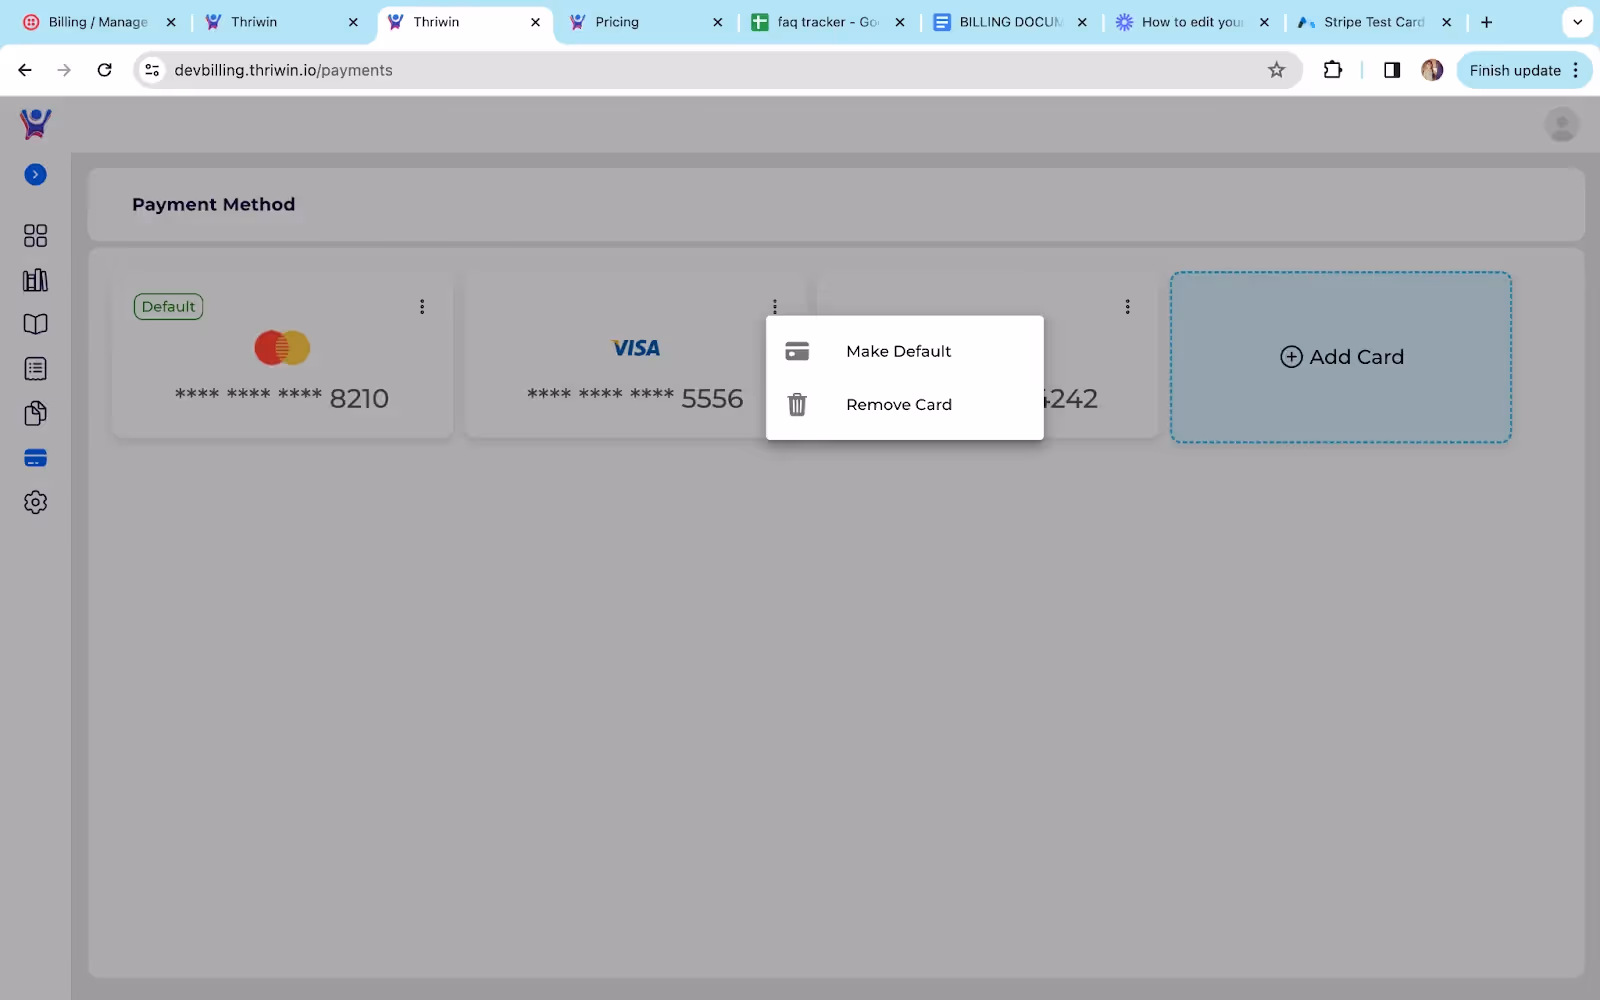
PAYMENT METHODS
Tired of repeatedly entering your card details? Our secure payment methods section lets you:
- Add and save multiple cards for a faster checkout experience.
- Easily switch between saved cards for convenient payment management.

- You can add a new card by clicking on add card and entering your details.
- After adding the card. Here is the list of all available saved cards
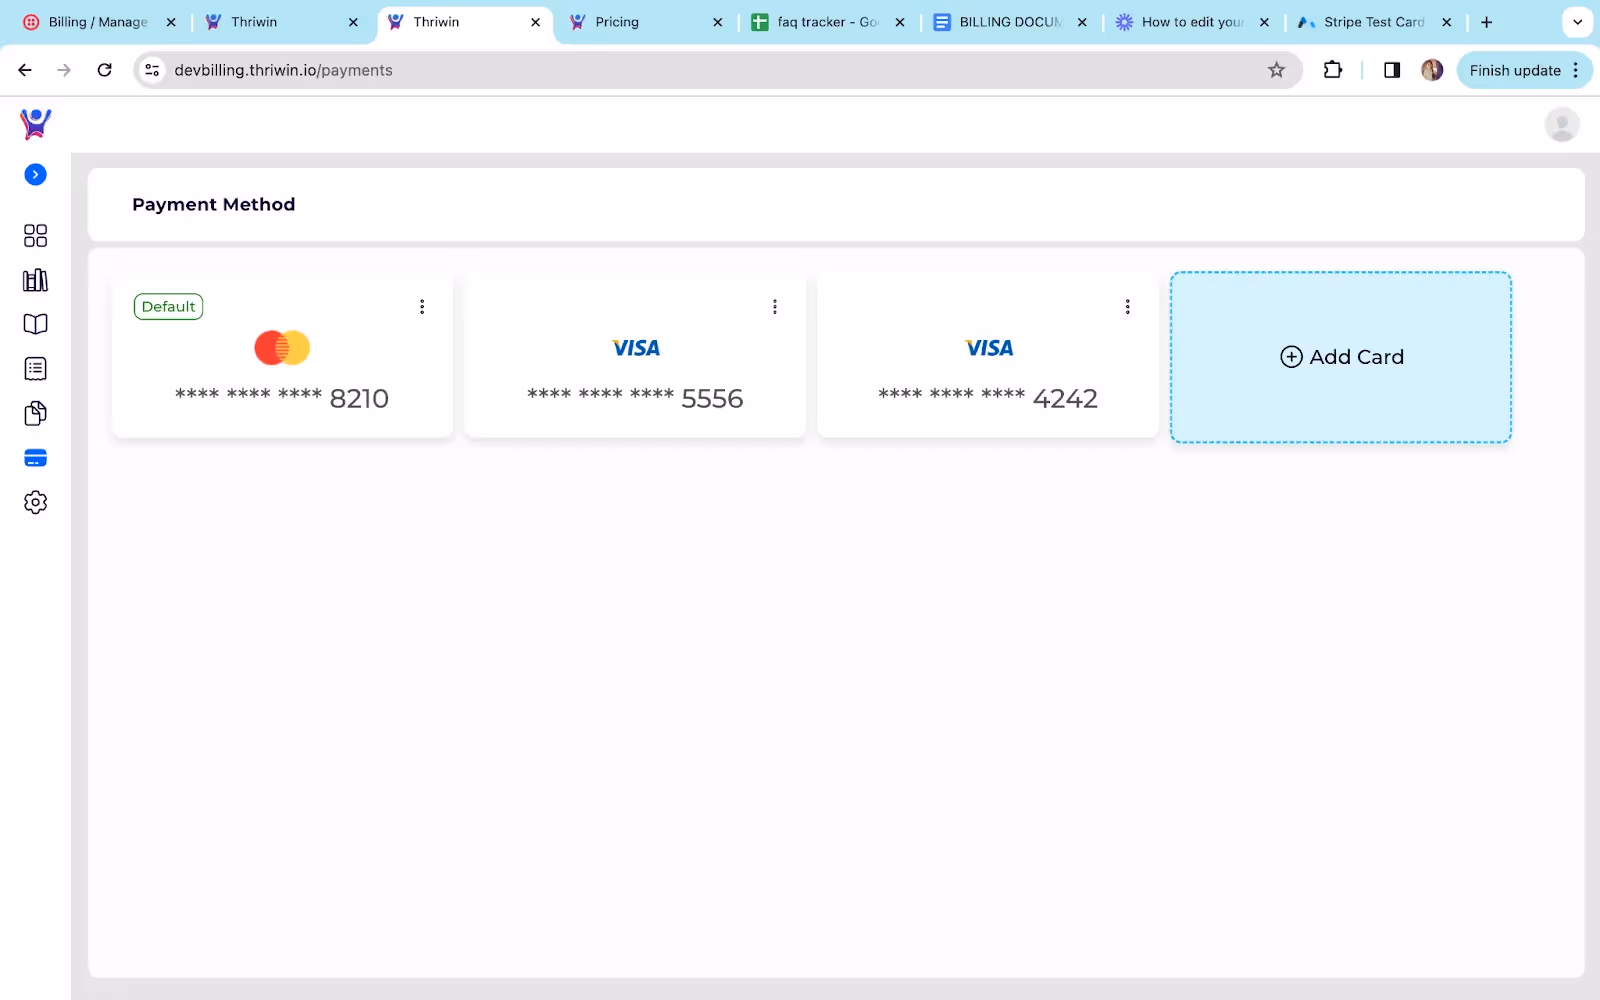
- You can also Remove a specific card (or) mark a card as default. You can do so by just clicking on the 3 dots on top right of the card.
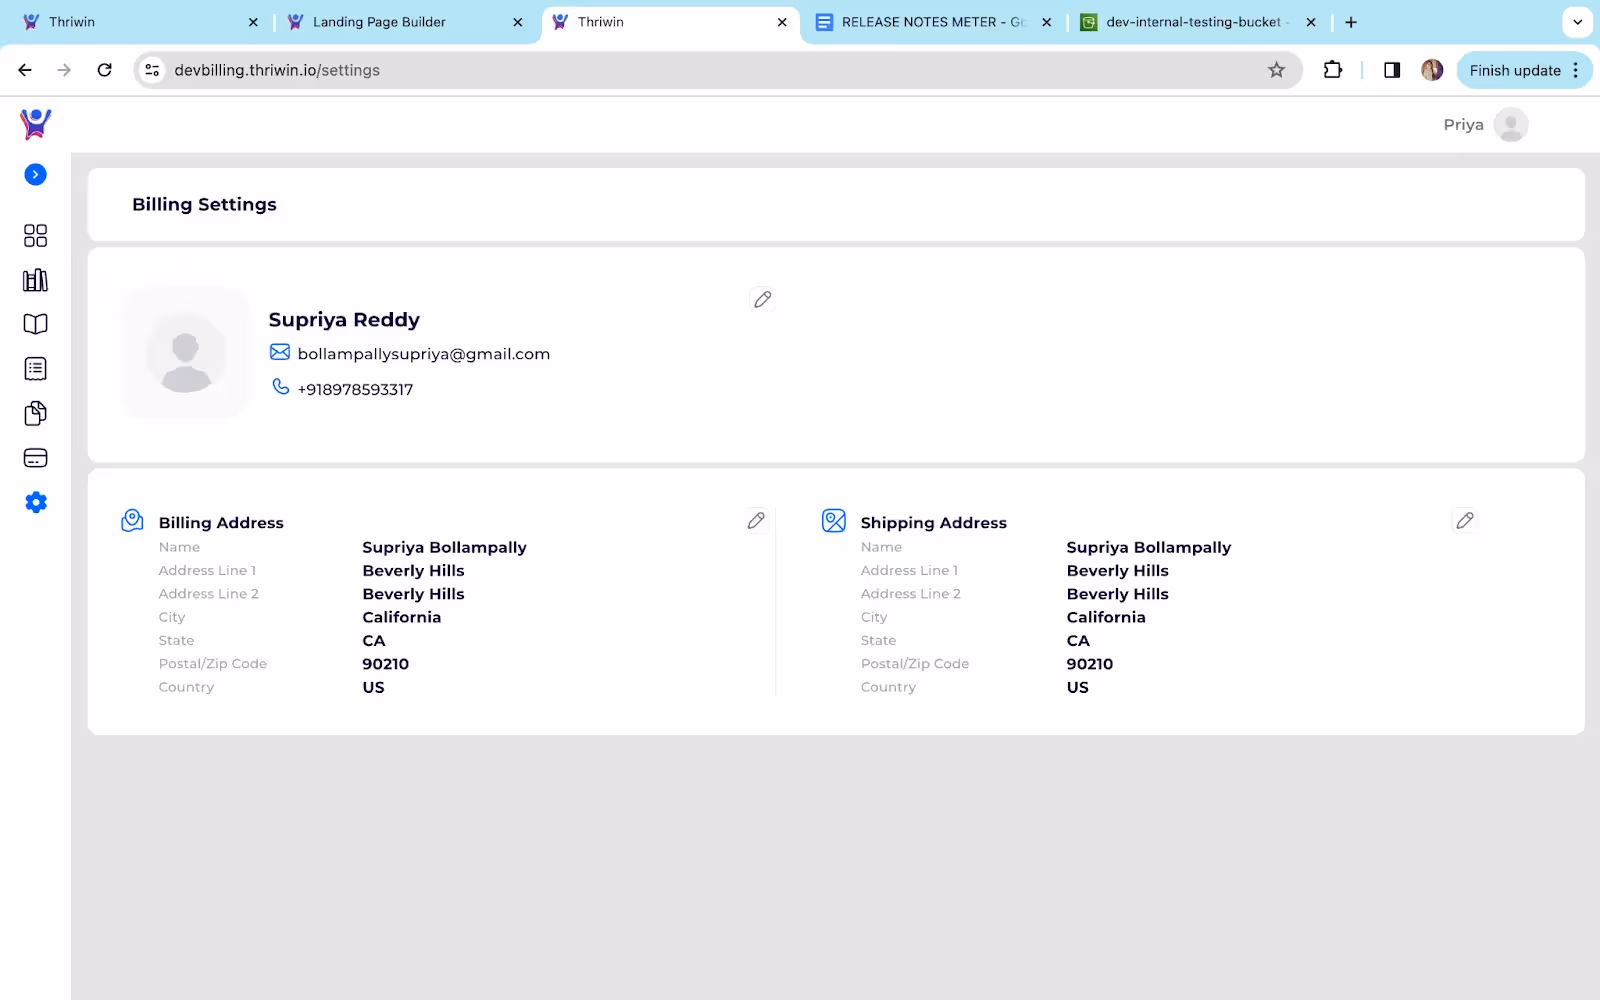
BILLING SETTINGS
Managing your account information is easy! Through the billing settings, you can:
- Update your billing address to ensure accurate deliveries.
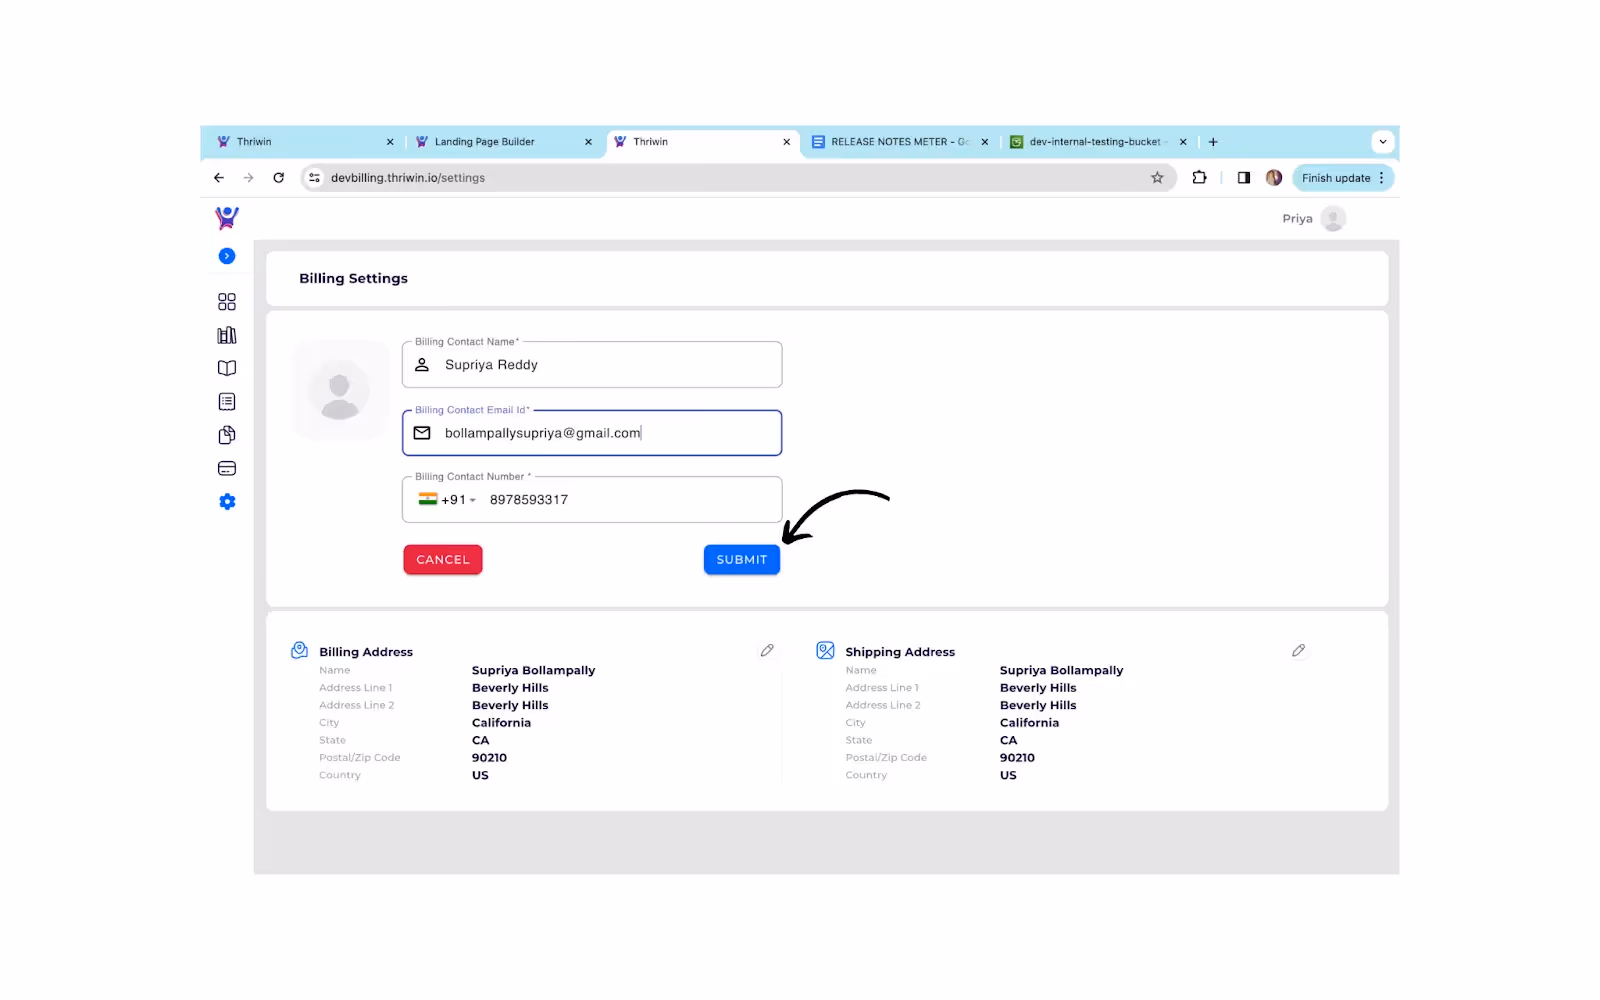
- Edit your contact information so we can reach you effectively.
- Modify your personal details (name, email) to keep your account current.
Simply access the settings menu (last icon on the navigation bar) and navigate to the billing section to make any necessary changes.
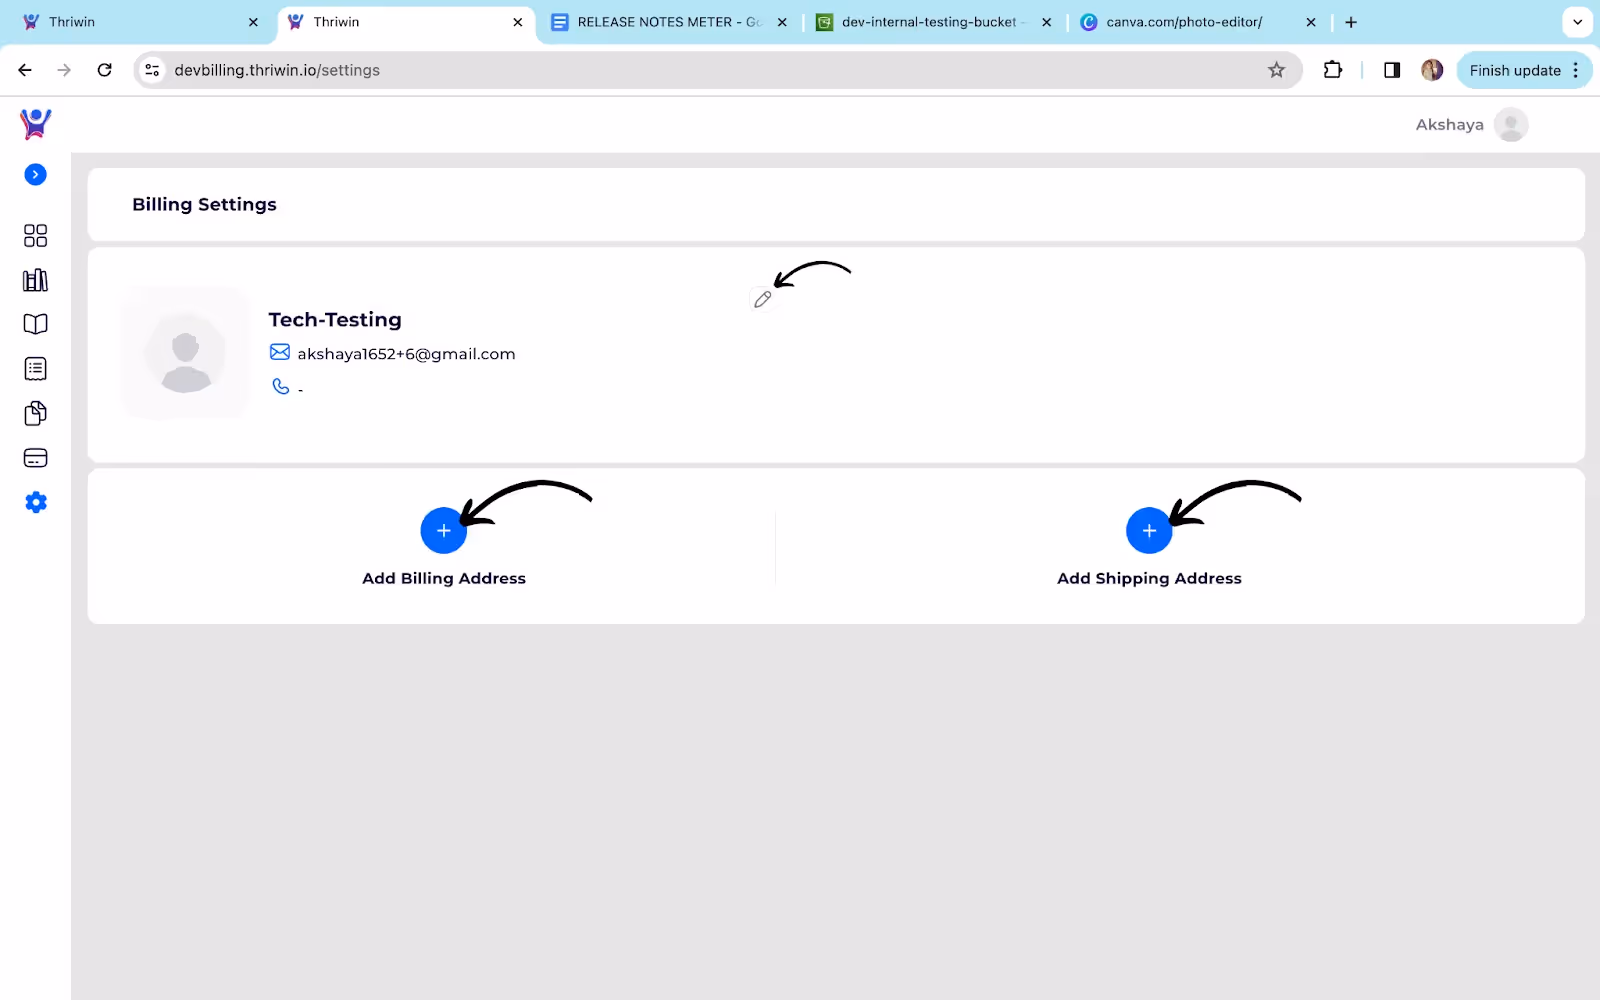
- By clicking on the Billing Address or Shipping Address card a modal will be opened where you are needed to enter your desired address.
Simplify Your Checkout
- For your convenience, we offer a checkbox near the submit button. Ticking this box will automatically copy your billing address to the shipping address section, saving you time during checkout.

Edit your contact information
Guide to the Thriwin billing system
The Thriwin billing system simplifies account management with a centralized dashboard, allowing you to access invoices, track transactions, and make secure payments. It also offers tools to manage billing details, event usage, and saved payment methods efficiently.
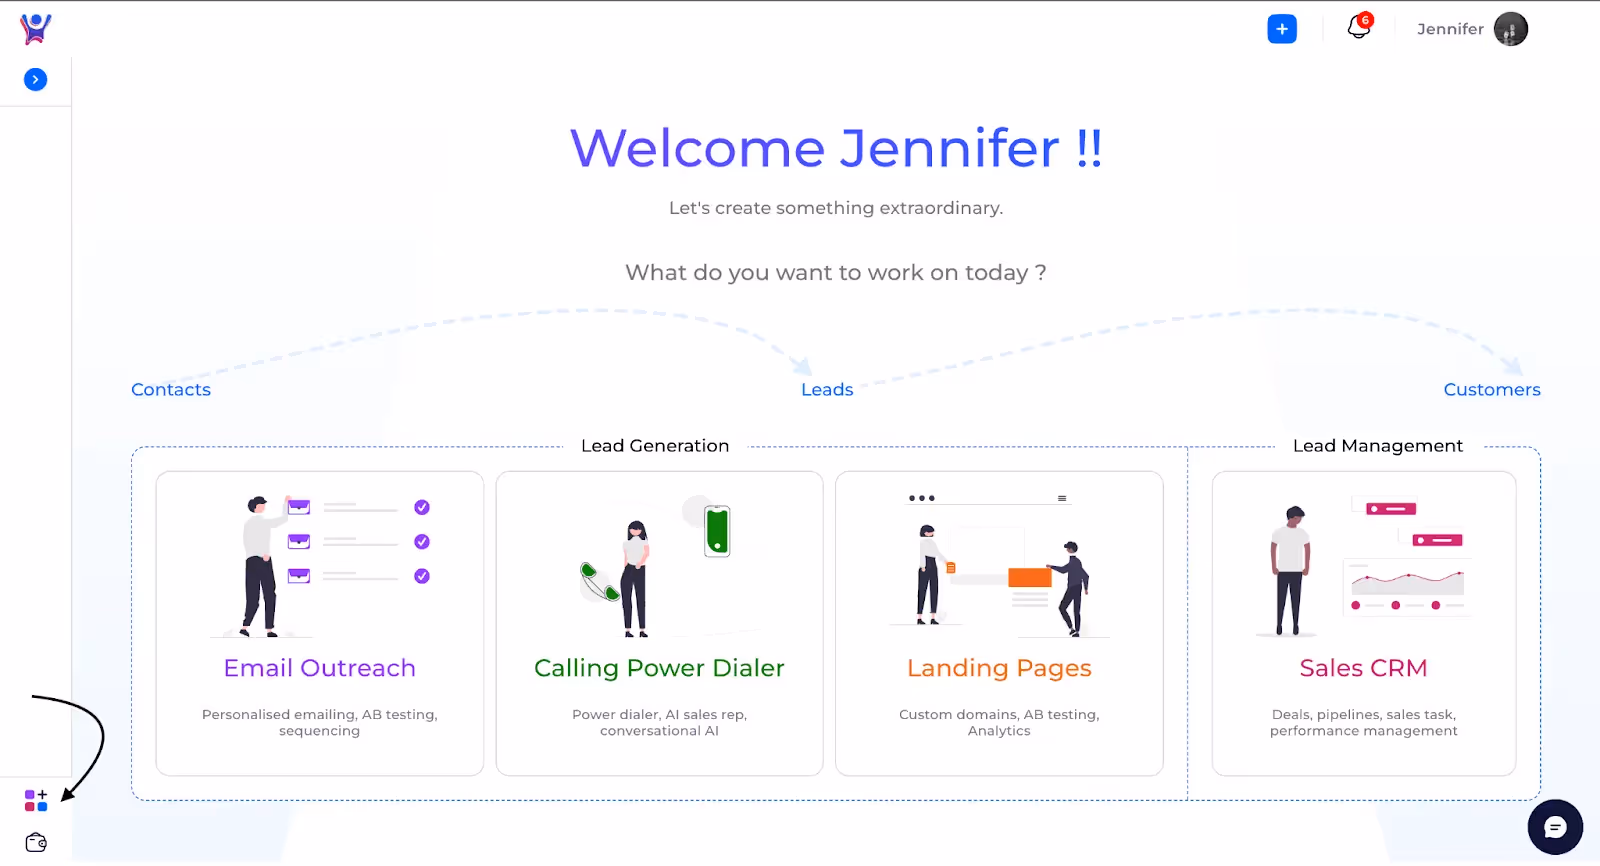
Enhance Communication with Trusted Calling. Elevate your calling experience with this free add-on! Enjoy seamless functionality, improved call quality, and secure, reliable connections through Trusted Calling and Voice Integrity features. Designed to provide peace of mind and efficient communication, this enhancement ensures your calls are trustworthy and crystal-clear.
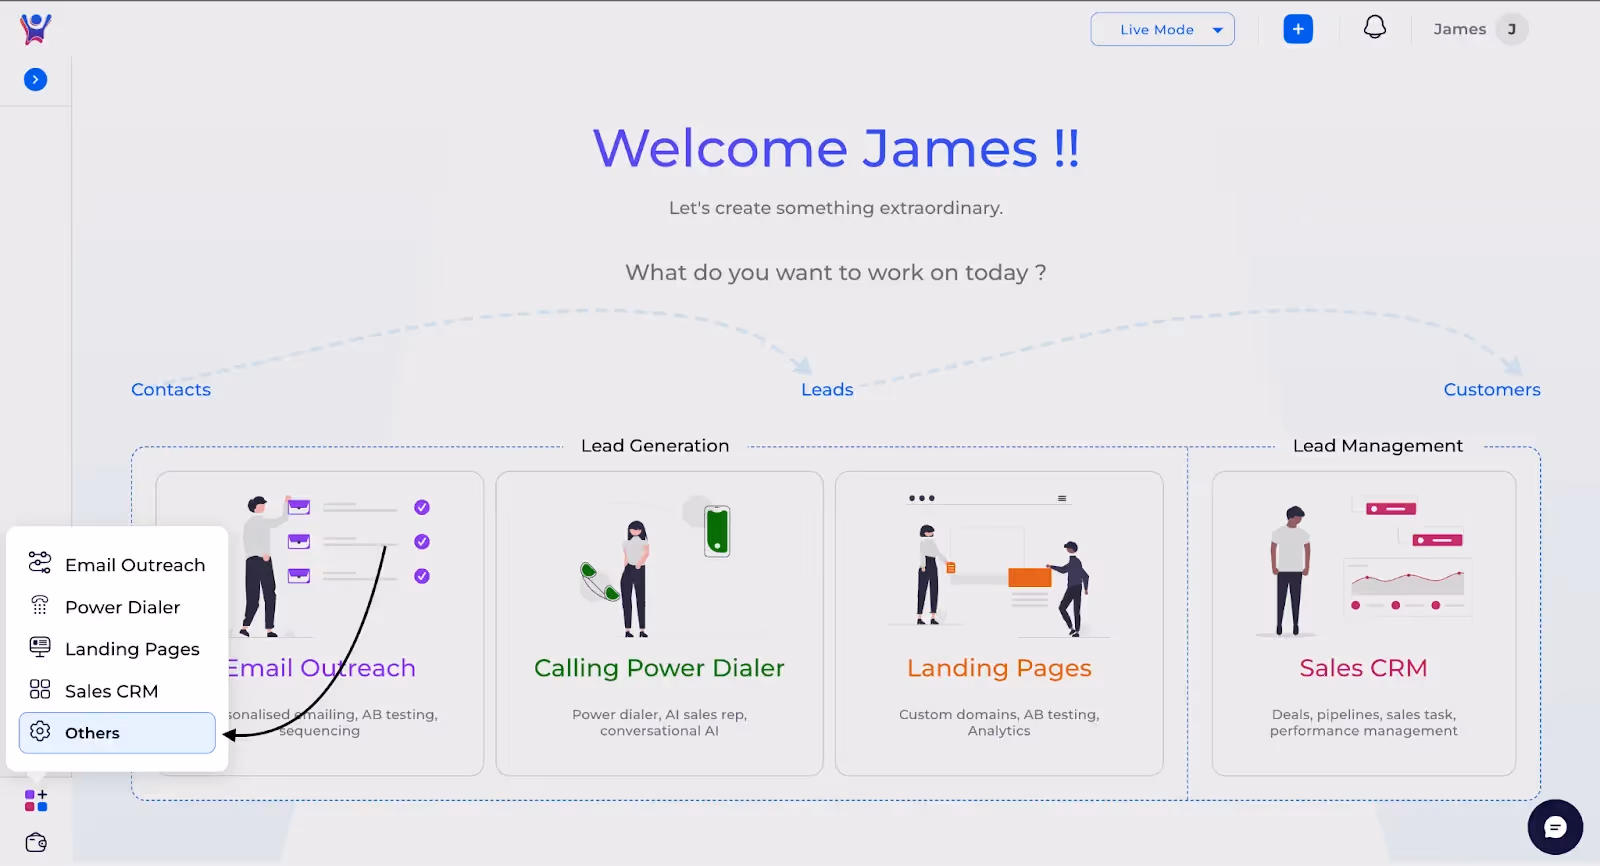
Navigating to Others
- Description: First, navigate to the Channels section in the menu, and then click on the Others option to access the Admin Settings.
- Screenshot (1):
- Screenshot(2)
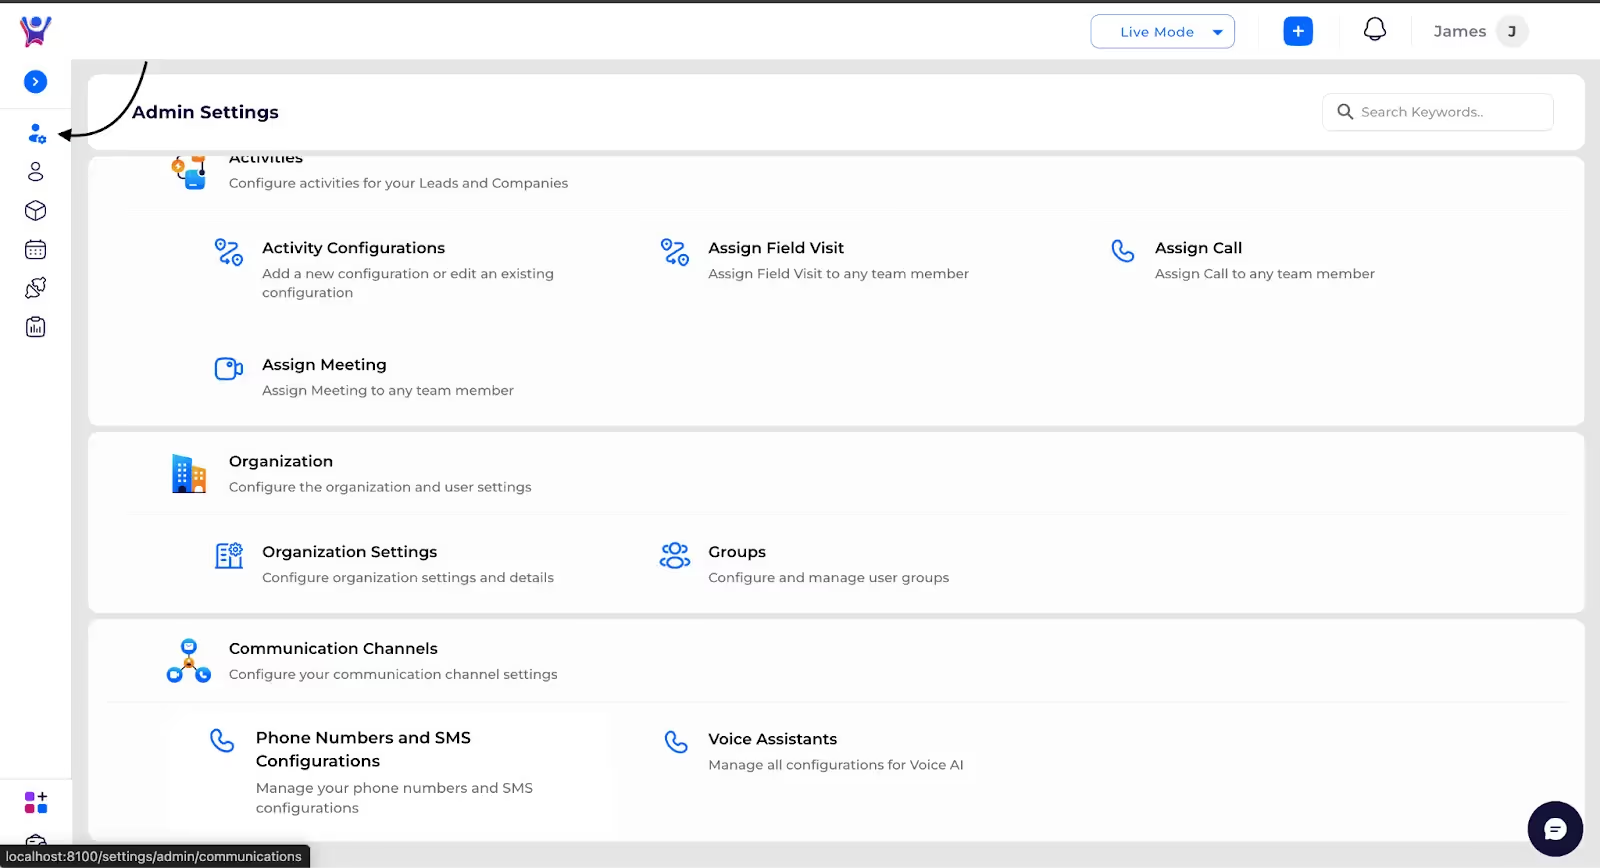
Navigating to Admin Settings
- Description: If you’re not on the Admin Settings page, click the Admin Settings icon in the menu to navigate there.After navigating to the Admin Settings page, scroll to the bottom to find the Phone Number and SMS Configurations section and click on it. Then, switch to the Calling tab located at the top.
- Screenshot(1):
- Screenshot(2):
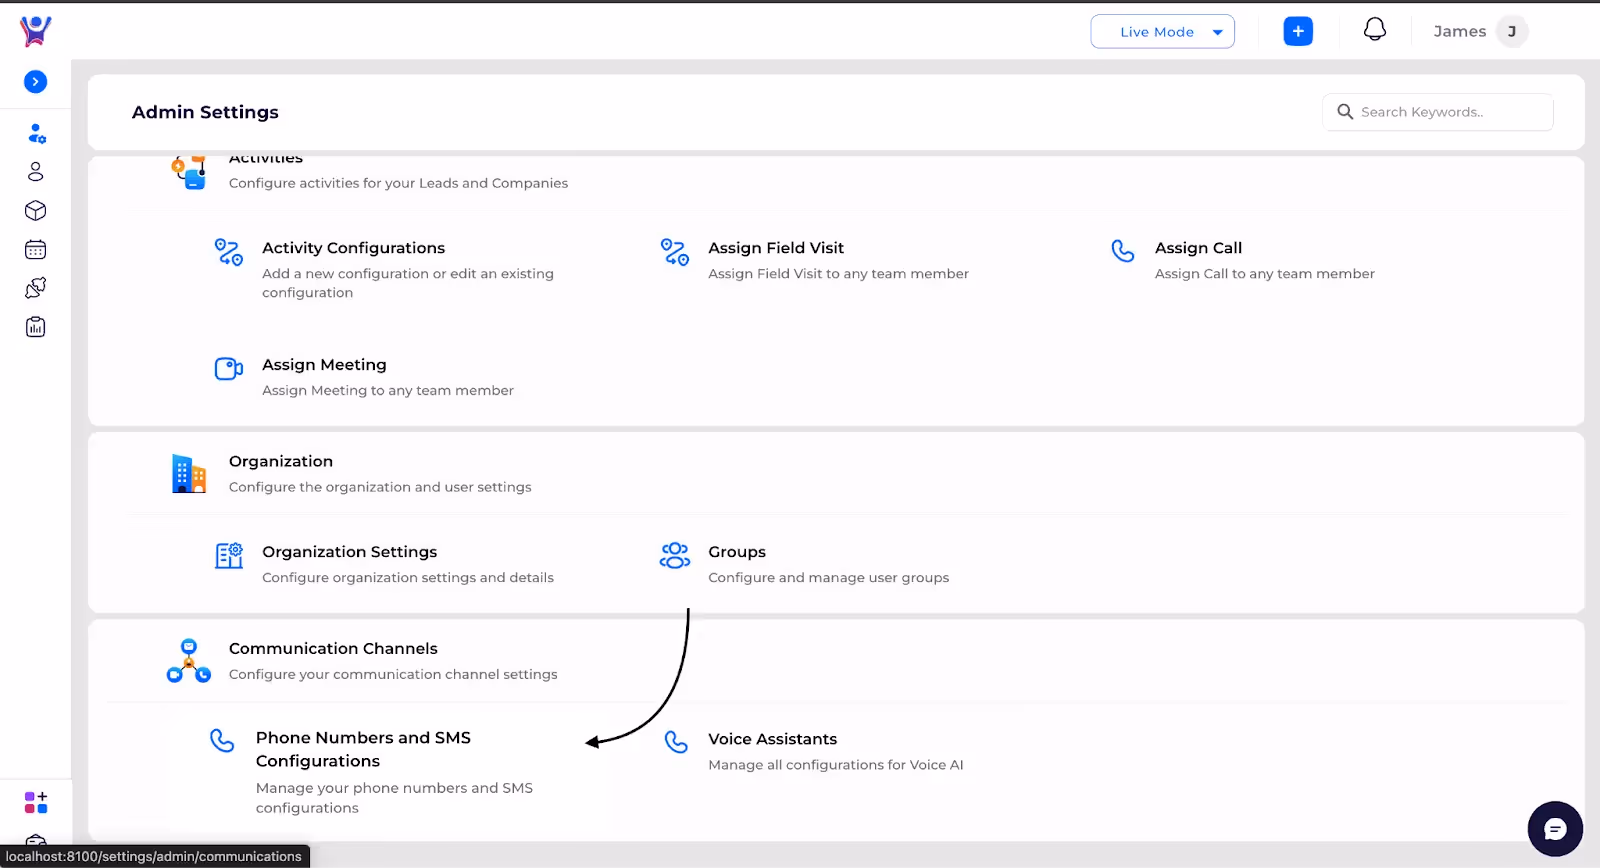
- Screenshot(3):
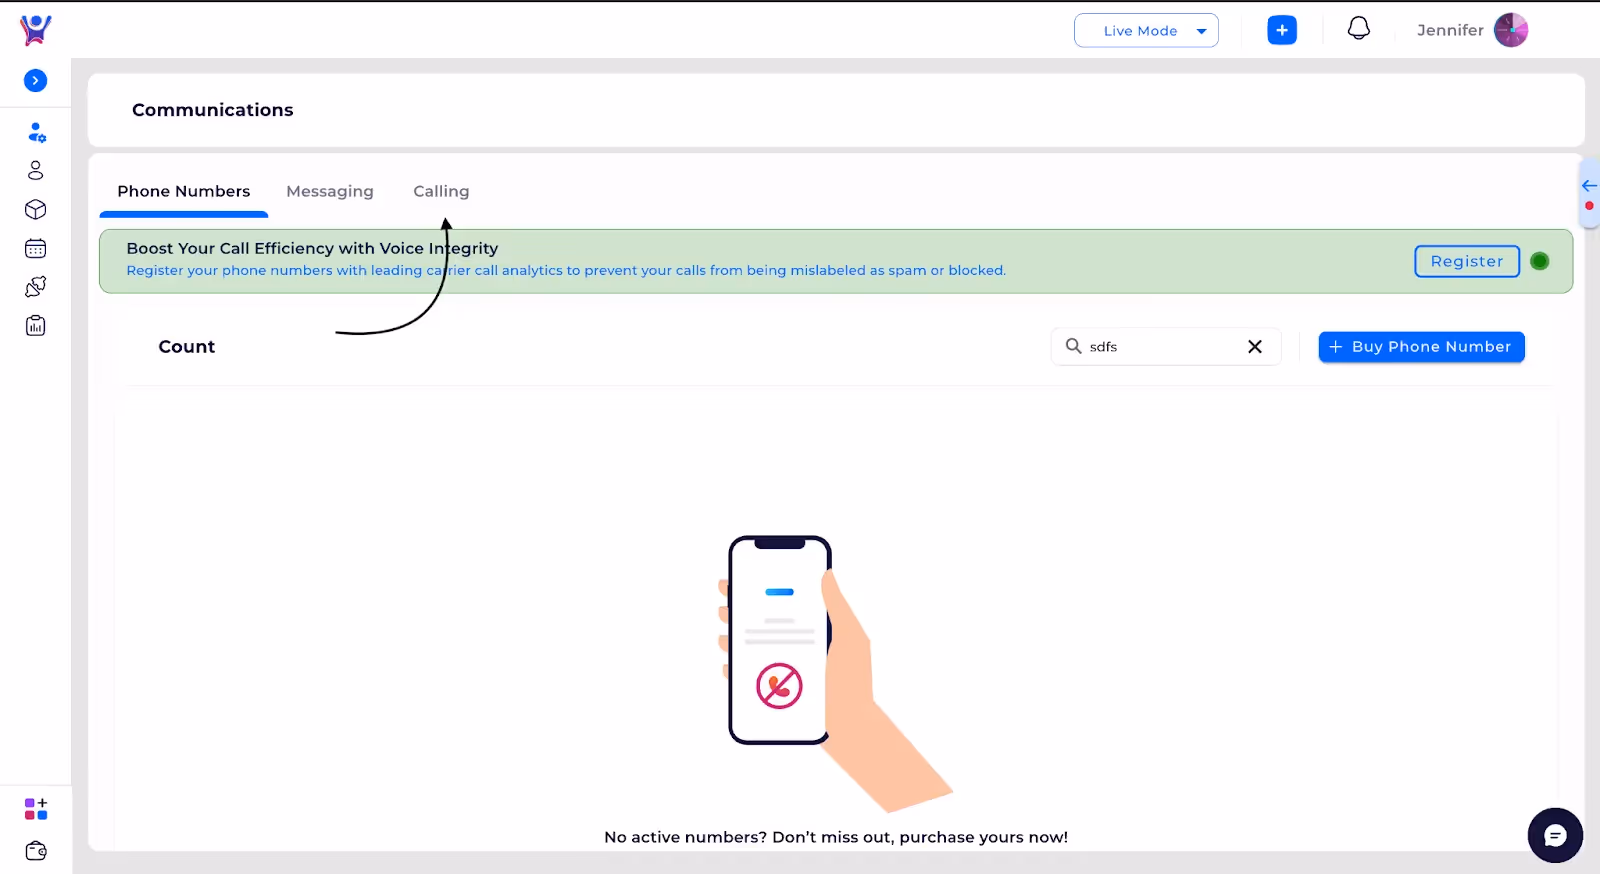
Click to Register
- Description : Click the Register button to get started!
- Screenshot :

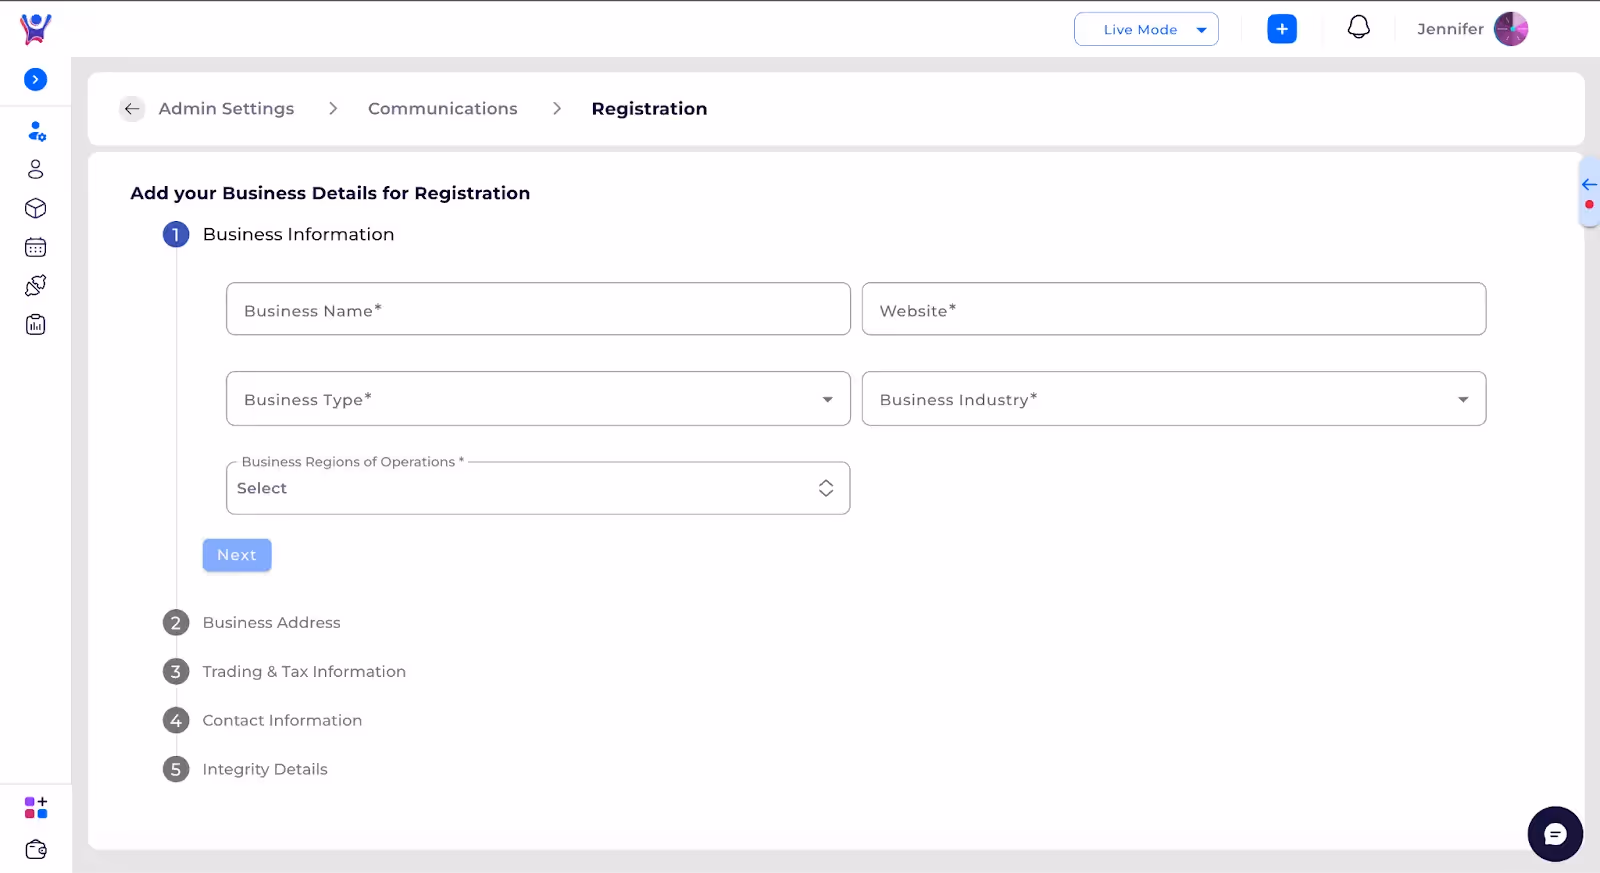
Filling Registration Form
- Description : Here’s a structured outline for filling out the required details for A2P 10DLC registration:
1. Business Information
- Business Name: [Enter business name]
- Business Industry: [Select from options: 'AUTOMOTIVE', 'AGRICULTURE', 'BANKING', 'CONSUMER', 'EDUCATION', 'ENGINEERING', 'ENERGY', 'OIL_AND_GAS', 'FAST_MOVING_CONSUMER_GOODS', 'FINANCIAL', 'FINTECH', 'FOOD_AND_BEVERAGE', 'GOVERNMENT', 'HEALTHCARE', 'HOSPITALITY', 'INSURANCE', 'LEGAL', 'MANUFACTURING', 'MEDIA', 'ONLINE', 'RAW_MATERIALS', 'REAL_ESTATE', 'RELIGION', 'RETAIL', 'JEWELRY', 'TECHNOLOGY', 'TELECOMMUNICATIONS', 'TRANSPORTATION', 'TRAVEL', 'ELECTRONICS', 'NOT_FOR_PROFIT']
- Business Regions of Operation: [Select from options: 'AFRICA', 'ASIA', 'EUROPE', 'LATIN_AMERICA', 'USA_AND_CANADA', 'AUSTRALIA']
- Website URL: [Enter website URL]
- Business Type: [Enter business type]
2. Business Address
- City: [Enter city]
- Country: [Enter country]
- Postal Code: [Enter postal code]
- State or Province: [Enter state/province]
- Street: [Enter street address]
- Street Secondary (optional): [Enter secondary address details if applicable]
3. Trading & Tax Information
- Stock Exchange (if applicable): [Enter stock exchange name]
- Stock Ticker (if applicable): [Enter stock ticker]
- Company Type: [Enter company type]
- Business Registration Identifier:
[Select from options: "US: Employer Identification Number (EIN)", "US: DUNS Number (Dun & Bradstreet)", "Canada: Canadian Business Number", "Great Britain: Company Number", "Australia: Company Number from ASIC", "India: Corporate Identity Number", "Estonia: VAT Number", "Romania: VAT Registration Number", "Israel: Registration Number", "Other"] - Business Registration Number: [Enter registration number]
4. Contact Information
- First Name: [Enter first name]
- Last Name: [Enter last name]
- Email: [Enter email]
- Phone Number: [Enter phone number]
- Business Title: [Enter business title]
- Job Position: [Enter job position]
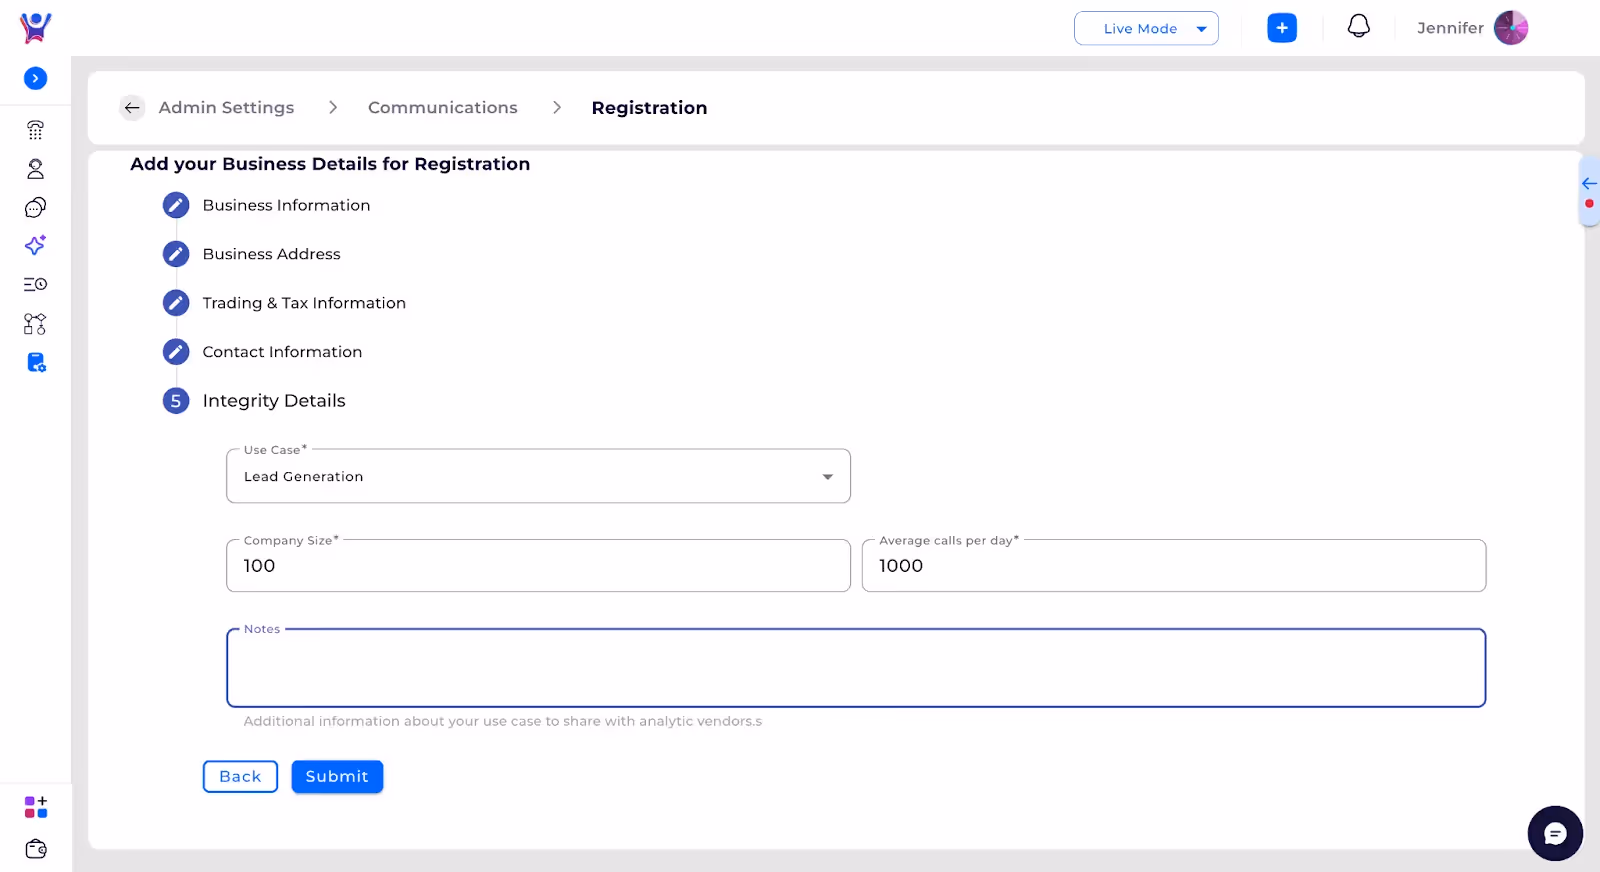
5. Integrity Details
- Usecase
- Company Size
- Average calls per day
- Notes(Additional information about your use case to share with analytic vendors)
- Screenshot(1):
- Screenshot(2):
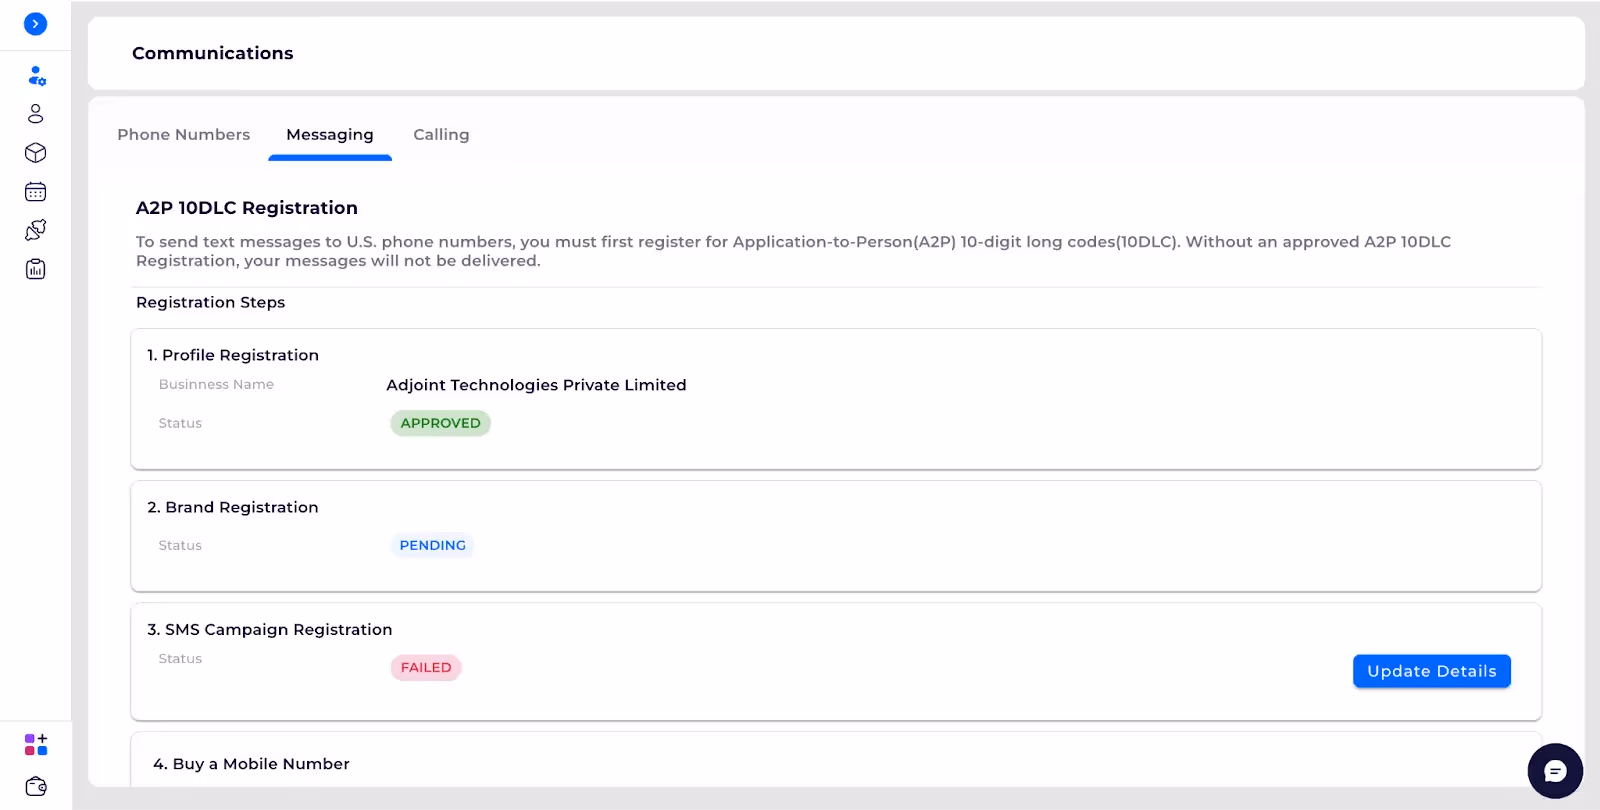
Step 3: Status of Registration
- Description :The registration process approval typically takes 2-4 business days after submitting the required information. However, the exact time may vary based on factors.You can track your registration status here. You will also receive an email once your registration is completed. After that, you can start sending SMS messages to US numbers.
Frequently Asked Questions (FAQs)
1. How long does it take to complete the registration?
Typically, the registration process takes 2-4 business days after submission. You will be notified by email once your registration is approved.
2. How can I track my registration status?
You can track the status of your registration directly from the platform. You will also receive an email notification once your registration is completed.
3. What information is required for registration?
You will need to provide business information, contact details, trading and tax info, as well as Integrity details such as your Usecase and average calls per day.
4. What happens if my registration is rejected?
If your registration is rejected, you will be notified, and you may need to provide additional information or correct any discrepancies. You can re-submit once the required changes are made.
Need More Help?
- Contact Support: For further queries, reach out to our support team
Call Integrity Registration
Step-by-Step Comprehensive guide
This article will guide you through the process of viewing email sequences and understanding key performance indicators (KPIs) in your dashboard. It is designed for users managing marketing sequences and seeking insights into email engagement and delivery metrics.
Access the Sequences Dashboard
Log in to your account and navigate to the “Sequences” section using the left-hand menu. Select the desired sequence to view detailed insights.

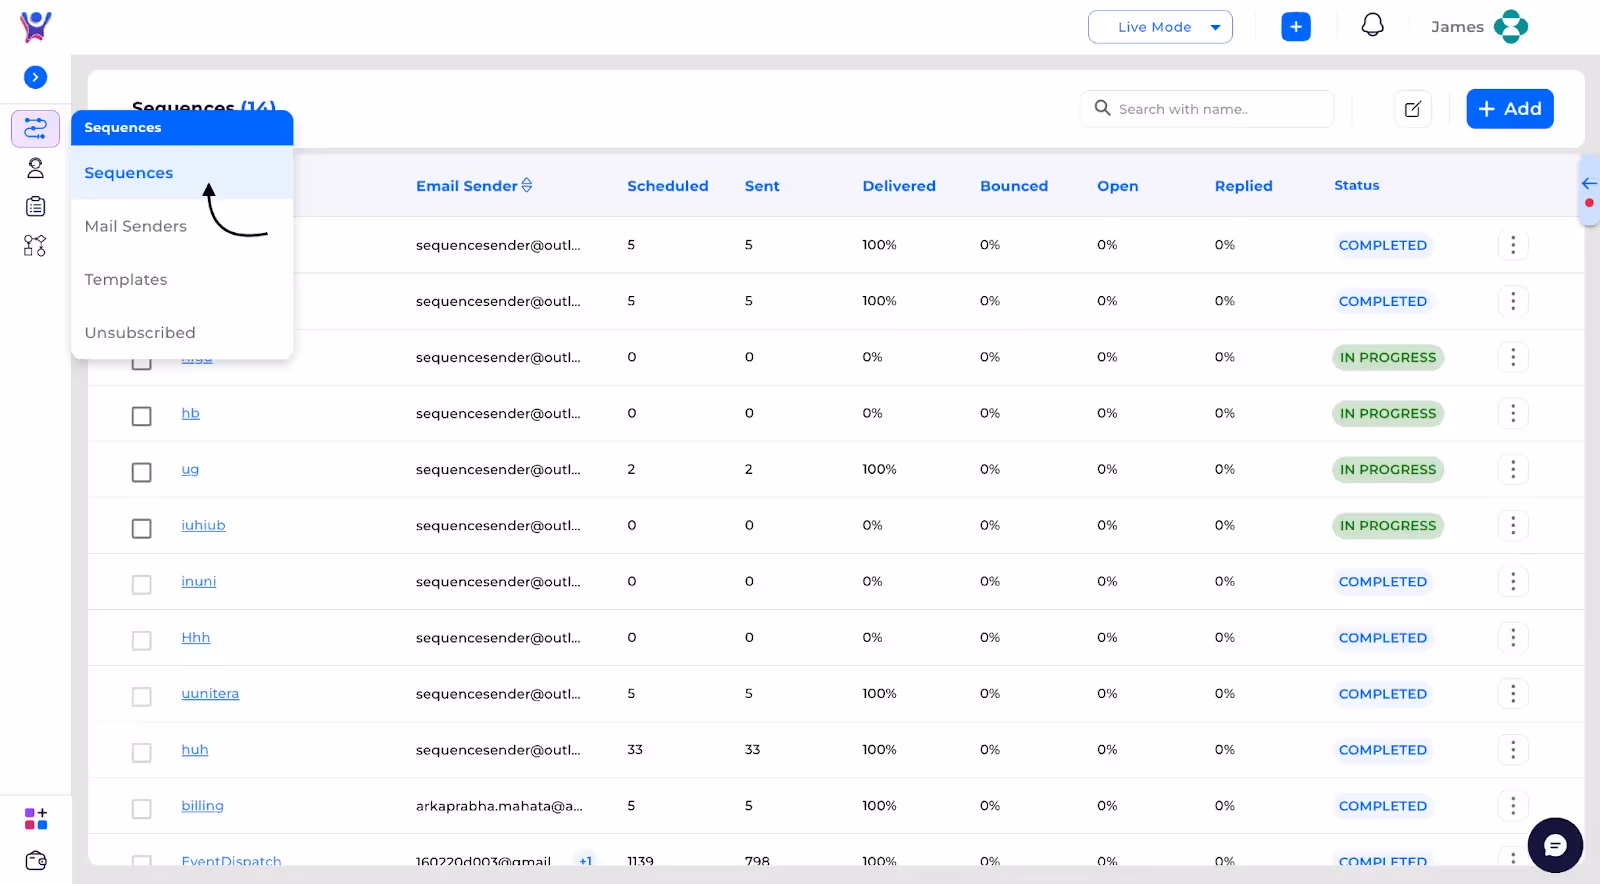
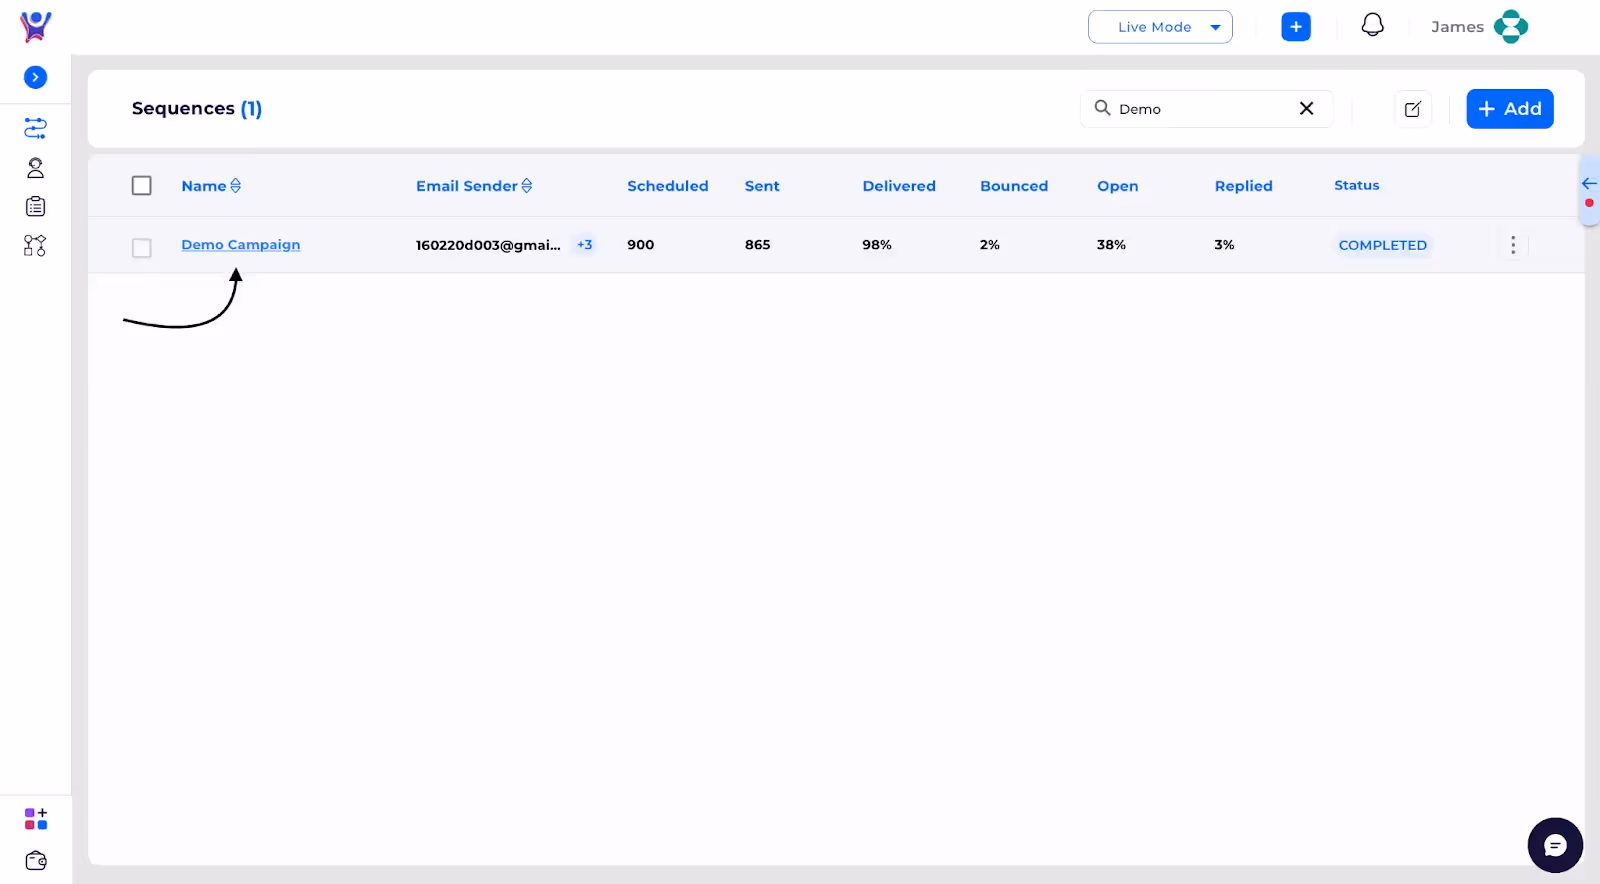
View Sequence Overview
On the campaign details page, you’ll find the following KPIs:
• Total Eligible Emails: Number of contacts eligible for this sequence (excludes previously unsubscribed or bounced emails).
• Emails Sent: Total emails sent in the sequence.
• Emails Delivered: Percentage and count of emails successfully delivered.
• Opened Emails: Percentage and count of emails opened by recipients.
• Emails Replied: Percentage and count of emails that received replies.
• Emails Bounced: Percentage and count of emails that failed delivery.
• Emails Unsubscribed: Number of users who unsubscribed via this sequence.
Tip: Click on any KPI card to view the respective list of email threads, such as replied or bounced emails.
Screenshot:

Explore Sequence Details
Description:
Scroll down to see additional details about the sequence, including:
• Sequence Name
• Start and End Dates
• Status (e.g., Completed or Ongoing)
• Associated Email List
• Time Zone
• Scheduled Sending Times
• List of Email Senders
Screenshot:

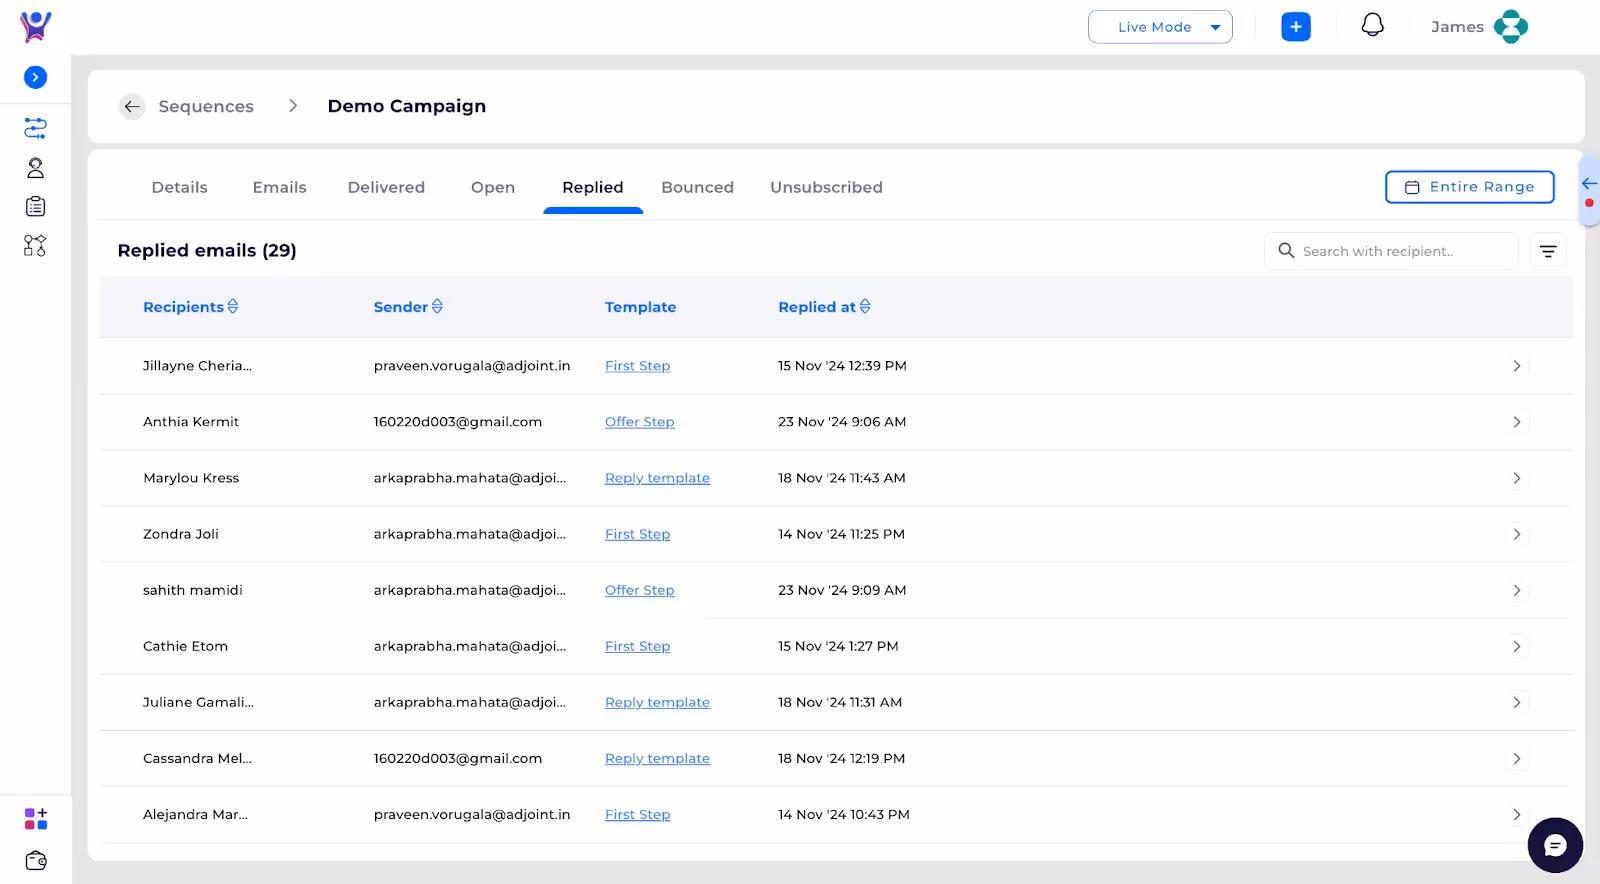
Navigate Tabs for Deeper Insights
Description:
Use the tabs at the top of the page to view specific analytics:
• Emails: Details about the emails sent.
• Delivered: List of successfully delivered emails.
• Open: Insights into opened emails.
• Replied: List of email replies received.
• Bounced: View of failed delivery attempts.
• Unsubscribed: Details on user opt-outs.
Screenshot:


Common Issues and Troubleshooting
Issue 1: Emails Not Delivering
Solution: Ensure the recipient email addresses are valid and active. Check your sender reputation or contact support for assistance.
Issue 2: KPI Data Not Updating
Solution: Refresh the page or check if the sequence status is “Completed.”
FAQs
Question 1: Can I see which users opened my emails?
Answer: Yes, navigate to the “Open” tab to see a list of users who opened your emails.
Question 2: What happens when an email bounces?
Answer: Bounced emails are excluded from future campaigns, ensuring higher deliverability rates.
Need More Help?
Contact Support:
If you need additional assistance, contact us.
Sequence list and details
Step-by-Step guide
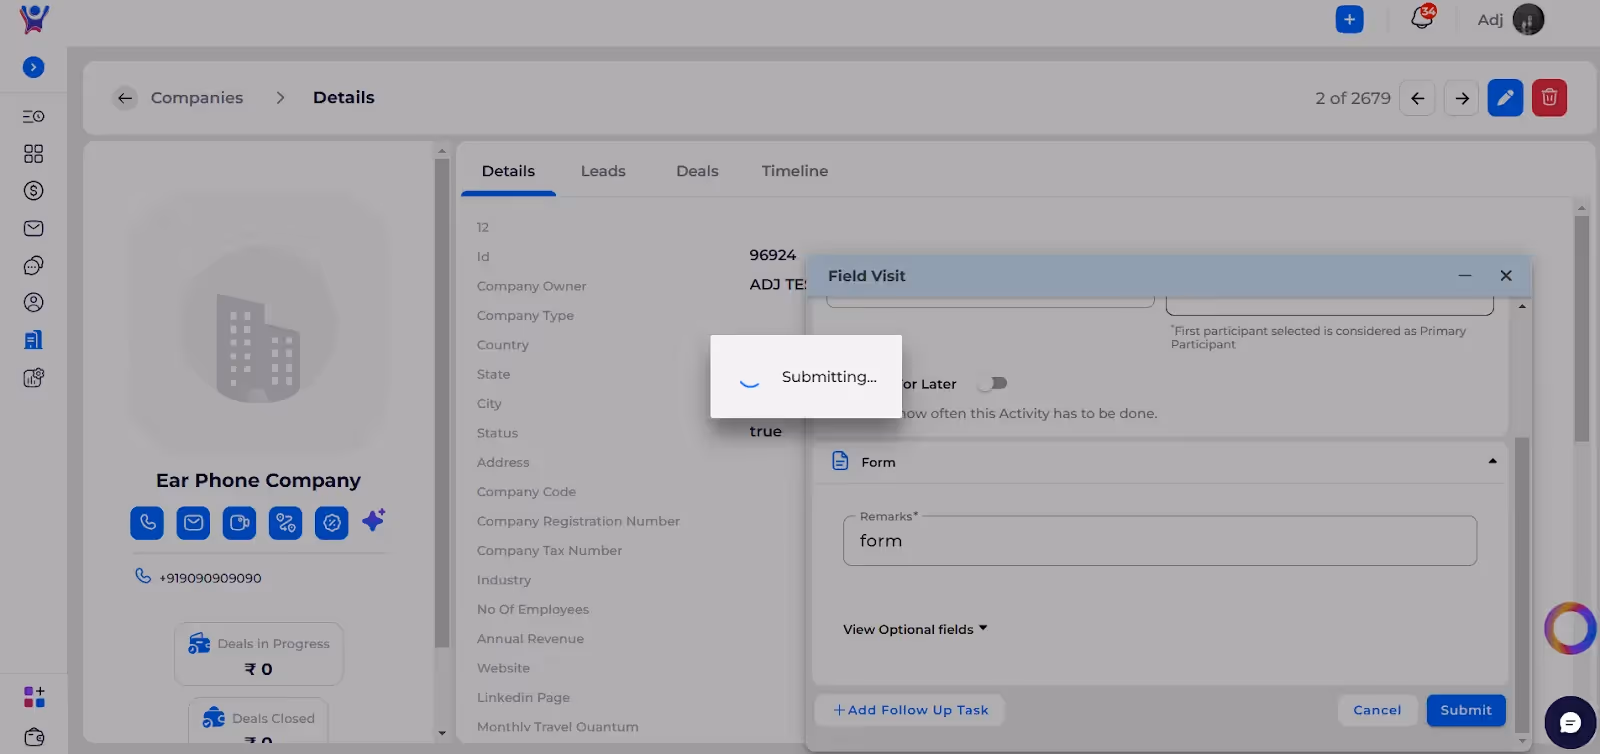
This comprehensive guide explains the Form configuration and Jobs functionality in Thriwin CRM, detailing how users interact with forms and access related jobs.
Form Configuration
- Description:
- Forms are configured in admin settings for different activities
- Mandatory field completion required
- Screenshot: (Screenshot 1: Form configuration in admin settings)
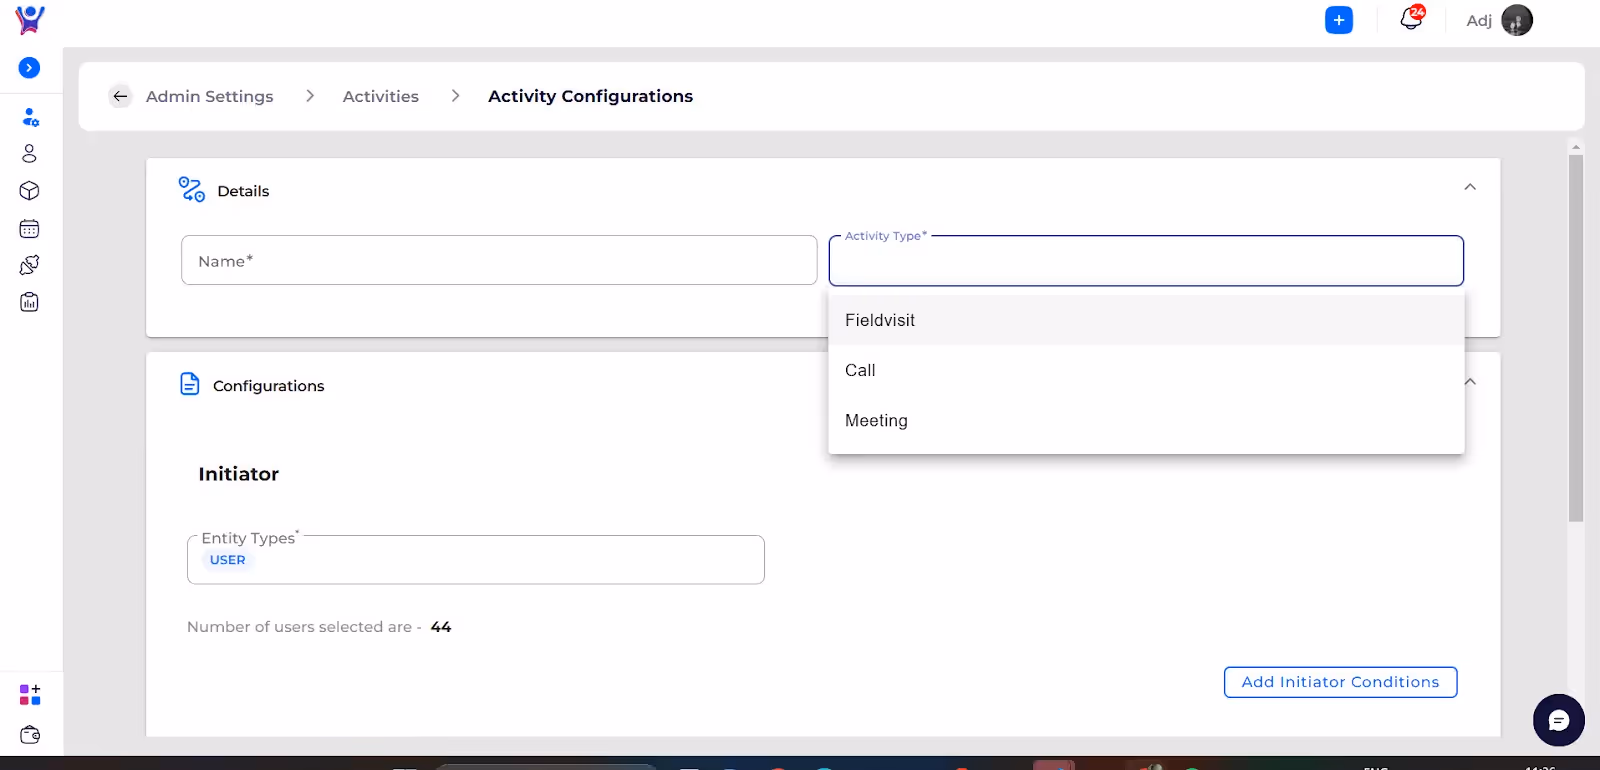
- Key Points:
- Required fields must be filled
- Users cannot skip mandatory fields
- Configuration varies by activity type
- Screenshot: (Screenshot 2: Sample activity form with required fields)
Key Form Characteristics
- Mandatory field validation
- Prevents form submission with incomplete information
- Ensures data completeness and quality
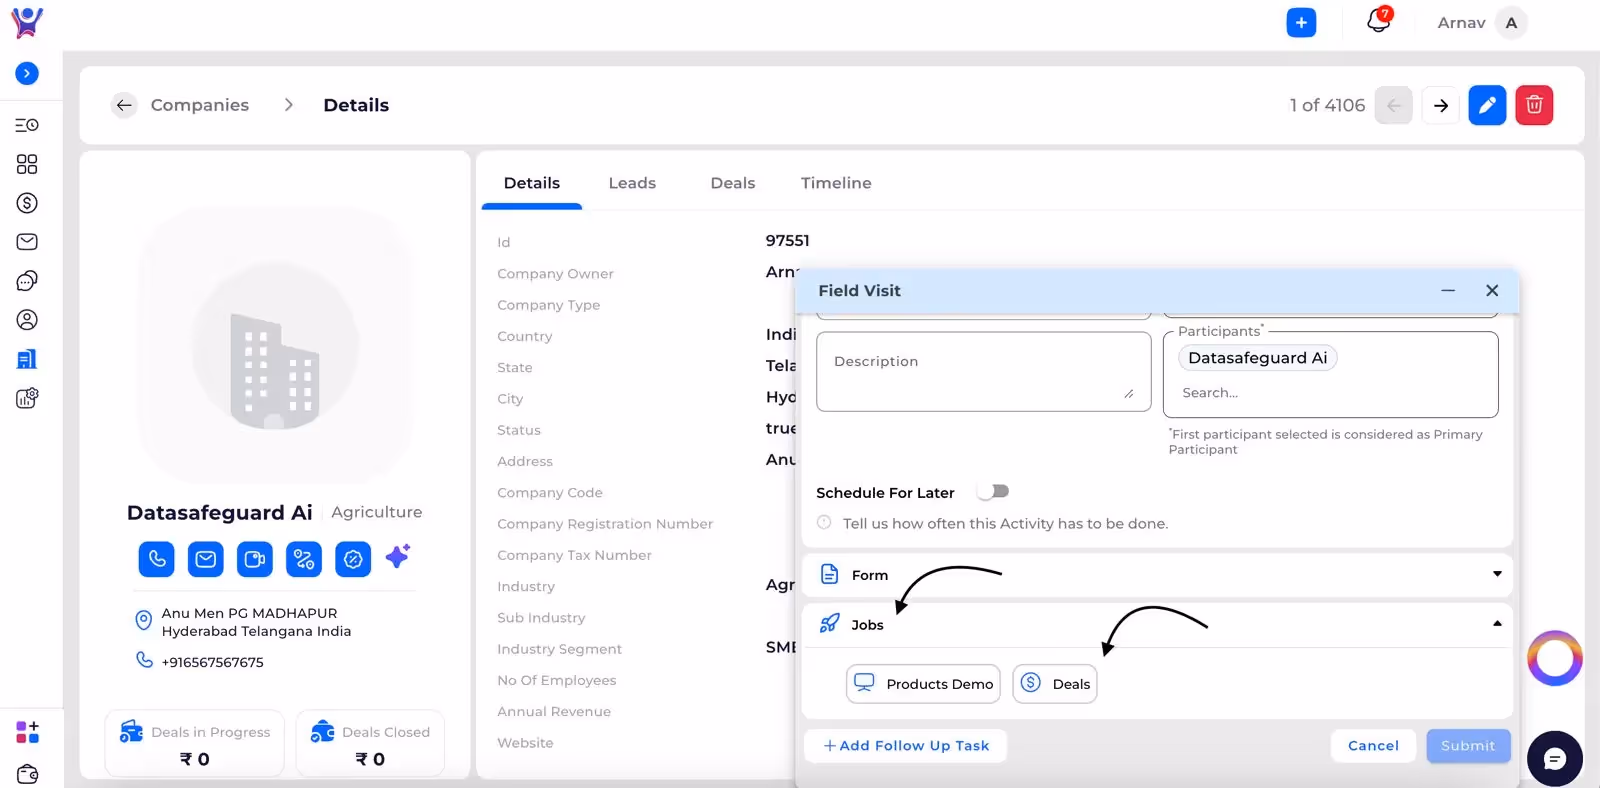
Jobs Functionality
Deal Jobs
- Description:
- Accessed through activity-related jobs section
- Displays deals specific to activity participants
- Screenshot: (Screenshot 3: Jobs section with Deal option selected)
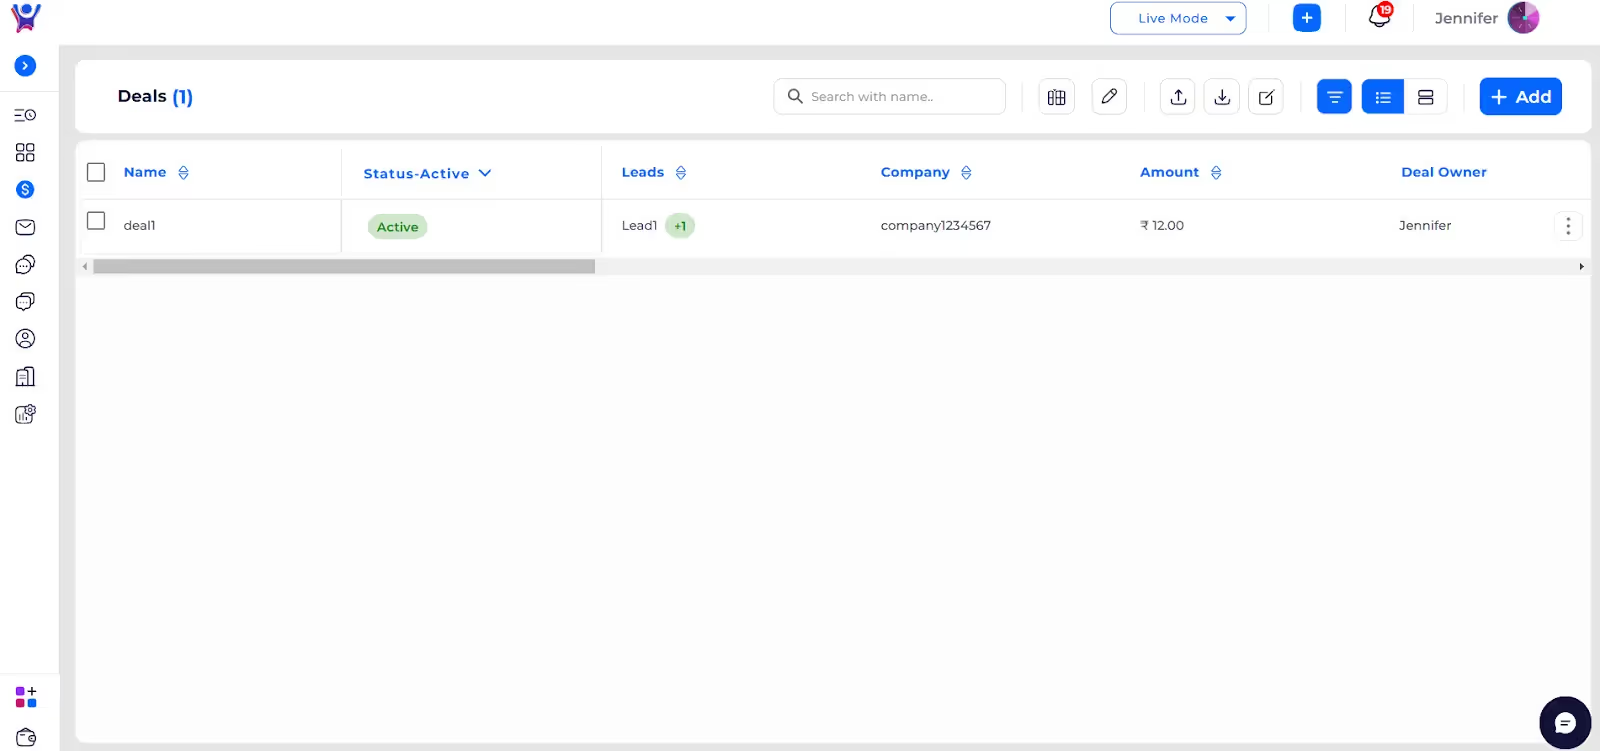
- Key Features:
- Filters deals by participants involved in the activity
- Shows only relevant deals
- Screenshot: (Screenshot 4: Click on deals in jobs section)
Click on deals in jobs section to open deals list filtered by participants
- Screenshot: (Screenshot 4:Deals list with participant filter applied)
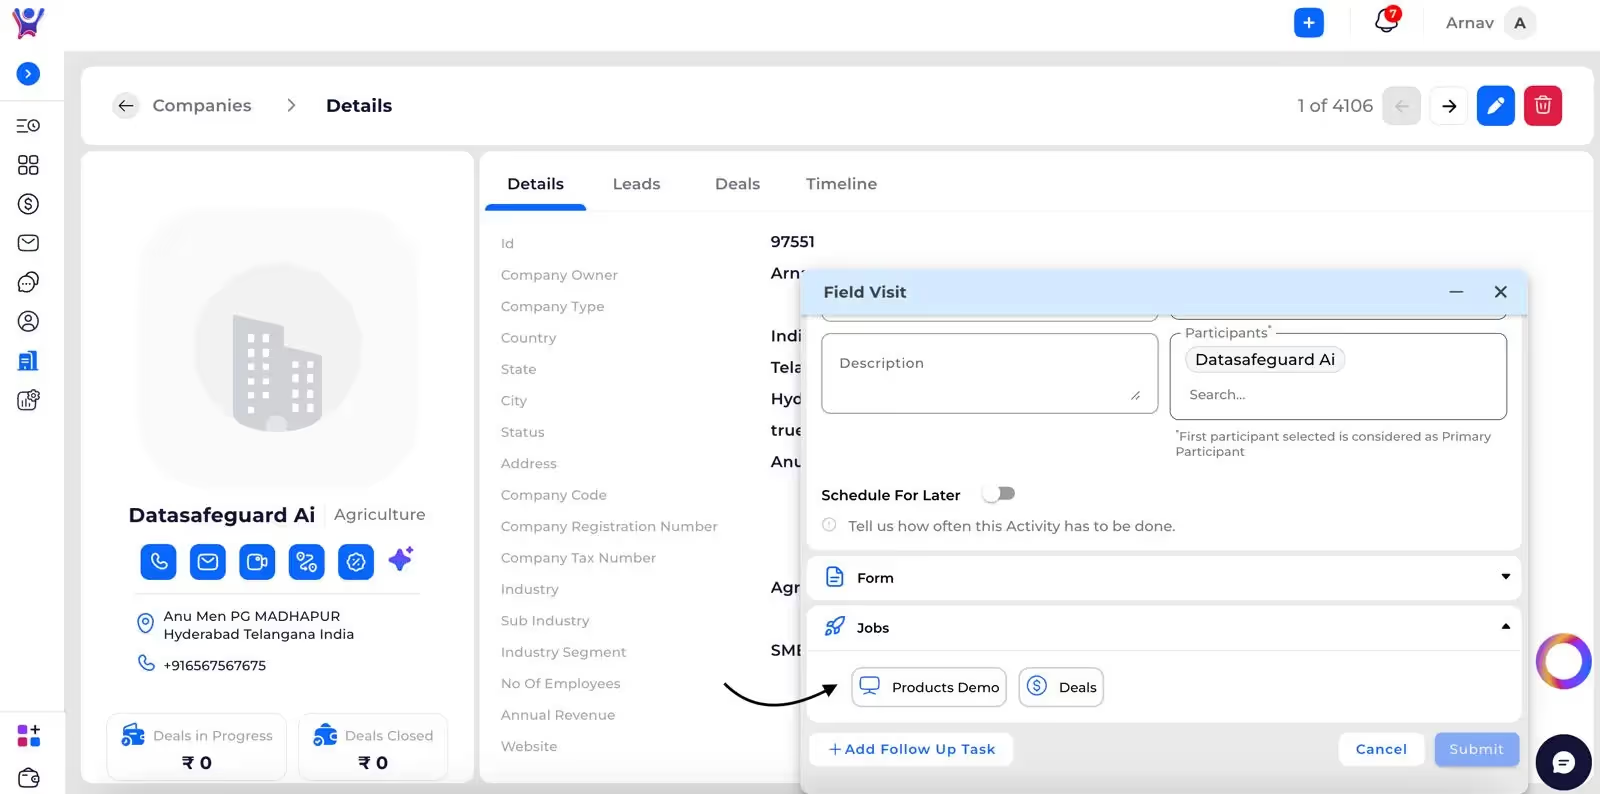
Product Demo Jobs
- Description:
- Opens in a new browser tab
- Displays comprehensive product list
- Screenshot: (Screenshot 5: Product Demo jobs section)
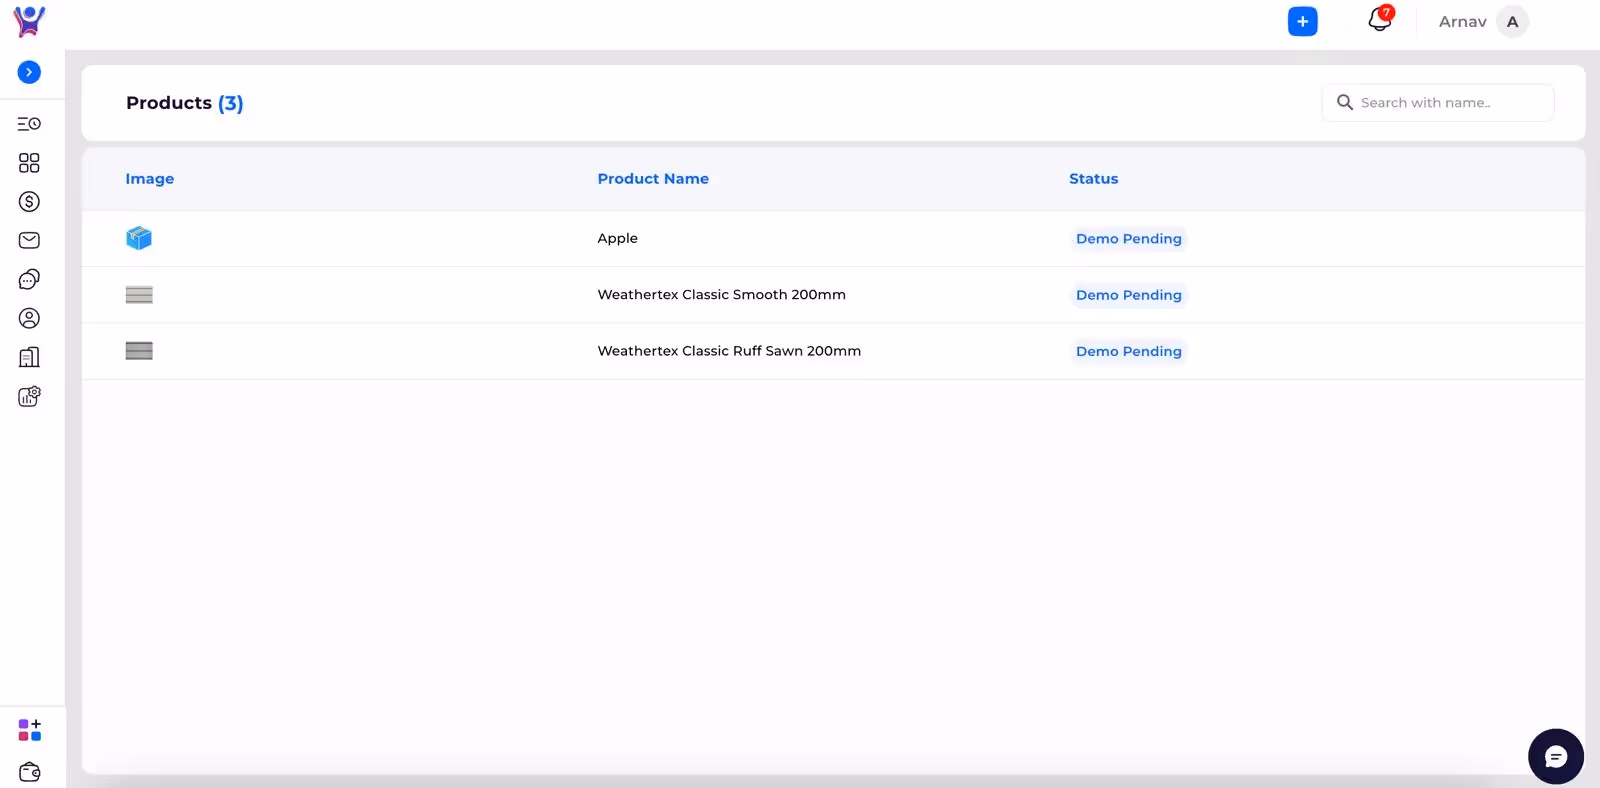
- Key Features:
- Full product catalog view
- Separate tab for easy navigation
- Screenshot: (Screenshot 6: Product list in new tab)
Common Issues and Troubleshooting
- Issue 1: Unable to submit form
- Solution: Complete all mandatory fields
- Issue 2: Cannot see specific deals
- Solution: Verify participant details in original activity
FAQs
- Question 1: Why can't I skip required fields?some text
- Answer: Mandatory fields ensure data completeness and system integrity
- Question 2: How are deals filtered in the Jobs section?some text
- Answer: Deals are filtered based on participants from the original activity
Important Considerations
- Form configuration is managed by admin settings
- Jobs provide contextual access to related deals and products
- Designed to streamline user workflow and information access
Need More Help?
- Contact Support: Reach out to Thriwin
Manage Forms and Jobs
Configure forms effortlessly
This comprehensive guide explains the Follow-Up Tasks feature in Thriwin CRM, detailing how users can schedule additional tasks after completing an initial activity.
Initiating Follow-Up Tasks
- Description:
- Follow-up tasks can be scheduled for tasks not previously scheduled for later
- Accessible through the original activity form
- Screenshot: (Screenshot 1: Original activity form with '+Add follow-up task' button)
Note: Click on Add Follow Up Task
- Key Points:
- Only applicable for immediate (Schedule Now) tasks
- Provides flexibility in task management
Selecting Follow-Up Task Type
- Description:
- Click on '+Add follow-up task' button
- Pop-up window opens with task options
- Screenshot: (Screenshot 2: Follow-up task type selection pop-up)

- Example Scenario:
- After a Field Visit, user can schedule a follow-up Call
- Multiple task types available for selection
- Screenshot: (Screenshot 3: Selecting Call as follow-up task)
Configuring Follow-Up Task
- Description:
- Fill in details for the selected follow-up task
- Customize task specifics
- Screenshot: (Screenshot 4: Follow-up Call task configuration form)

- Key Features:
- Inherit relevant information from original task
- Flexible task customization
- Screenshot: (Screenshot 5: Completed follow-up task form)
Appending Follow-Up Task
- Description:
- Submit follow-up task
- Task added to the original activity form
- Key Points:
- Follow-up task becomes part of the original activity
- Visible within the same form
- Screenshot: (Screenshot 6: Main form showing original and follow-up tasks)

Scheduling Tasks
- Description
- Submit the original activity form
- Both original and follow-up tasks scheduled in timeline.
- Key Features:
- Seamless task scheduling
- Comprehensive task tracking
Common Issues and Troubleshooting
- Issue 1: Unable to add follow-up tasks
- Solution: Ensure original task is set to 'Schedule Now'
- Issue 2: Follow-up task not visible
- Solution: Verify task was properly submitted
FAQs
- Question 1: Can I add multiple follow-up tasks?
- Answer: Typically, one follow-up task can be added per original activity
- Question 2: What task types can be used as follow-ups?
- Answer: Available types include Calls, Field Visits, Meetings, and Emails
Important Considerations
- Follow-up tasks enhance task management capabilities
- Provides seamless workflow continuation
- Ensures comprehensive activity tracking
Need More Help?
- Contact Support: Reach out to Thriwin CRM support team for detailed assistance with Follow-Up Tasks functionality.
Create a Followup Task
Create Follow-up tasks -meticulous guide
This comprehensive guide explains the two primary methods of task scheduling in Thriwin CRM - Schedule for Now and Schedule for Later.
Schedule for Now
- Description:
- Tasks completed immediately after form submission
- Instantly added to the timeline
- No future scheduling involved
- Screenshot: (Screenshot 1: Activity form with 'Schedule Later' option not selected)
- Key Points:
- Immediate task completion
- Automatically marked as completed
- Instantly reflects in timeline
Schedule for Later
Non-Recurring Task
- Description:
- One-time task scheduling
- Scheduled for a specific future date
- Scheduled Type: One Time
- Screenshot: (Screenshot 2: Non-recurring task scheduling interface)
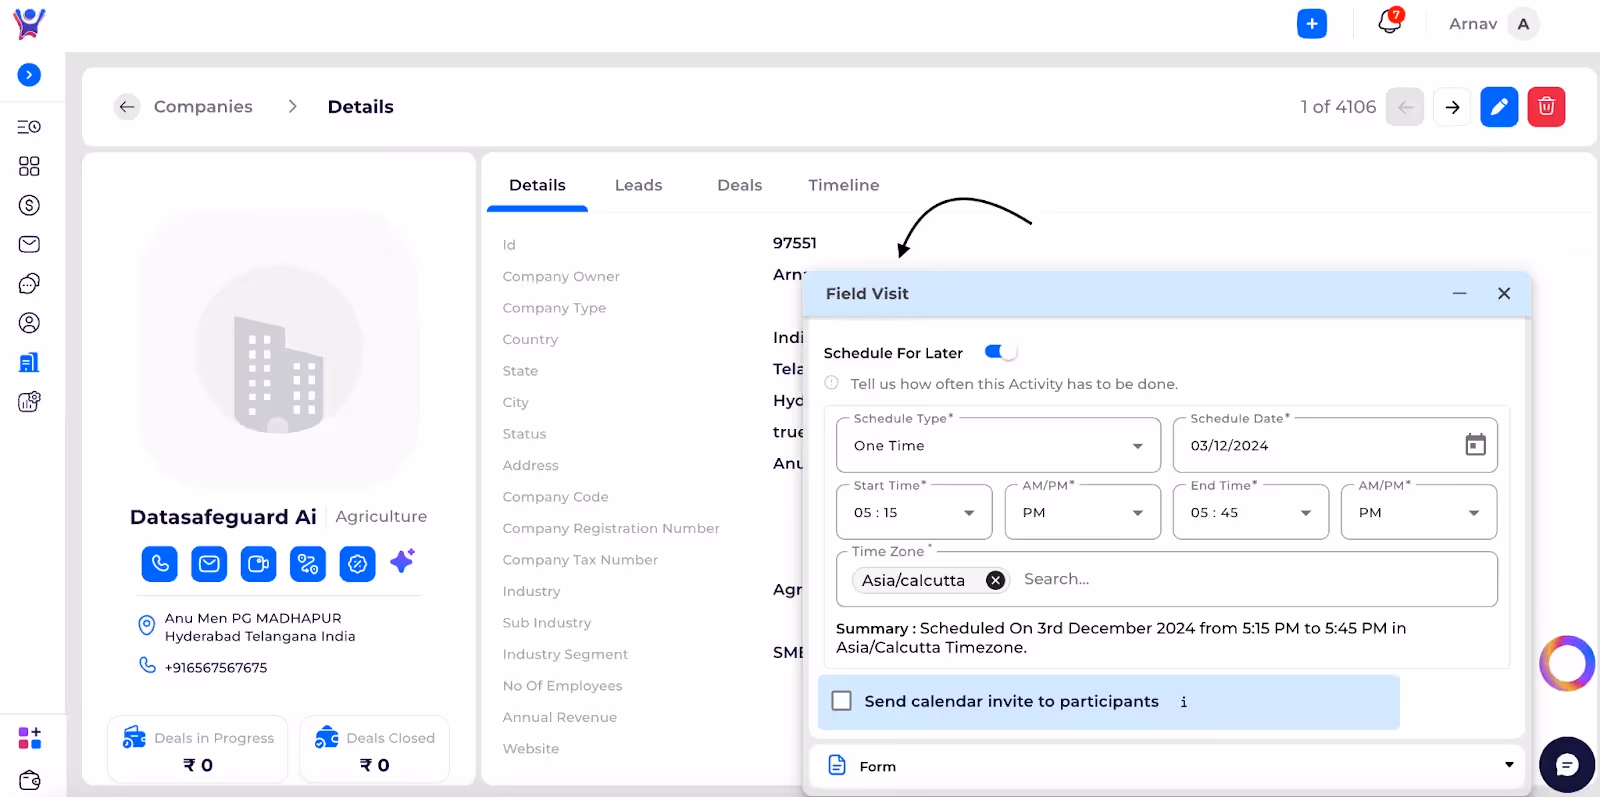
- Key Features:
- Select specific date and time
- Single occurrence of task
- Flexibility to modify task details
- Screenshot: (Screenshot 3: One-time task configuration)
Recurring Task
- Description:
- Multiple occurrence task scheduling
- Repeated at specified intervals
- Scheduled Type: Recurring
- Screenshot: (Screenshot 4: Recurring task scheduling interface)

- Key Features:
- Define recurrence pattern
- Set frequency (daily, weekly, monthly)
- Customize task repetition
- Screenshot: (Screenshot 5: Recurring task configuration options)
Common Issues and Troubleshooting
- Issue 1: Unable to schedule task
- Solution: Ensure all required fields are completed
- Issue 2: Incorrect task scheduling
- Solution: Double-check date, time, and recurrence settings
FAQs
- Question 1: Can I change a scheduled task after creation?
- Answer: Yes, you can modify task details before and after scheduling
- Question 2: What's the difference between one-time and recurring tasks?
- Answer: One-time tasks occur once, while recurring tasks repeat at specified intervals
Scheduling Flexibility
- Users can modify all fields according to their specific task requirements
- Comprehensive control over task scheduling and management
Need More Help?
- Contact Support: Reach out to Thriwin CRM support team for detailed assistance with task scheduling and management.
Schedule a task
Schedule a task effortlessly
This comprehensive guide explains how to create a Meeting form in Thriwin CRM, detailing various methods of access and form completion for users.
Accessing Meeting Form via Toolbar
- Description:
- Click on '+' icon in the toolbar
- Open the Activities dropdown
- Select 'Meeting' option
- Screenshot: (Screenshot 1: Toolbar with '+' icon and Activities dropdown)
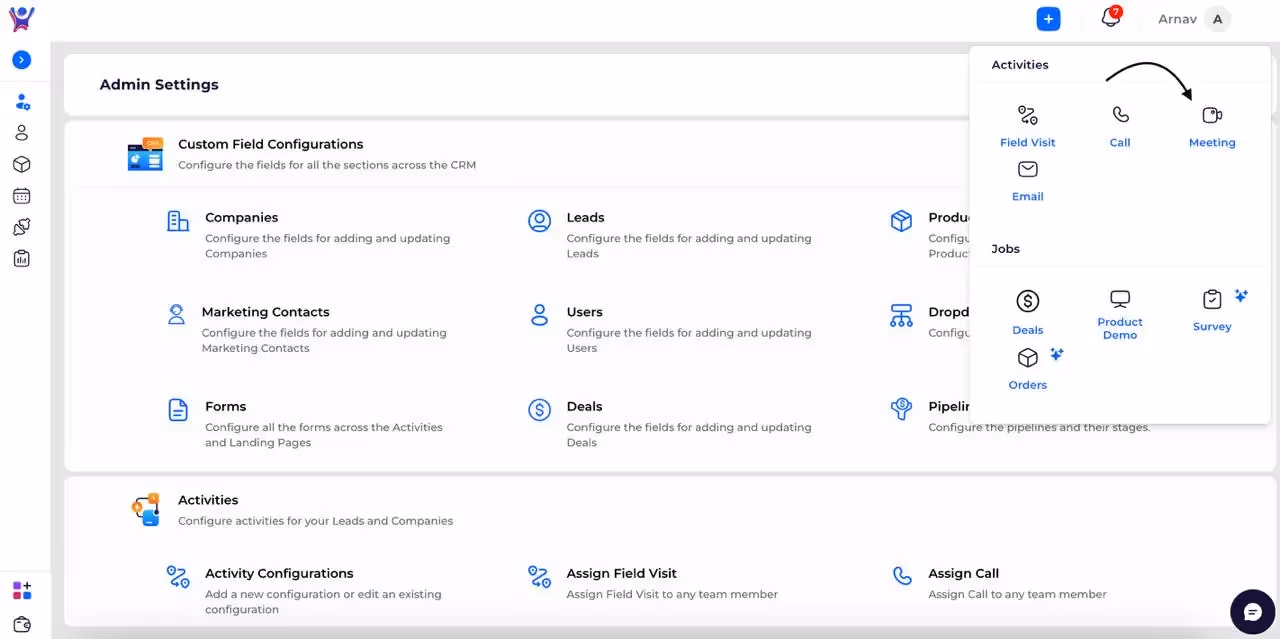
- Key Points:
- Only the initiator will be pre-filled
- User must manually complete all other required fields
- Screenshot: (Screenshot 2: Meeting form with initiator pre-filled)

- Important Note: After filling required fields, the task will be scheduled in the timeline
Accessing Meeting Form from Entity Details Pages
Company Details Page
- Description:
- Navigate to specific Company details page
- Click on Meeting icon
- Company Name automatically pre-fills in participants field
- Screenshot: (Screenshot 3: Company details page with Meeting icon)

- Screenshot: (Screenshot 4: Meeting form with Company Name pre-filled)

Lead Details Page
- Description:
- Open specific Lead details page
- Click on Meeting icon
- Lead Name automatically pre-fills in participants field
- Screenshot: (Screenshot 5: Lead details page with Meeting icon)

- Screenshot: (Screenshot 6: Meeting form with Lead Name pre-filled)

Deals Details Page
- Description:some text
- Navigate to specific Deal details page
- Click on Meeting icon
- Corresponding Deal's Leads automatically pre-fill in participants field
- Screenshot: (Screenshot 7: Deals details page with Meeting icon)
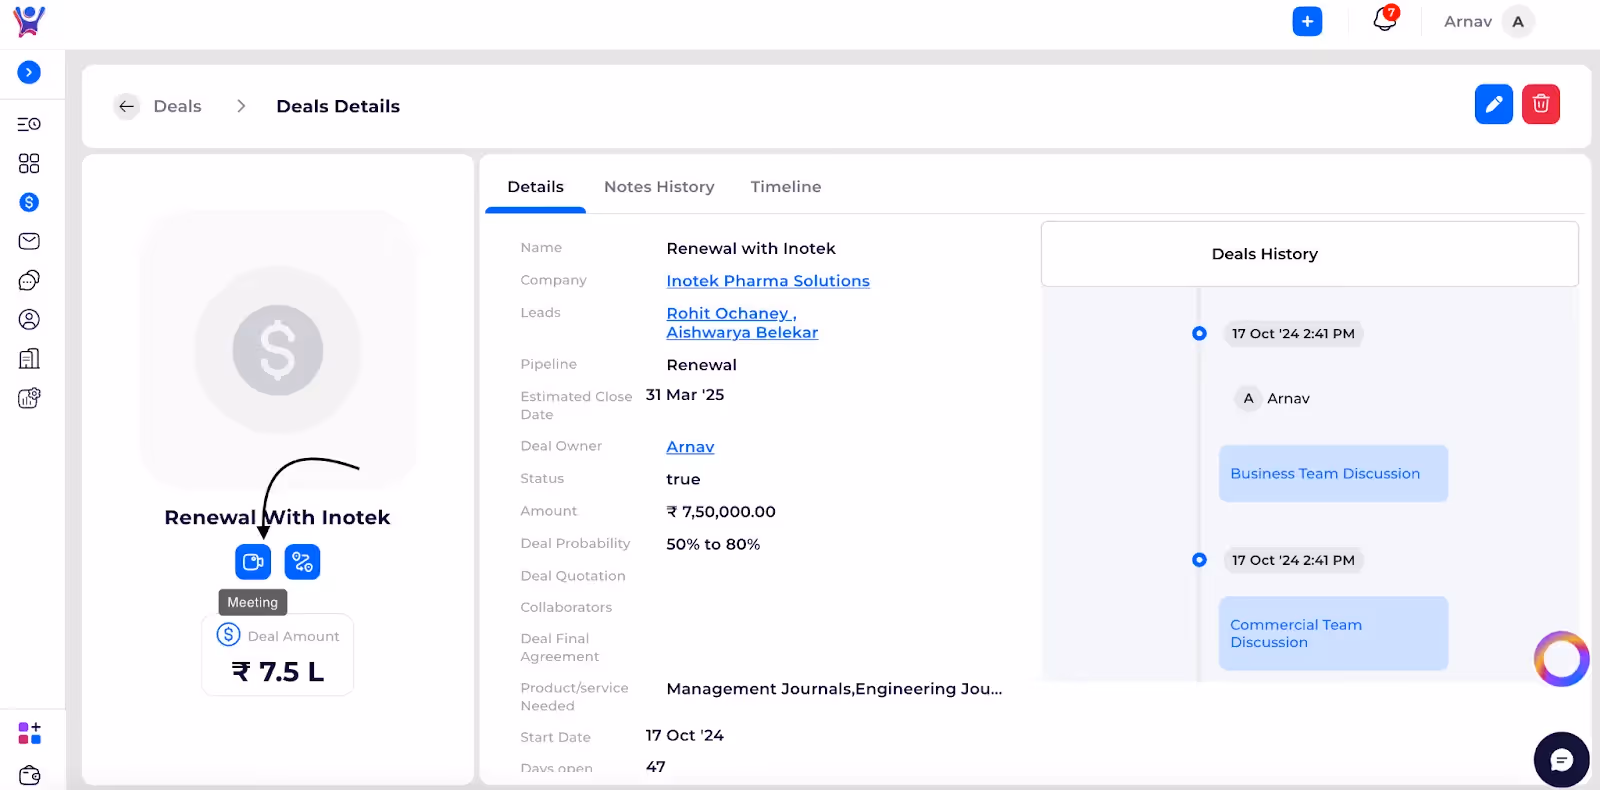
- Screenshot: (Screenshot 8: Meeting form with Deal Leads pre-filled)

Marketing Contacts Details Page
- Description:
- Open specific Marketing Contact details page
- Click on Meeting icon
- Marketing Contact name automatically pre-fills in participants field
- Screenshot: (Screenshot 9: Marketing Contacts details page with Meeting icon)

- Screenshot: (Screenshot 10: Meeting form with Marketing Contact pre-filled)

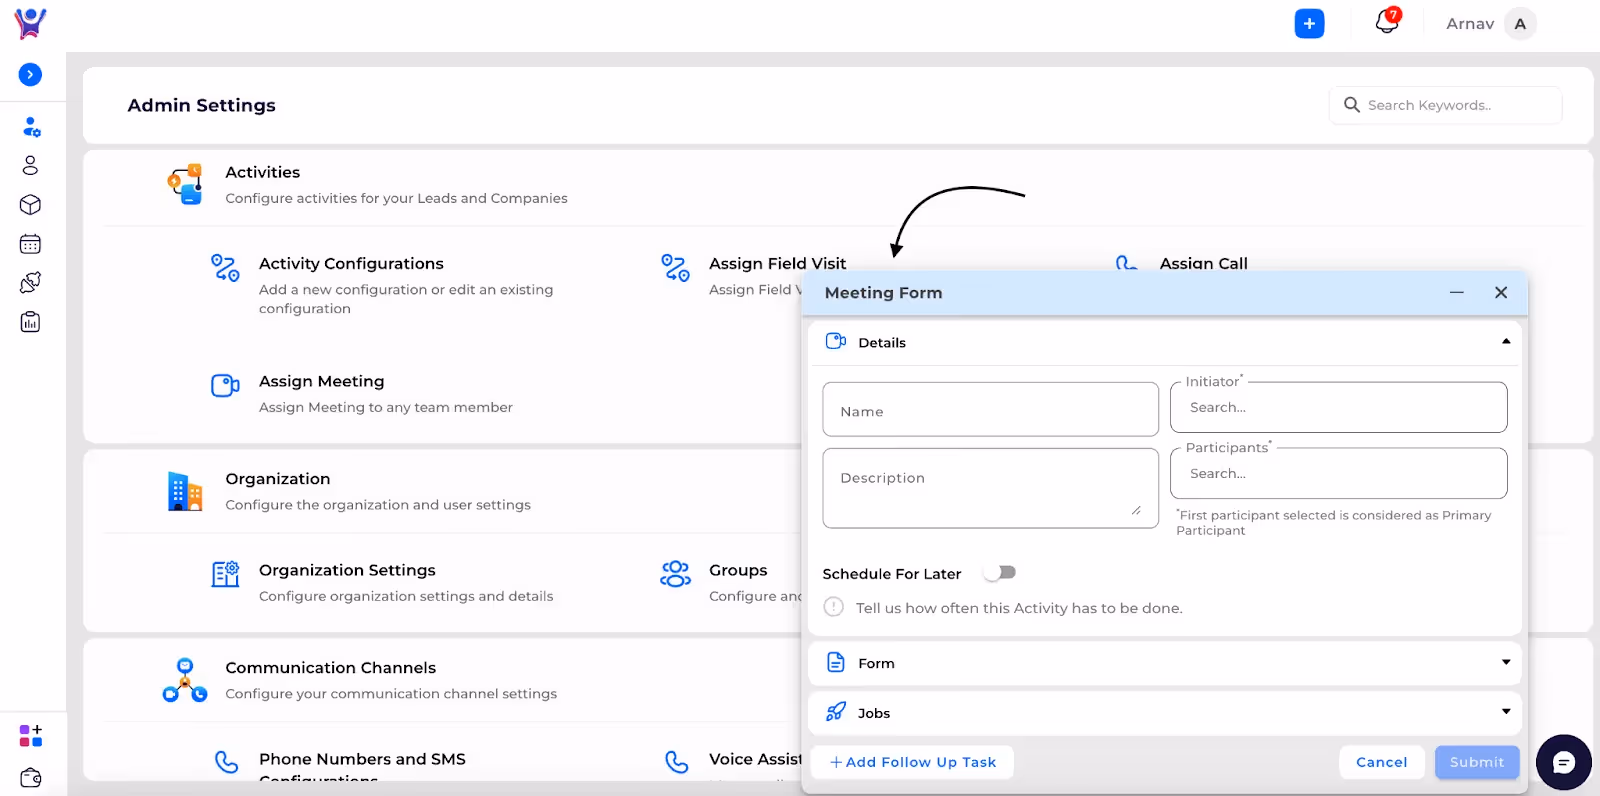
Step 3: Accessing Meeting Form from Admin Settings
- Description:
- Navigate to Admin Settings
- Select 'Assign Meeting'
- No fields are pre-filled
- Admin must manually enter all required information
- Considered as an administrative task
- Screenshot: (Screenshot 11: Admin Settings page)

- Screenshot: (Screenshot 12: Blank Meeting form in Admin Settings)
Common Issues and Troubleshooting
- Issue 1: Fields not pre-filling correctly
- Solution: Verify correct entity is selected before opening Meeting form
- Issue 2: Unable to save Meeting form
- Solution: Ensure all required fields are completed
FAQs
- Question 1: Can I modify pre-filled participant information?some text
- Answer: Yes, pre-filled information can be edited before form submission
- Question 2: How many participants can I add to a meeting?some text
- Answer: Multiple participants can be added to a meeting form
Need More Help?
- Contact Support: Reach out to Thriwin CRM support team for detailed assistance with Meeting form navigation and completion.
how to create a Meeting
Schedule a Meeting- step-by-step guide
This comprehensive guide explains how to create a Call form in Thriwin CRM, detailing various methods of access and form completion for users.
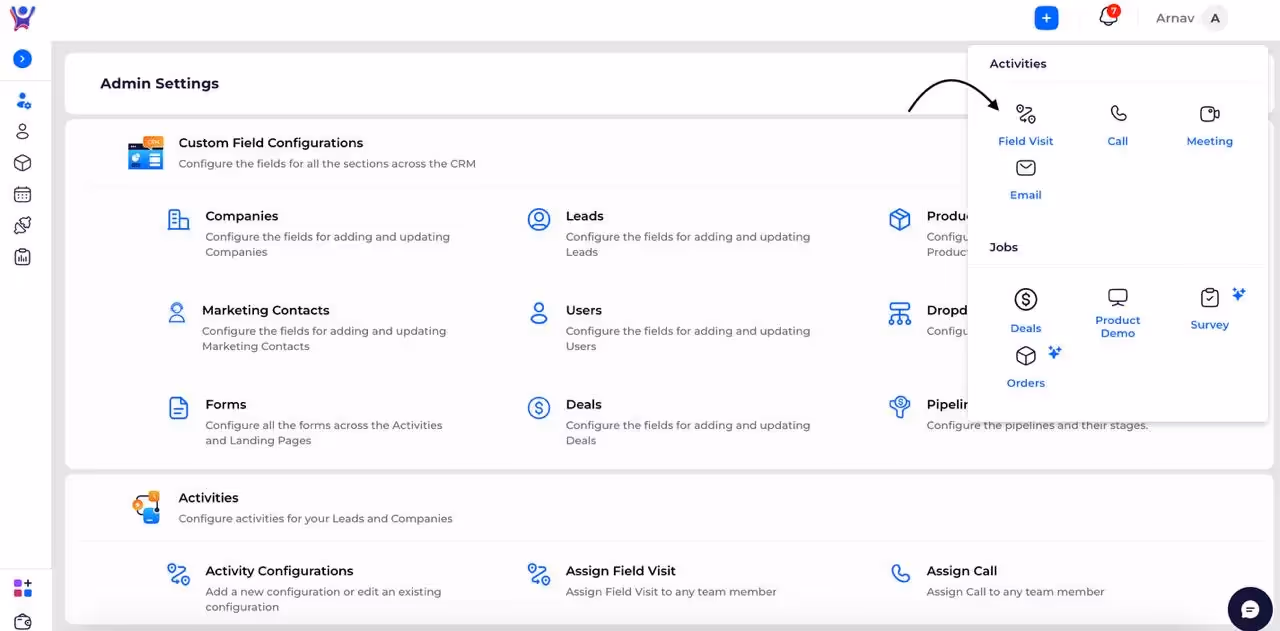
Accessing Call Form via Toolbar
- Description:
- Click on '+' icon in the toolbar
- Open the Activities dropdown
- Select 'Call' option
- Screenshot: (Screenshot 1: Toolbar with '+' icon and Activities dropdown)

- Key Points:
- Only the initiator will be pre-filled
- User must manually complete all other required fields
- Screenshot: (Screenshot 2: Call form with initiator pre-filled)

- Important Notes:
- Call button enables only when a participant is selected
- Only single participant can be selected for call task
- Instant call possible only if participant has a valid mobile number
Accessing Call Form from Entity Details Pages
Company Details Page
- Description:
- Navigate to specific Company details page
- Click on Call icon
- Company Name automatically pre-fills in participants field
- Screenshot: (Screenshot 3: Company details page with Call icon)

- Screenshot: (Screenshot 4: Call form with Company Name pre-filled)

- Note: Instant call can be made to the participant by clicking call icon
Lead Details Page
- Description:
- Open specific Lead details page
- Click on Call icon
- Lead Name automatically pre-fills in participants field
- Screenshot: (Screenshot 5: Lead details page with Call icon)
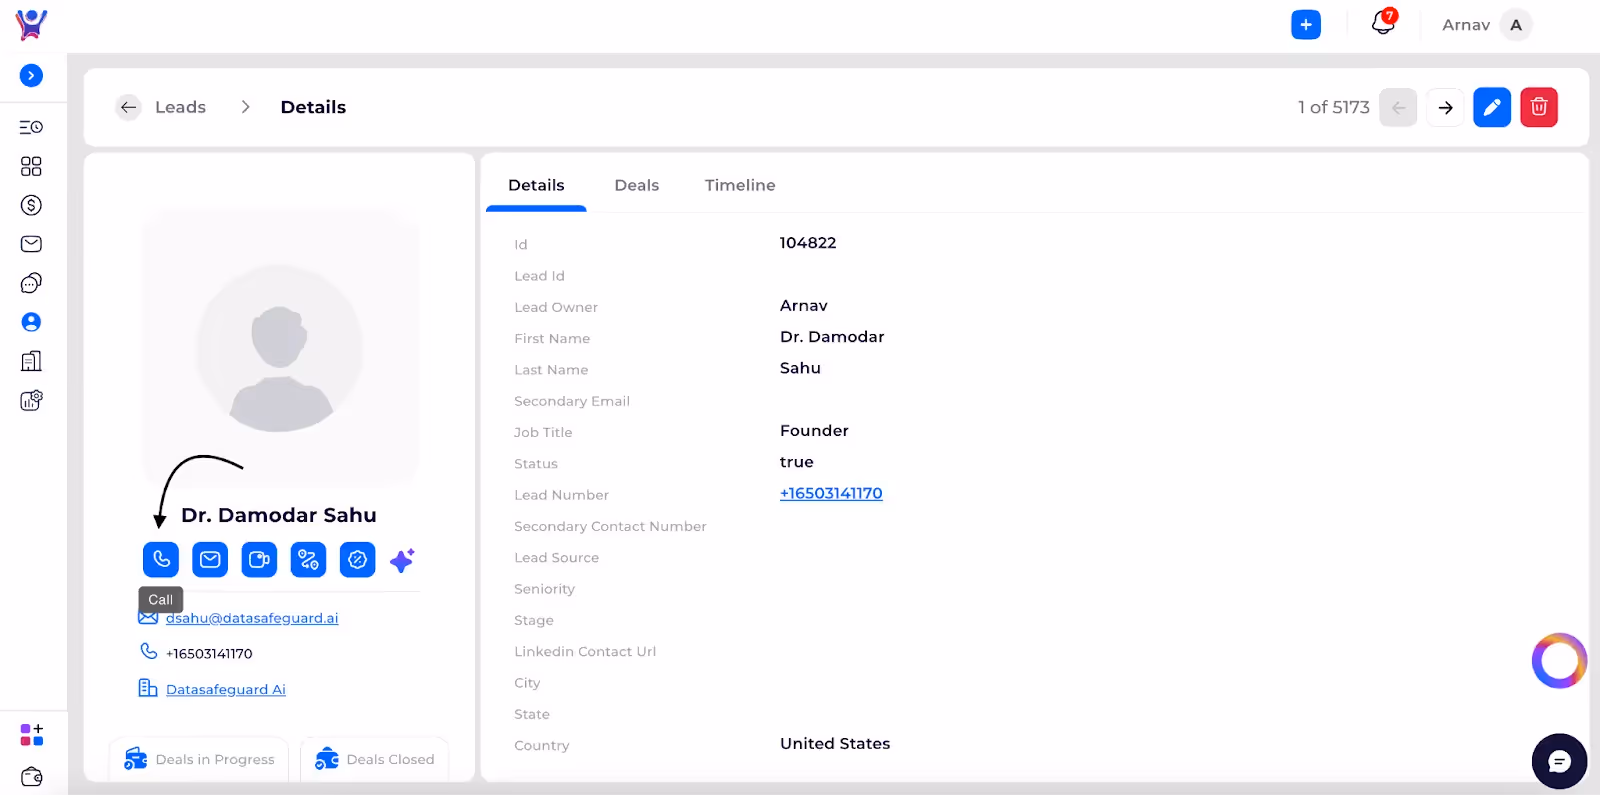
- Screenshot: (Screenshot 6: Call form with Lead Name pre-filled)

- Note: Instant call can be placed to the participant by clicking call icon
Marketing Contacts Details Page
- Description:
- Open specific Marketing Contact details page
- Click on Call icon
- Marketing Contact name automatically pre-fills in participants field
- Screenshot: (Screenshot 7: Marketing Contacts details page with Call icon)
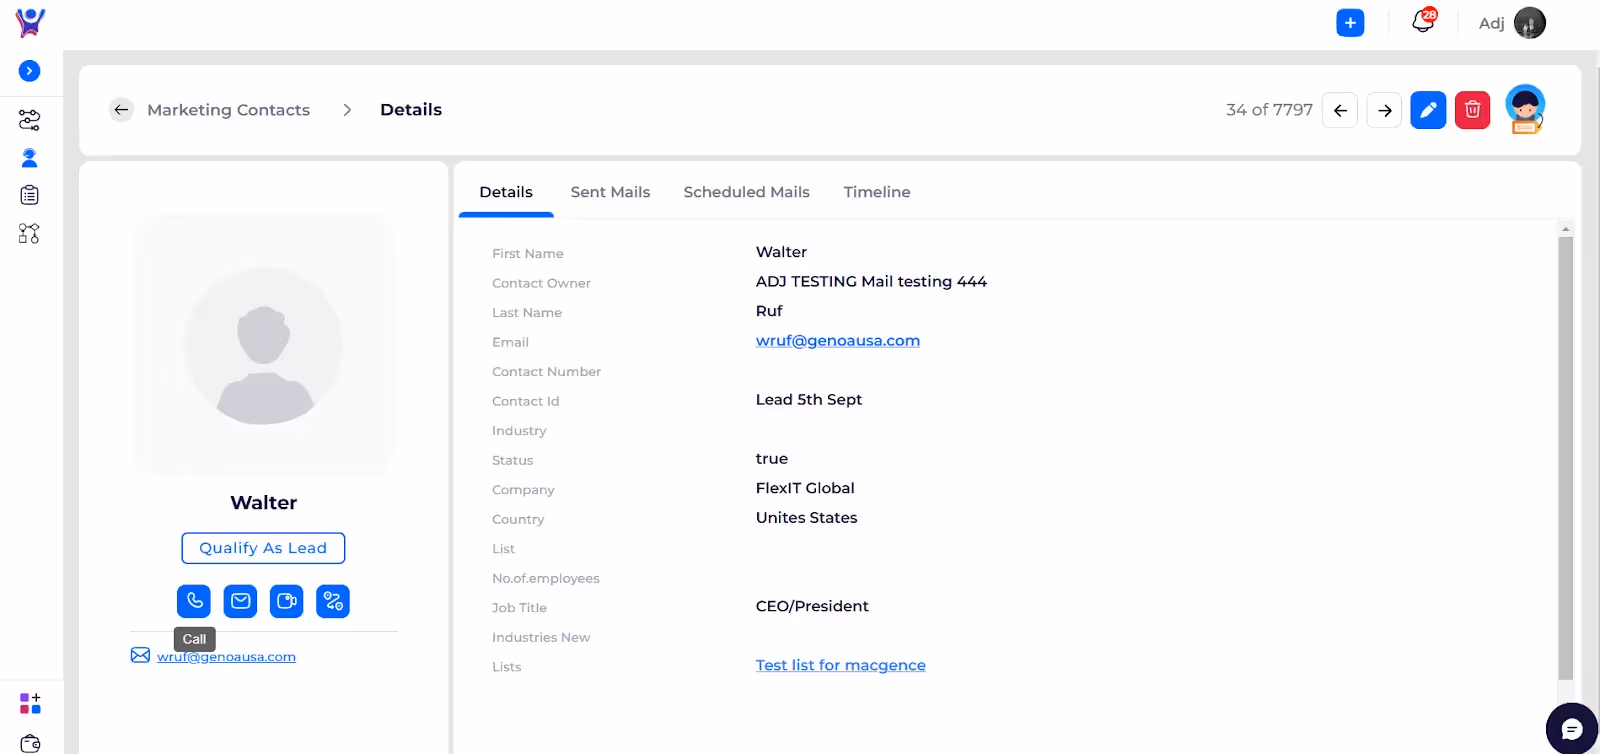
- Screenshot: (Screenshot 8: Call form with Marketing Contact pre-filled)

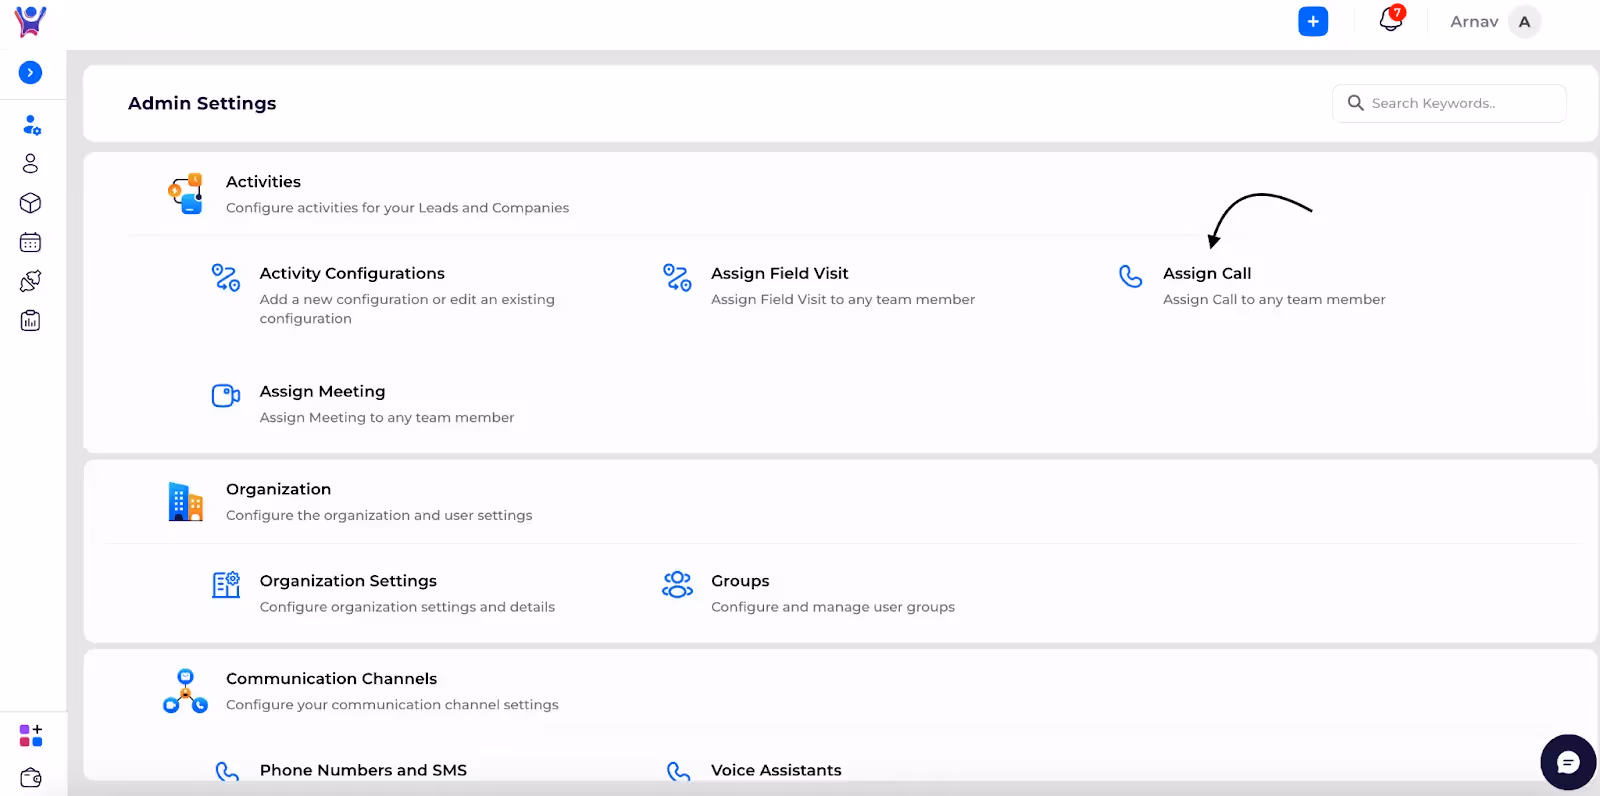
Accessing Call Form from Admin Settings
- Description:
- Navigate to Admin Settings
- Select 'Assign Call'
- No fields are pre-filled
- Admin must manually enter all required information
- Considered as an administrative task
- Screenshot: (Screenshot 9: Admin Settings page)
- Screenshot: (Screenshot 10: Blank Call form in Admin Settings)

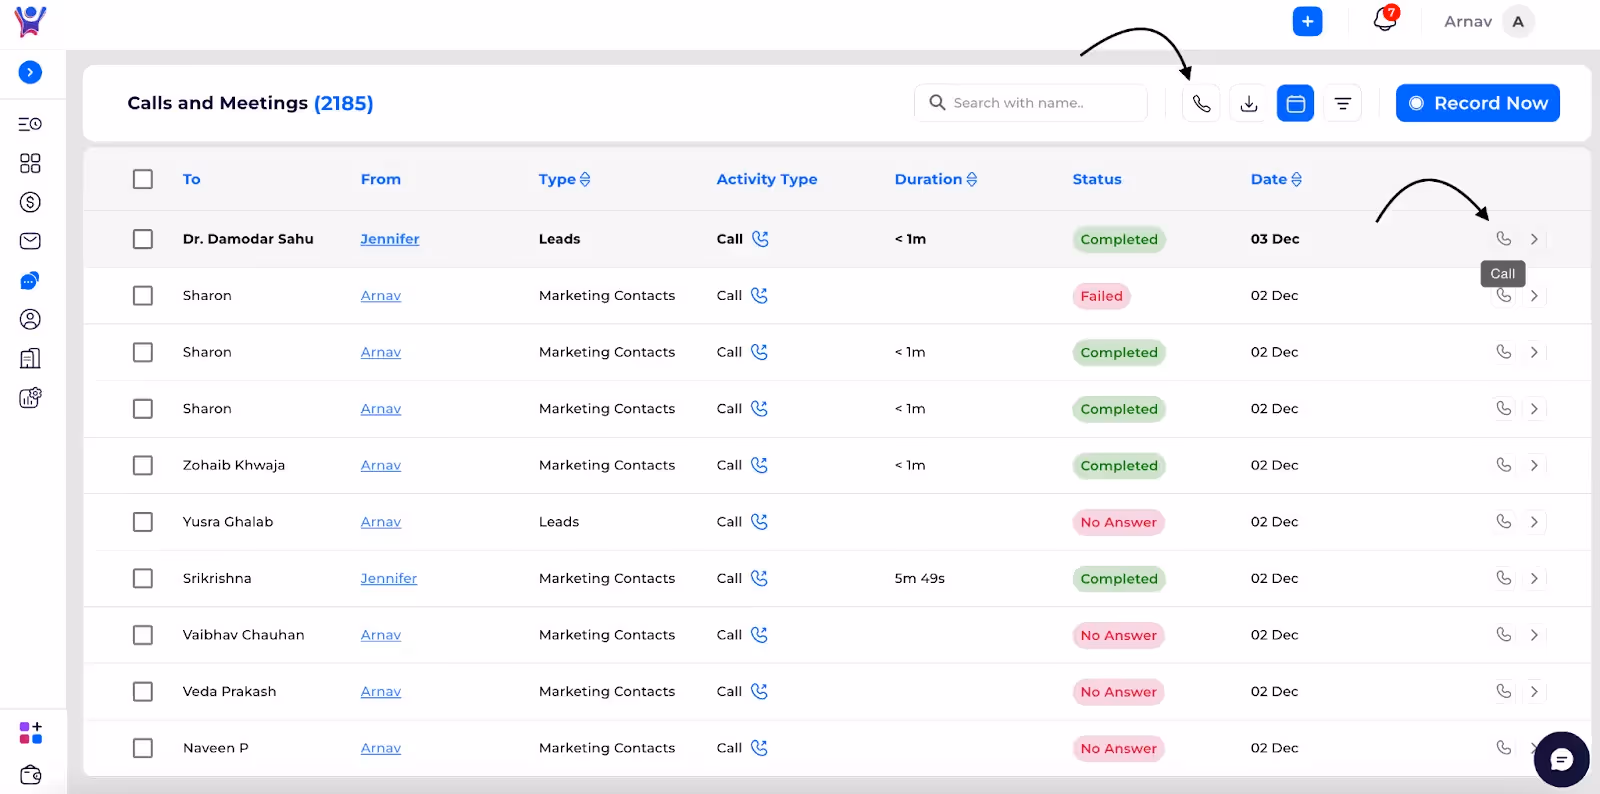
Step 4: Accessing Call Form from Calls and Meetings
From Calls and Meetings List
- Description:
- Click on call icon in corresponding record in list
- Call form opens with the particular participant pre-filled
- Screenshot: (Screenshot 11: Calls and Meetings list with call icon)
- Screenshot: (Screenshot 12: Call form pre-filled from list)

From Calls and Meetings Details Page
- Description:
- Click on 'Complete Task'
- Call form opens with completed call details
- Screenshot: (Screenshot 13: Calls and Meetings details page)
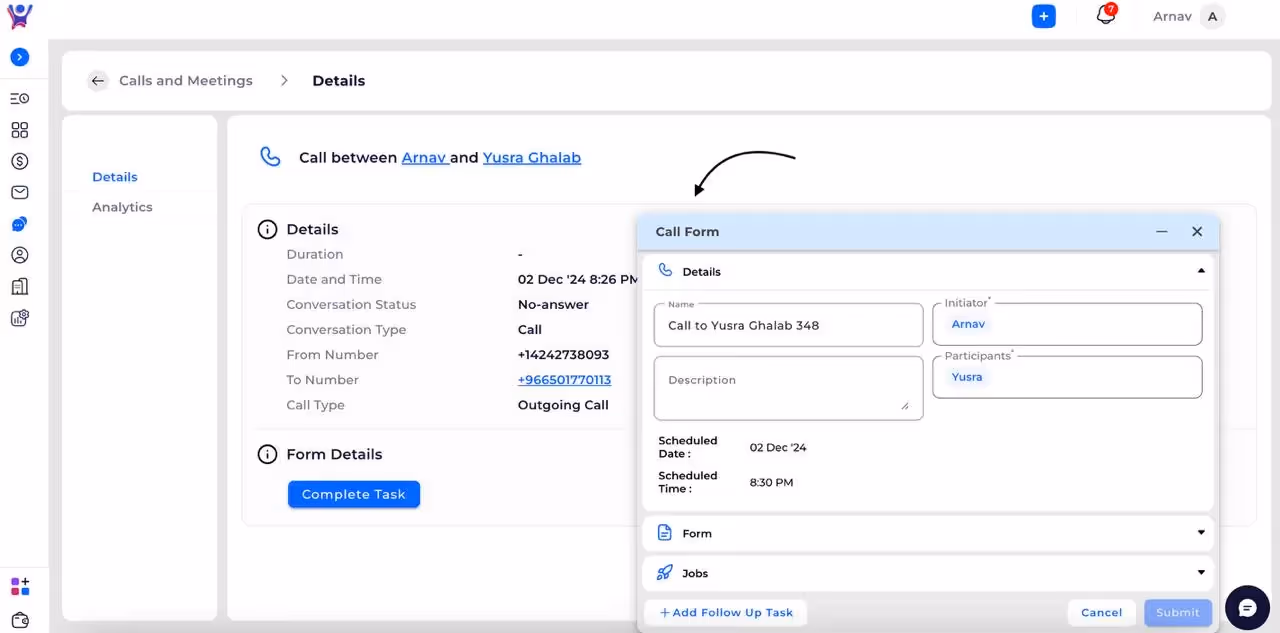
- Screenshot: (Screenshot 14: Call form opened from completed task)
Common Issues and Troubleshooting
- Issue 1: Unable to make instant call
- Solution: Verify participant has a valid mobile number
- Issue 2: Call button not enabling
- Solution: Ensure a participant is selected
FAQs
- Question 1: Can I modify pre-filled participant information?
- Answer: Yes, pre-filled information can be edited before form submission
- Question 2: Why can I only select one participant for a call?
- Answer: Calls are designed for one-to-one communication in this CRM
Need More Help?
- Contact Support: Reach out to Thriwin CRM support team for detailed assistance with Call form navigation and completion.
Make a Call through Call Form
Make a Call - Step-by-Step Comprehensive guide
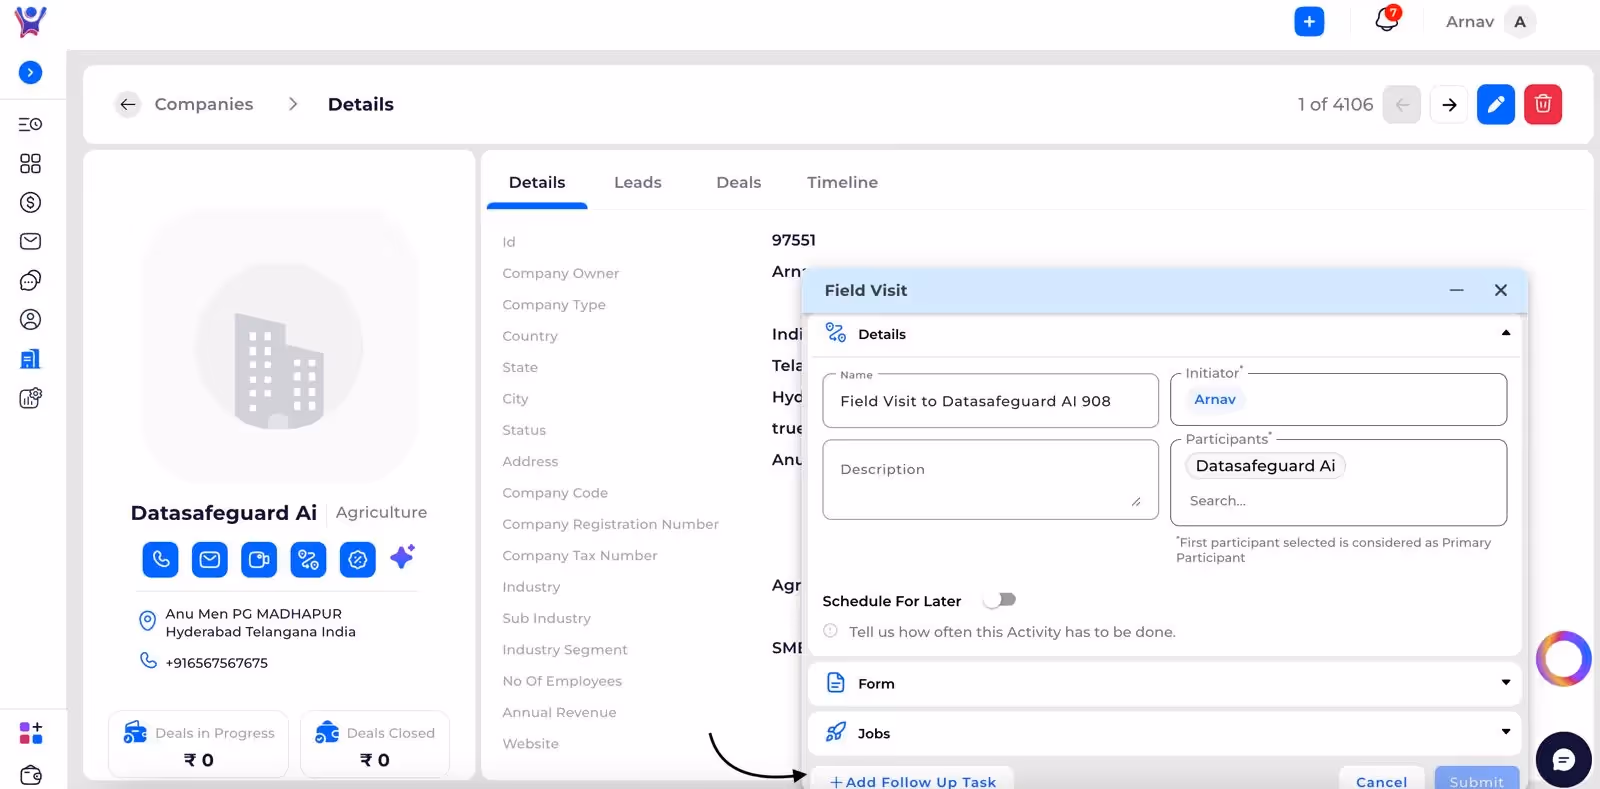
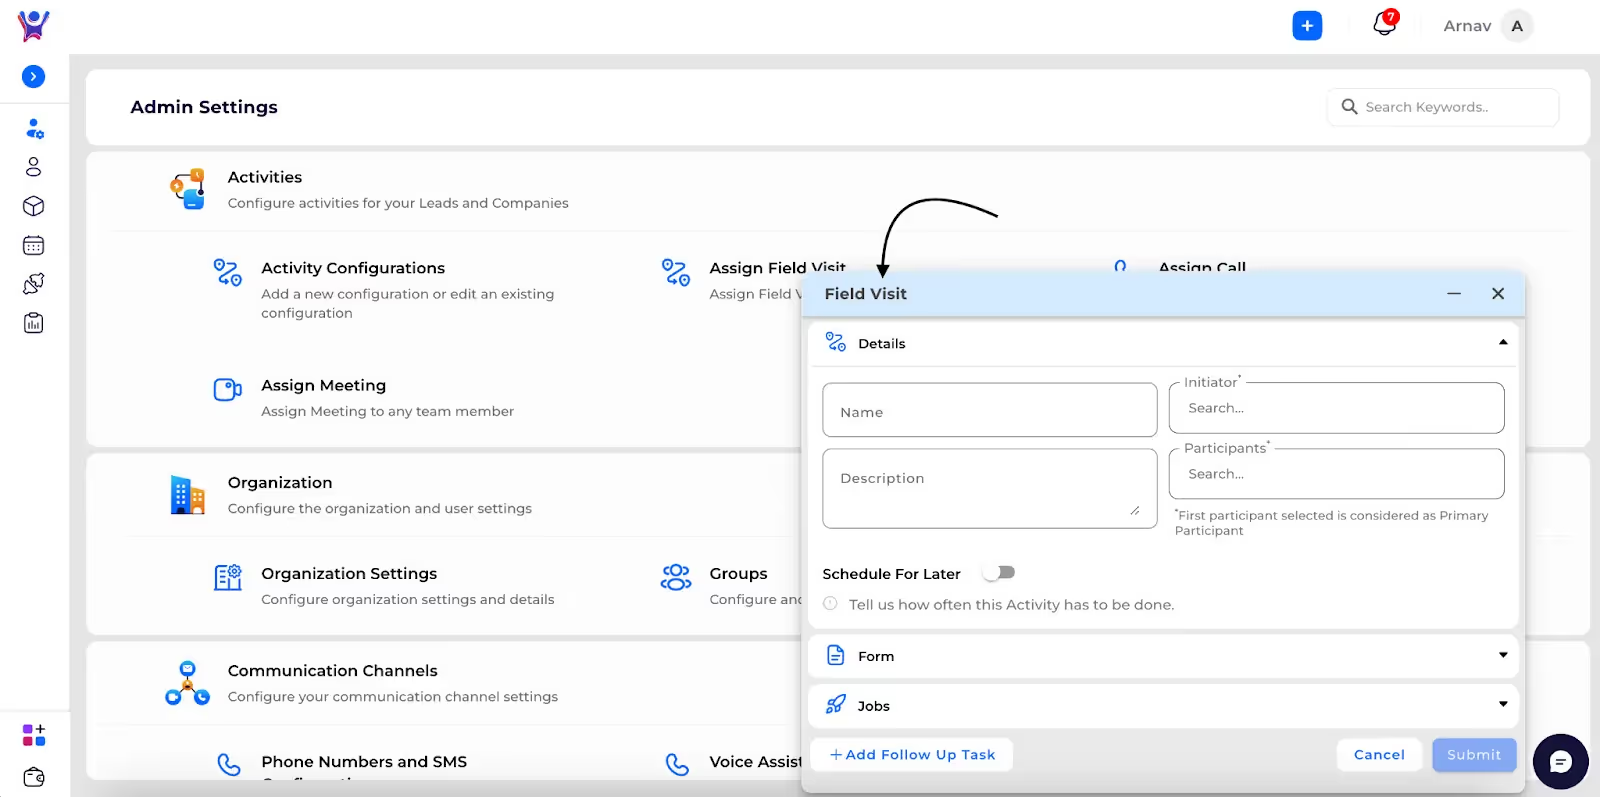
This comprehensive guide explains how to create a Field Visit form in Thriwin CRM, detailing various methods of access and form completion for users.
Accessing Field Visit Form via Toolbar
- Click on '+' icon in the toolbar
- Open the Activities dropdown
- Select 'Field Visit' option
- Screenshot:
- Screenshot (1): Toolbar with '+' icon
- Screenshot (2): Field Visit form after clicking on Field Visit icon in activity dropdown
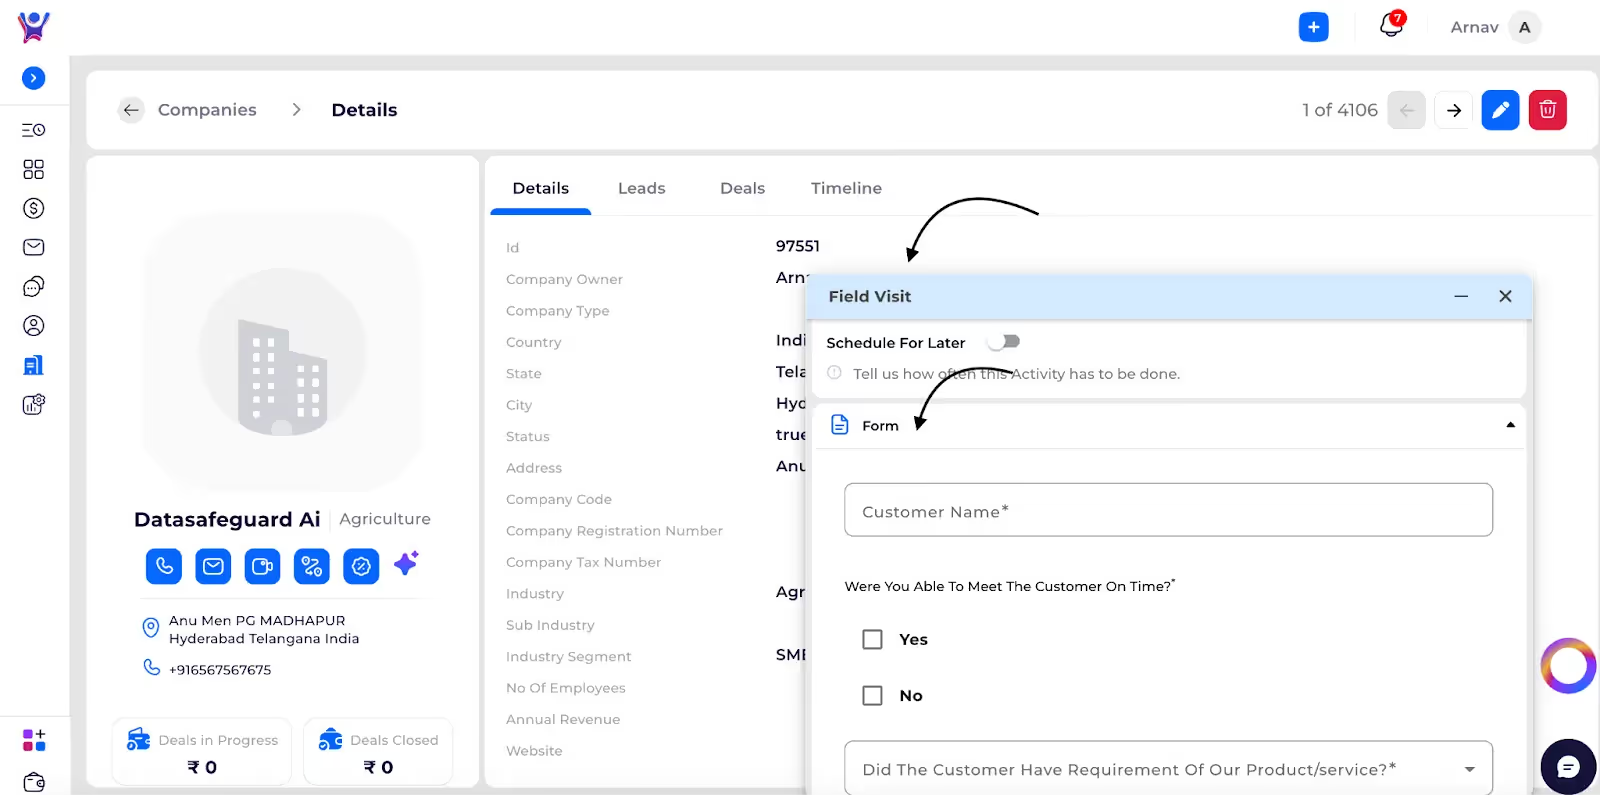
Accessing Field Visit Form from Entity Details Pages
Company Details Page
- Description:
- Navigate to specific Company details page
- Click on Field Visit icon
- Company Name automatically pre-fills in participants field
- Screenshot:
- Screenshot (3): Field Visit icon in Company details page

- Screenshot (4): Field Visit form with Company Name pre-filled

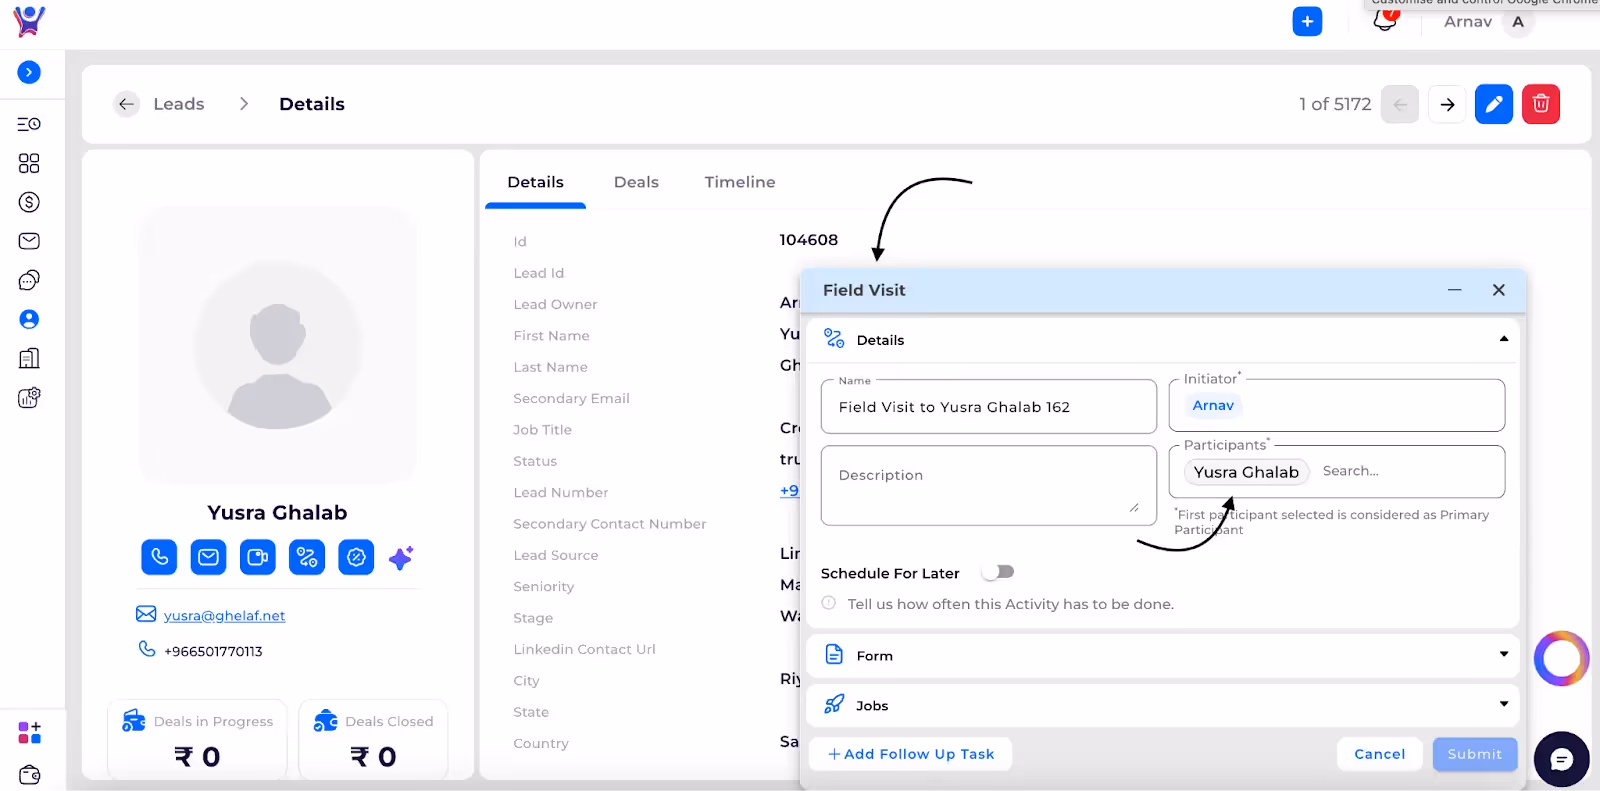
Lead Details Page
- Description:
- Open specific Lead details page
- Click on Field Visit icon
- Lead Name automatically pre-fills in participants field
- Screenshot:
- Screenshot (5): Field Visit icon in Lead details page
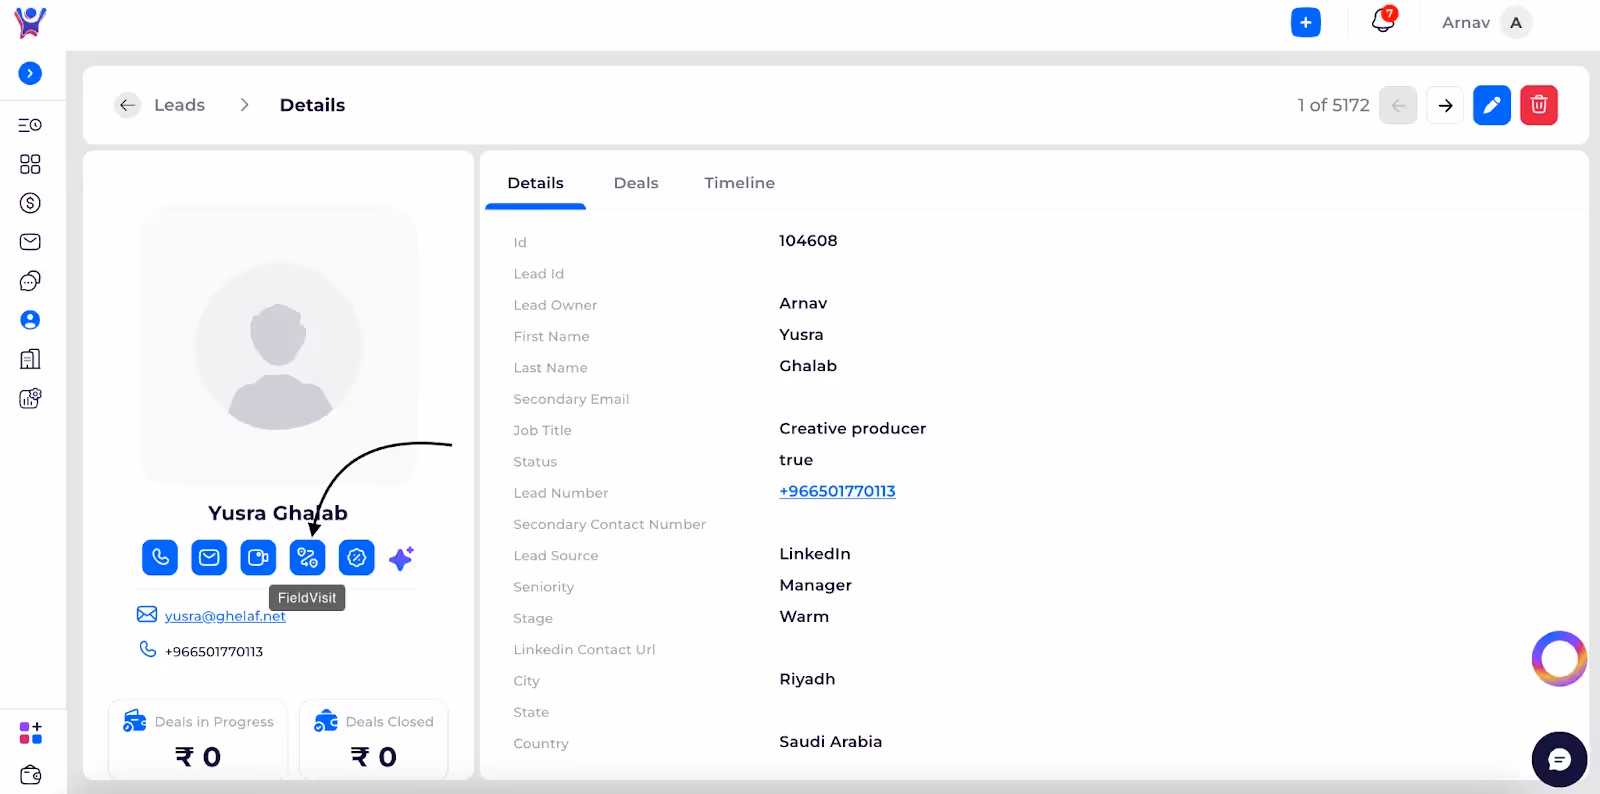
- Screenshot (6): Field Visit form with Lead Name pre-filled
Deals Details Page
- Description:
- Navigate to specific Deal details page
- Click on Field Visit icon
- Corresponding Deal's Leads automatically pre-fill in participants field
- Screenshot:
- Screenshot (7): Field Visit icon in Deals details page

- Screenshot (8): Field Visit form with Deal Leads pre-filled

Marketing Contacts Details Page
- Description:
- Open specific Marketing Contact details page
- Click on Field Visit icon
- Marketing Contact name automatically pre-fills in participants field
- Screenshot:
- Screenshot (9): Field Visit icon in Marketing Contacts details page

- Screenshot (14): Field Visit form with Marketing Contact pre-filled

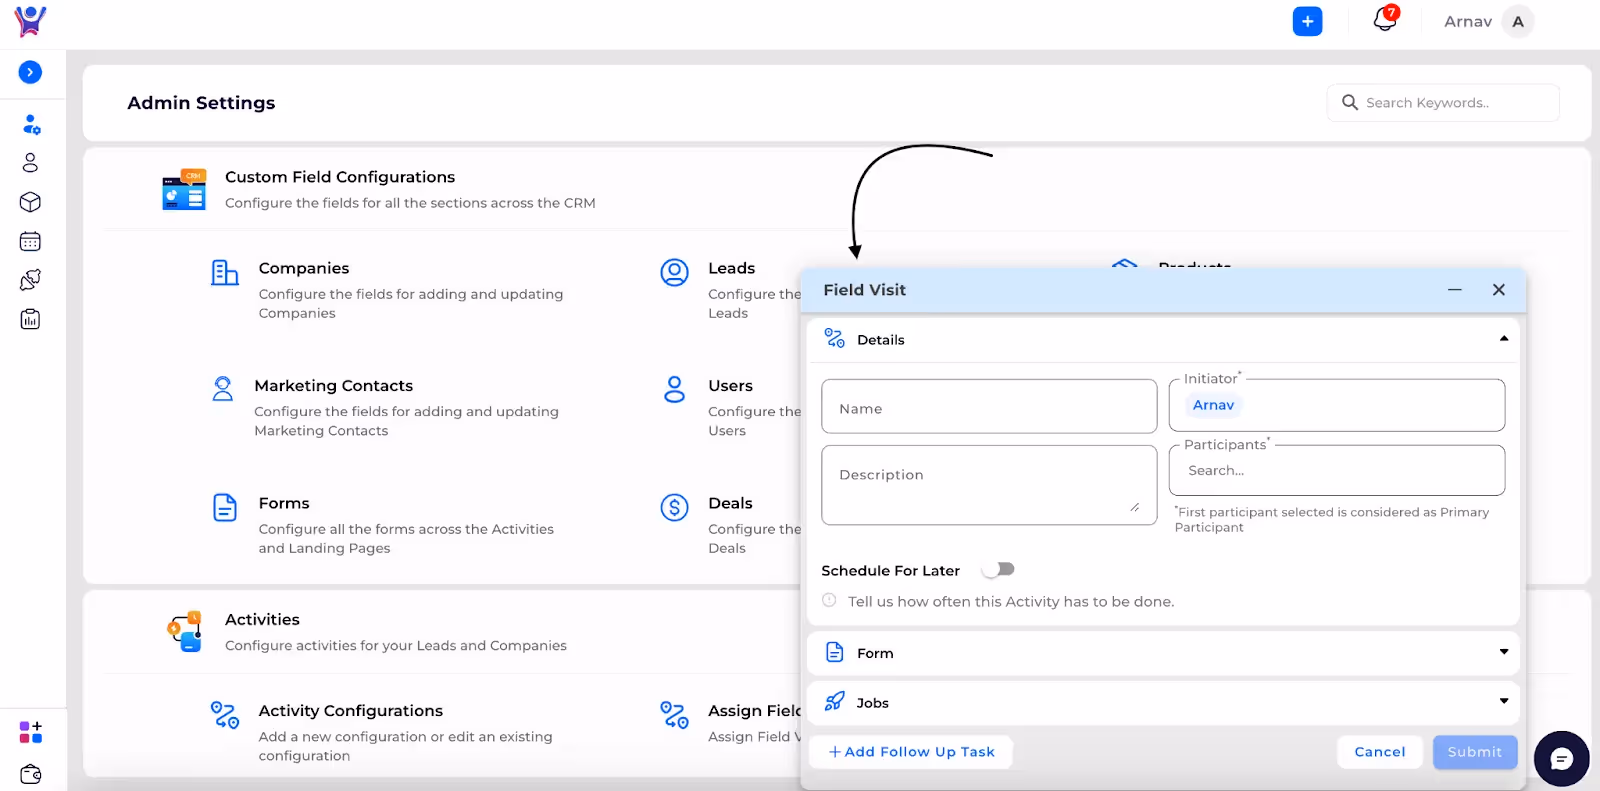
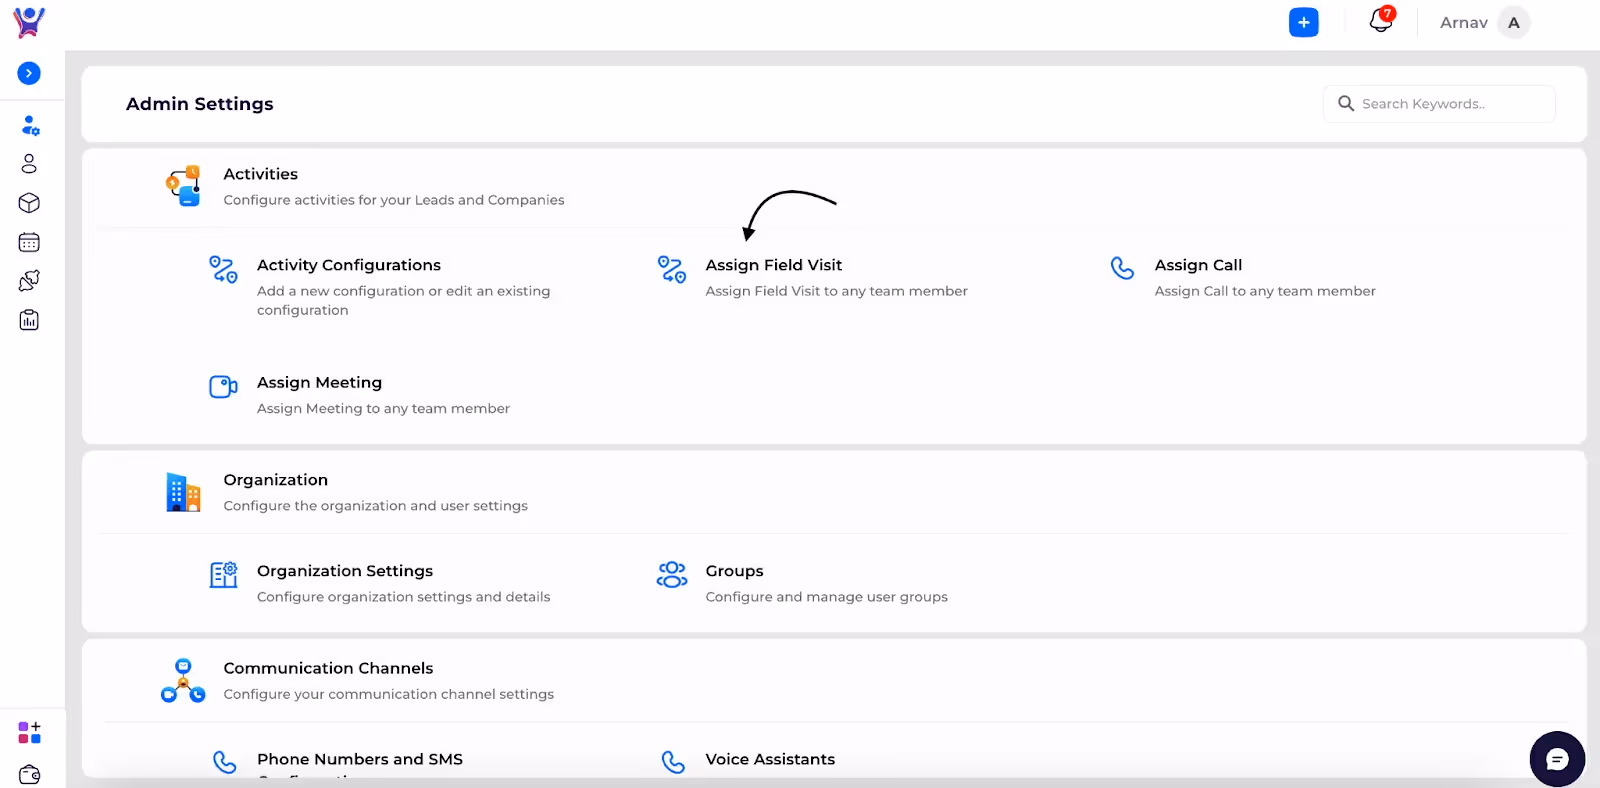
Accessing Field Visit Form from Admin Settings
- Description:
- Navigate to Admin Settings
- Select 'Assign Field Visit'
- No fields are pre-filled
- Admin must manually enter all required information
- Considered as an administrative task
- Screenshot:
- Screenshot (10): 'Assign Field Visit' option
- Screenshot (11): Blank Field Visit form in Admin Settings
Common Issues and Troubleshooting
- Issue 1: Fields not pre-filling correctly
- Solution: Verify correct entity is selected before opening Field Visit form
- Issue 2: Unable to save Field Visit forms
- Solution: Ensure all required fields are completed
FAQs
- Question 1: Can I modify pre-filled participant information?
- Answer: Yes, pre-filled information can be edited before form submission
- Question 2: Is Field Visit form the same across different access methods?
- Answer: Core form remains consistent, with variations in pre-filling based on access point
Need More Help?
- Contact Support: Reach out to Thriwin CRM support team for detailed assistance with Field Visit form navigation and completion.
create a Field Visit
Create a field Visit- Comprehensive guide
This guide will help you in setting up KPI Targets and tracking those KPI’s.
Set Target For KPI
- Set targets for the specific KPI .
- To set a target for specific KPI we have to navigate to the KPI list, by selecting the channel as sales CRM and then selecting the KPI list from the performance management section.

- Now in the KPI list click on the action button on the KPI which you want to set target and select the set target button this will open the form pop up.
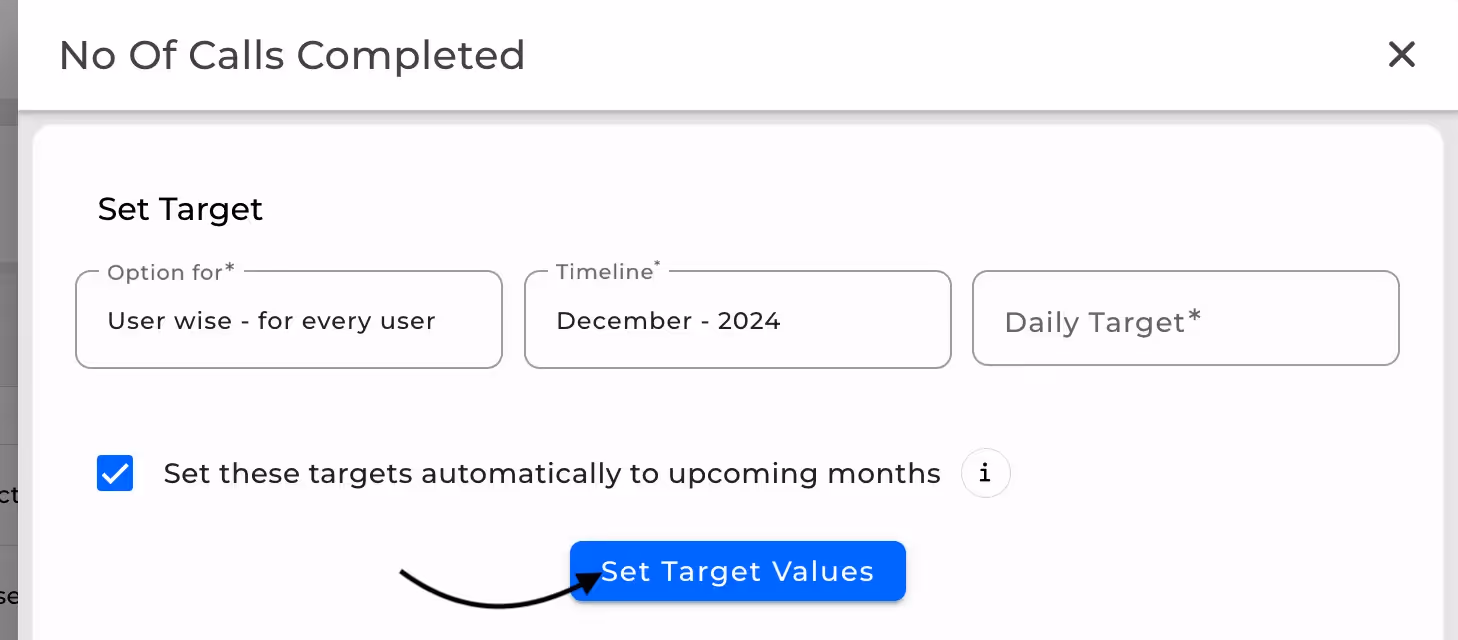
- You can set for different timelines month wise and also select configuration whether the target is set for each individual user or across all users split the target.
- Then click on the ‘Set Target Values’ button.
- This will redirect you to KPI Details where targets are set for that respective timeline up to the month end along with total.

- You can also view the achieved values for the KPI by toggling the achieved button, this will display all the achieved values for the users.
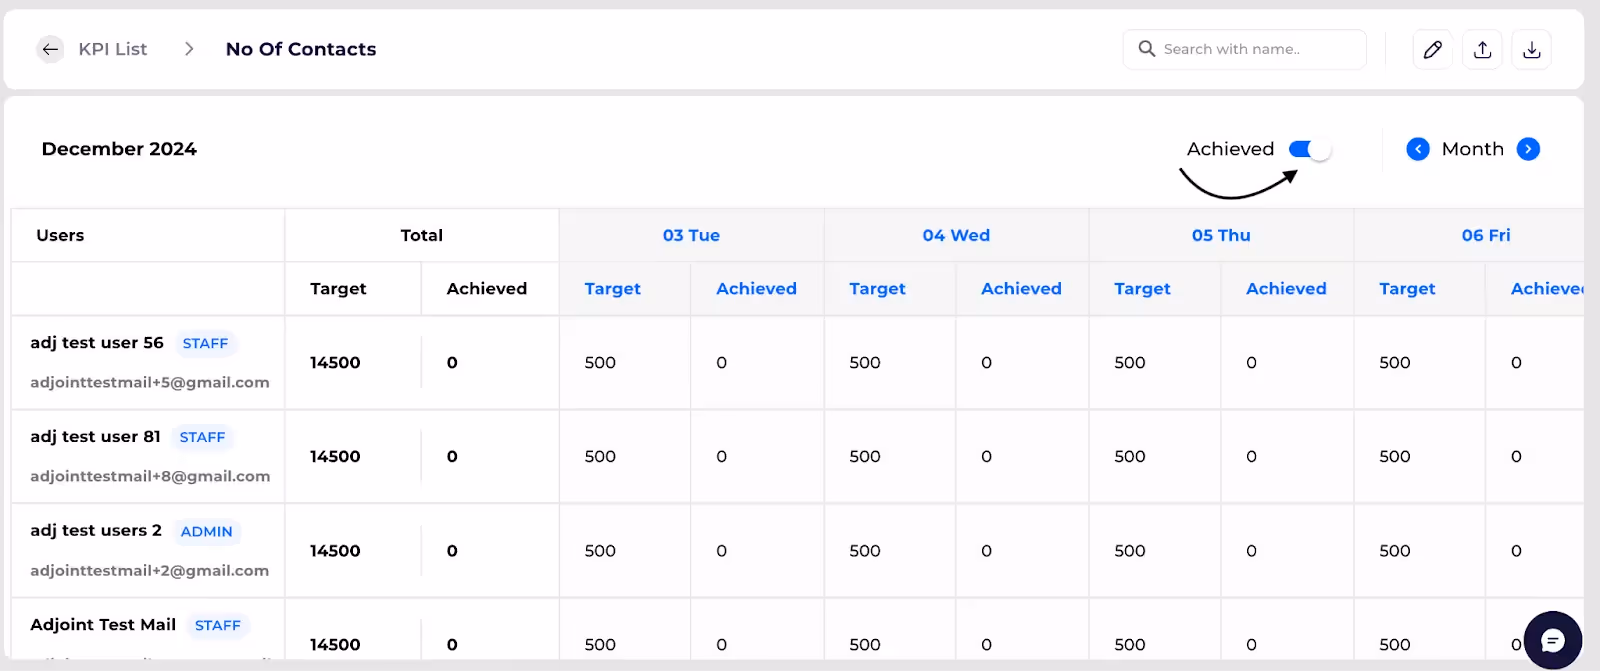
User wise performance
- Navigate to user wise performance from the performance management section.some text
- In the user wise performance screen we can see how different users are performing with respect to their target and how much they have achieved.

- We can also change the month wise timeline by clicking on the timeline button as shown below.

- We can also view the graph analysis of the performance of users by clicking on the KPI Details.
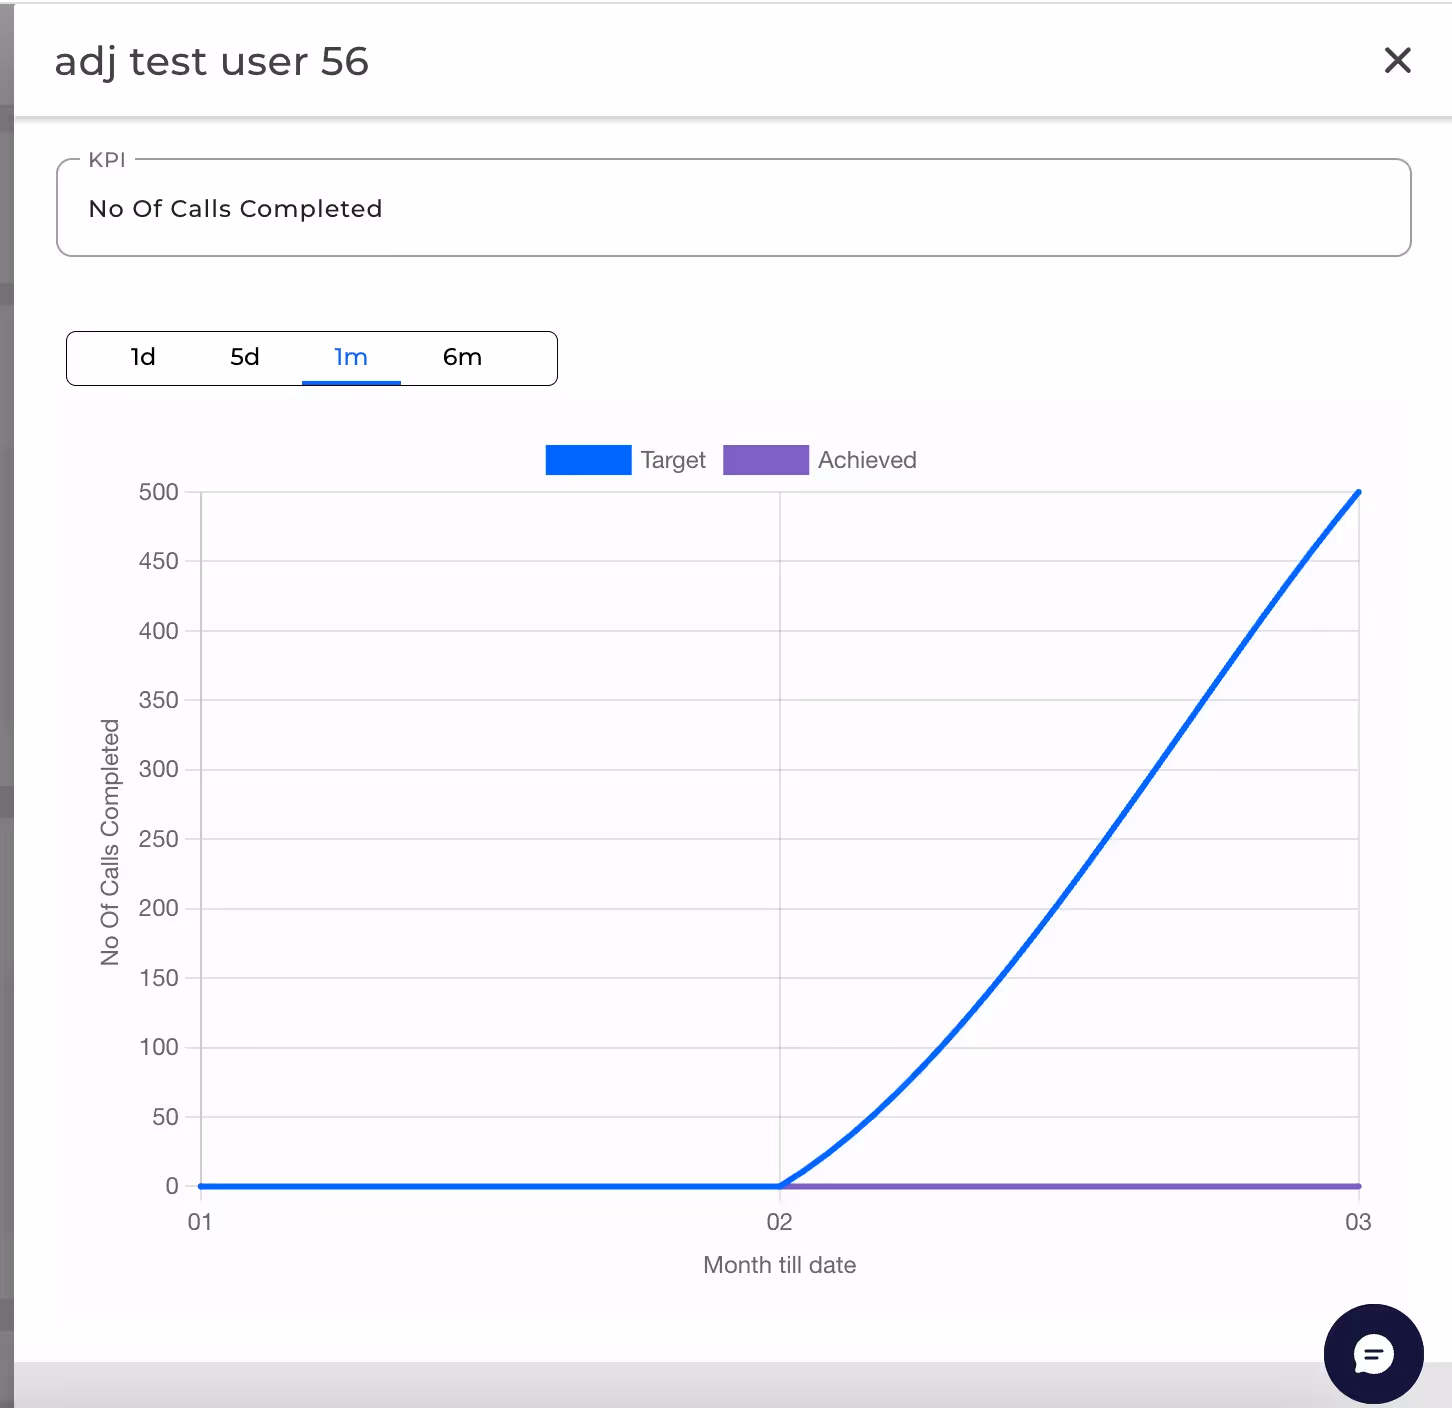
- We can toggle the timeline and see performance for the user in that timeline.
Need More Help?
- Contact Support: Contact our support team Thriwin CRM support team for further details.
KPI Targets and tracking those KPI’s.
A Complete Guide to Setting and Tracking KPI Target
Builder View
Switch Layout
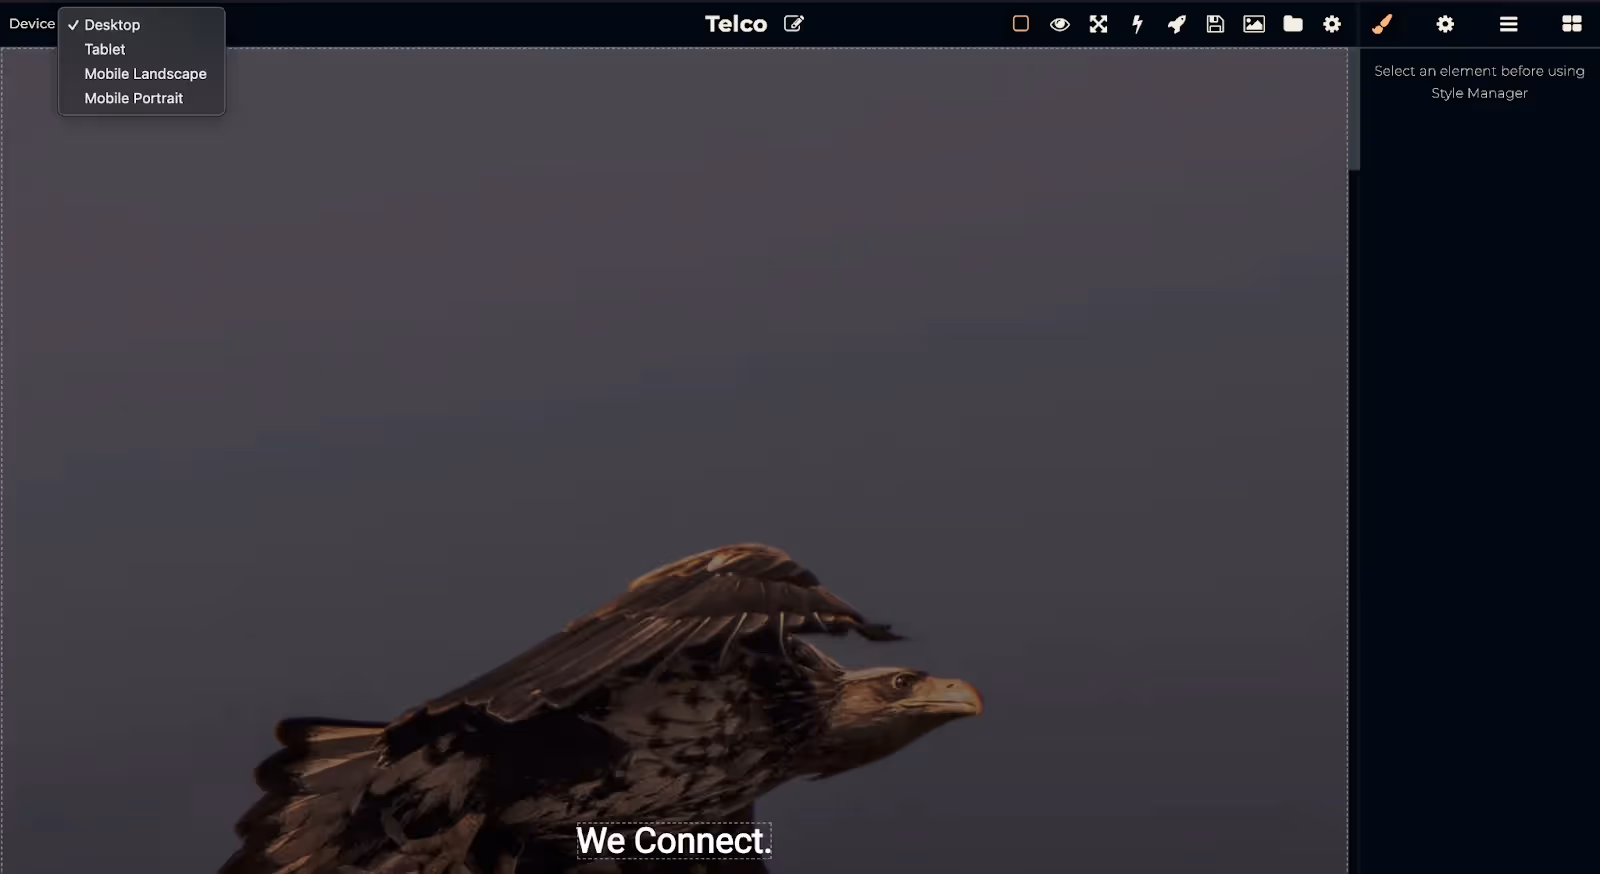
- Click on the device icons in the top-left corner of the page builder to switch between different device layouts, such as desktop, tablet, and mobile views. This allows you to preview how the landing page will look on various devices and make necessary adjustments to ensure a responsive design.
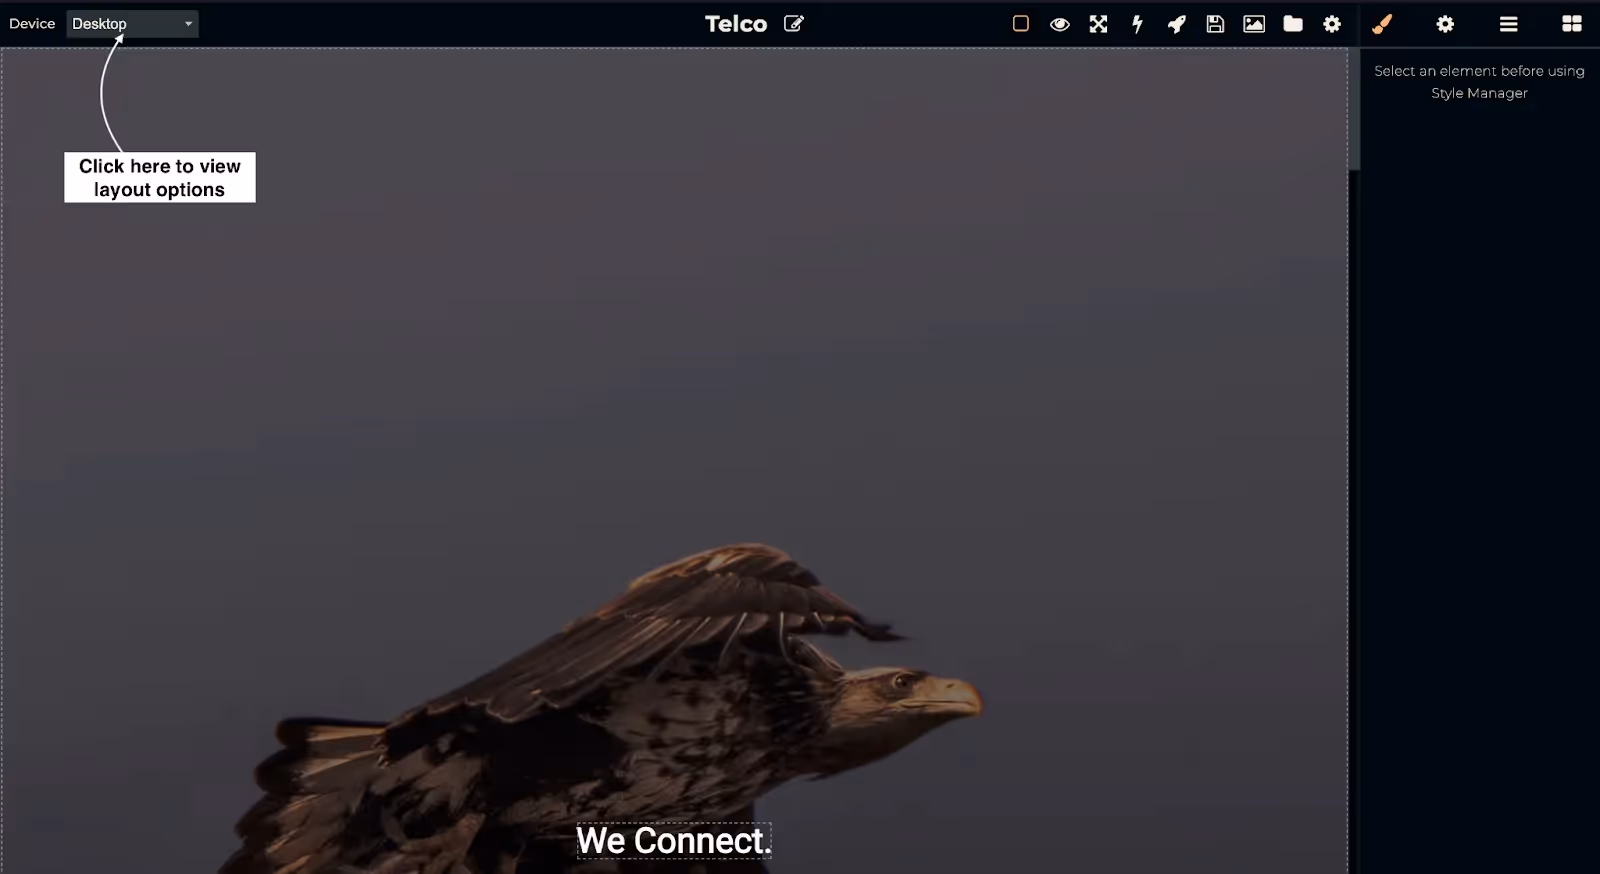
- From the dropdown in the top-left corner of the builder, select the desired device layout (Desktop, Tablet, Mobile). This enables you to view and edit the landing page for that specific device layout, ensuring the design and content are optimized for each device type.
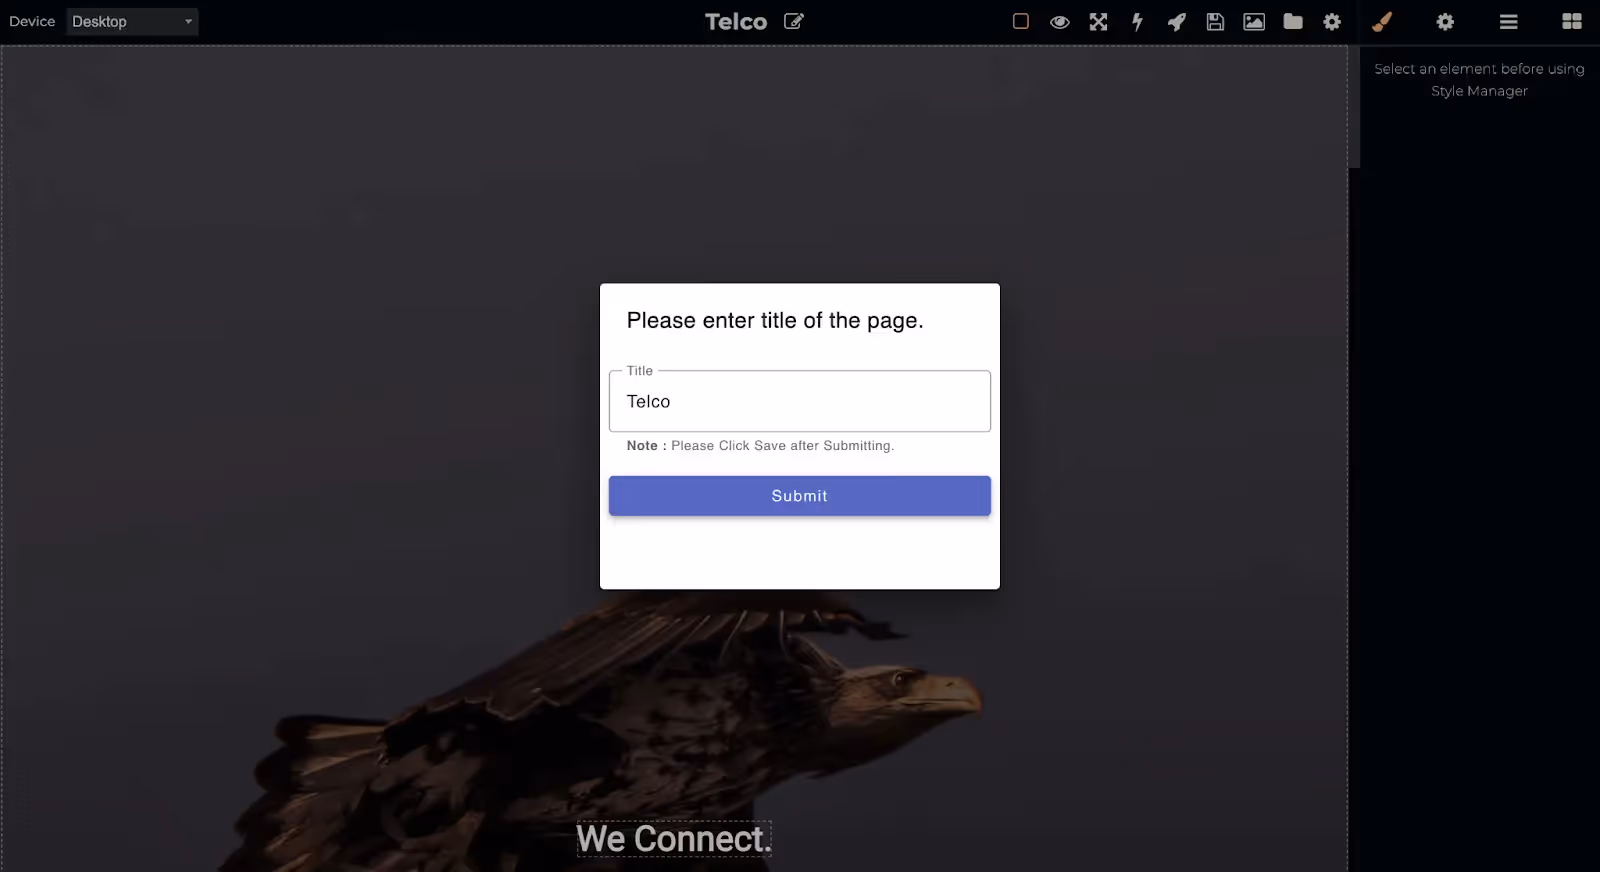
Edit Page Title
- Click the pencil icon located at the top center of the builder, next to the page name. This allows you to edit and rename the page to your desired title.

Step 2 :
- A pop-up will appear with the current name pre-filled. Update the name as needed and click on Submit to save the changes.
Save Page
Step 1 :
- Click on the Save button to save the current state of the page.

Publish Page
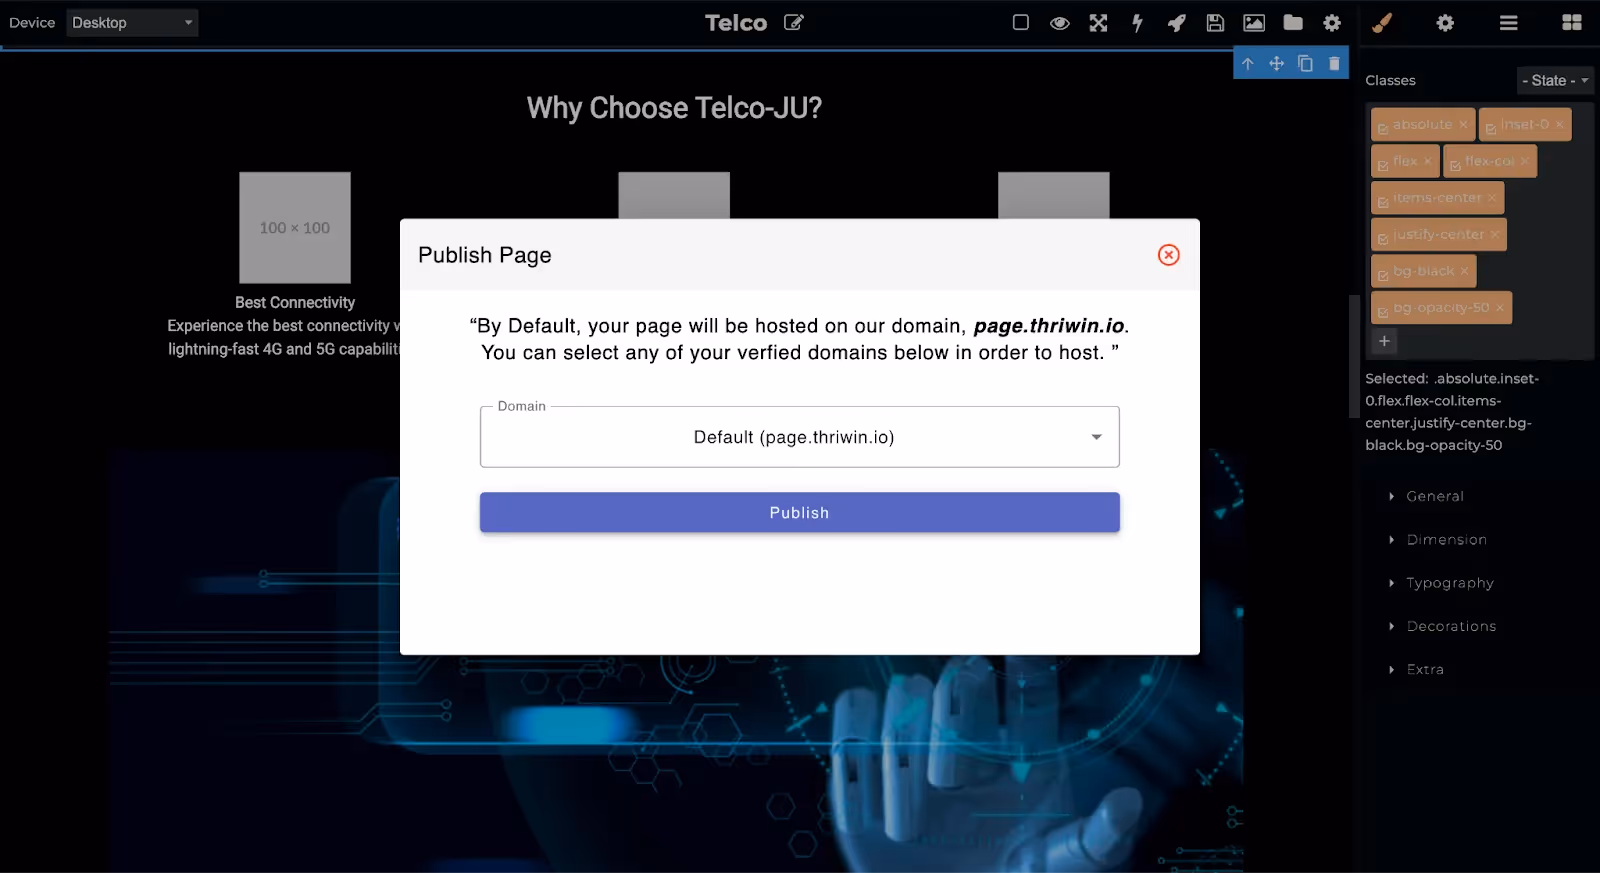
- Click on the Rocket icon in the top bar to save and publish the current version of the page.
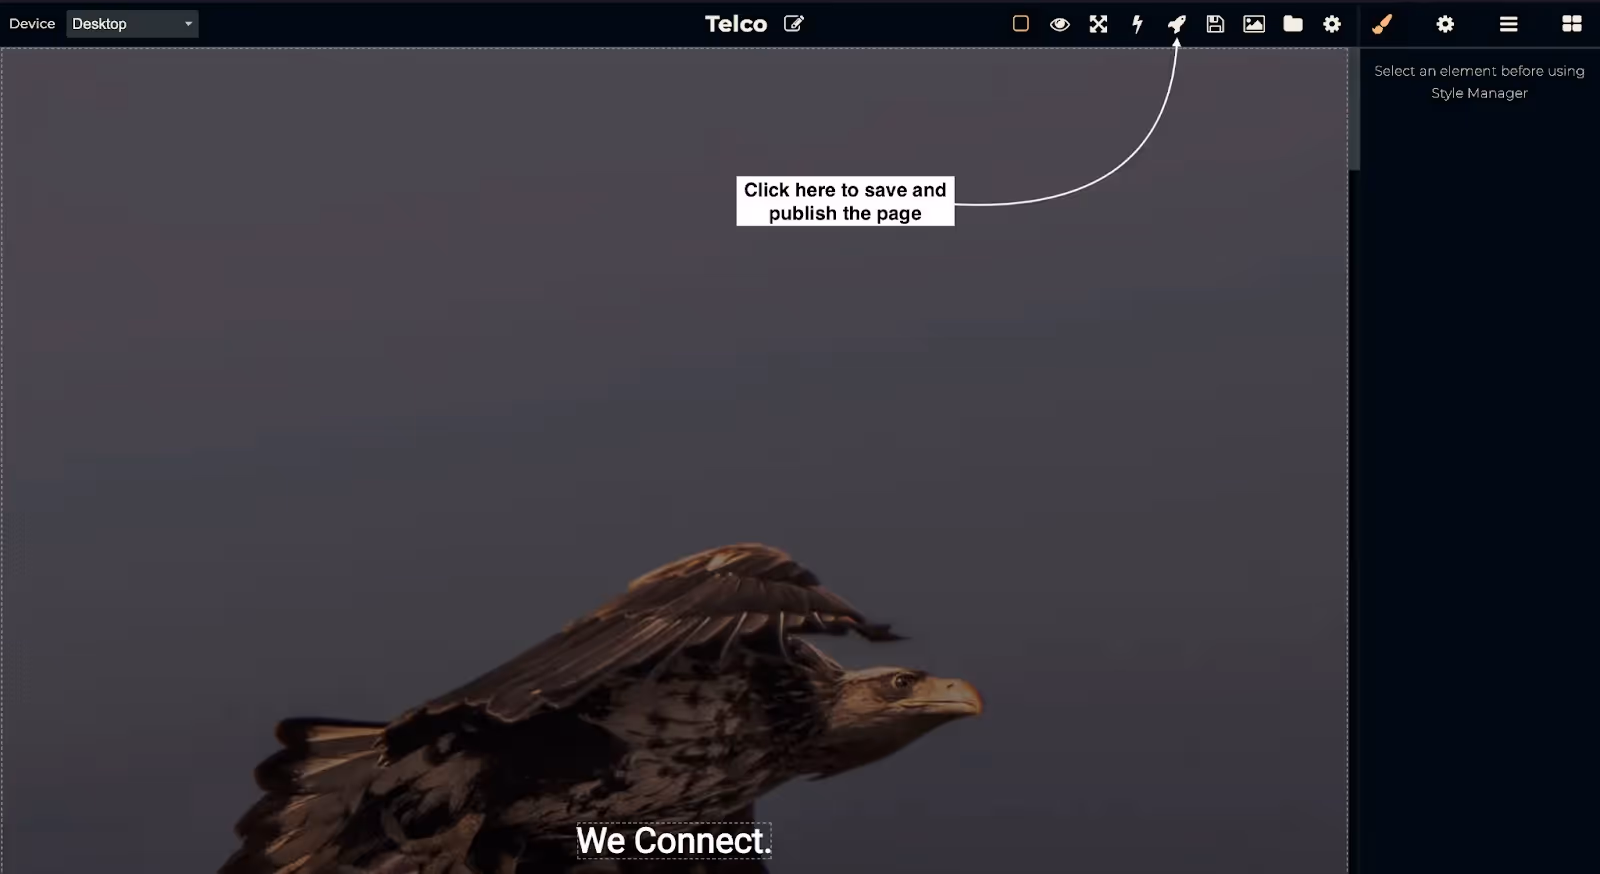
- If the page has not been configured for publishing, a pop-up will appear requesting essential details such as page title, slug, and description for SEO optimization. Complete the required fields and click Submit to publish the page.

- After submitting the SEO details, you'll be redirected to the domain selection screen. All connected and available domains for publishing will be displayed. By default, page.thriwin.io is selected. You can change the domain if needed and click Publish. This will generate and provide the final published URL for the page.
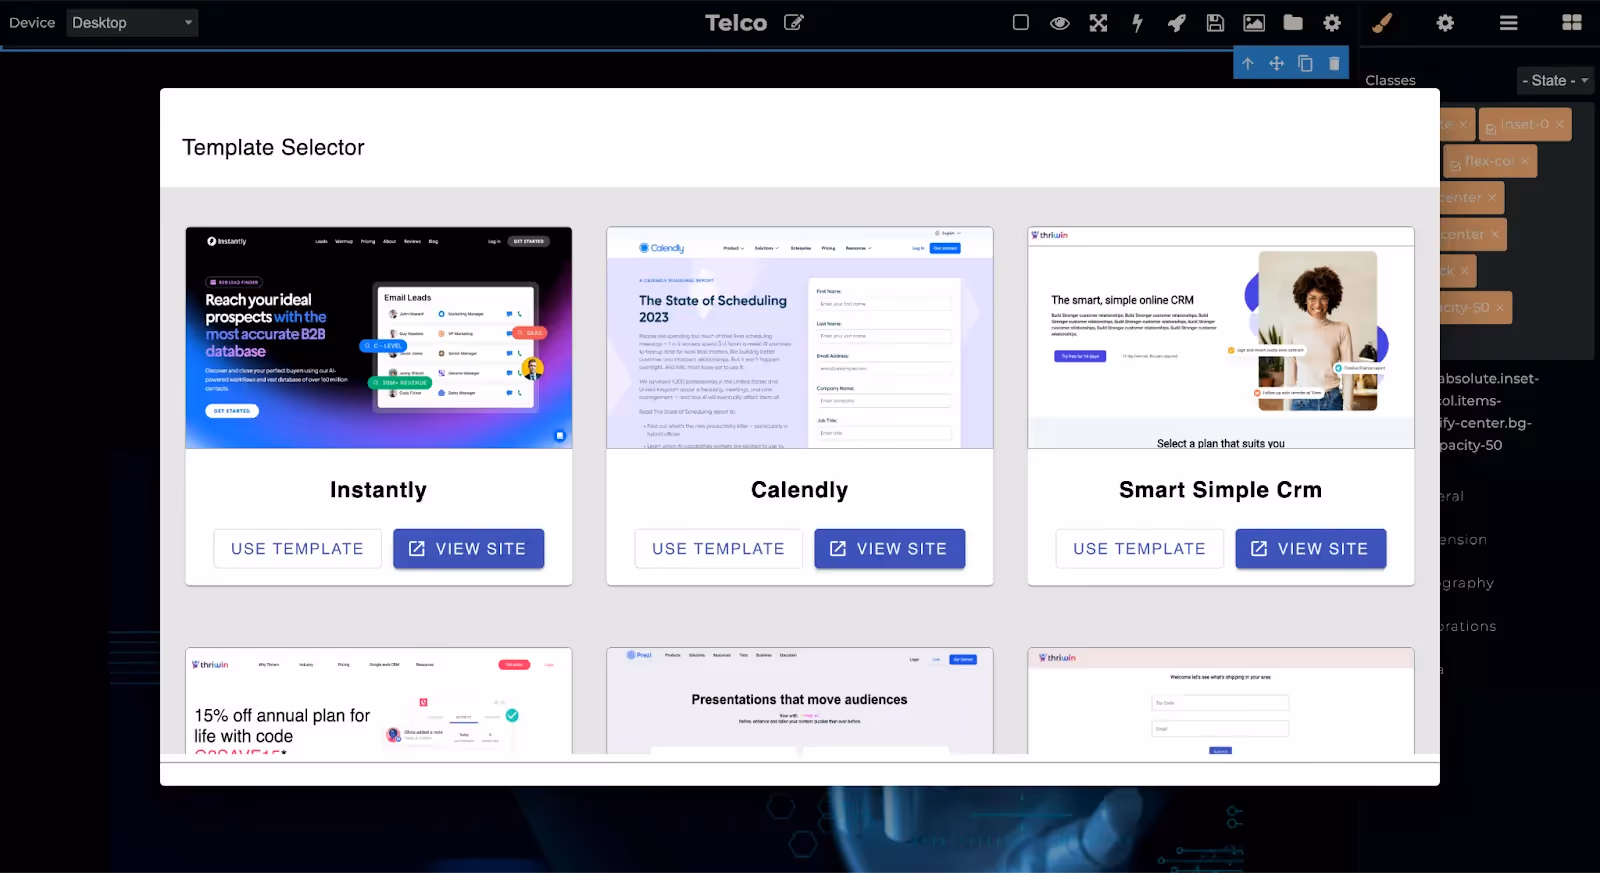
Template Selection
- Locate and click the template selector icon in the top toolbar. The icon appears as a folder/document symbol, positioned near the right side of the top menu bar.
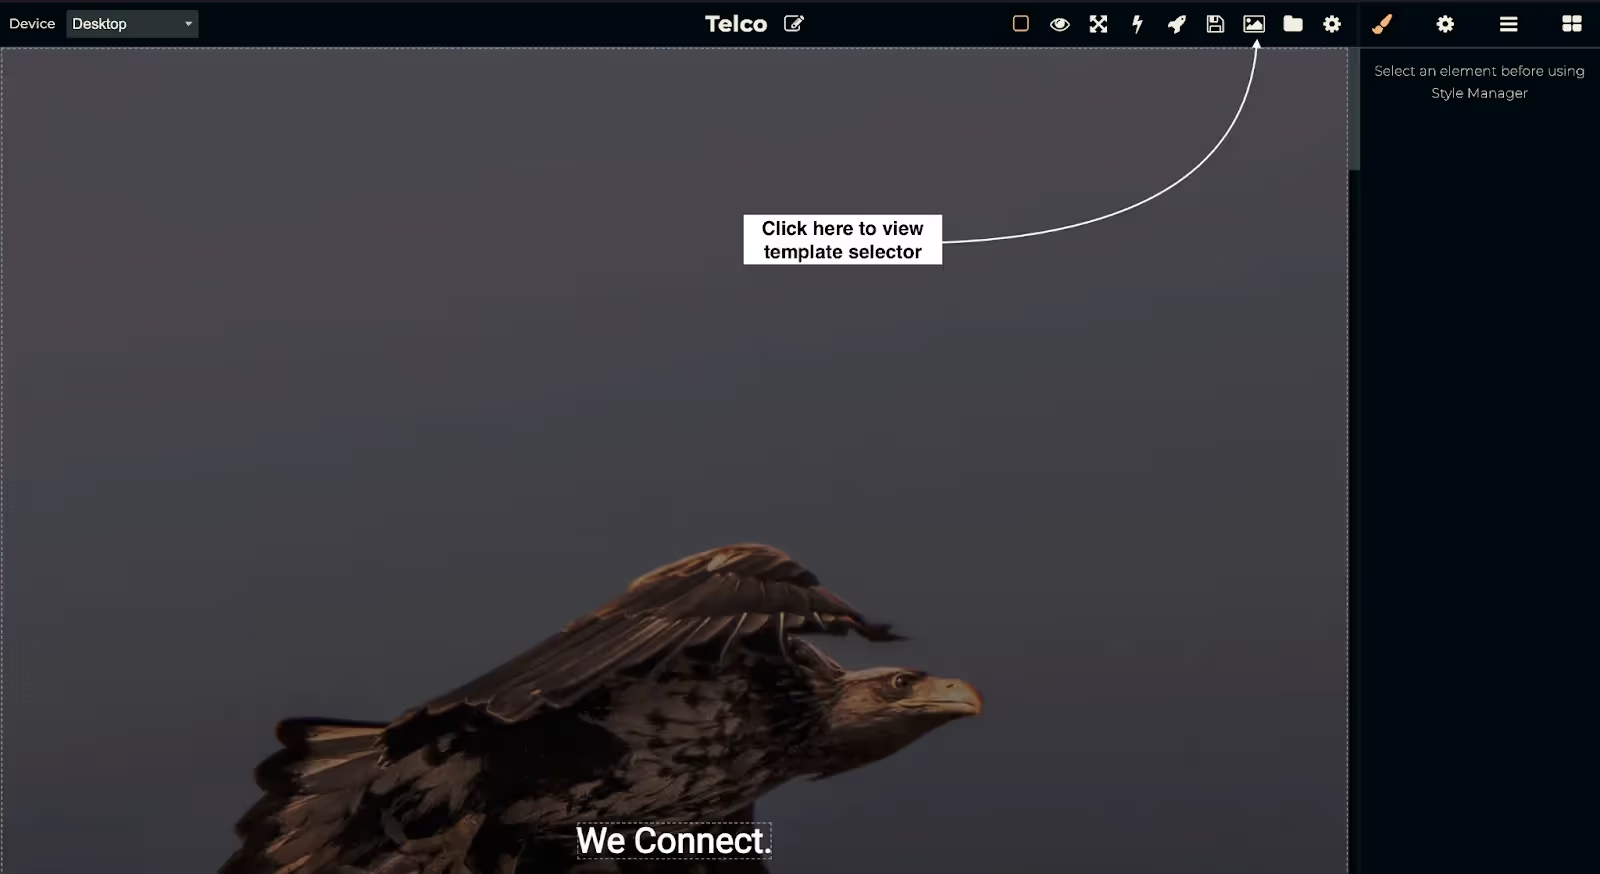
- Pick the desired template from the list displayed on the page, as shown in the image below. This template will serve as the foundation for creating your landing page.
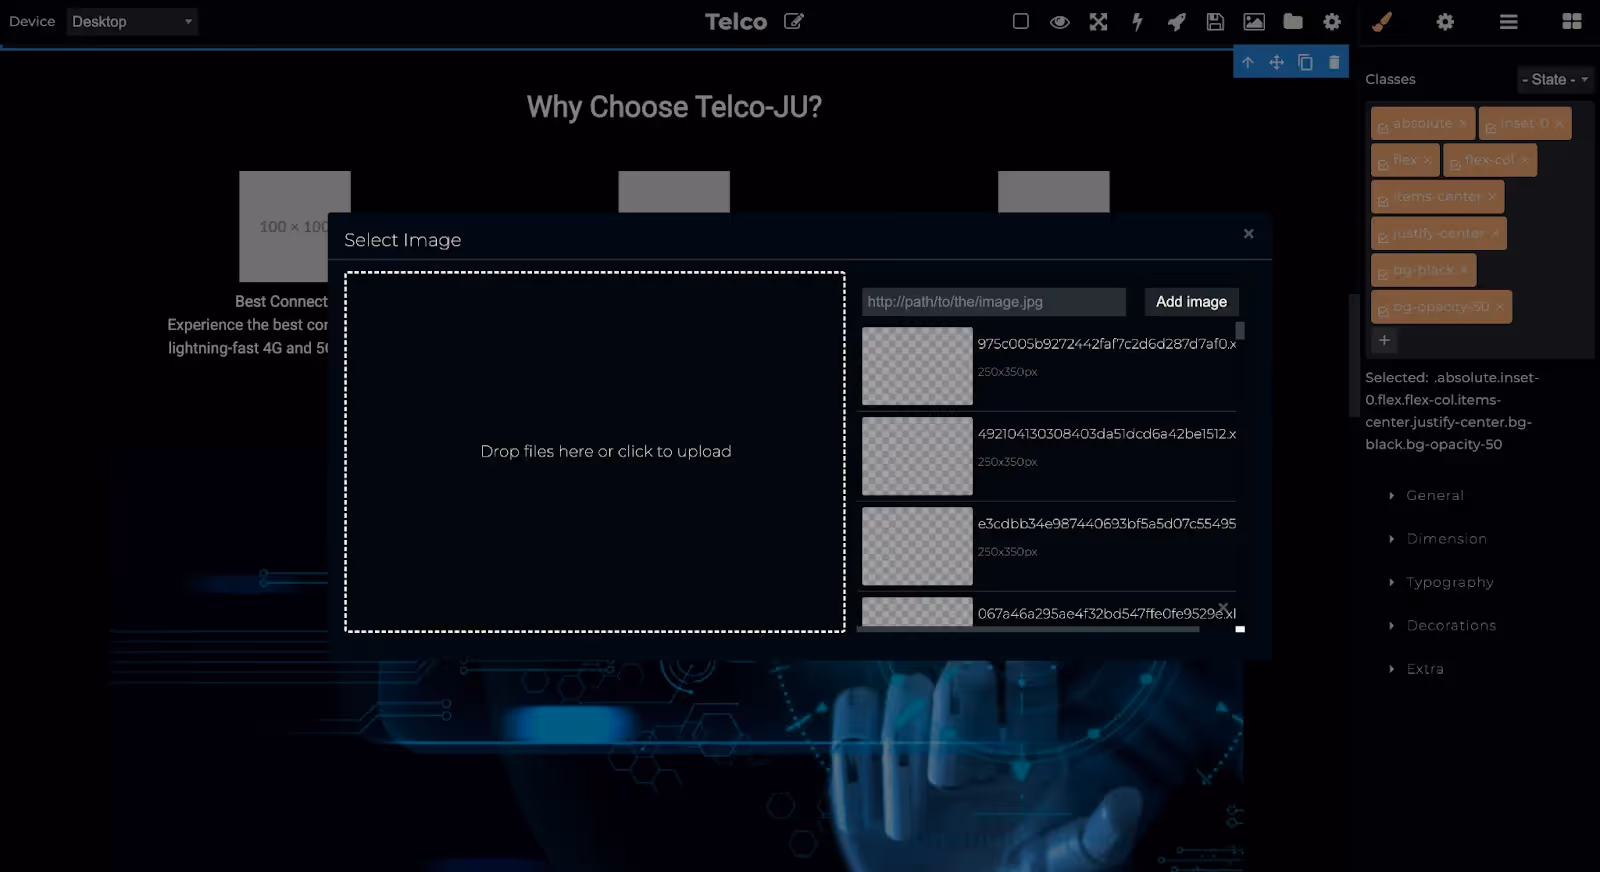
Asset Upload
- Access the Asset Manager by clicking the icon in the top toolbar. The icon is located near the right side of the top menu bar.
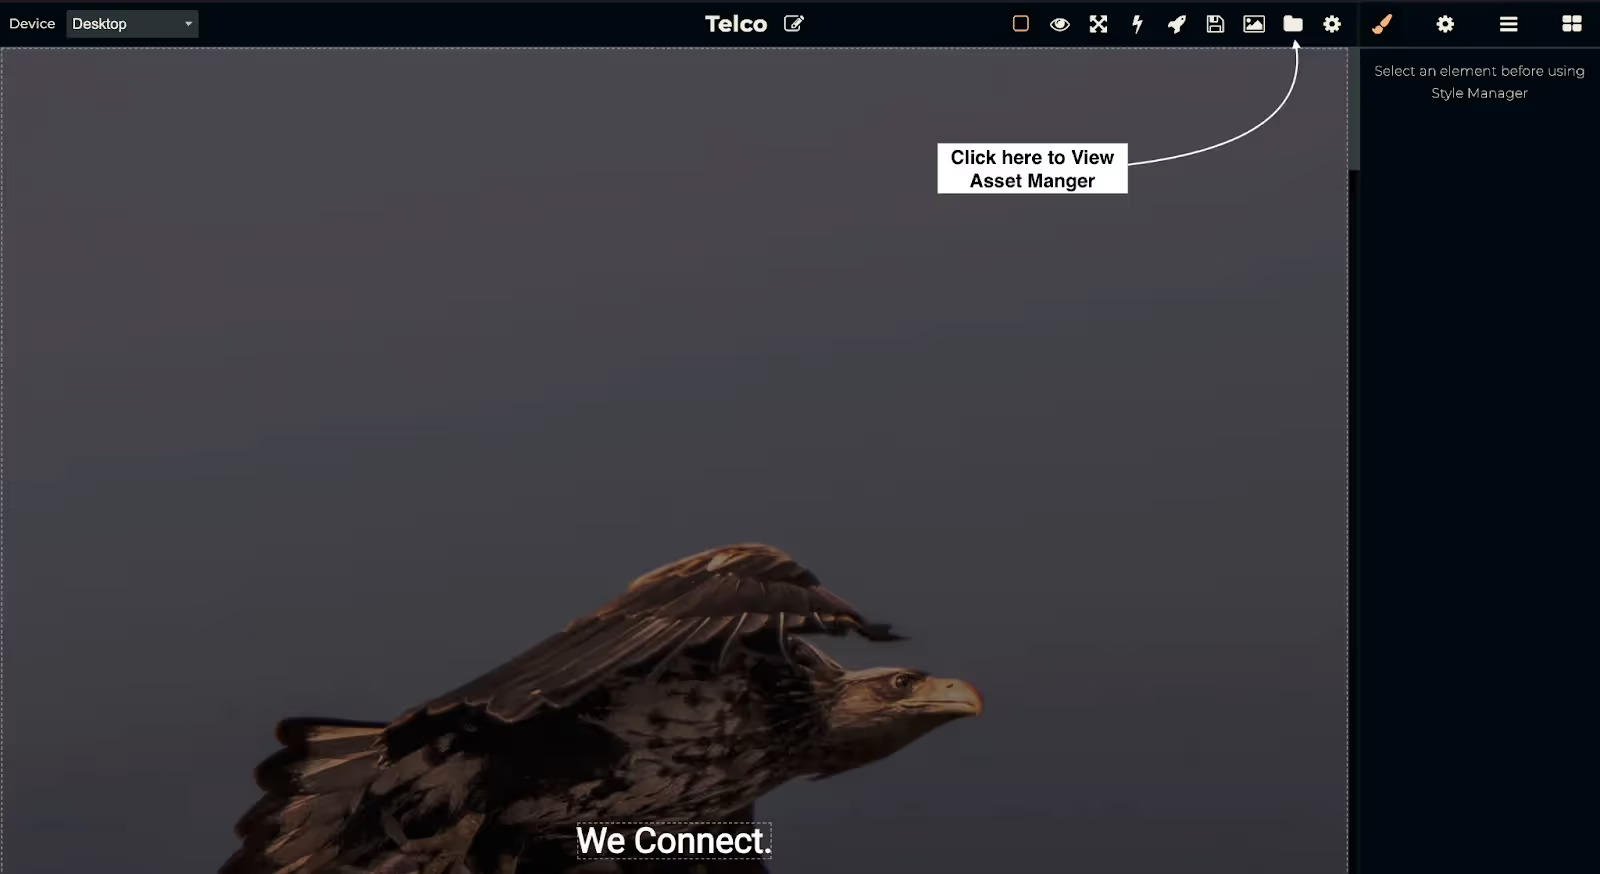
- Select existing images from asset manager, or upload new images by clicking the Add Image button. This will allow you to personalize your landing page with the appropriate visuals.
Preview Page
- The preview icon can be found in the upper-right portion of the screen, displayed as an eye symbol. This preview feature is essential for ensuring your content appears as intended before publishing.

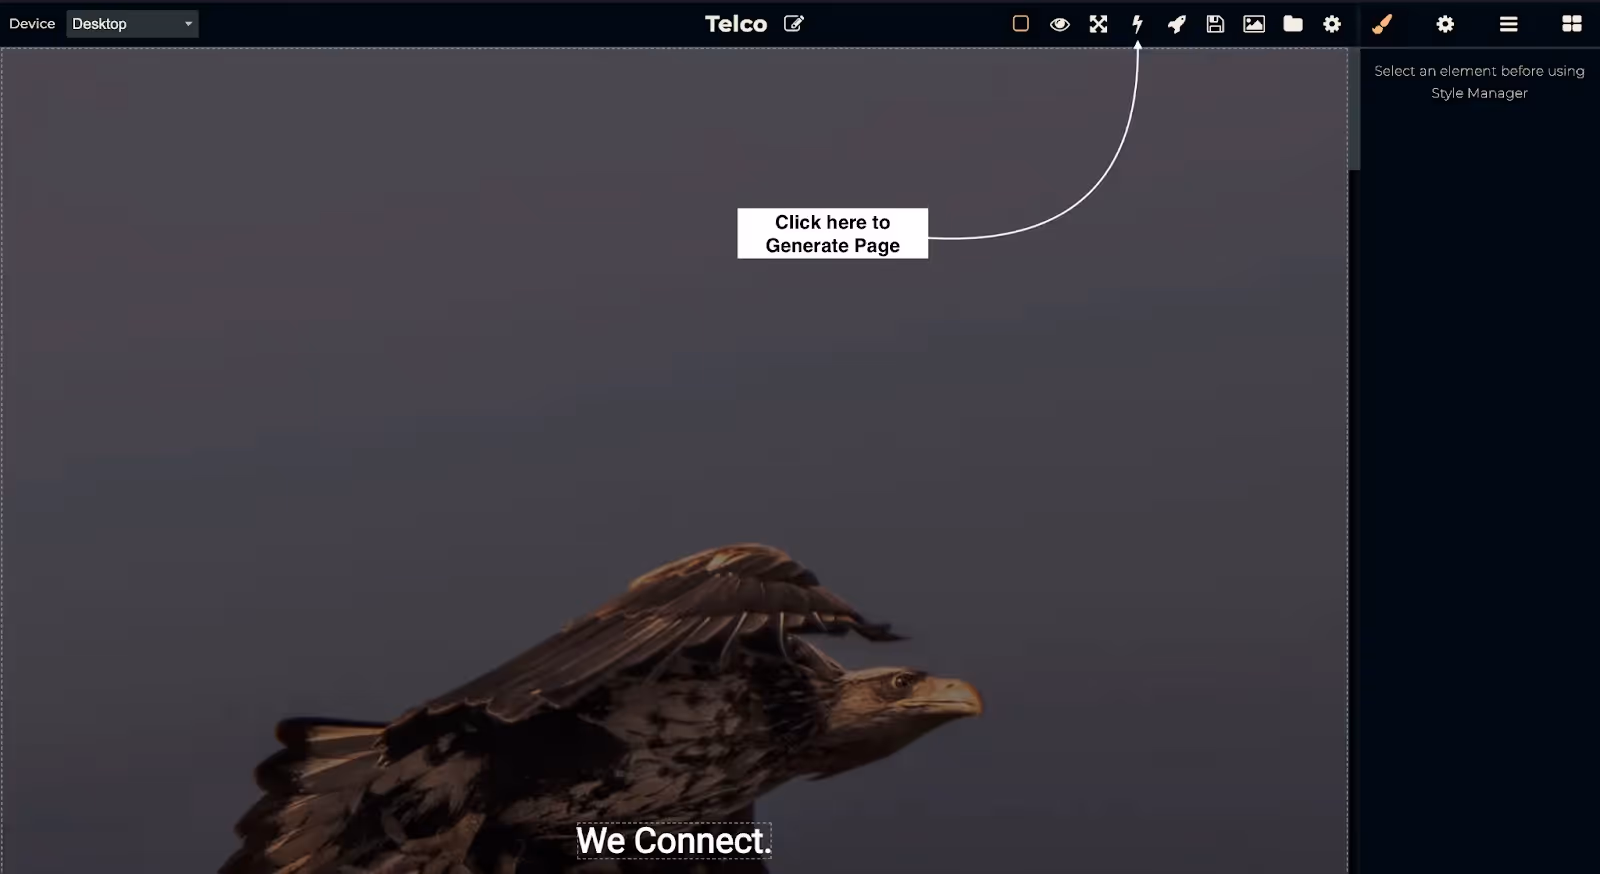
Generate / Regenerate Page with AI
- Locate and click the page generation icon in the top toolbar, near the right side of the screen. The icon appears as a lightning bolt symbol.
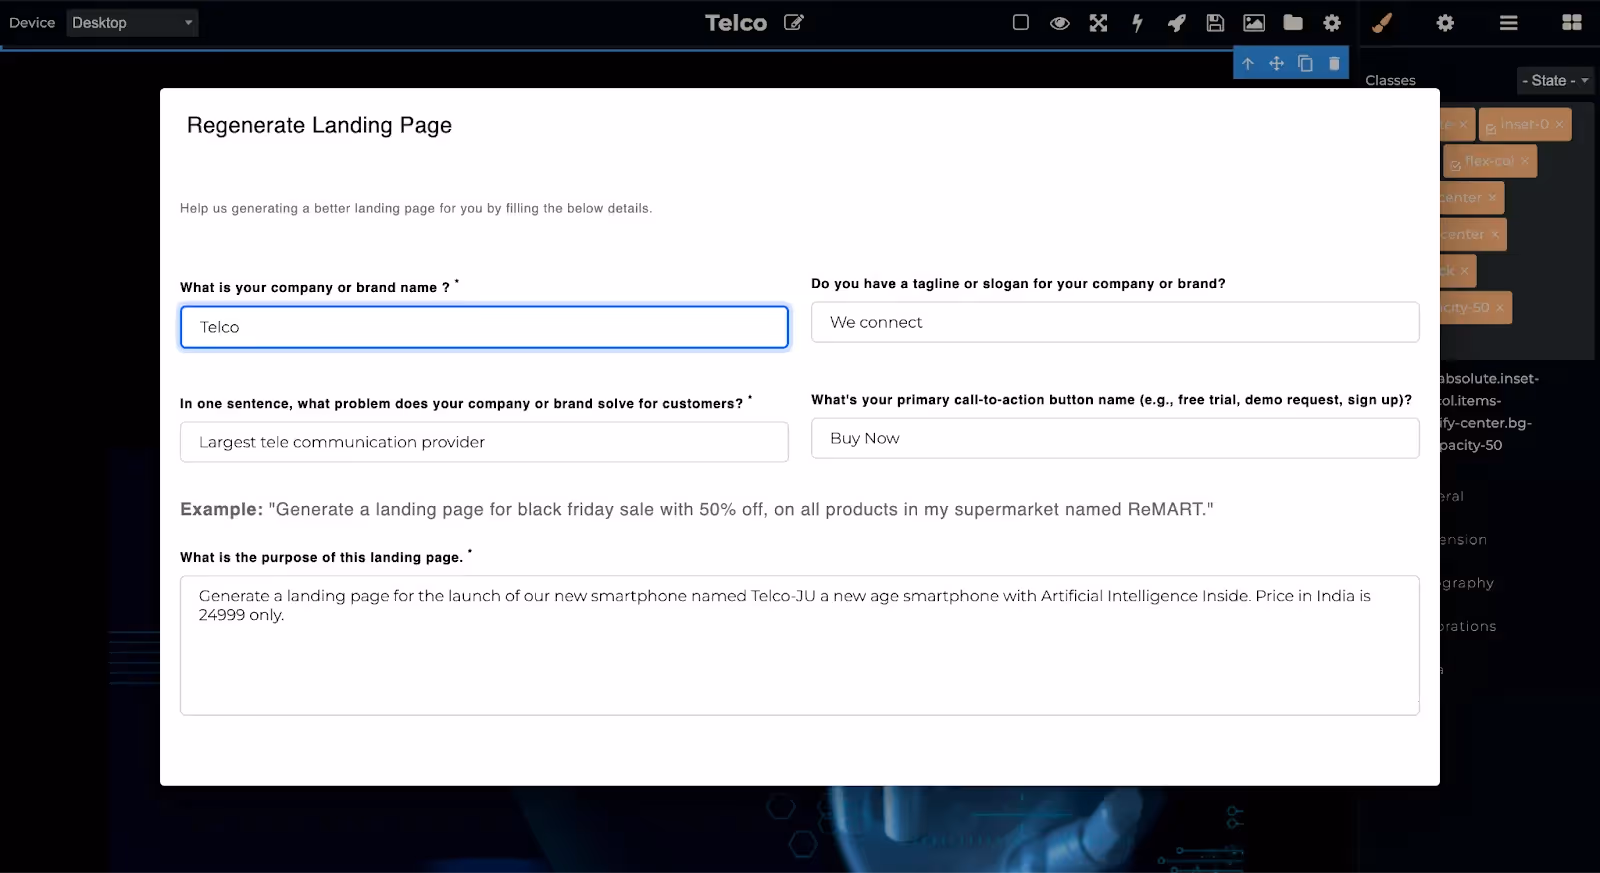
- A form will appear allowing you to enter the essential details of the landing page. Here’s a guide for filling in the required fields in your form:
- Company/Brand Name (Required): Enter the name of your company or brand. (Example: "Telco")
- Tagline or Slogan: Input your company’s tagline or slogan to summarize its mission or values. (Example: "We connect")
- Problem Solution Statement (Required): Provide a brief description of the core problem your company solves or its primary value proposition. (Example: "Largest telecommunication provider")
- Call-to-Action Button Text: Define the text that will appear on the call-to-action button to encourage user interaction. (Example: "Buy Now")
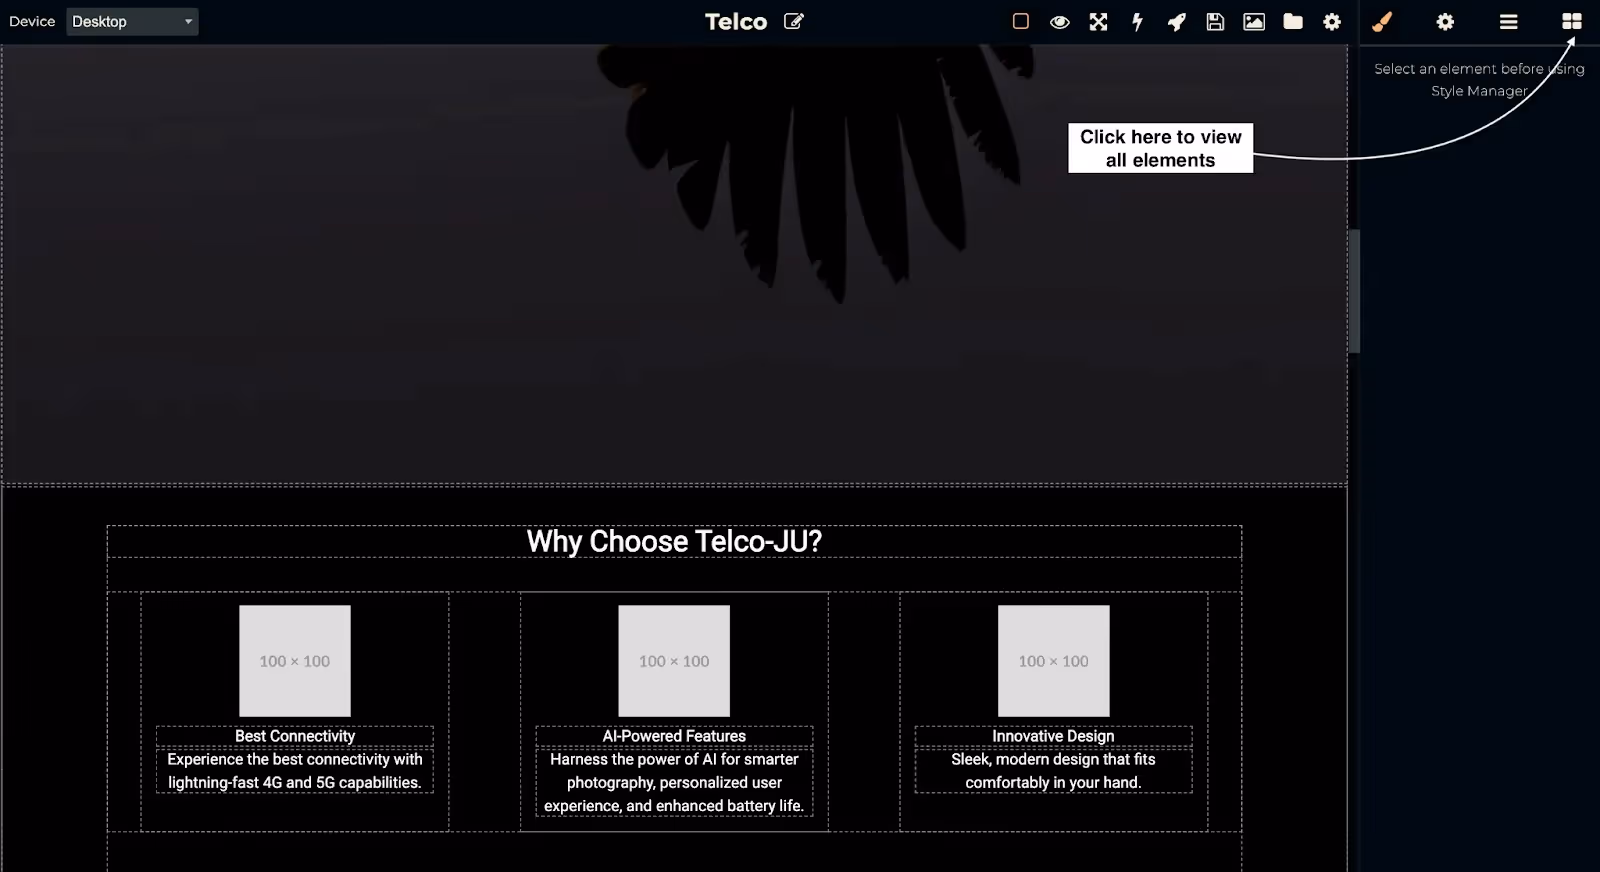
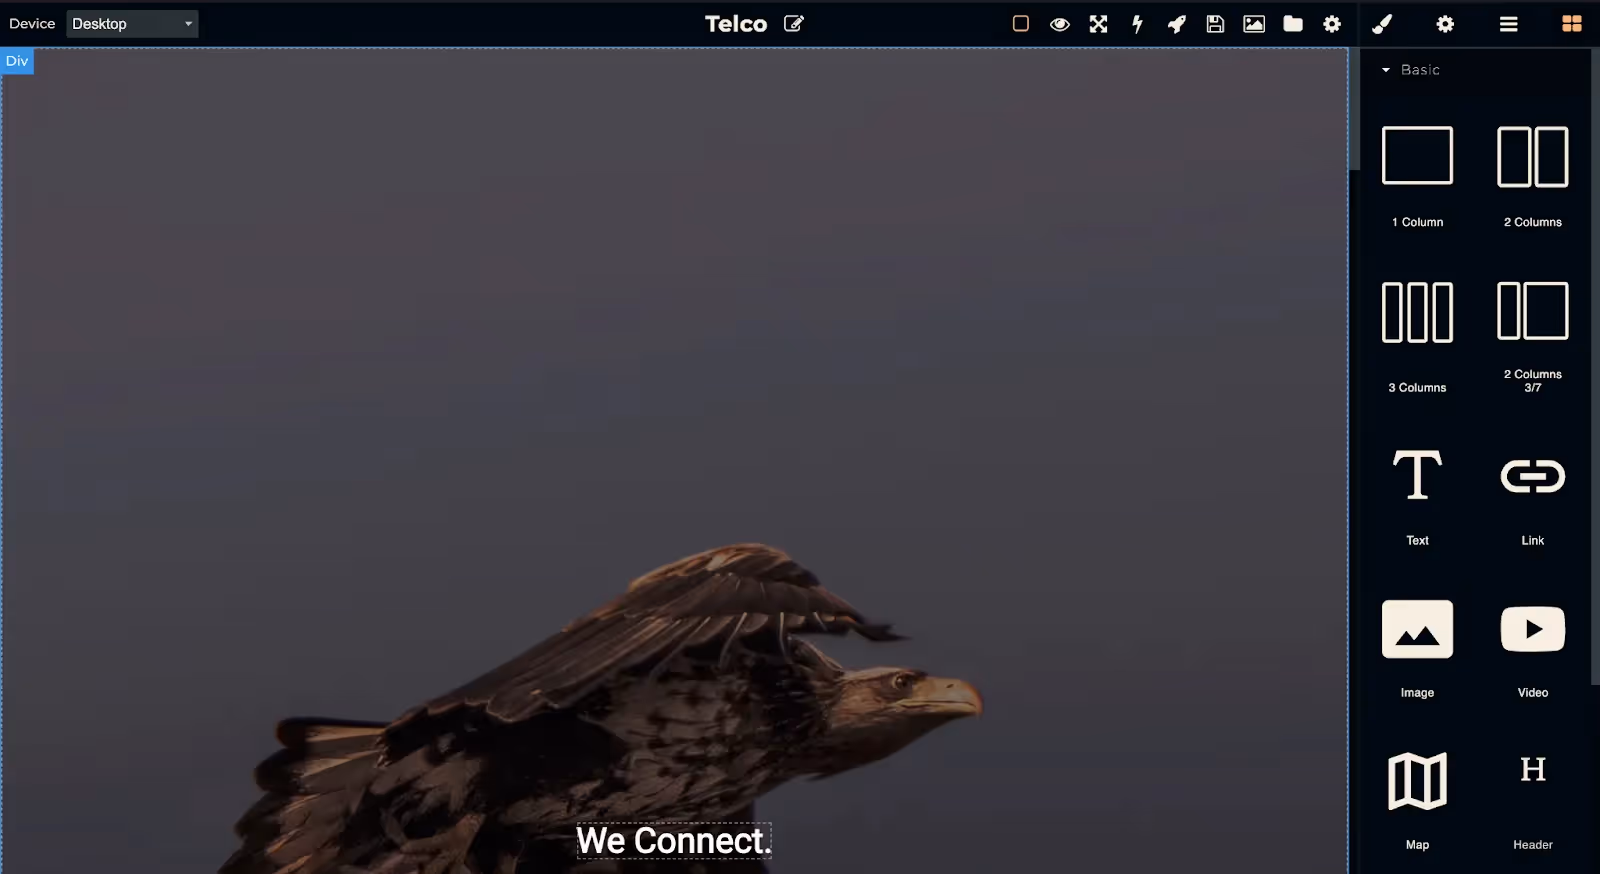
Add a new element:
- To view all elements on your landing page, click the grid icon (represented by nine dots) located at the top-right corner of the toolbar, in the main navigation bar. This will provide a comprehensive view of the page’s structure, displaying individual components, section layouts, and content blocks. The feature offers a clear overview of the page’s architecture, helps in understanding the relationships between different elements, and facilitates easy navigation between them. It is a useful tool for efficiently selecting and editing specific elements, ensuring precise control over the page’s layout and content organization.
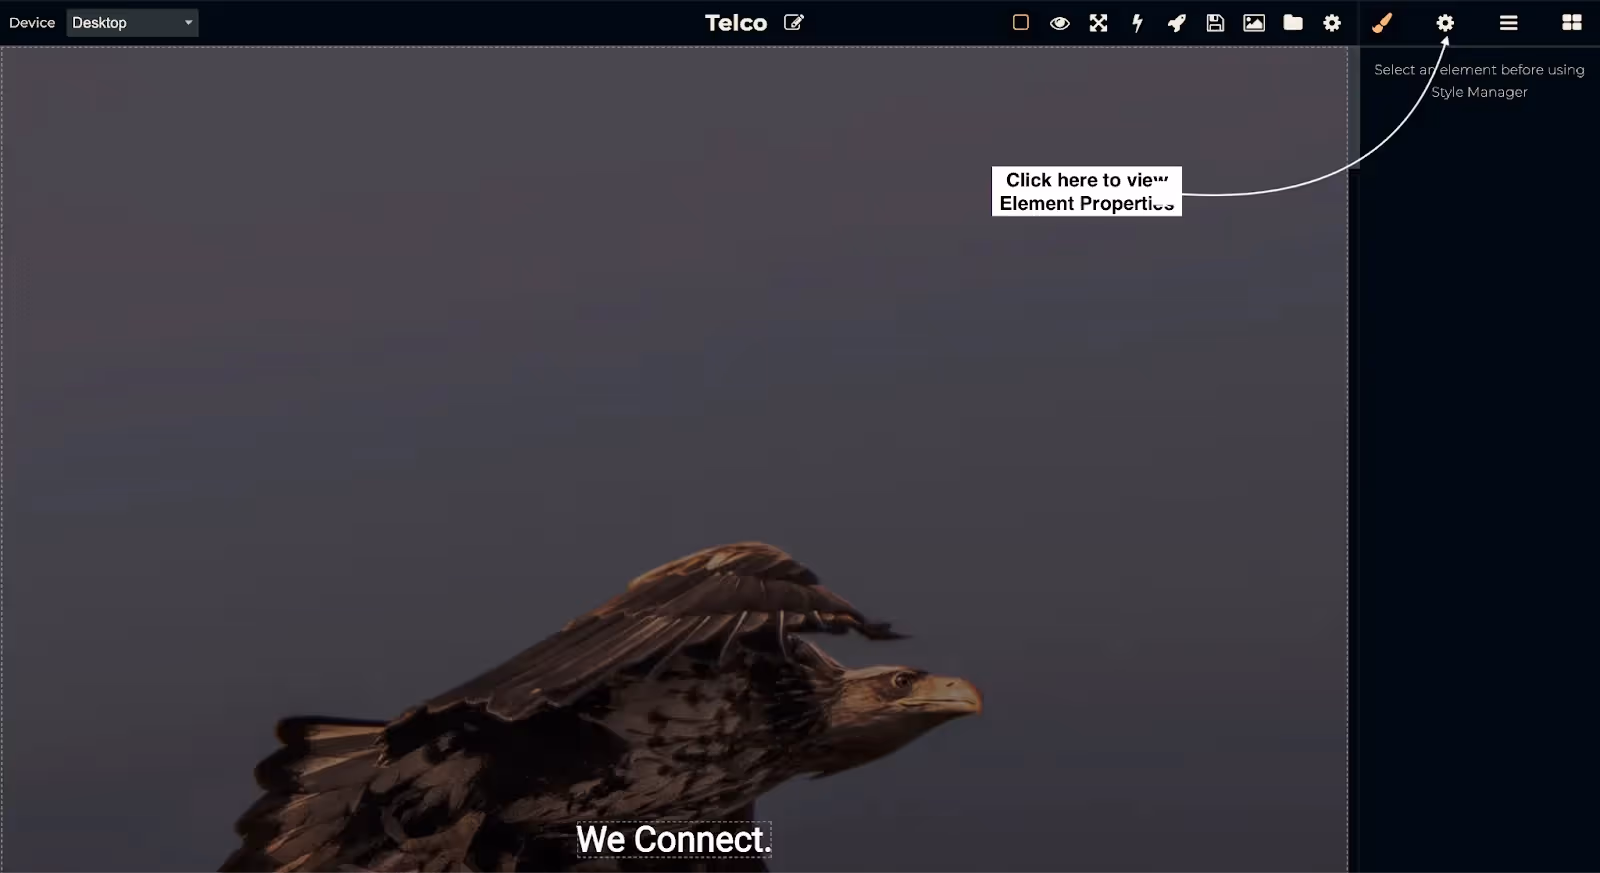
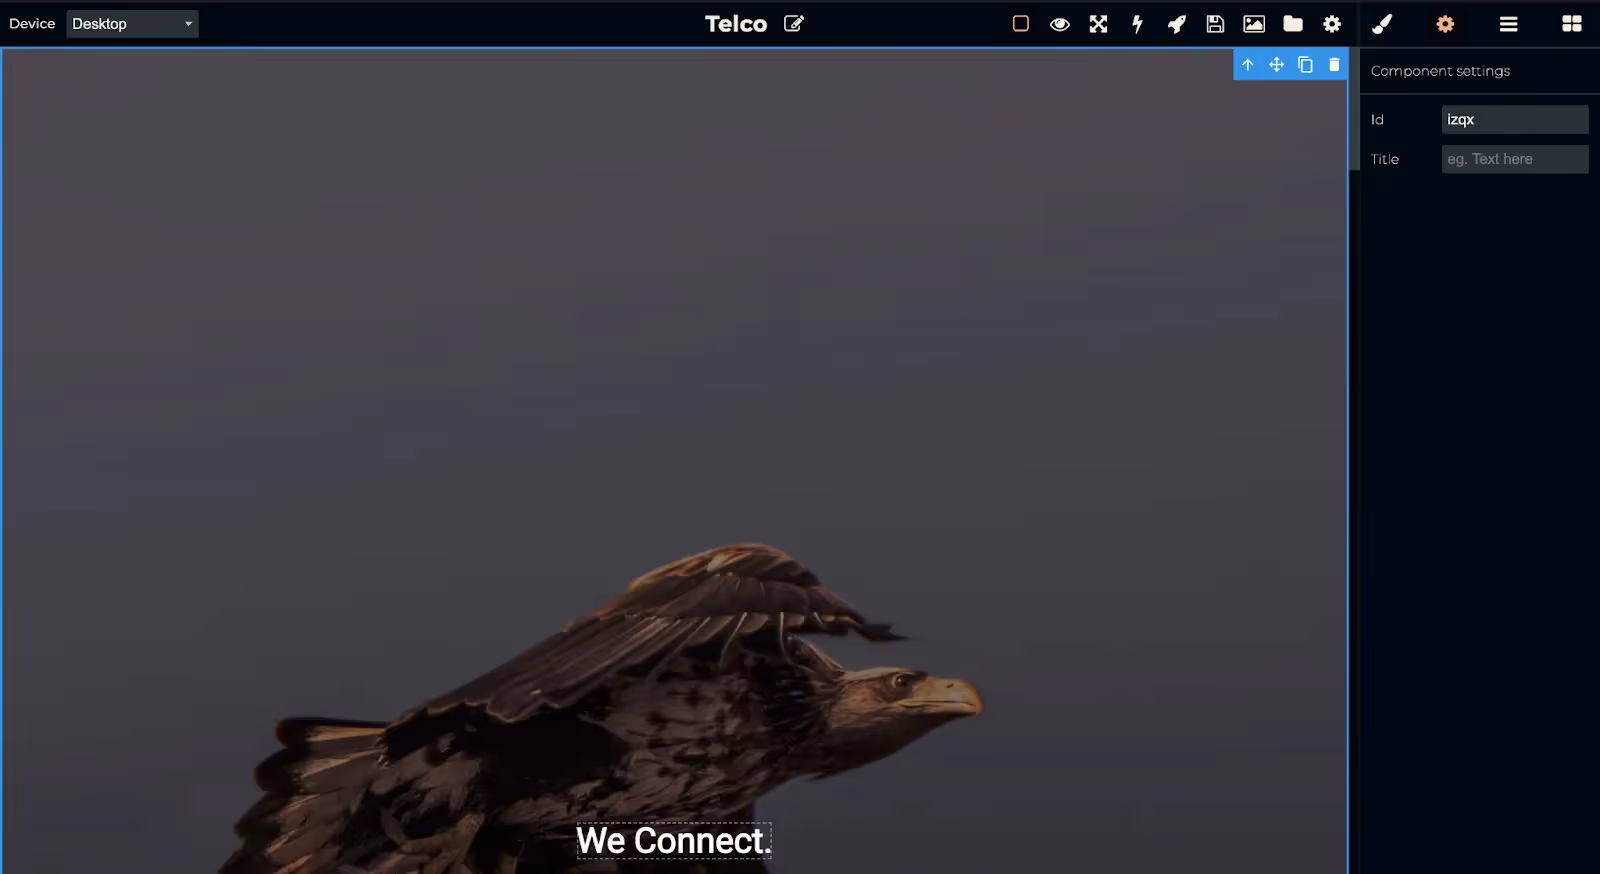
Change Element Properties
Click on the gear icon to update its properties. This icon allows you to access the settings and make adjustments to the selected element
Change Element Styles
Click on the paintbrush icon located at the top-right corner of the element to adjust its style. This allows you to customize the appearance of the element, such as its color, font, size, alignment, and other styling options, helping you match the element's design to your page's overall look and feel.

Landing page Builder view
Mastering the Landing page Builder View: A Complete Guide
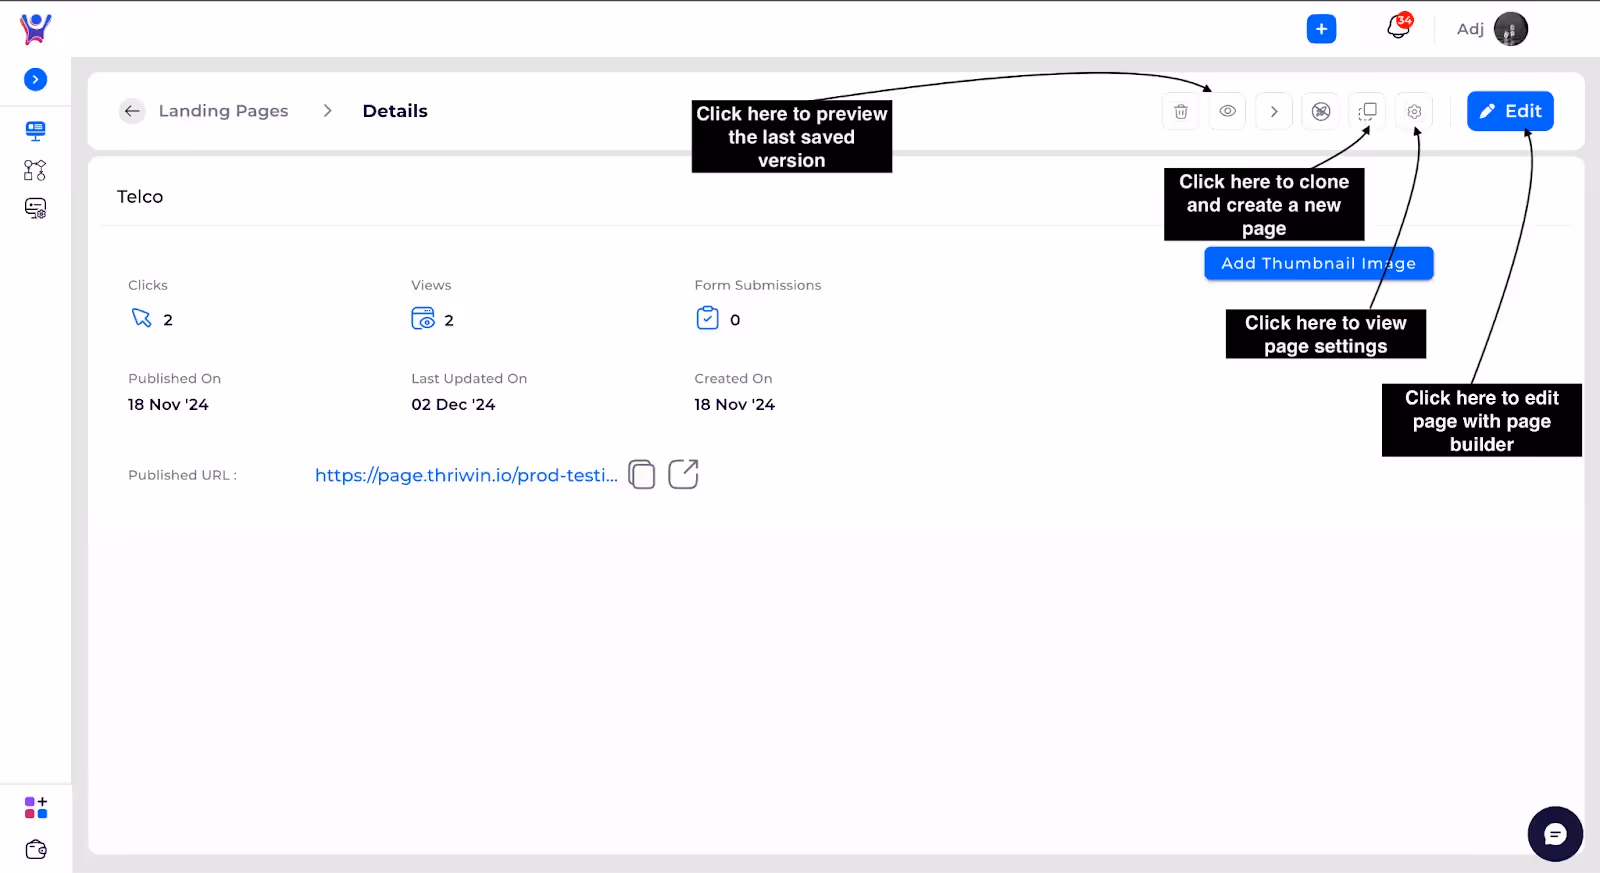
View Details
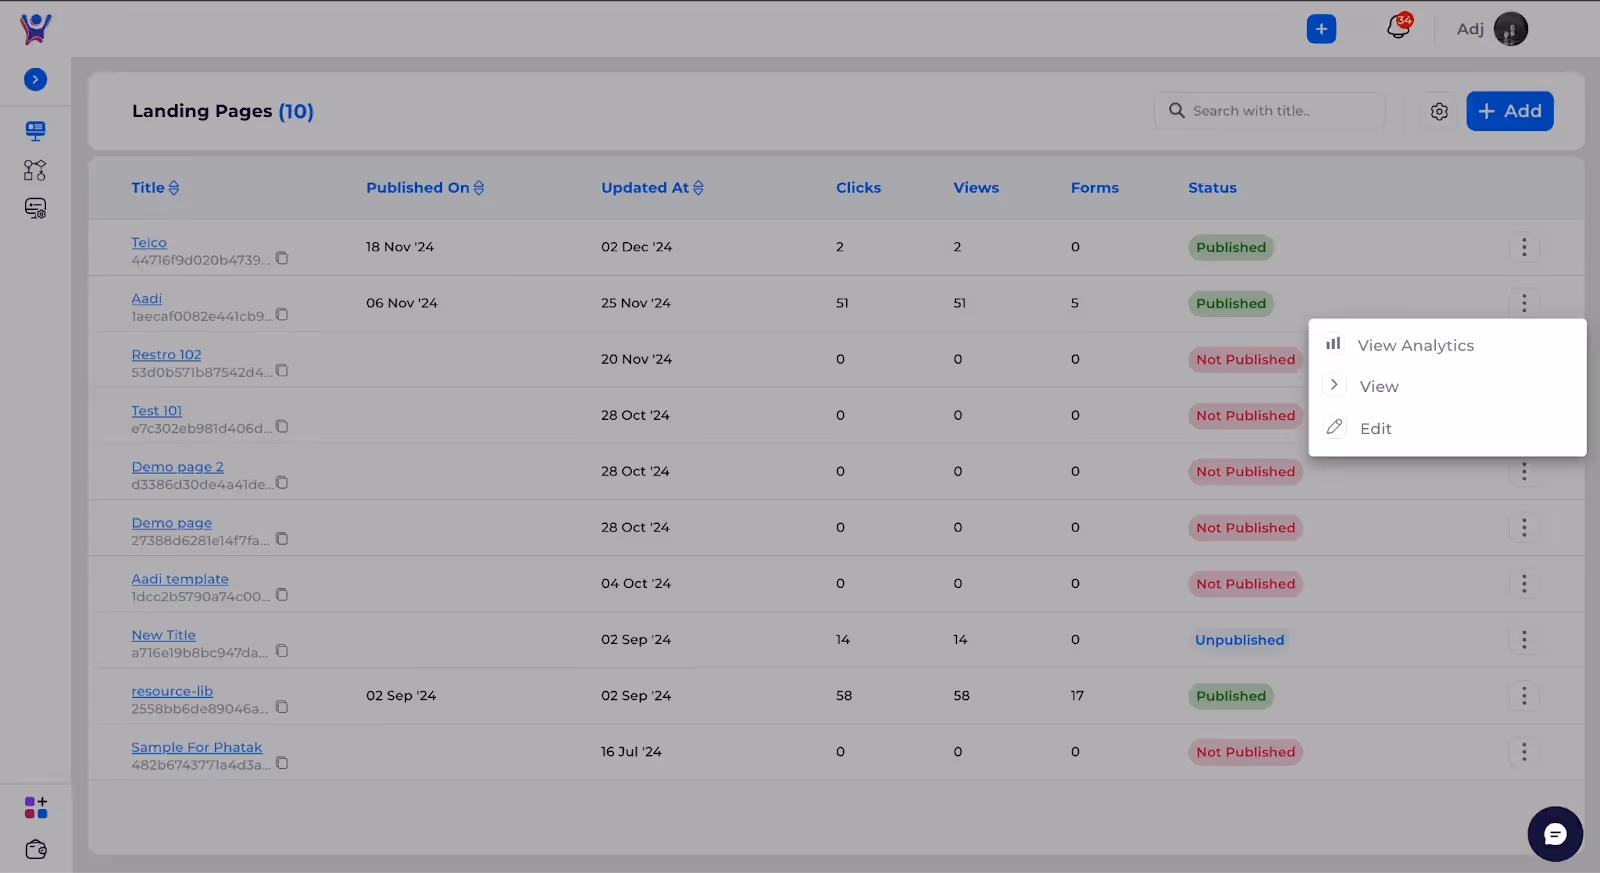
View Different options
Click the three dots menu on any item in the Pages list to access various page-related options, such as editing, duplicating, deleting, or viewing the page. This menu provides quick access to manage the page’s settings and actions.

View Page Details
The three dots menu on each page in the list provides the following options:
- Page Analytics (if the page is published): View performance metrics like views, conversions, and engagement.
- View Published/Last Saved Page: Open the most recent version of the page, whether it’s published or saved as a draft.
- Edit Page: Access the page builder to make changes to the content, layout, or design.
To view page details, click on View Analytics or directly on the page item.
Different Actions in Page Details
Here are the details related to a page that can be viewed:
- Page View: Displays the total number of views for the page, visible only if the page is published.
- Form Submission: Shows the number of form submissions made through the page, if a form is attached to the page.
- Click: Displays the total number of clicks on the page, including duplicates.
- Published URL: Provides the URL of the published page for easy access.
- List of Actions: A list of actions performed on the page (as seen in the image below), such as edits, saves, or other updates.
Page list and details
Comprehensive Guide to Page Lists and Details
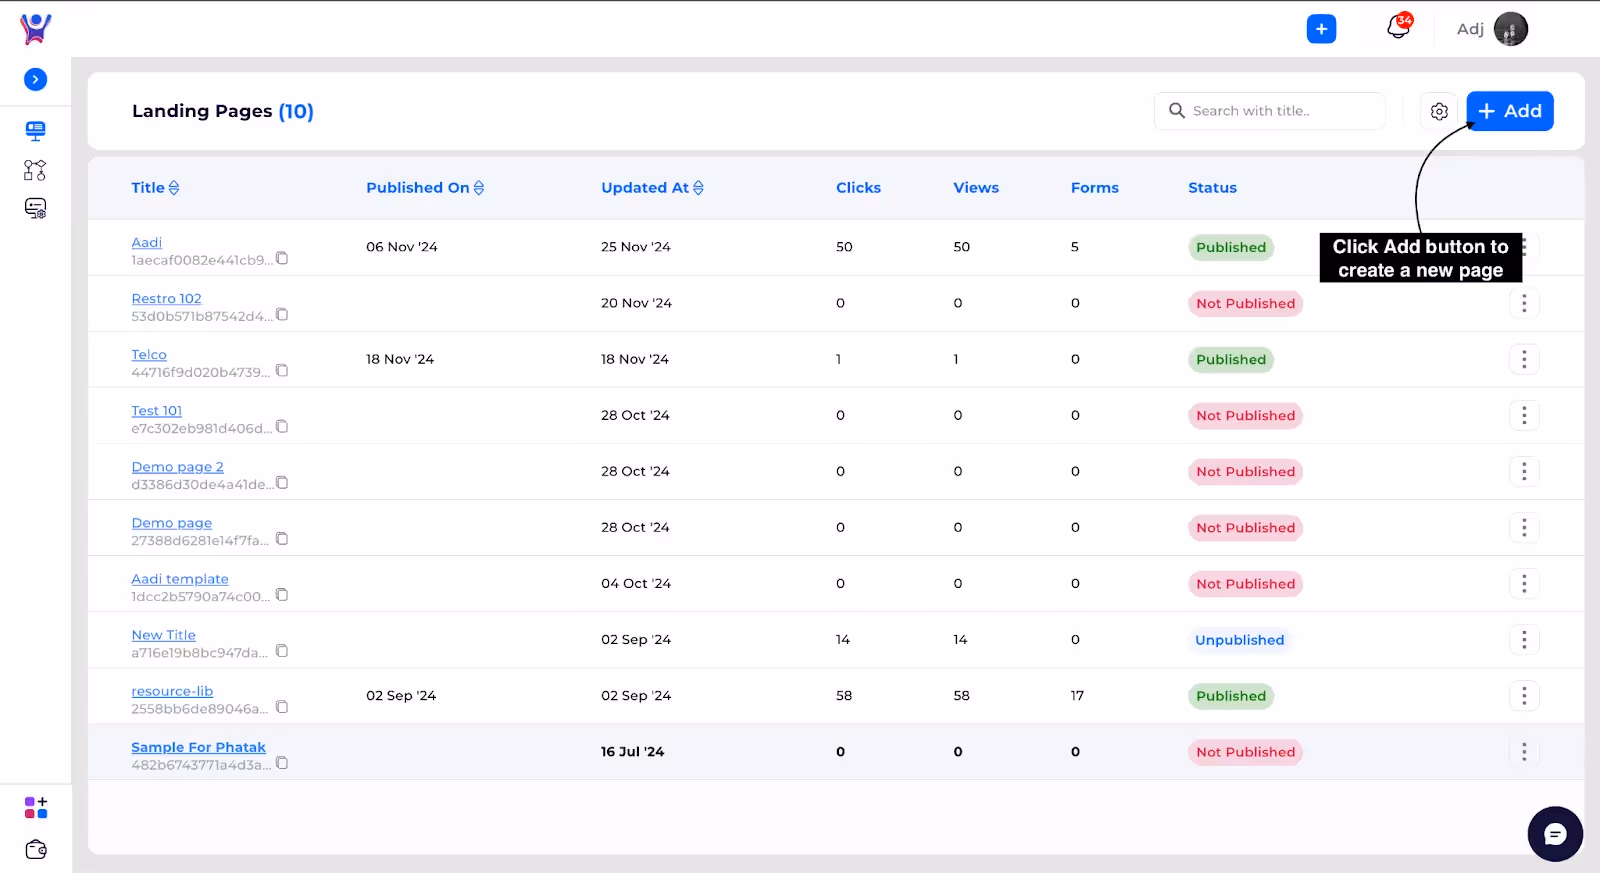
Click on Add Page
After navigating to the Landing Pages list, click the Add Page button in the top-right corner to create a new landing page. This will allow you to start setting up a customized page for your sales or marketing campaign, where you can capture leads, promote offers, or share information.
- Screenshot :
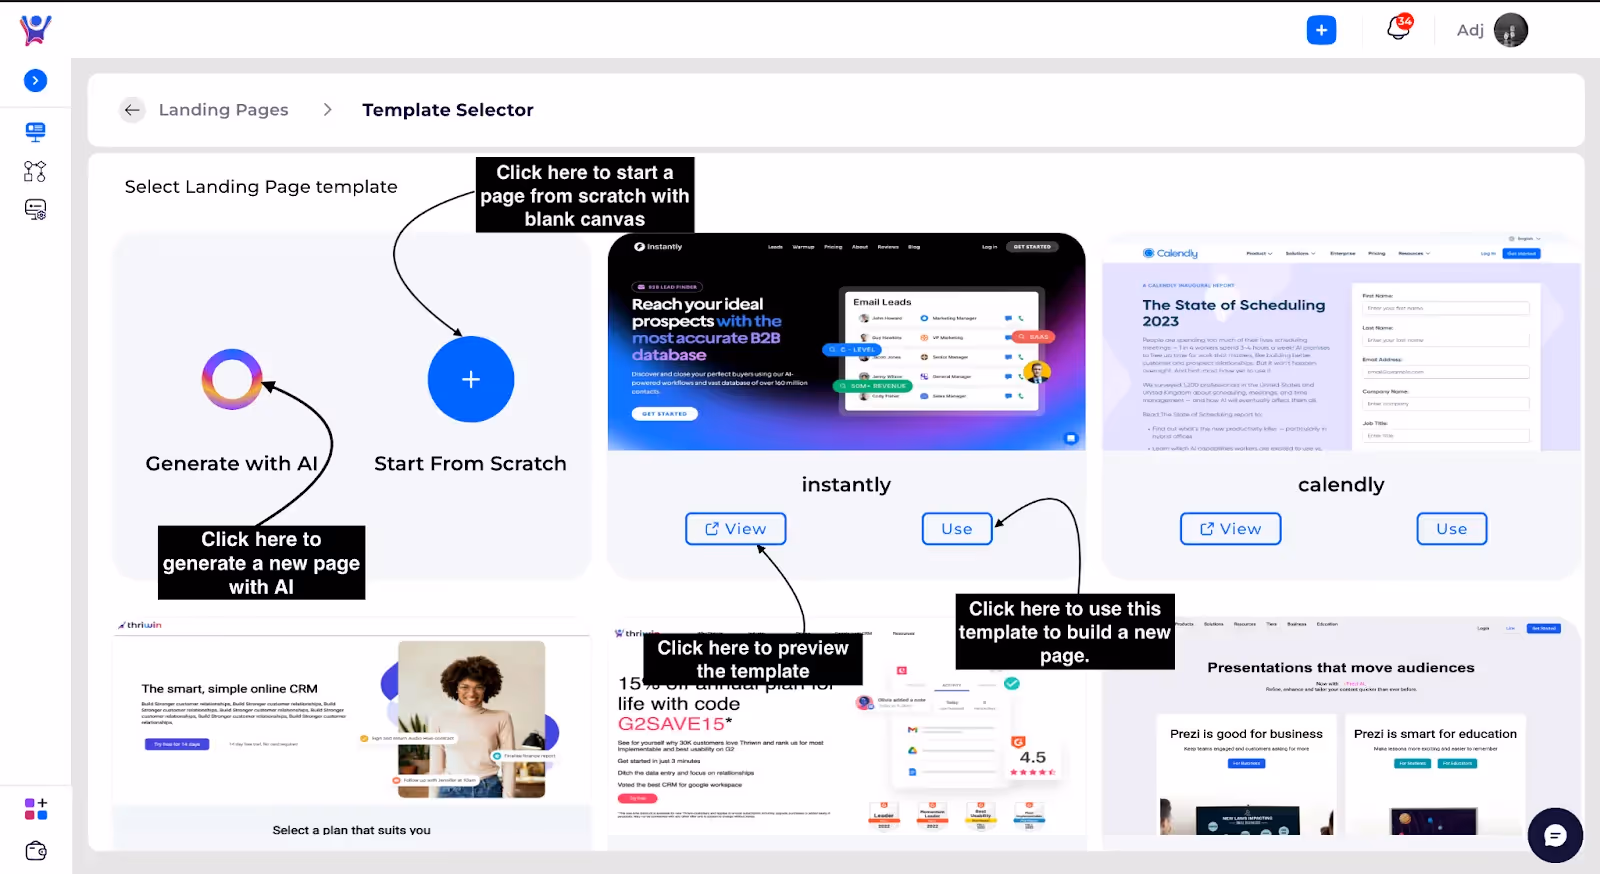
Page Creation options
After clicking the Add Page button, you will be redirected to the Template Selector. Here, you have several options to create a new landing page:
Build page from scratch
Step 1 : Click on Start from Scratch
Click the Start from Scratch button to create a new landing page with a blank canvas, allowing you to design and customize the page entirely from the ground up. This option gives you complete control over the layout and content of your page.
- Screenshot :
Build Landing page from scratch
Guide to Building a Landing Page from Scratch
Building a Landing page with template
Click on Add Page
After navigating to the Landing Pages list, click the Add Page button in the top-right corner to create a new landing page. This will allow you to start setting up a customized page for your sales or marketing campaign, where you can capture leads, promote offers, or share information.
- Screenshot :
Page Creation options
After clicking the Add Page button, you will be redirected to the Template Selector. Here, you have several options to create a new landing page:
- Generate Page with AI: Use AI-powered tools to automatically generate a landing page based on your inputs, making it easier and faster to set up.
- Use Template to Build a Page: Choose from a variety of pre-designed templates that you can customize to fit your campaign needs.
- Start From Scratch: Build a landing page from the ground up, offering complete flexibility and control over the design and content.
- Screenshot :
Preview a template
To preview a template, click the View button located below each template in the list. This will open a full preview of the selected template, allowing you to see its layout, design, and content before making your final selection or customization.
- Screenshot :
Click on the use button to build using the template.
After previewing a template, click the Use button located below the template to create a new landing page based on that template. This will open the page builder where you can further customize the template to suit your needs.
Building a Landing page with template
Effortlessly build a landingpage with one click
Building a page with AI
Click on Add Page
After navigating to the Landing Pages list, click the Add Page button in the top-right corner to create a new landing page. This will allow you to start setting up a customized page for your sales or marketing campaign, where you can capture leads, promote offers, or share information.
Page Creation options
After clicking the Add Page button, you will be redirected to the Template Selector. Here, you have several options to create a new landing page:
- Generate Page with AI: Use AI-powered tools to automatically generate a landing page based on your inputs, making it easier and faster to set up.
- Use Template to Build a Page: Choose from a variety of pre-designed templates that you can customize to fit your campaign needs.
- Start From Scratch: Build a landing page from the ground up, offering complete flexibility and control over the design and content.
Click Generate with AI
- Description : After clicking on Generate with AI, you will be redirected to the AI Page Generator. Here, you will need to fill in the required fields, which may include details such as:
- Page Name: The title or name of your landing page.
- Objective: The goal of the landing page (e.g., lead generation, product promotion).
- Target Audience: Who the landing page is meant to attract or convert.
- Key Features: Specific elements or content you want to include on the page.
Once you've filled in the necessary information, click on the Generate Landing Page button at the bottom to have AI automatically create your landing page based on the details provided
- Screenshot :
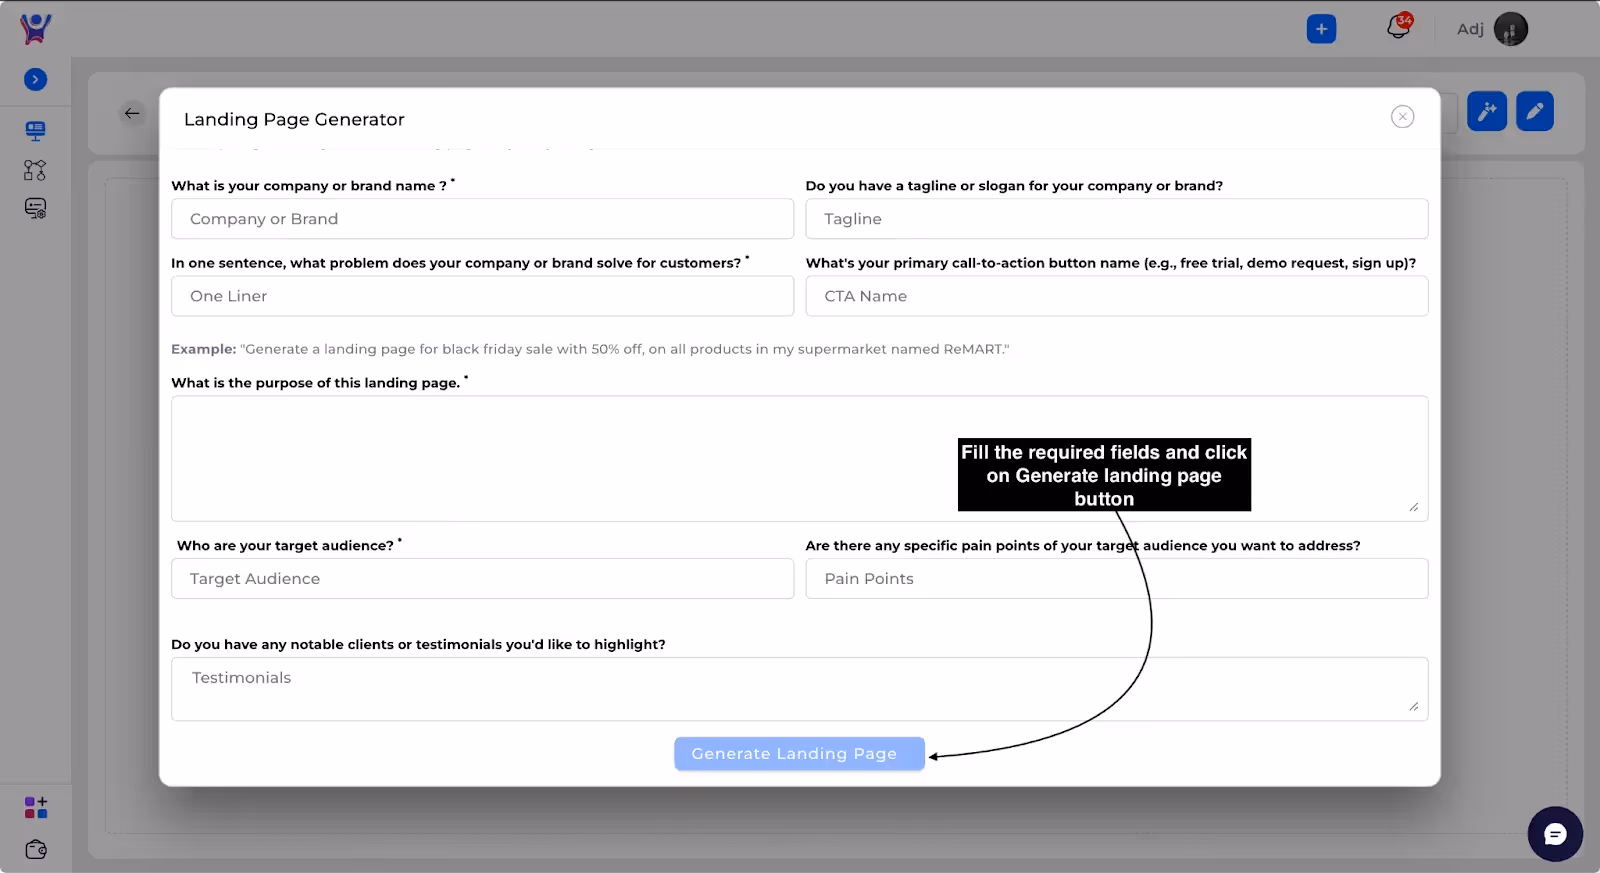
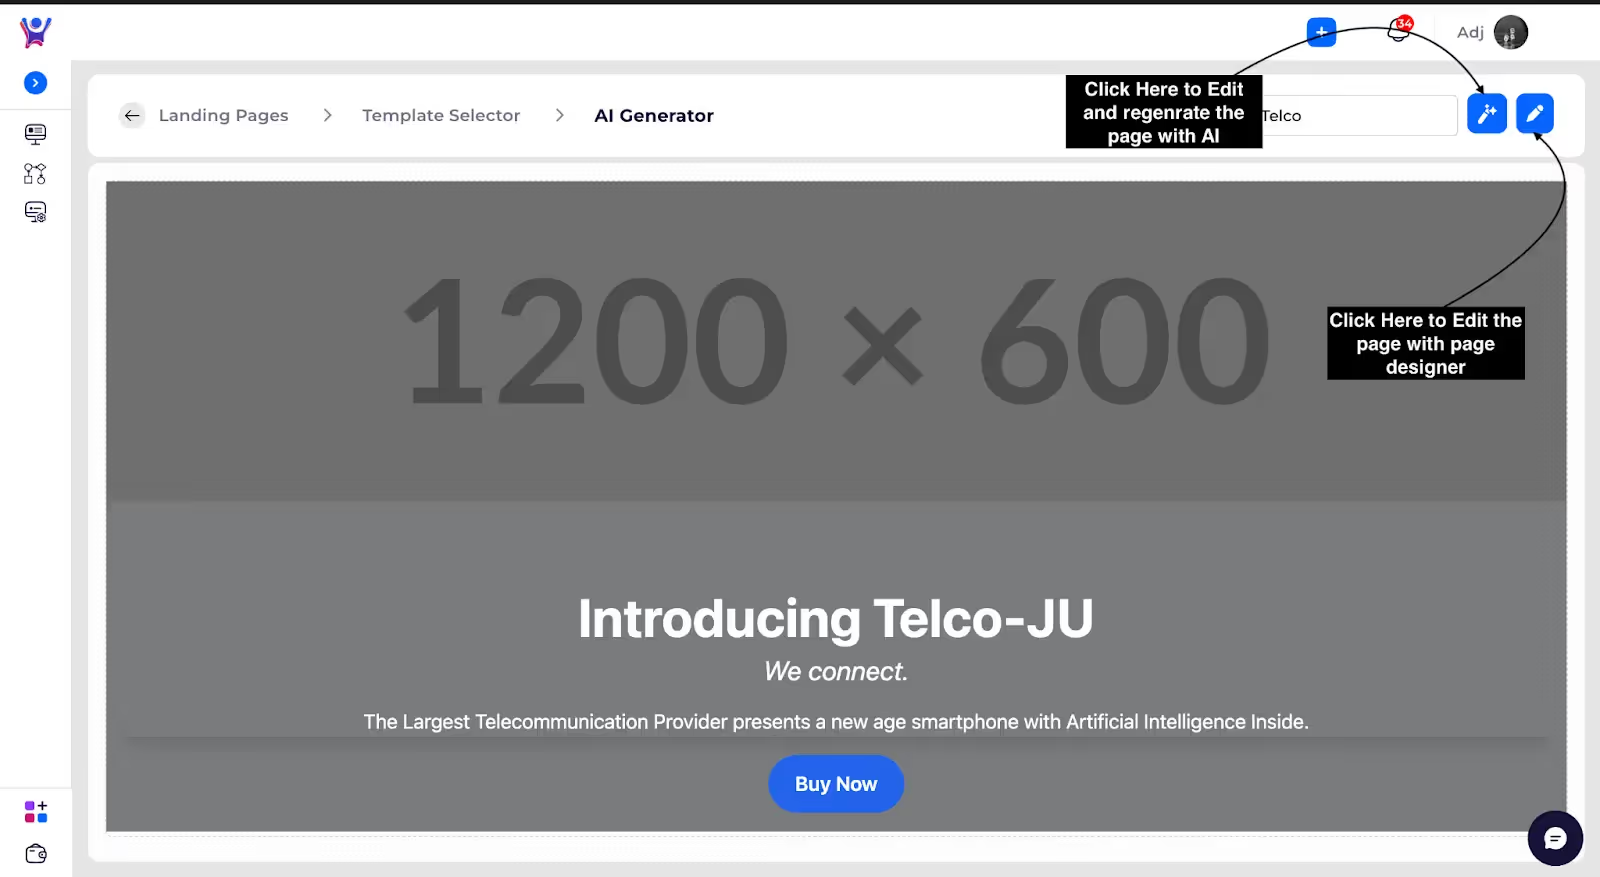
Step 4 : View, Edit and Regenerate Page
- Description : Once the page is generated, it will be displayed for review. In the top-right corner, you will find two options:
- Regenerate Page: Click this button if you want to generate a new version of the page with updated details or to improve its design.
- Edit in Page Builder: This option opens the page in the Page Builder, where you can customize it further. You can add images, modify text, adjust alignments, and make other design adjustments to fit your needs.
By default, the AI-generated pages do not include images, but you can easily add and customize images in the Page Builder to enhance the design of the page.
Screenshot :
Building Landing page with AI
Effortlessly Create Stunning Landing Pages Using AI
The purpose of using a landing page in CRM sales is to effectively capture leads, engage potential customers, and drive conversions. Landing pages are designed to focus on a specific offer, product, or service, providing clear and concise information that encourages users to take a particular action, such as filling out a form, subscribing to a newsletter, or making a purchase.
Navigating to landing pages
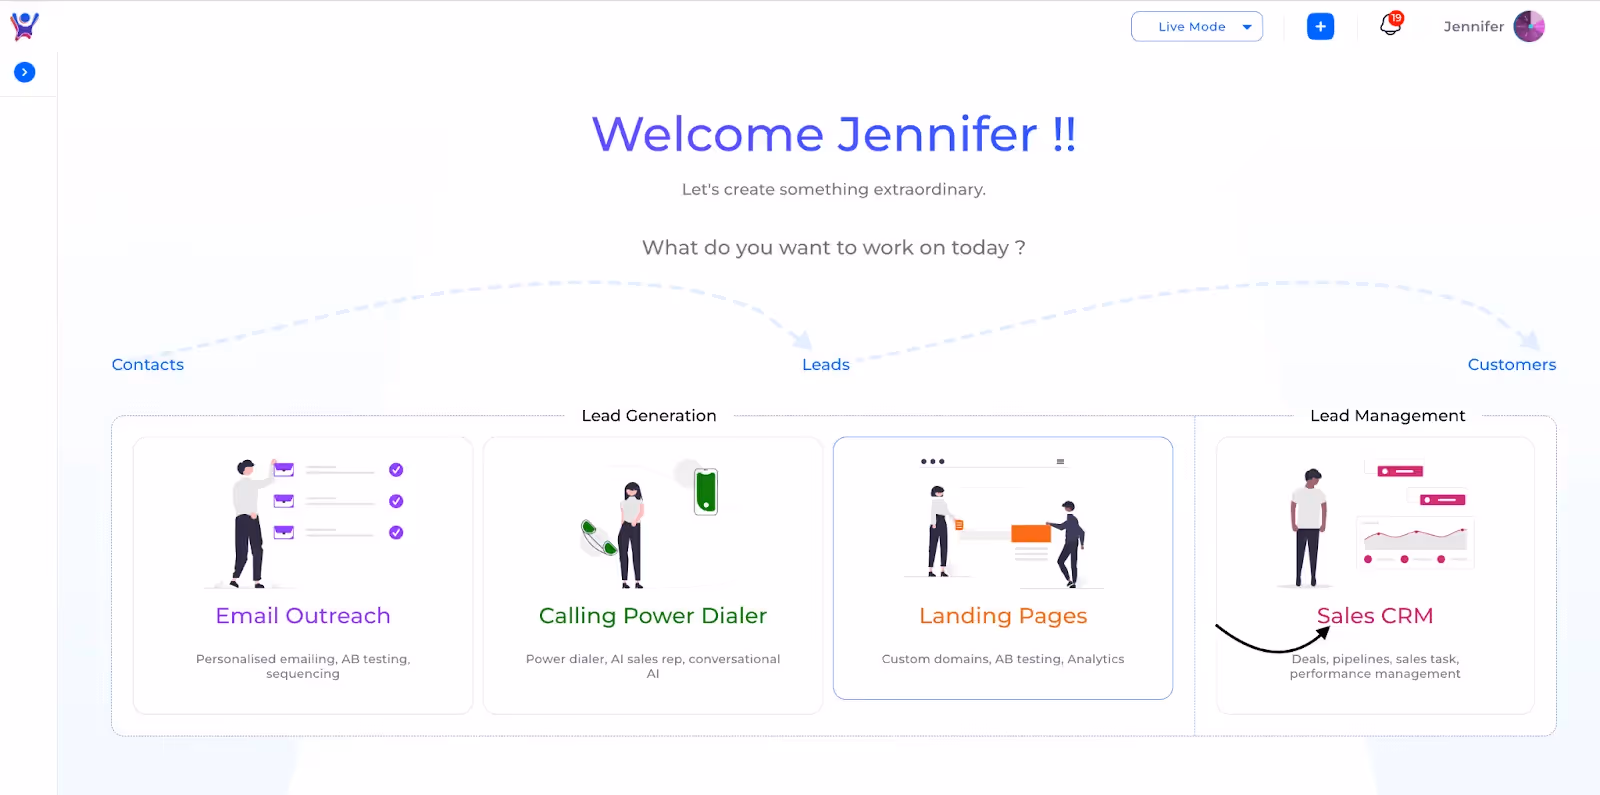
Navigating to landing pages from home screen
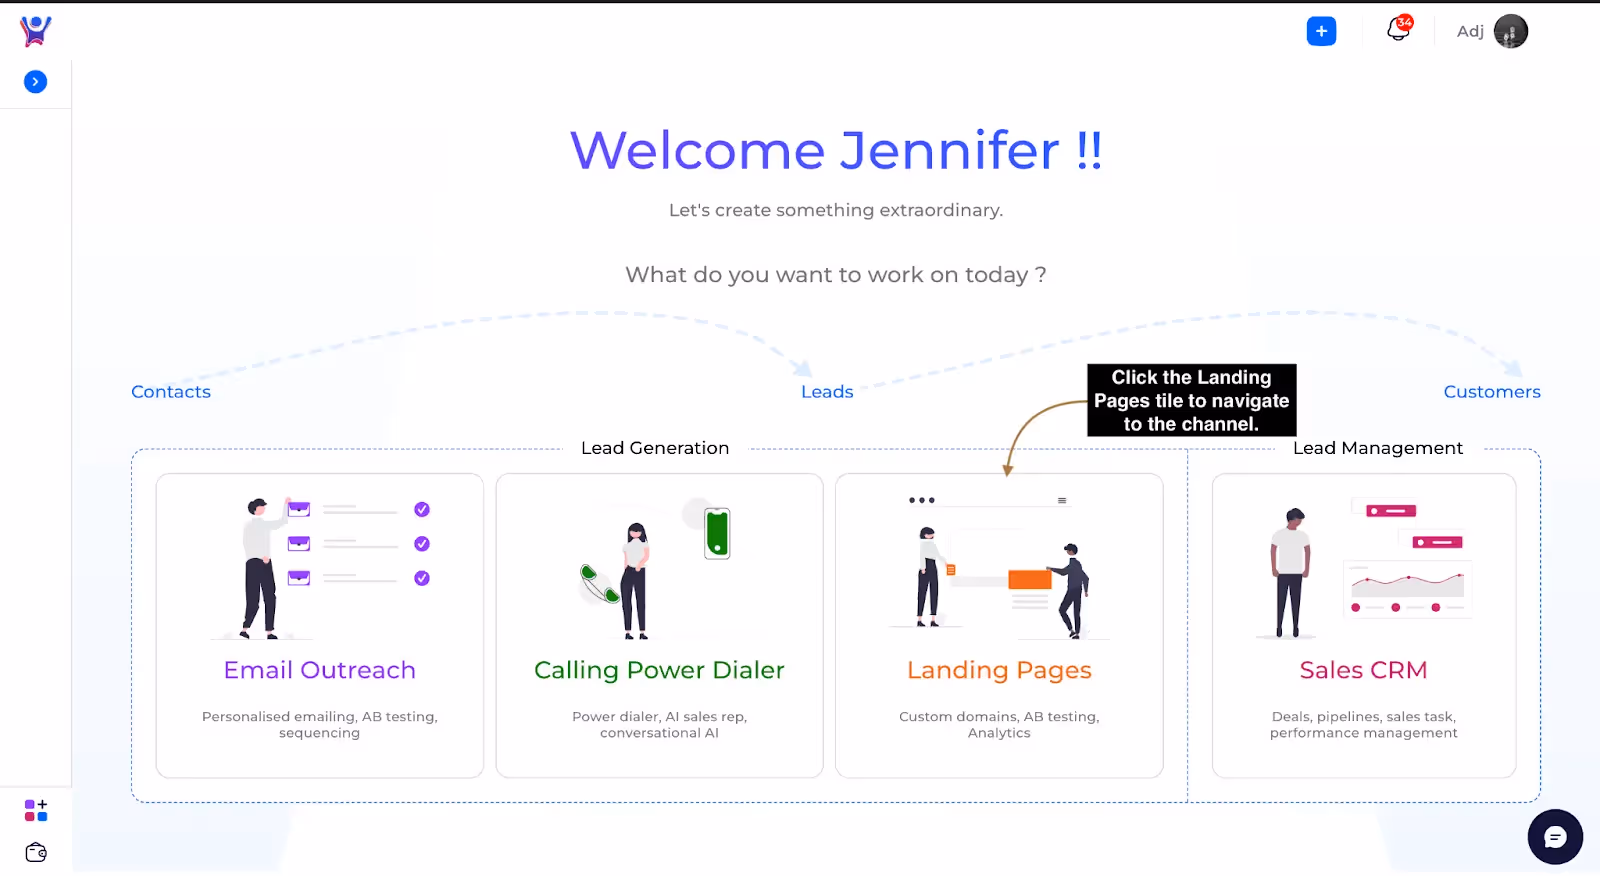
Step 1:
After logging in, you will be redirected to the homepage, where you can explore various channels available in the CRM. To view and work on landing pages, navigate to the Landing Pages channel. This section allows you to create, manage, and track landing pages for your campaigns. Simply click on the Landing Pages option to access the landing page management tools and start building or editing your landing pages.
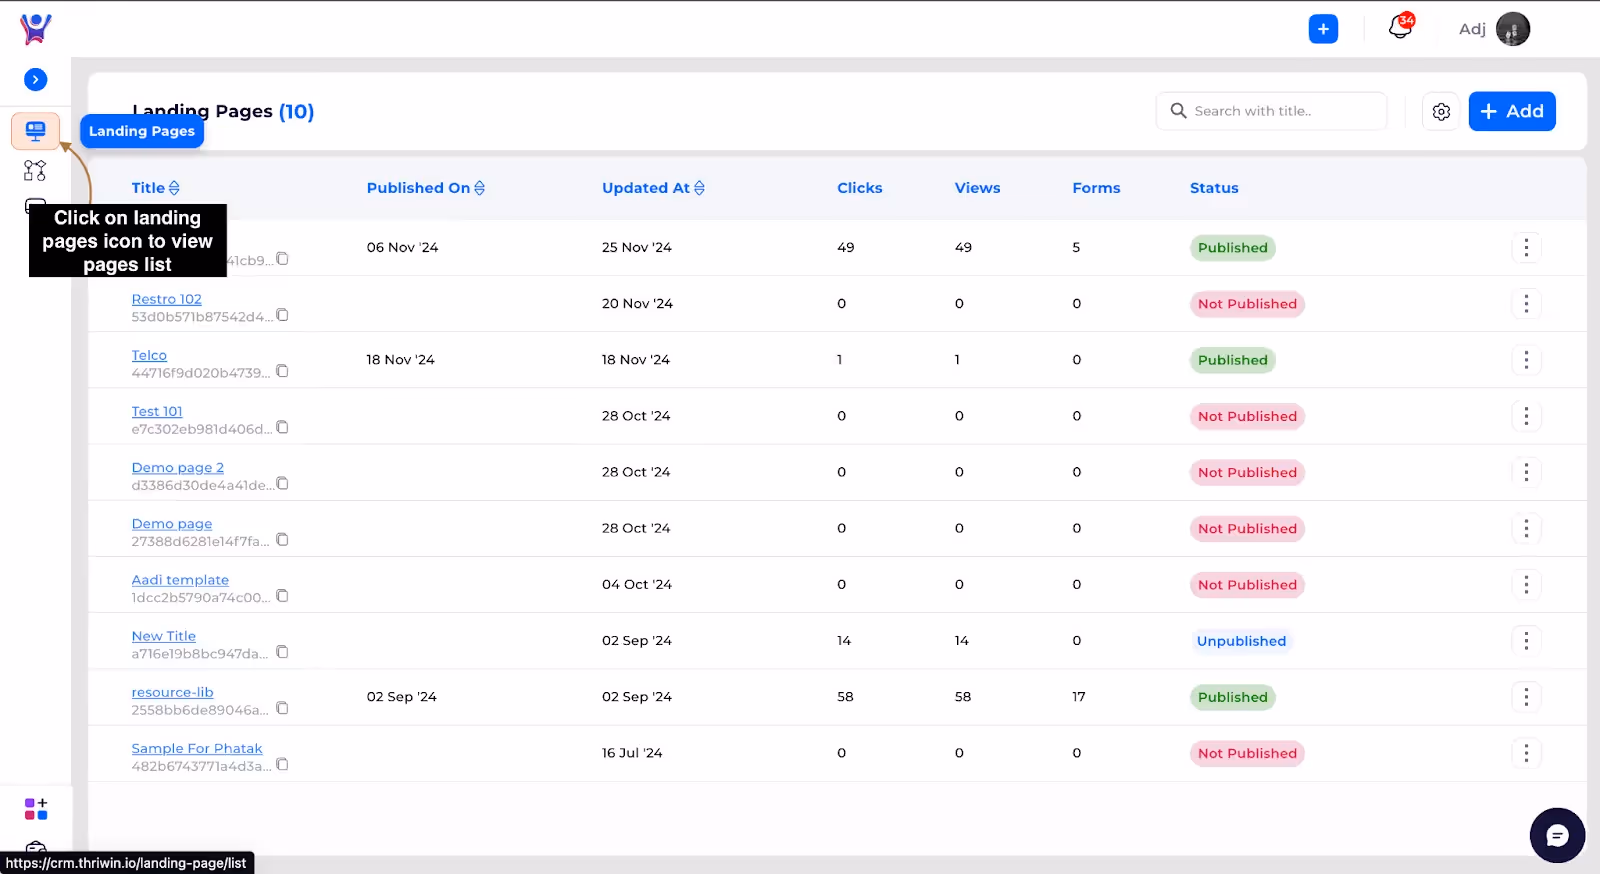
Step 2 :
After clicking on Landing Pages, you will be redirected to the Landing Pages channel, where the Landing Pages list will be selected by default. If it is not selected, simply click on the Landing Pages icon to view and manage your landing pages. This will allow you to access a list of all existing landing pages, where you can create new ones, edit existing ones, or view their performance metrics.
Navigating to landing pages through channels
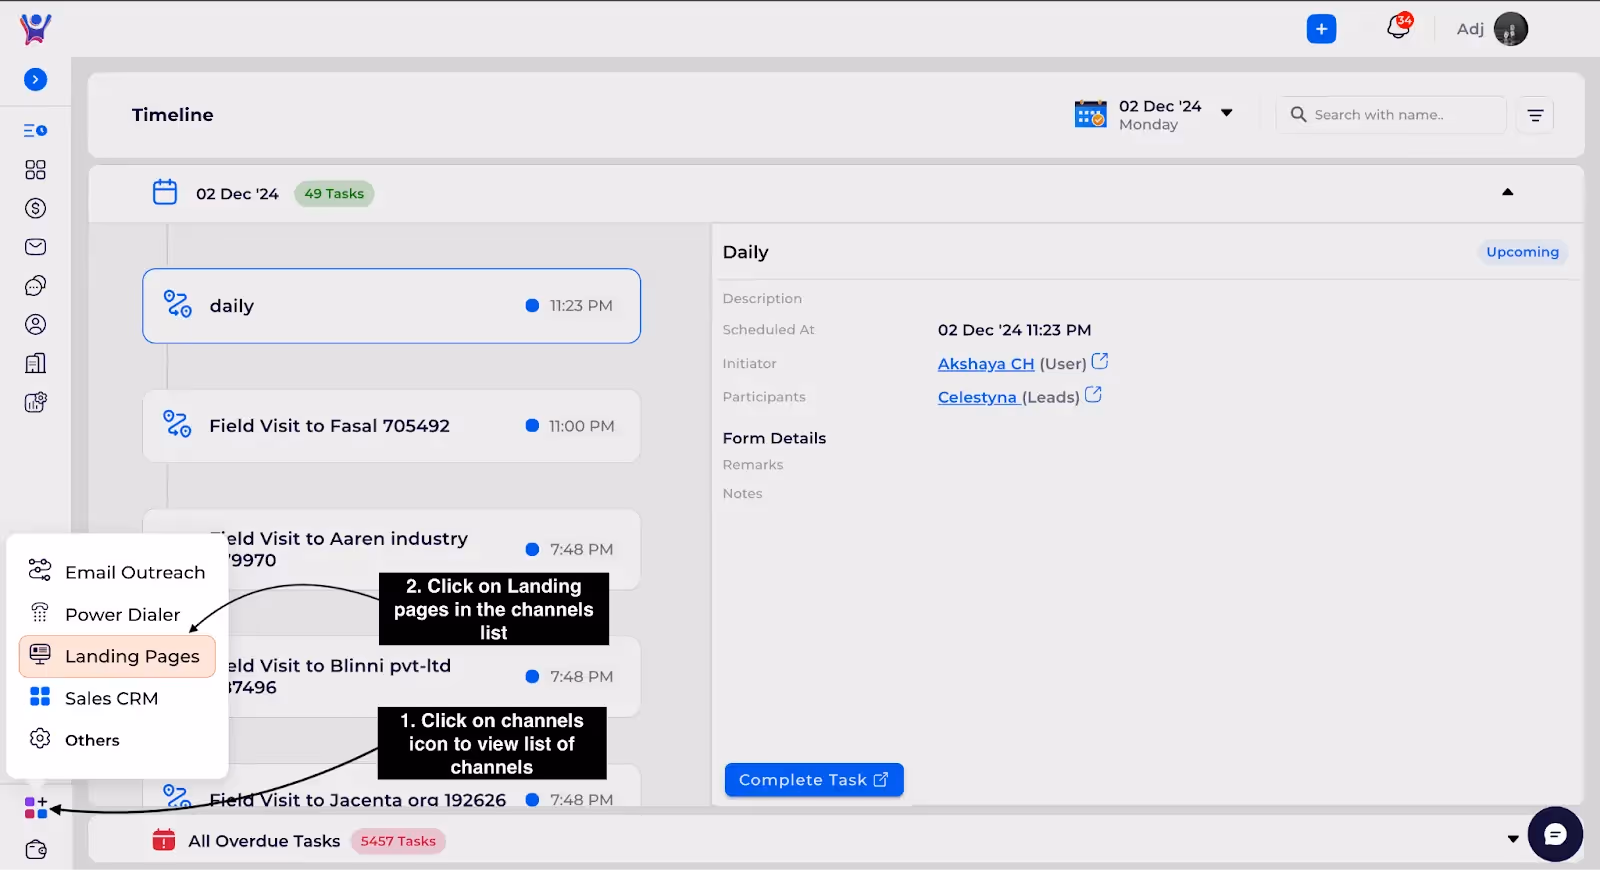
Step 1 :
To view the list of channels, click the Channels icon located at the bottom left of the page on the web, or at the bottom of the navigation pane on mobile. Then, select Landing Pages from the list to navigate to the Landing Pages section. Here, you can manage and create landing pages to help track leads and improve your sales process.
Step 2 :
Landing pages navigation
Navigating to Landing pages-Step-by-Step Guide
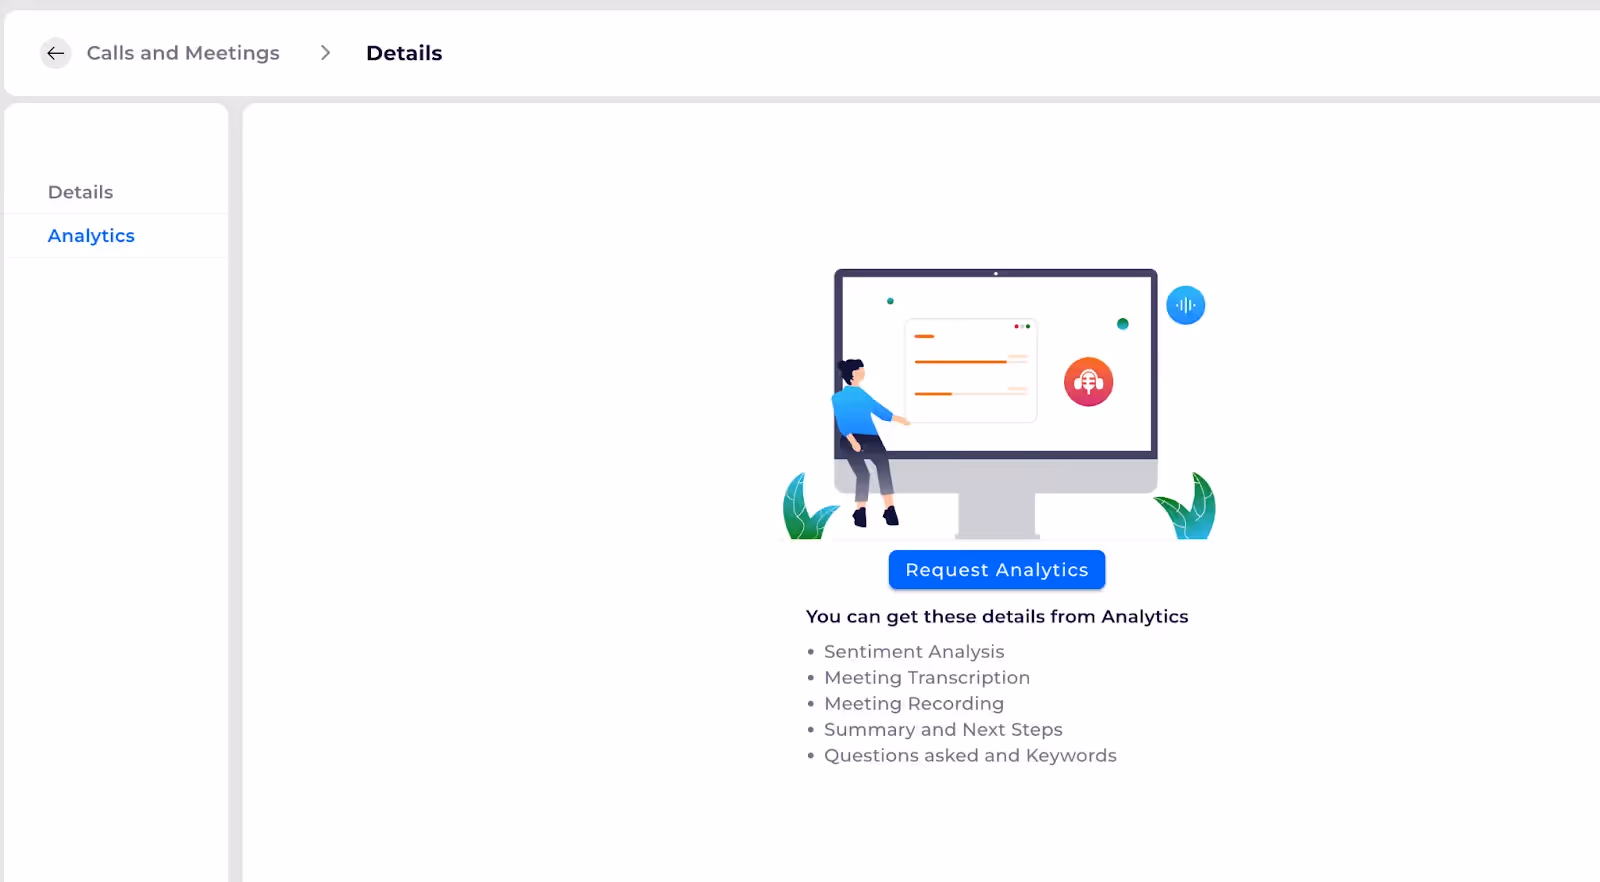
Call and Meeting Analytics:
Go to the Calls and Meetings List
- Navigate to the Calls and Meetings Section.
- From your Thriwin dashboard, go to the Calls and Meetings section. This is where you can view and manage all the calls and meetings associated with your account.

Select Specific Record
- Click on the Specific Record:
- In the Calls and Meetings section, locate and click on the specific call or meeting record you wish to view analytics for.
- Select Analytics from the Options:
- Once you've selected the record, click on the "Analytics" option from the available actions or menu.

Generate Analytics
- Check for Automatically Generated Analytics:some text
- Once you select the Analytics option, check if the analytics for the selected call or meeting are displayed automatically.
- Click on the "Generate Analytics" Button:some text
- If the analytics are not generated automatically, click on the "Generate Analytics" button to manually generate the data.
Enable or Disable Auto Generate Analytics.
Go to the Admin Settings
- Open the Toggle Menu:
- In the left-bottom corner of the interface, locate and click on the "Others" option in the toggle menu.
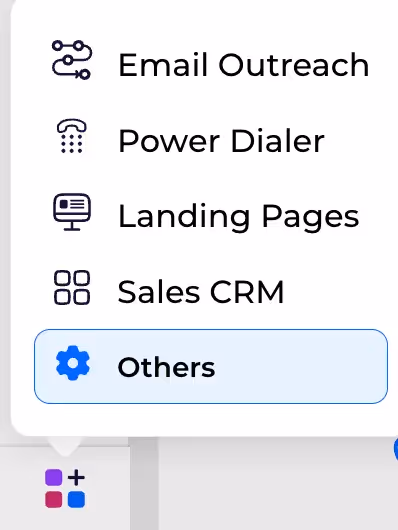
Select Organization Settings
- Locate the Organization Section:
- In the Admin Settings page, look for the Organization section.
- Select "Organization Settings":
- Under the Organization section, click on the "Organization Settings" option.

Enable or Disable Auto-Generate Analytics
- Navigate to Preferences:
- In the Organization Settings page, find and navigate to the Preferences section.
- Enable or Disable Auto-Generate Analytics:
- In the Preferences section, locate the option for Auto-Generate Analytics.
- Use the toggle button to either Enable or Disable this feature according to your needs.

Manage Calls and Meetings
- To sort records, click on the respective column header

- To apply filters, click on

- in the upper right corner above the header and input the desired field values to apply the filter.
- To export Calls and meetings, click on

- The downloaded file will be mailed once its ready.
Need More Help?
For further assistance, feel free to contact our support team. Visit our Support Center for detailed help and FAQs.
Call/Meeting history list and analytics
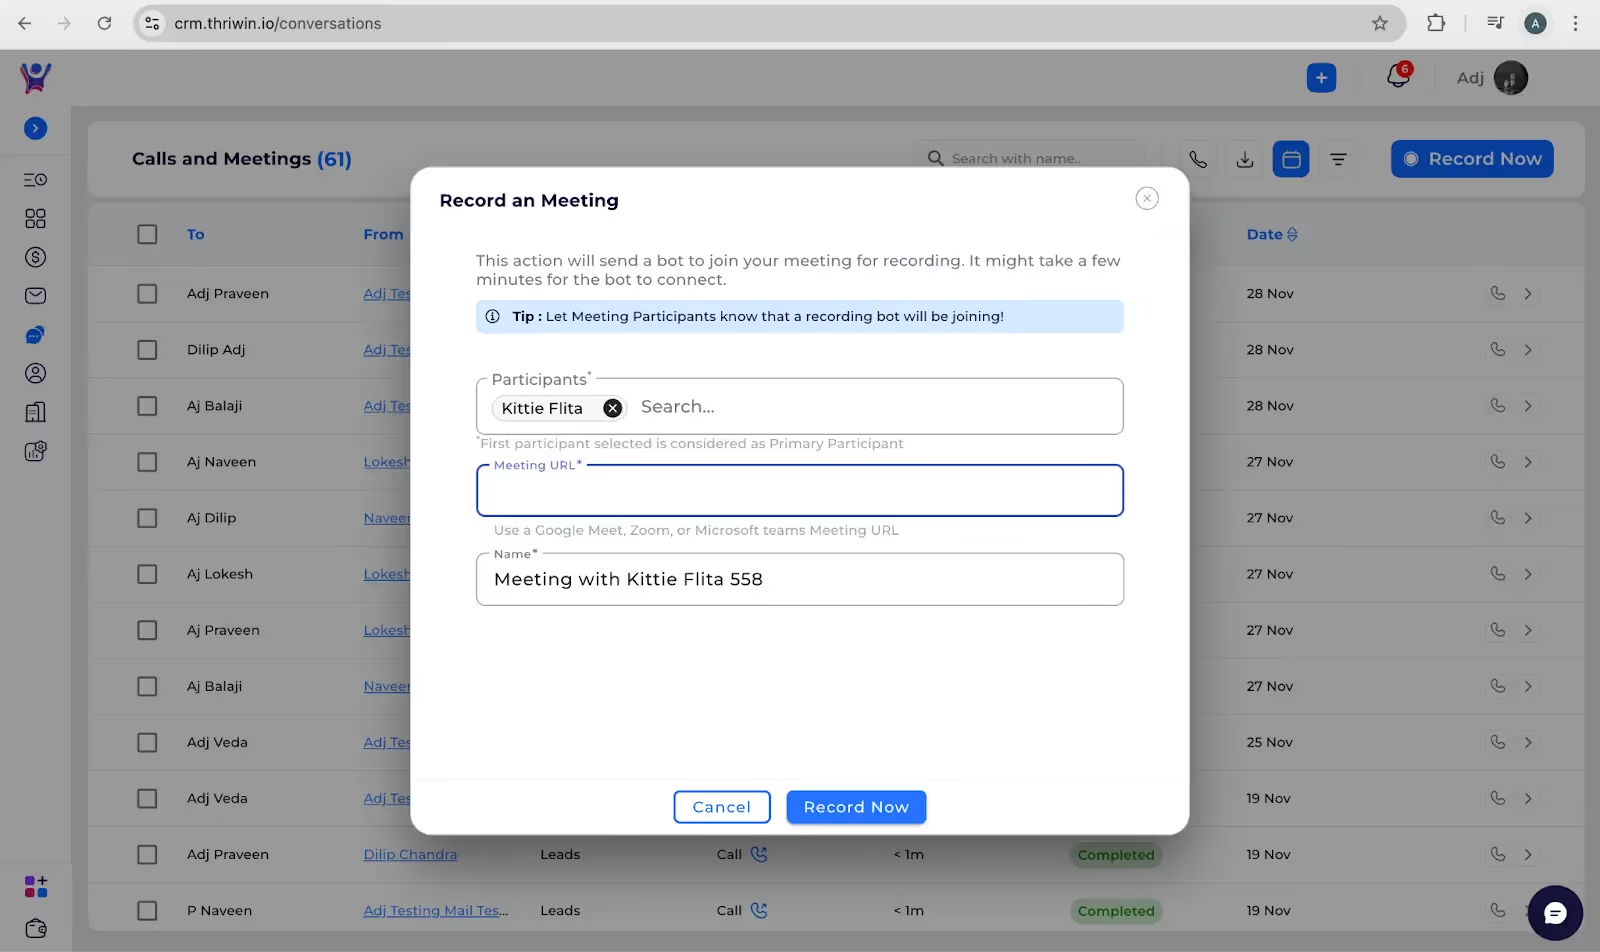
Start a Meeting
- Go to the Calls and Meetings Section:
- Navigate to the Calls and Meetings section on your Thriwin dashboard.
- Click on "Meeting" and Select "Record Now":
- Click on the "Meeting" option.
- From the available options, select "Record Now" to start an instant meeting.

Enter Meeting Details
- Enter Participant Names and Meeting URL:
- In the meeting setup pop-up, enter the names or email addresses of the participants you wish to invite to the meeting.
- Provide the meeting URL (if applicable), which can be a link to the virtual meeting platform (e.g., Zoom, Google Meet).
- Click “Record Now”:
- After entering the details, click the "Record Now" button to launch the meeting instantly and start the recording.
Need More Help?
For further assistance, feel free to contact our support team. Visit our Support Center for detailed help and FAQs.
Instant Meeting
Start meetings in seconds with Thriwin – quick, easy, and effective
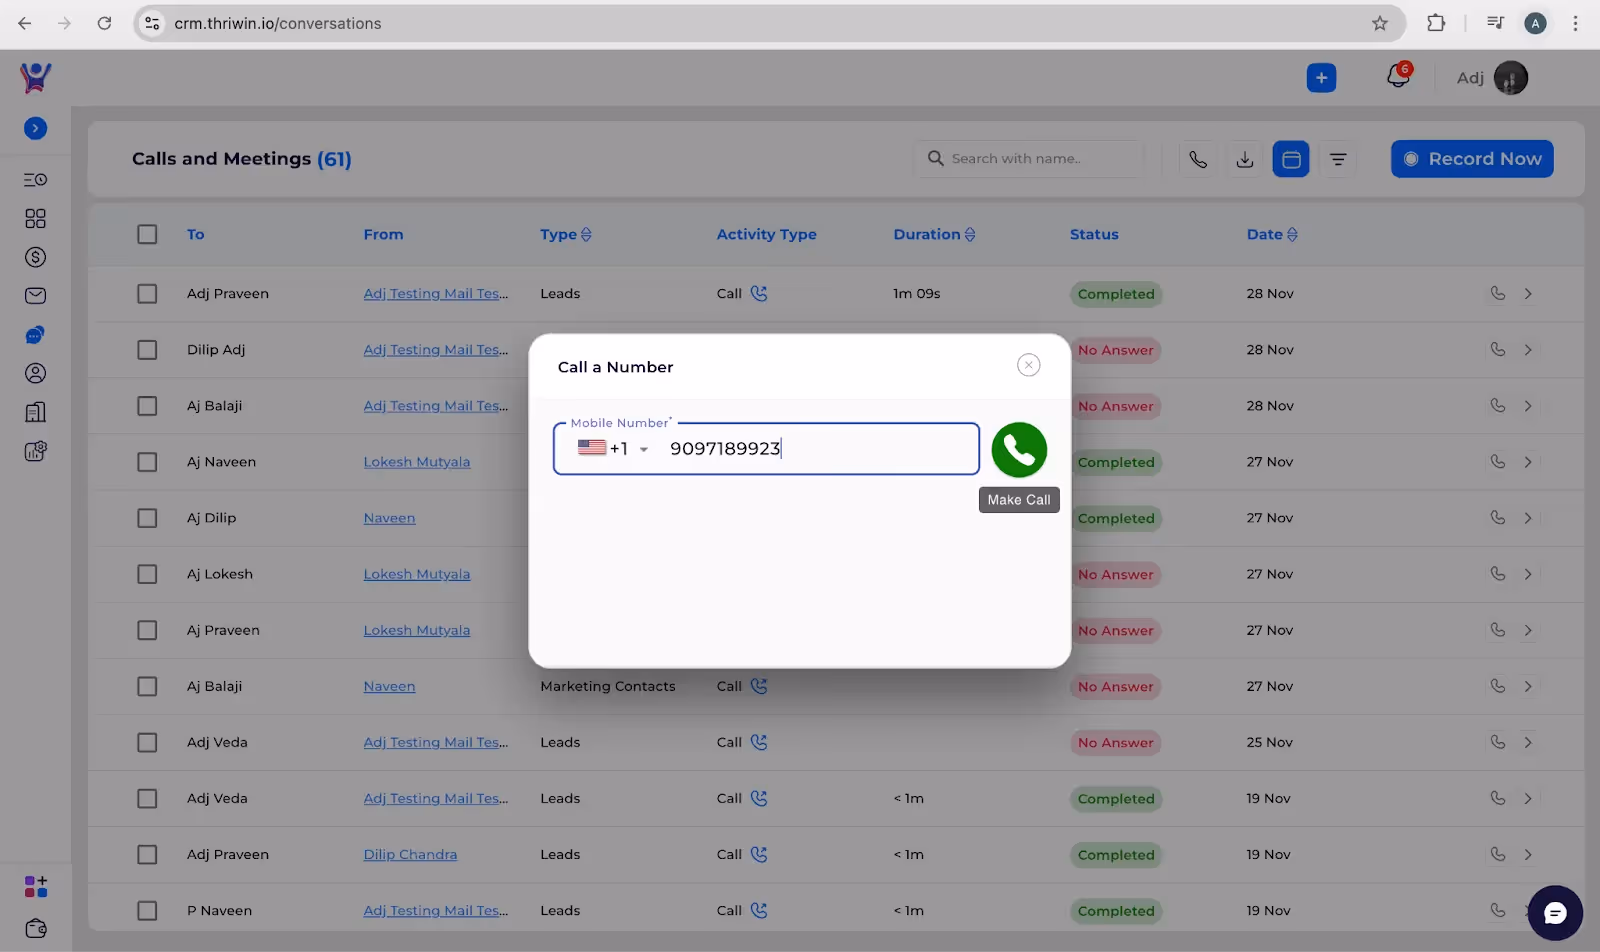
Instant Call
Initiate an Instant Call
- Go to the Calls and Meetings Section:
- Navigate to the Calls and Meetings section of your Thriwin dashboard.
- Click on the "Call" Button:
- In the Calls and Meetings section, you will find the "Call" button. Click on it to initiate an instant call.

Enter Number in Pop-Up
- Enter the Phone Number:
- After clicking the "Call" button, a pop-up will appear prompting you to enter the phone number for the call.
- Type in the phone number of the person you wish to call.
- Click “Start Call”:
- Once the phone number is entered, click the "Start Call" button to initiate the call immediately.
Calling from Lead, Company, or Marketing Contact Details
You can initiate calls directly from the lead, company, or marketing contact details in Thriwin, streamlining the process of reaching out to your contacts.
Navigate to the Lead, Company, or Marketing Contact
- Go to the Leads, Companies, or Marketing Contacts Section:
- From your Thriwin dashboard, navigate to the Leads, Companies, or Marketing Contacts section, depending on the type of contact you want to reach.
- Select the Relevant Lead, Company, or Contact:
- Browse through the list of leads, companies, or contacts and select the specific one you want to initiate a call with.
Click on the Phone Number
- Locate the Phone Number:
- On the contact details page, find the phone number associated with the selected lead, company, or marketing contact.
- Click on the Phone Number:
- You’ll see a clickable phone number (a direct link). Simply click on it to initiate the call.
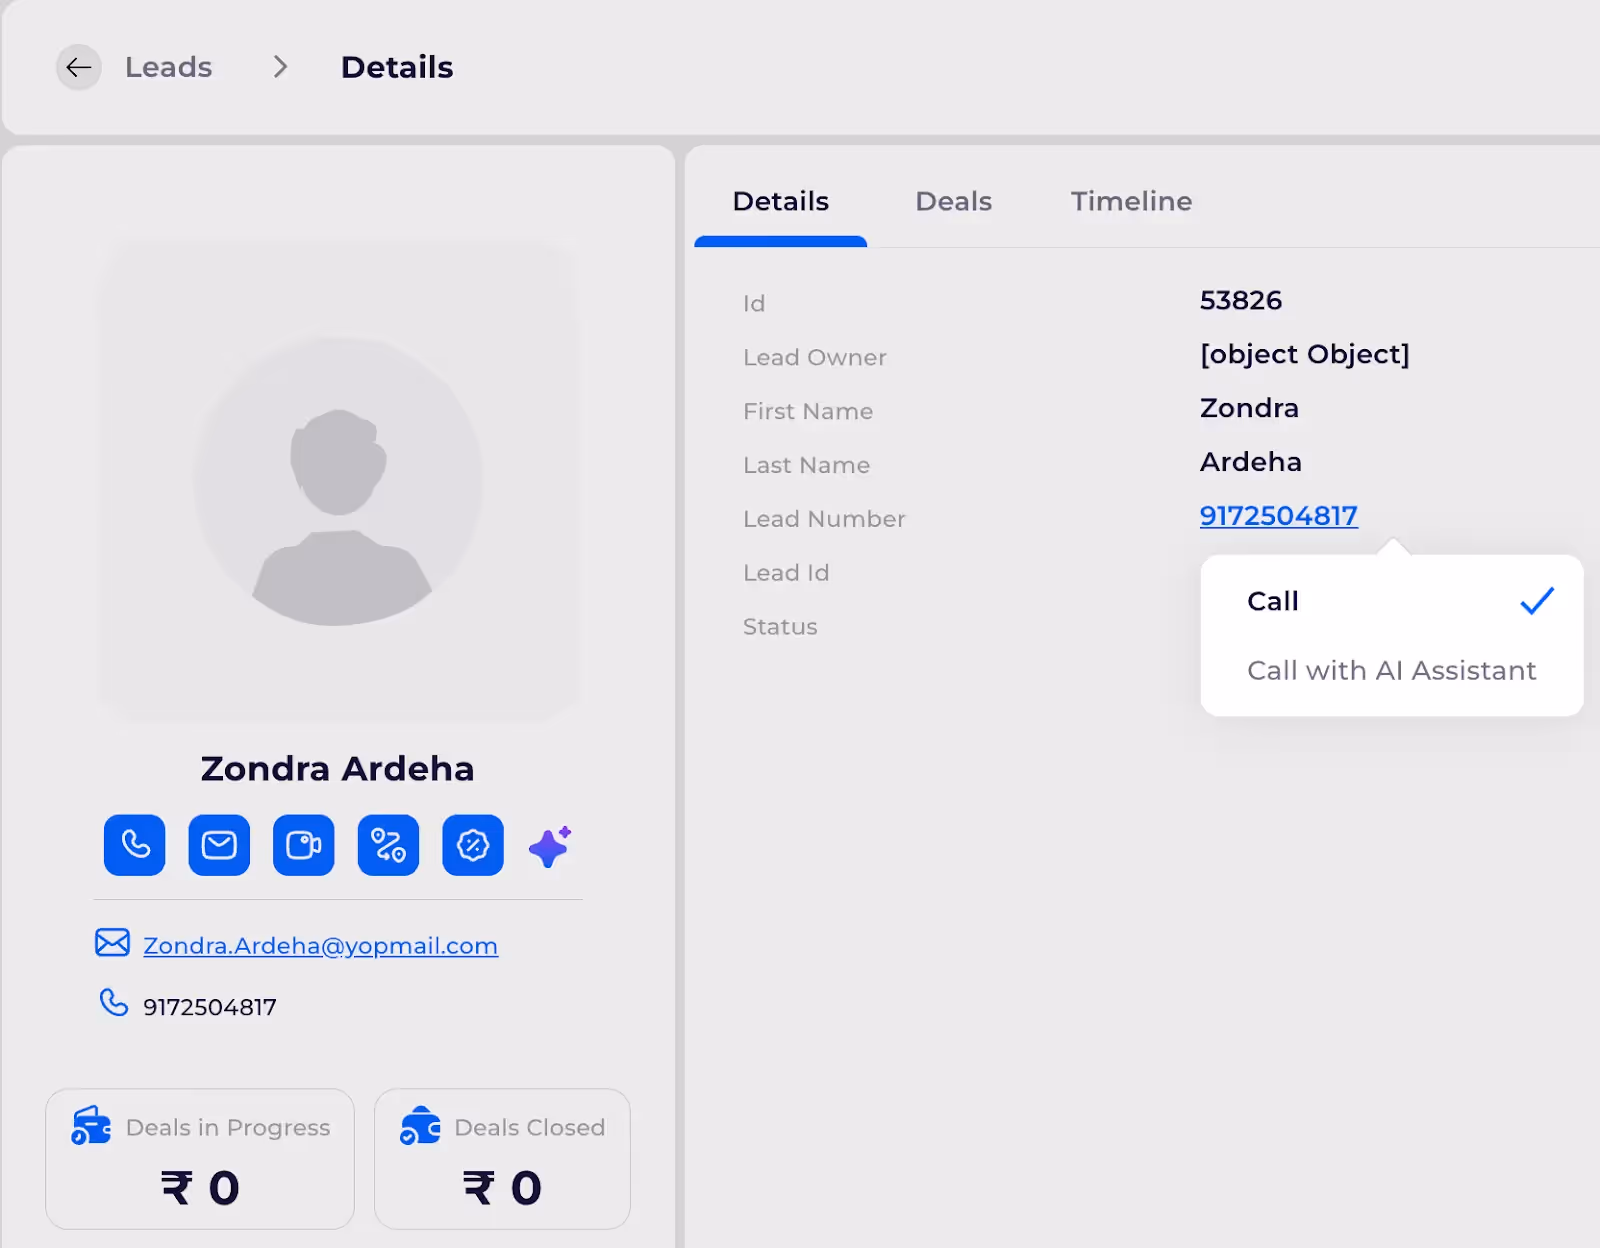
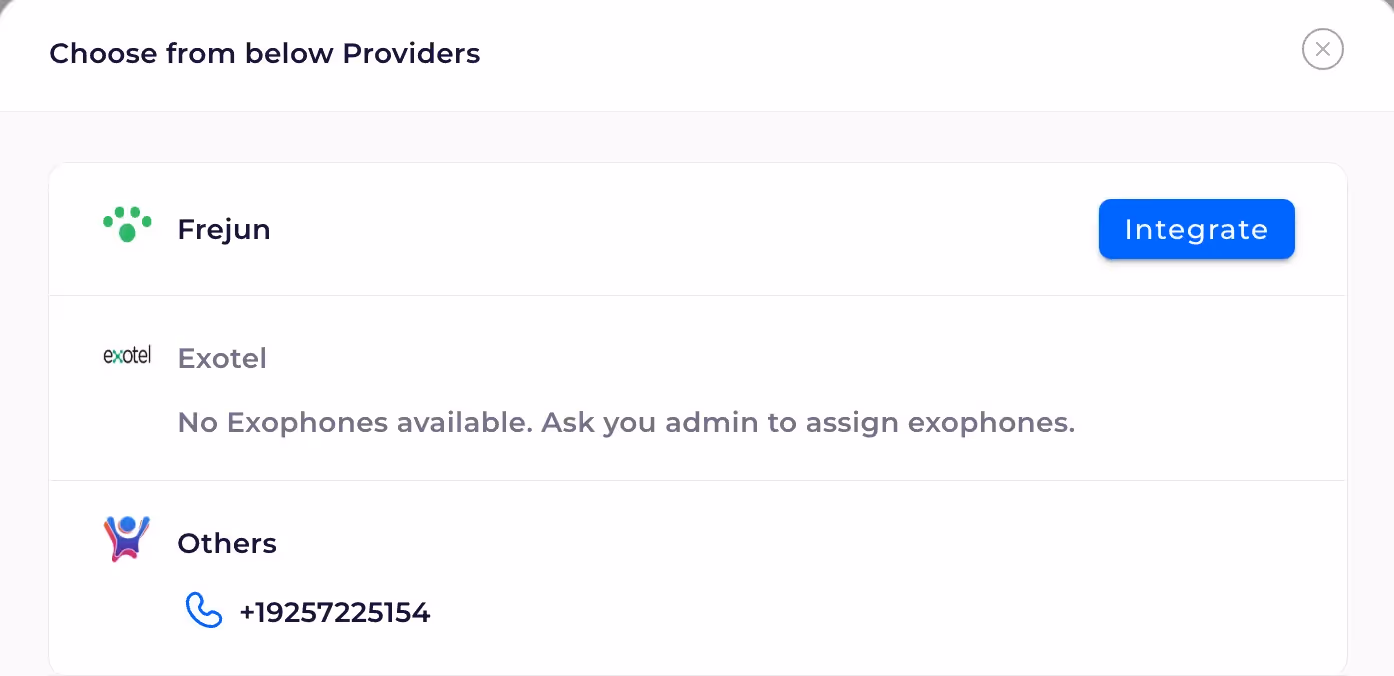
Initiate the Call and Select Provider
- Click on the Phone Number Link:
- After clicking on the phone number link, a prompt will appear asking you to choose your preferred call provider.
- Select the Call Provider:
- Choose the desired call provider (e.g., your phone system, VoIP service, or any other available provider).
- Call Will Be Placed:
- After selecting the call provider, the system will place the call to the contact's phone number.
Instant call
Connect instantly with Thriwin – no delays, just seamless calls!
This guide is designed to help new users get started quickly with scheduling and managing calls and meetings using Thriwin. By following these steps, you can organize virtual meetings efficiently and keep track of your scheduled appointments.
Scheduling a Call or Meeting
Select "Call" or "Meeting" Activity
To schedule a new call or meeting in Thriwin:
- Navigate to the "+" Button: At the top of the navigation bar, you'll find the "+" button. Click on it to open the options menu.
- Select "Call/Meeting": In the options menu, click on the "Call/Meeting" option. This will open the form to create a new call or meeting.
By following these steps, you can easily initiate the process to schedule your call or meeting.

Fill in Call or Meeting Details
- After selecting "Call/Meeting" to create a new call or meeting, you will need to enter the required details:
- Title: Give your call or meeting a relevant title, such as "Sales Call with Client" or "Team Meeting."
- Date and Time:
- Choose the date for the meeting.
- Set the time that works for both you and the participants.
- Participants:
- Add the email addresses or select from your contacts or users in Thriwin.
- Agenda/Description (Optional)some text
- Add a brief agenda or description of what the meeting will be about. This helps participants prepare for the meeting.
- Agenda/Description (Optional)some text

After entering all the required details for your call or meeting, follow these steps to confirm and notify participants:
- Review the Event Details:
- Double-check the title, date, time, participants, and any other details you’ve entered. Ensure that all the participants are correctly listed and that the meeting details are accurate.
- Click “Send Invitations”:
- Once you have reviewed the event, click on the "Send Invitations" button to send the invites to all participants. This will notify them of the meeting schedule and provide them with the meeting link or location.
By clicking Send Invitations, you will finalize the scheduling process, and the participants will receive email notifications with all the meeting details.
Scheduling a call or meeting
Master scheduling and managing virtual meetings with ease
Texts Registration
A2P 10DLC (Application-to-Person 10-Digit Long Code) registration is a mandatory process for businesses in the US that send SMS messages to customers. It ensures compliance with carrier regulations, enhances message delivery rates, and improves trust by verifying the sender's identity. Registration involves submitting business details, use cases, and campaign information to carriers for approval. This process helps businesses maintain high-quality communication while adhering to regulatory standards.
Step-by-Step Instructions
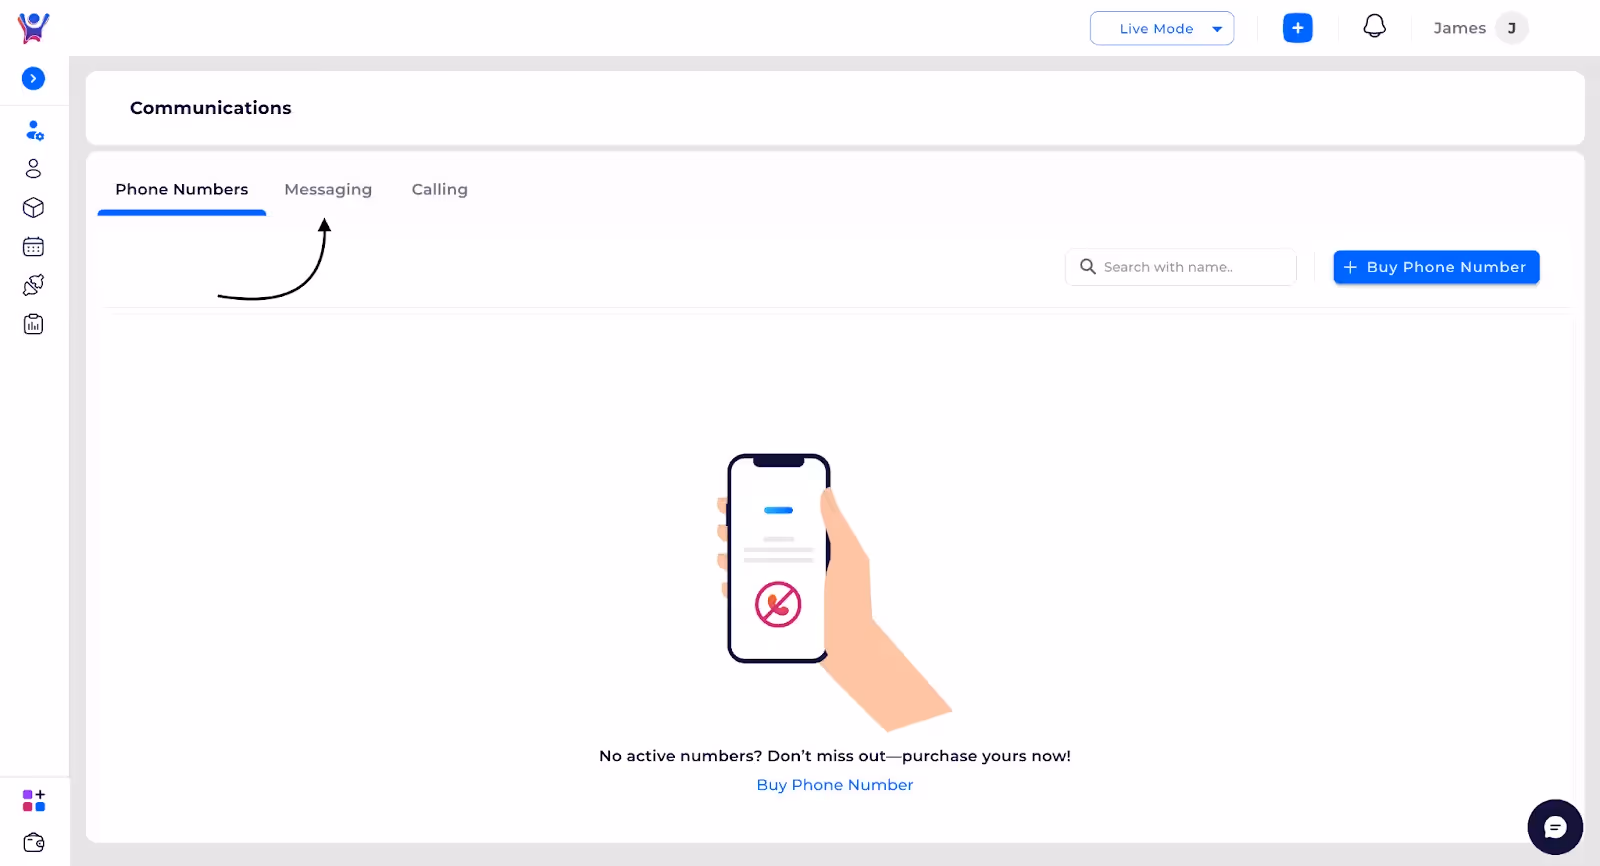
Navigating to Others
- Description: First, navigate to the Channels section in the menu, and then click on the Others option to access the Admin Settings.
- Screenshot (1):
- Screenshot(2)
Navigating to Admin Settings
- Description: If you’re not on the Admin Settings page, click the Admin Settings icon in the menu to navigate there.After navigating to the Admin Settings page, scroll to the bottom to find the Phone Number and SMS Configurations section and click on it. Then, switch to the Messaging tab located at the top.
- Screenshot(1):
- Screenshot(2):
- Screenshot(3):
Selecting Registration type
- Description : Choose one of the options below based on your SMS usage to proceed with registration
- Screenshot :

Filling Registration Form
Here’s a structured outline for filling out the required details for A2P 10DLC registration:
1. Business Information
- Business Name: [Enter business name]
- Business Industry: [Select from options: 'AUTOMOTIVE', 'AGRICULTURE', 'BANKING', 'CONSUMER', 'EDUCATION', 'ENGINEERING', 'ENERGY', 'OIL_AND_GAS', 'FAST_MOVING_CONSUMER_GOODS', 'FINANCIAL', 'FINTECH', 'FOOD_AND_BEVERAGE', 'GOVERNMENT', 'HEALTHCARE', 'HOSPITALITY', 'INSURANCE', 'LEGAL', 'MANUFACTURING', 'MEDIA', 'ONLINE', 'RAW_MATERIALS', 'REAL_ESTATE', 'RELIGION', 'RETAIL', 'JEWELRY', 'TECHNOLOGY', 'TELECOMMUNICATIONS', 'TRANSPORTATION', 'TRAVEL', 'ELECTRONICS', 'NOT_FOR_PROFIT']
- Business Regions of Operation: [Select from options: 'AFRICA', 'ASIA', 'EUROPE', 'LATIN_AMERICA', 'USA_AND_CANADA', 'AUSTRALIA']
- Website URL: [Enter website URL]
- Business Type: [Enter business type]
2. Business Address
- City: [Enter city]
- Country: [Enter country]
- Postal Code: [Enter postal code]
- State or Province: [Enter state/province]
- Street: [Enter street address]
- Street Secondary (optional): [Enter secondary address details if applicable]
3. Trading & Tax Information
- Stock Exchange (if applicable): [Enter stock exchange name]
- Stock Ticker (if applicable): [Enter stock ticker]
- Company Type: [Enter company type]
- Business Registration Identifier:
[Select from options: "US: Employer Identification Number (EIN)", "US: DUNS Number (Dun & Bradstreet)", "Canada: Canadian Business Number", "Great Britain: Company Number", "Australia: Company Number from ASIC", "India: Corporate Identity Number", "Estonia: VAT Number", "Romania: VAT Registration Number", "Israel: Registration Number", "Other"] - Business Registration Number: [Enter registration number]
4. Contact Information
- First Name: [Enter first name]
- Last Name: [Enter last name]
- Email: [Enter email]
- Phone Number: [Enter phone number]
- Business Title: [Enter business title]
- Job Position: [Enter job position]
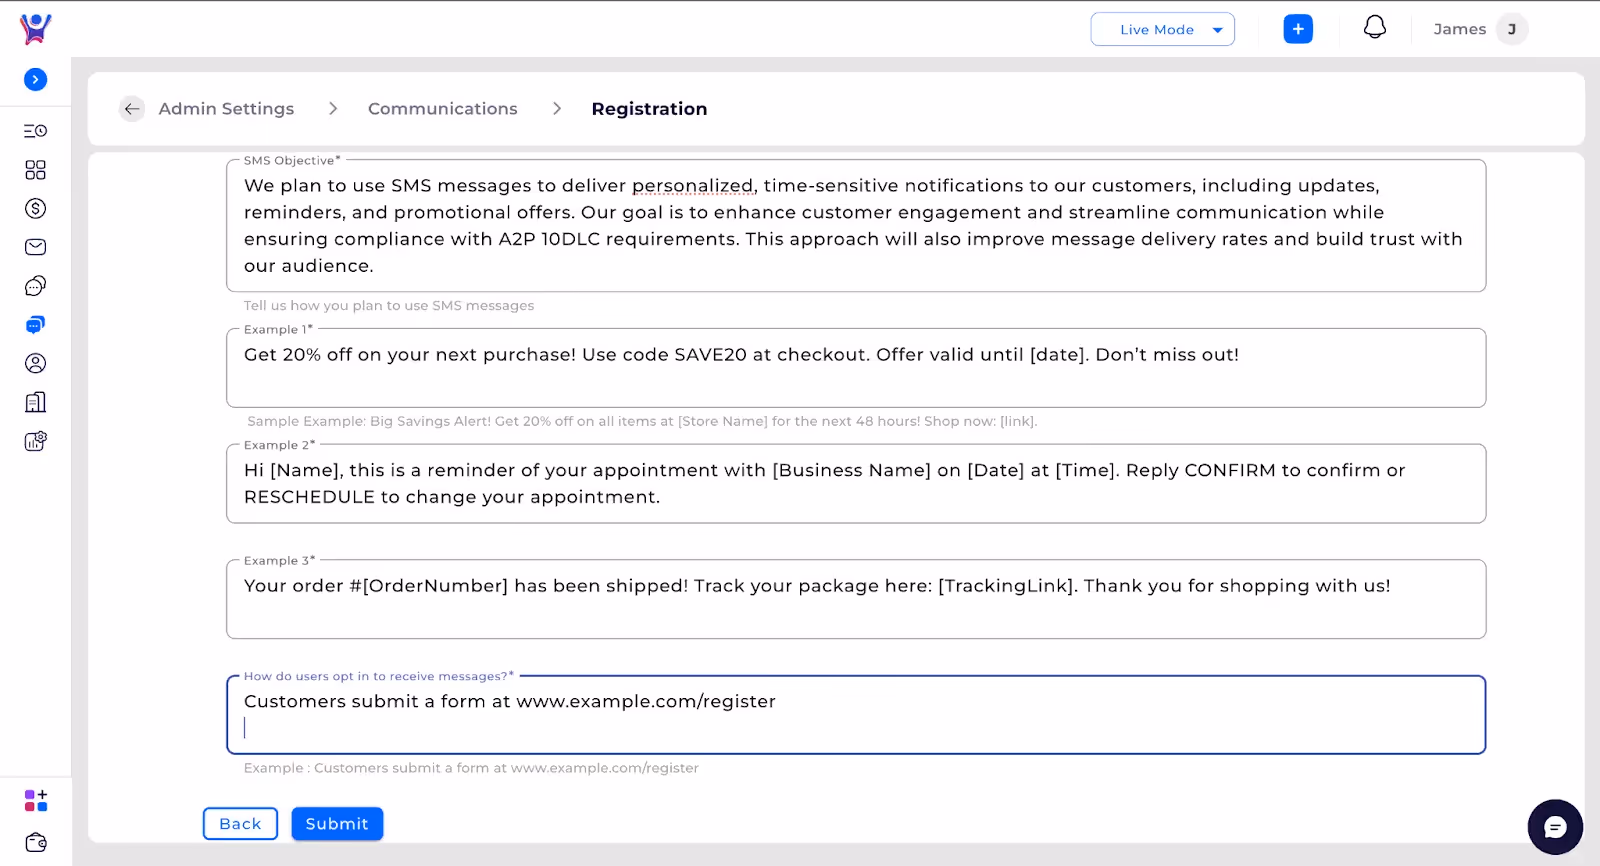
5. SMS Campaign Details
- SMS Objective: [Enter SMS objective]
- How do users opt in to receive messages?
Example: "Users opt in by texting a keyword (e.g., JOIN) to a short code, checking an opt-in box on the website, or confirming consent through a double opt-in process." - Three SMS Examples:(these are samples only)
some text- "Get 20% off your next purchase! Use code SAVE20 at checkout. Valid until [date]."
- "Hi [Name], your appointment with [Business Name] is scheduled for [Date] at [Time]. Reply CONFIRM to confirm or RESCHEDULE."
- "Your order #[OrderNumber] has shipped! Track your package here: [TrackingLink]. Thank you for shopping with us!"
- Screenshot(1):

- Screenshot(2):
Status of Registration
- Description :The registration process for US A2P 10DLC and campaign approval typically takes 2-4 business days after submitting the required information. However, the exact time may vary based on factors.You can track your registration status here. You will also receive an email once your registration is completed. After that, you can start sending SMS messages to US numbers.
- Screenshot:
Frequently Asked Questions (FAQs)
1. What is A2P 10DLC registration?
A2P 10DLC (Application-to-Person 10-Digit Long Code) registration is required for businesses in the US to send SMS messages to customers. It ensures compliance with carrier regulations and improves message delivery rates.
2. How long does it take to complete the registration?
Typically, the registration process takes 2-4 business days after submission. You will be notified by email once your registration is approved.
3. How can I track my registration status?
You can track the status of your registration directly from the platform. You will also receive an email notification once your registration is complete.
4. What do I do after my registration is approved?
Once your registration is approved, you can start sending SMS messages to US numbers using your A2P 10DLC-registered number.
5. How do I know if I need A2P 10DLC registration?
If your business plans to send SMS messages to US customers for marketing, customer support, or notifications, you will need to register for A2P 10DLC to ensure compliance and better message delivery.
6. What information is required for registration?
You will need to provide business information, contact details, trading and tax info, as well as SMS campaign details such as your SMS objective and how users opt in to receive messages.
7. What happens if my registration is rejected?
If your registration is rejected, you will be notified, and you may need to provide additional information or correct any discrepancies. You can re-submit once the required changes are made.
Need More Help?
- Contact Support: For further queries, reach out to our support team.
A2P 10DLC Registration- Registration for Start Messaging
Your Complete Guide to A2P 10DLC Registration:
This method allows you to create a Power Dialer list directly from your marketing contacts, simplifying the process.
Step-by-Step Instructions
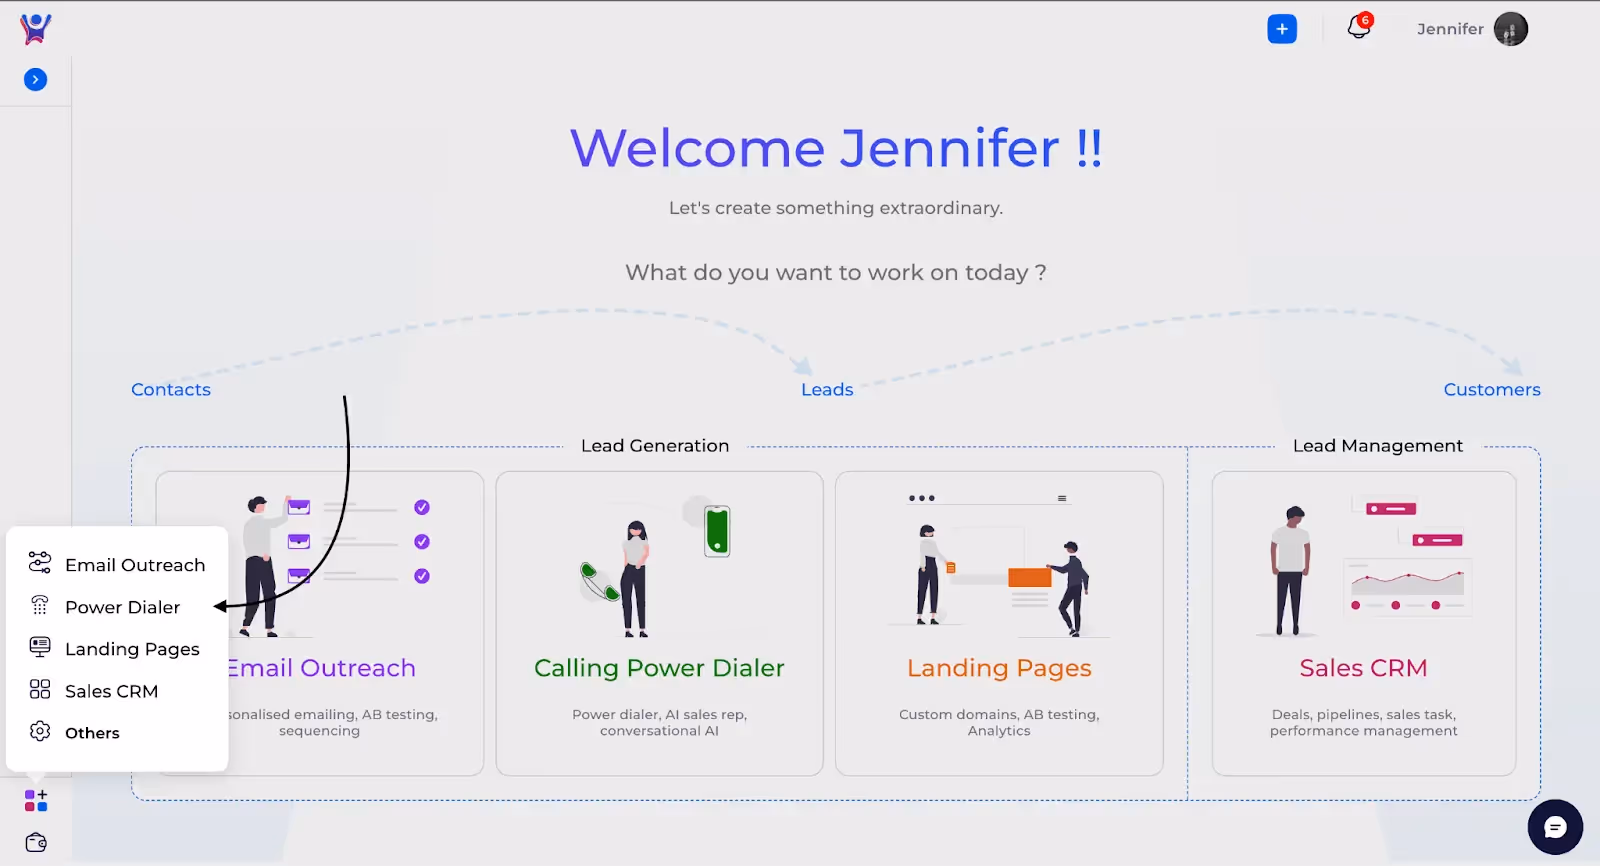
Step 1: Navigating to Power Dialing Channel
- Description: First, navigate to the Channels section in the menu, and then click on the Power Dialing option to access the dialing list.
- Screenshot (1):
- Screenshot(2)
Step 2: Navigating to Marketing Contacts
- Description: This will take you to the page where you can view and manage all your marketing contacts. From here, you can select contacts to add to your Power Dialer lists or perform other actions.
- Screenshot:

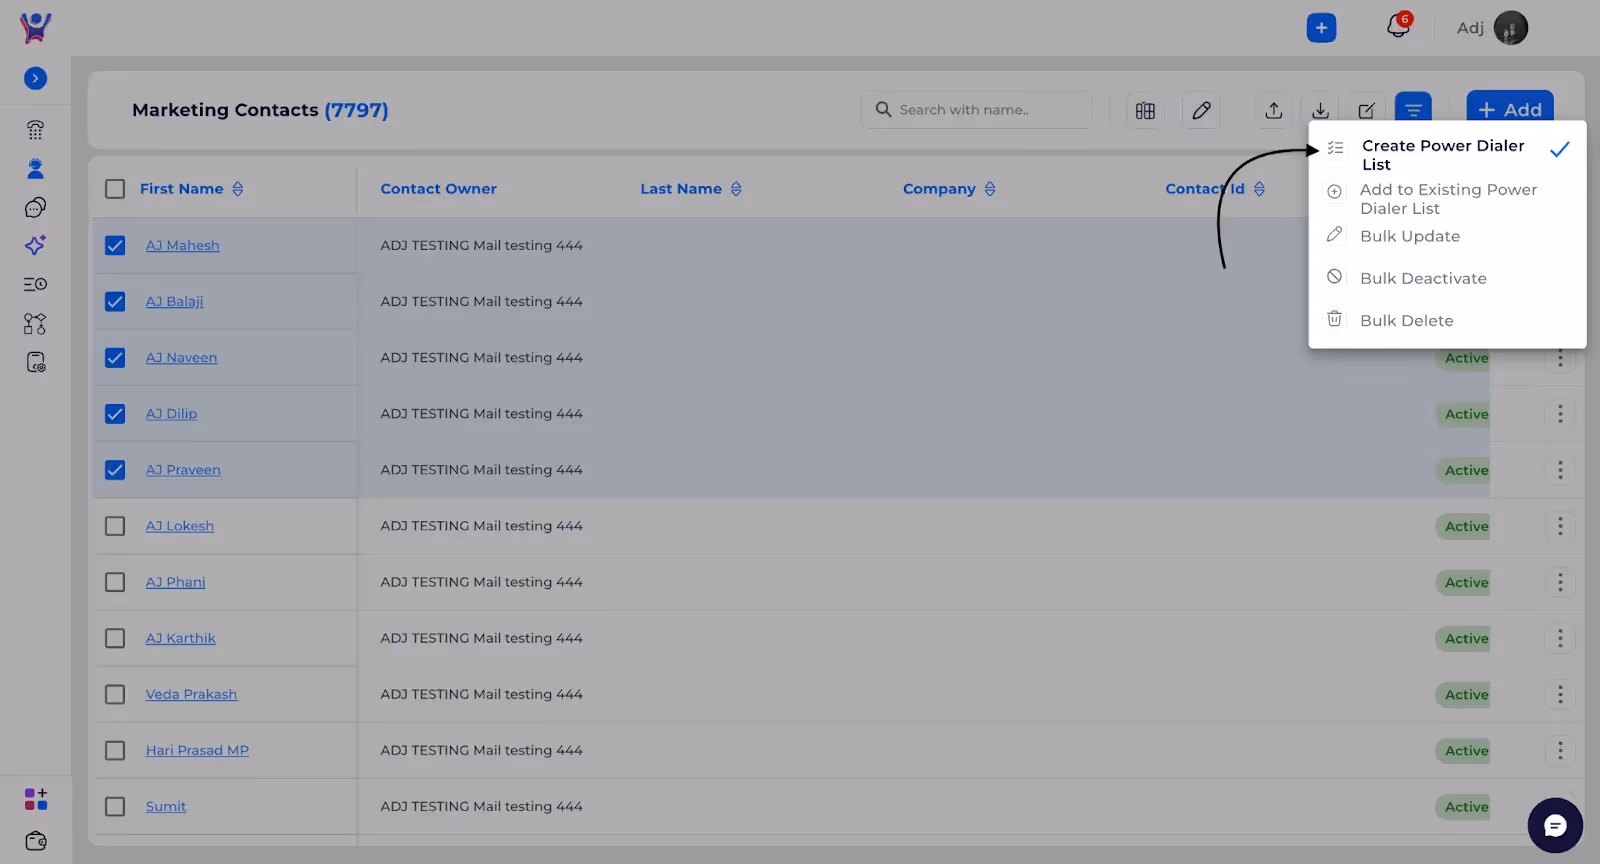
Step 3: Selecting Marketing Contacts
- Description : You can select individual marketing contacts or select all contacts at once. After making your selection, click on the Bulk Actions icon at the top to perform actions such as adding the contacts to a Power Dialer list.
- Screenshot :

- Screenshot(2):

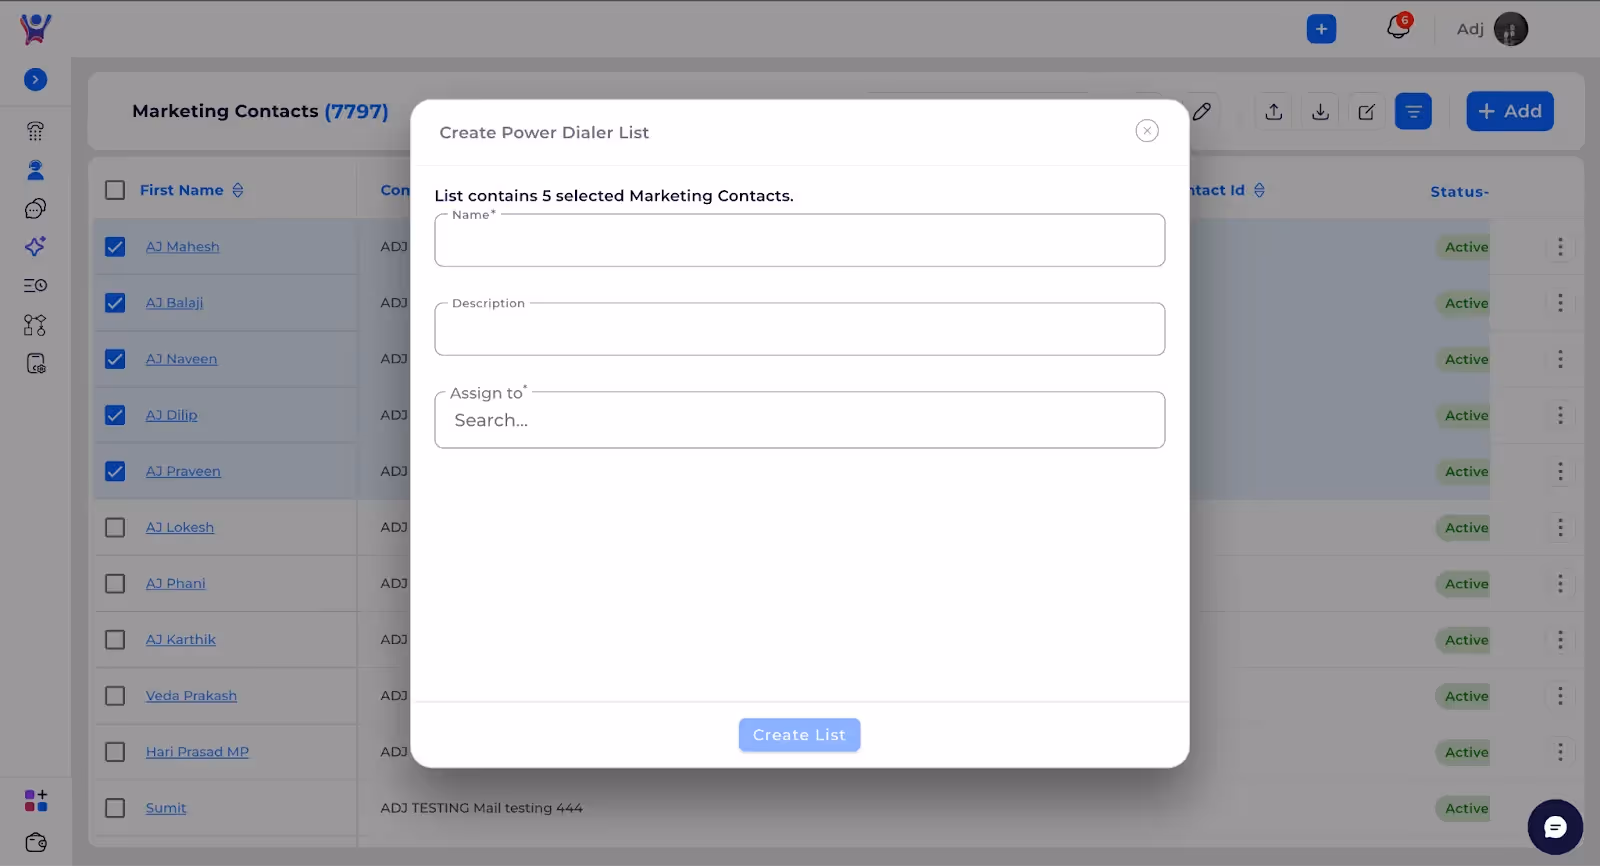
Step 4: Select Create New Power Dialer List
- Description : In Bulk Actions, select Create New Power Dialer List, then provide the basic details for the new Power Dialer list, such as Name, Description, and Assign To. After entering the details, click Create List to finalize and create the new Power Dialer list with the selected contacts.
- Screenshot(1):
- Screenshot(2):
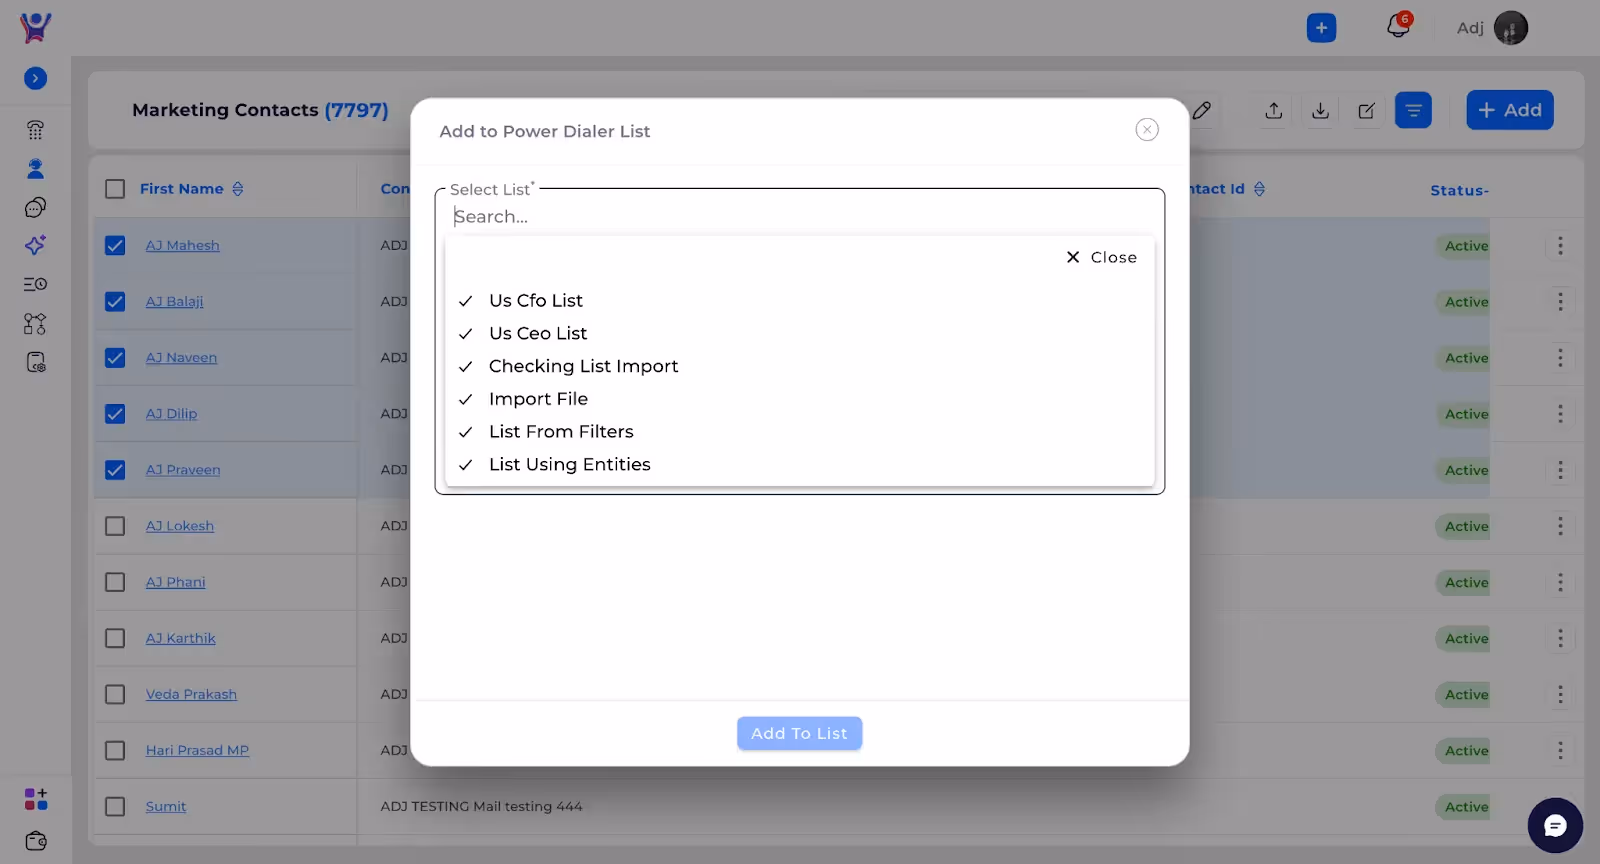
Step 5: Adding Contacts to Existing Power Dialer List (optional)
- Description :You can select the contacts, then click on Bulk Actions and choose Add to Existing Power Dialer List. Next, select any existing list from the available options to add the selected contacts to that particular Power Dialer list.
- Screenshot(1):

- Screenshot(2):
FAQs
1. How can I add contacts to an existing Power Dialer list?
To add contacts to an existing Power Dialer list, select the contacts you want to add, click on Bulk Actions, then choose Add to Existing Power Dialer List. Select the desired list and confirm to add the contacts.
2. Can I add multiple contacts at once to a Power Dialer list?
Yes, you can select multiple contacts or select all contacts, and then use the Bulk Actions option to add them to an existing Power Dialer list.
3. What happens after I add contacts to a Power Dialer list?
Once the contacts are added, they will appear in the selected Power Dialer list, ready for use in your outbound calling.
4. Can I add contacts to a new Power Dialer list?
Yes, you can create a new Power Dialer list by selecting Create New List in the Bulk Actions menu. After providing the necessary details, the selected contacts will be added to the newly created list.
5. Can I add contacts to multiple Power Dialer lists at the same time?
Currently, you can only add selected contacts to one Power Dialer list at a time. To add them to multiple lists, repeat the process for each list.
Need More Help?
- Contact Support: For further queries, reach out to our support team
Create a Powerdialer List from Marketing Contacts
Effortlessly turn your marketing contacts into a Power Dialer list
The purpose of creating a Power Dialer list using an import file is to efficiently upload a large set of contacts into the system for outbound calling. This method allows you to quickly create and manage Power Dialer lists by importing pre-existing contact data, ensuring faster setup and reducing manual entry. It streamlines the process of organizing contacts for automated dialing, improving productivity for sales and support teams.
- Purpose: This is a step-by-step explanation on how to set up Power Dialing in Thriwin to efficiently make outbound sales calls and track your call activities.
Step-by-Step Instructions
Step 1: Navigating to Power Dialing Channel
- Description: First, navigate to the Channels section in the menu, and then click on the Power Dialing option to access the dialing list.
- Screenshot (1):
- Screenshot(2)
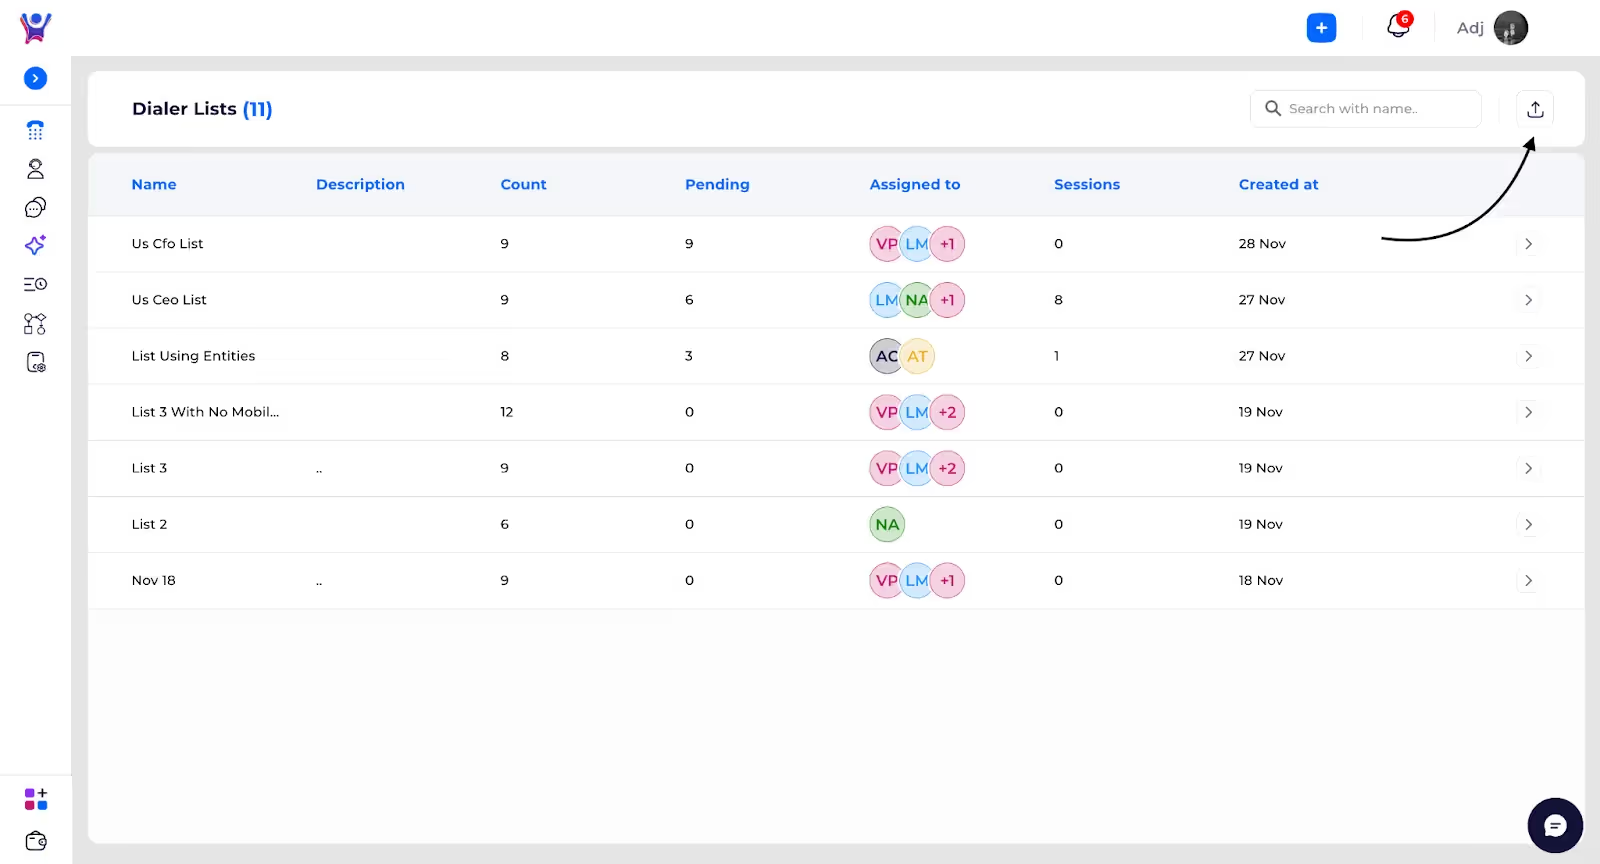
Step 2: Power Dialer List
- Description: This is the Power Dialer List page, where you can view all power dialer lists created by you or assigned to you. Each list displays basic details such as:
- Name
- Description
- Count
- Pending
- Assigned to
- Sessions
- Created at
You can also click on the Upload button at the top to add new lists.
- Screenshot
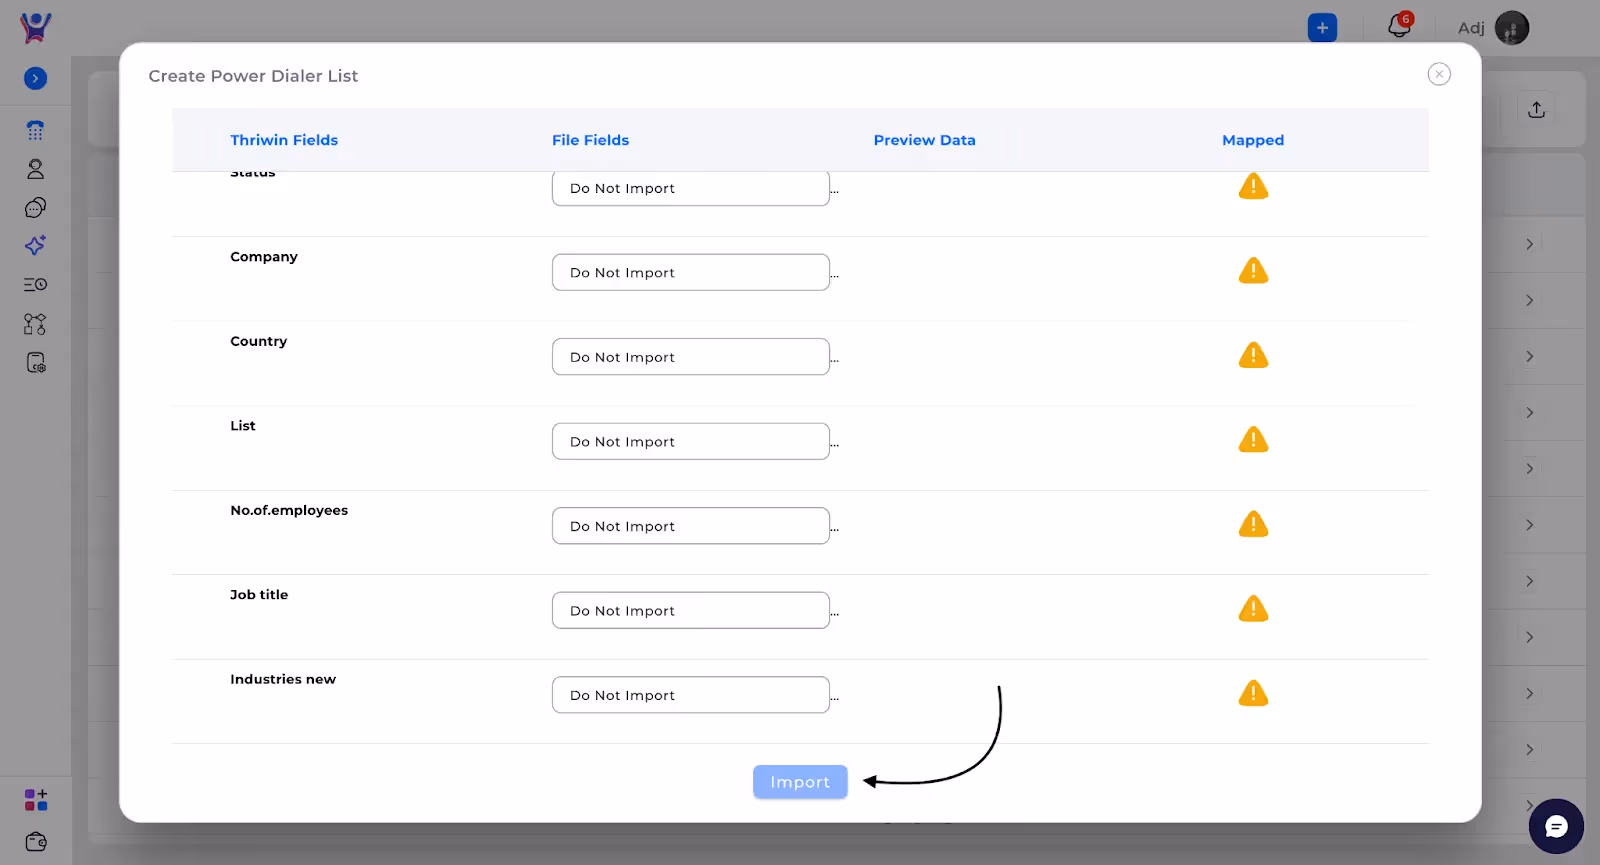
Step 3: Uploading to Power Dialer List
Description: When uploading a new power dialer list, you need to provide basic details such as:
- Name: The title of the list.
- Description: A brief explanation of the list.
- Assign To: Select the users to whom this list should be assigned.
Next, upload the file containing your contact data and map the fields to ensure the data aligns correctly. Once done, click Submit, and the power dialer list will be created successfully.
Screenshot(1):

Screenshot(2):
FAQs
1. How do I create a new Power Dialer list?
To create a new Power Dialer list, navigate to the Power Dialer List page, click on the Upload button, and fill in the necessary details such as Name, Description, and Assign To. Then, upload the file containing your contacts, map the fields, and click Submit to create the list.
2. What file format is supported for uploading a Power Dialer list?
The Power Dialer list supports CSV or Excel files for uploading. Ensure that the file is properly formatted with the required fields before uploading.
3. Can I assign a Power Dialer list to multiple users?
Yes, you can assign a Power Dialer list to multiple users by selecting the relevant users in the Assign To section during the creation process.
4. What happens after I submit a Power Dialer list?
After you click Submit, the Power Dialer list will be created and available on the list page. The assigned users will be able to access and use the list for their outbound calls.
5. How do I edit or update an existing Power Dialer list?
You can edit basic details such as Name, Description, and Assign To. Additionally, you can add more contacts by selecting contacts from the Marketing Contacts page and adding them to a specific list.
Need More Help?
- Contact Support: For further queries, reach out to our support team.
Create a Powerdialer by importing a File
Create powerdialer list by Importing a file- Process made simple
Power Dialer
It is an automated calling system designed to streamline outbound calls by dialing numbers sequentially from a power dialer list. It minimizes downtime and improves efficiency by automating call placement and connection. Ideal for sales and support teams, it boosts productivity by eliminating manual dialing and delays.
Introduction
- Purpose: Step by step explanation on all operations that can be performed on the Power Dialer
Step-by-Step Instructions
Step 1: Power Dialer List
- Description: This is the Power Dialer List page, where you can view all power dialer lists created by you or assigned to you. Each list displays basic details such as:
- Name
- Description
- Count
- Pending
- Assigned to
- Sessions
- Created at
- Screenshot:
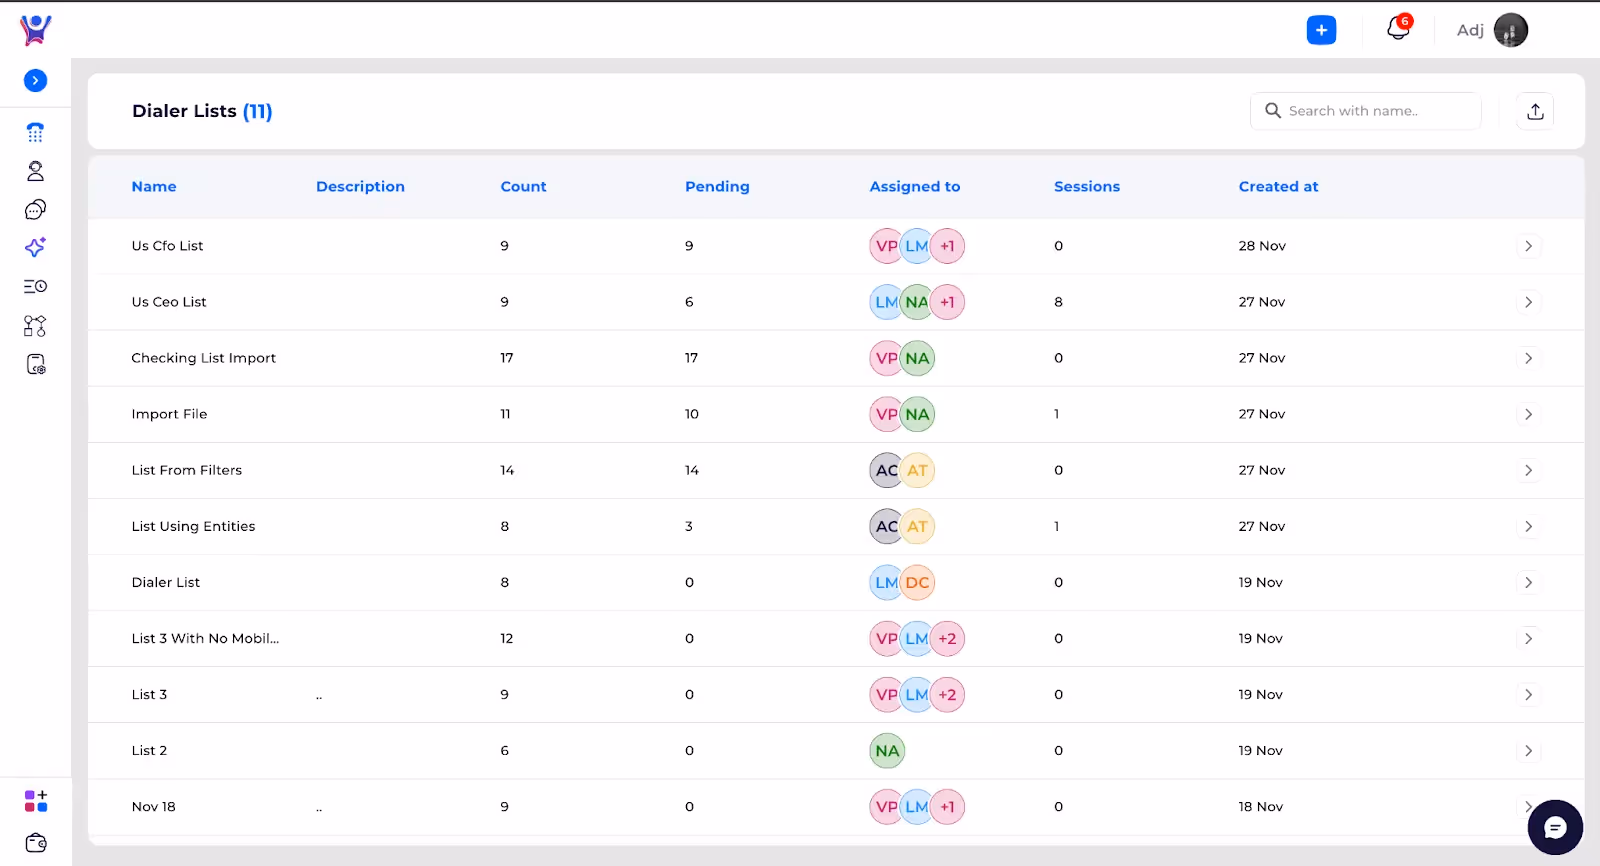
Step 2: Power Dialer List Details
- Description: Here, you can view all the contacts assigned to the list along with the status of each contact, such as Pending, Completed, No Answer, etc. At the top of the page, you have the option to Start or Resume your session. Additionally, you can reset the status of contacts by clicking on the Reset button at the top, allowing you to manage the progress of your calling sessions effectively.
- Screenshot (1):
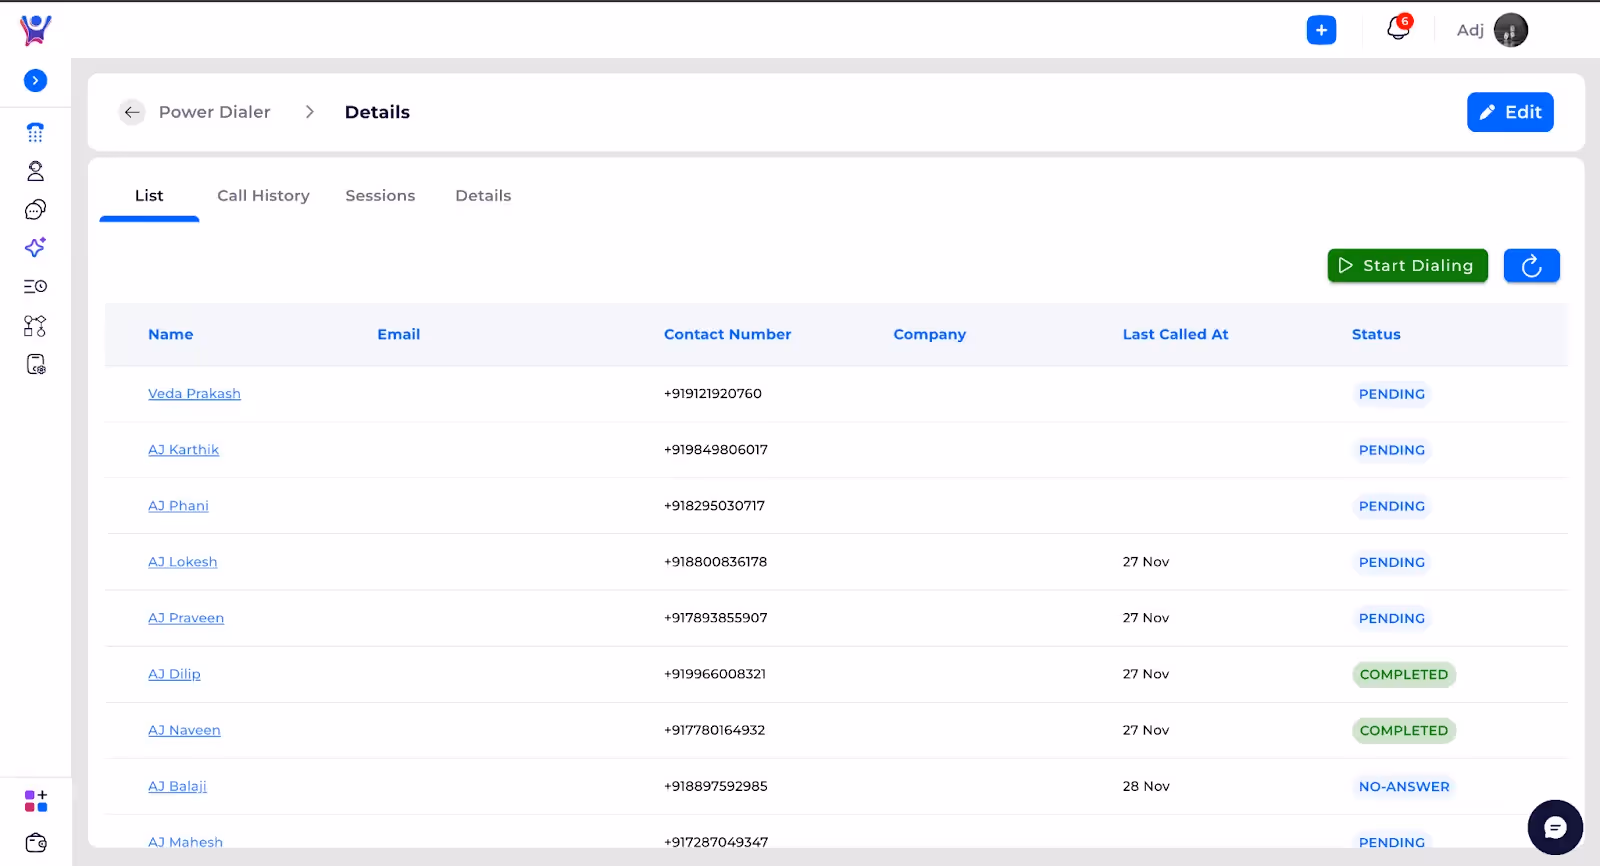
- Screenshot(2):
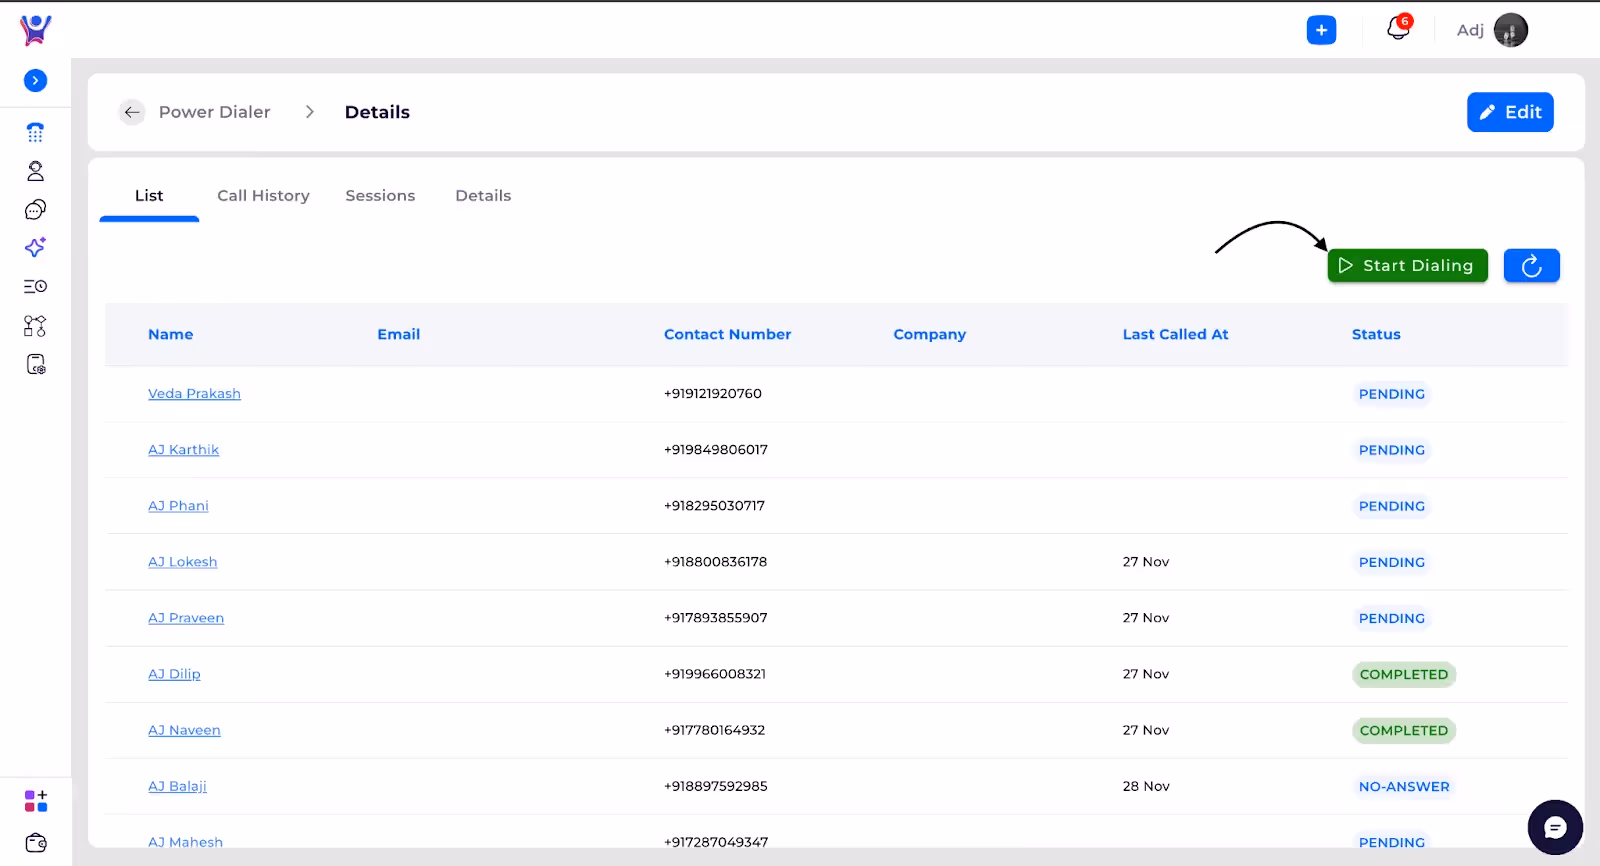
- Screenshot(3):
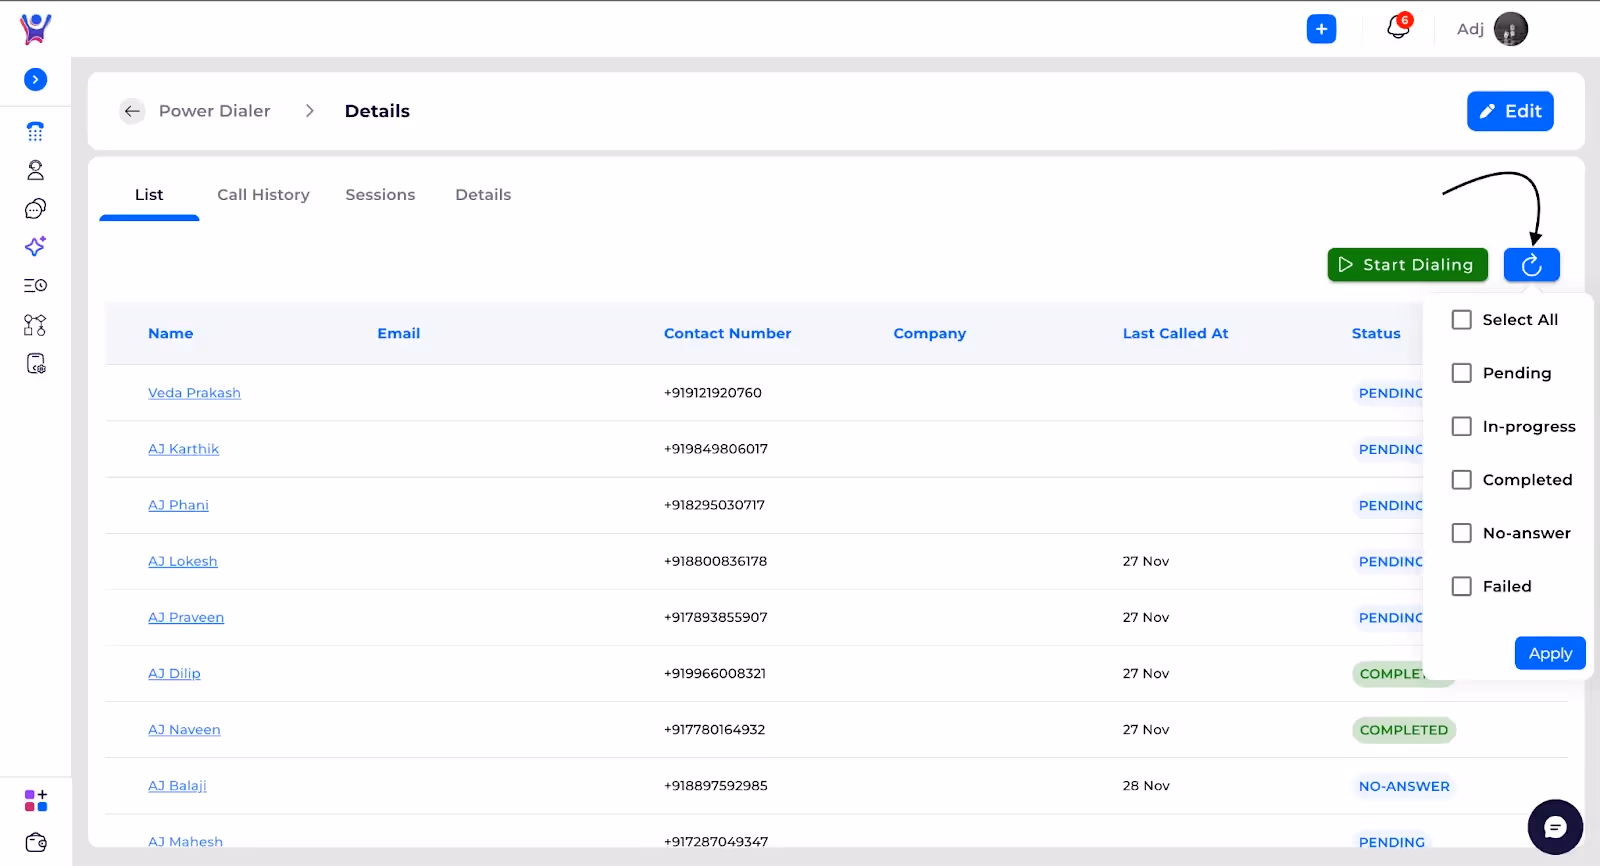
- Note: You can reset the status of contacts to make them available for calling again if they were previously marked as Completed or No Answer, etc.. This allows you to retry calling those contacts during future sessions.
Step 3: Call History
- Description: Here, you can view the entire call history for the particular Power Dialer list, including details of each call made, such as call duration, outcome, and any associated notes. This helps you track the progress and performance of your calling.
- Screenshot:

Step 4: Sessions
- Description: Here, you can view all the session details, including Total Calls, Answered Calls, Total Talk Time, Average Talk Time, and the User Name associated with each session. This provides a comprehensive overview of the session's performance and metrics.Clicking on a single session will provide detailed information, including individual call data, outcomes, duration, and the associated user.
- Screenshot(1):

- Screenshot(2):
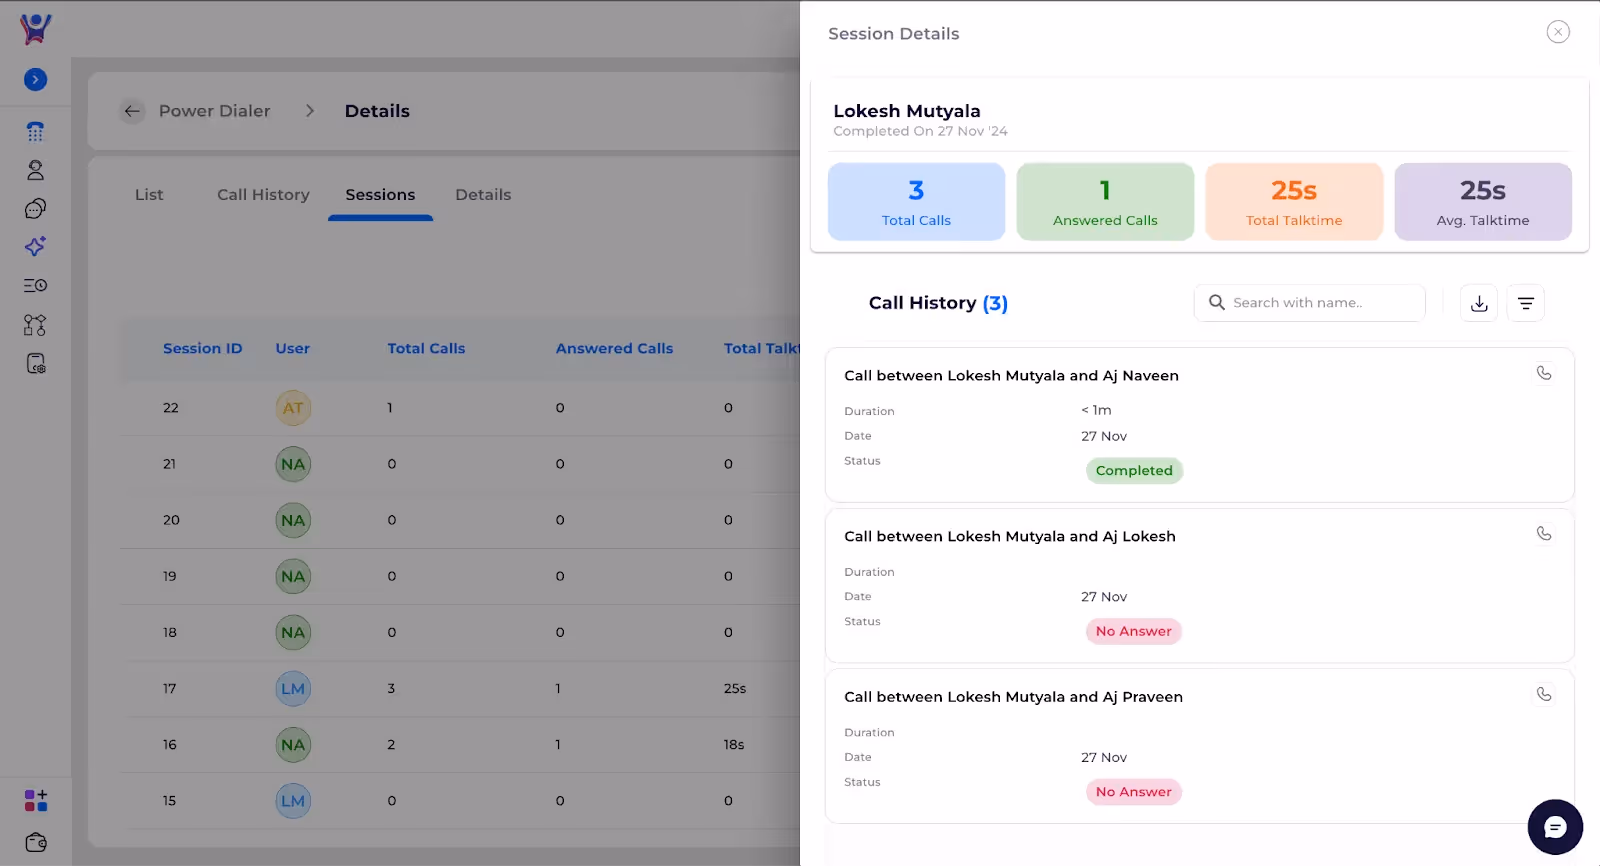
Step 4: Details
- Description: The Dialer List displays comprehensive details, including:some text
- Basic Information: List name, description, and assigned users.
- KPIs: Metrics such as total calls, answered calls, total call duration, and average call duration. These are available both for all users collectively and for each individual user.
- Screenshot:
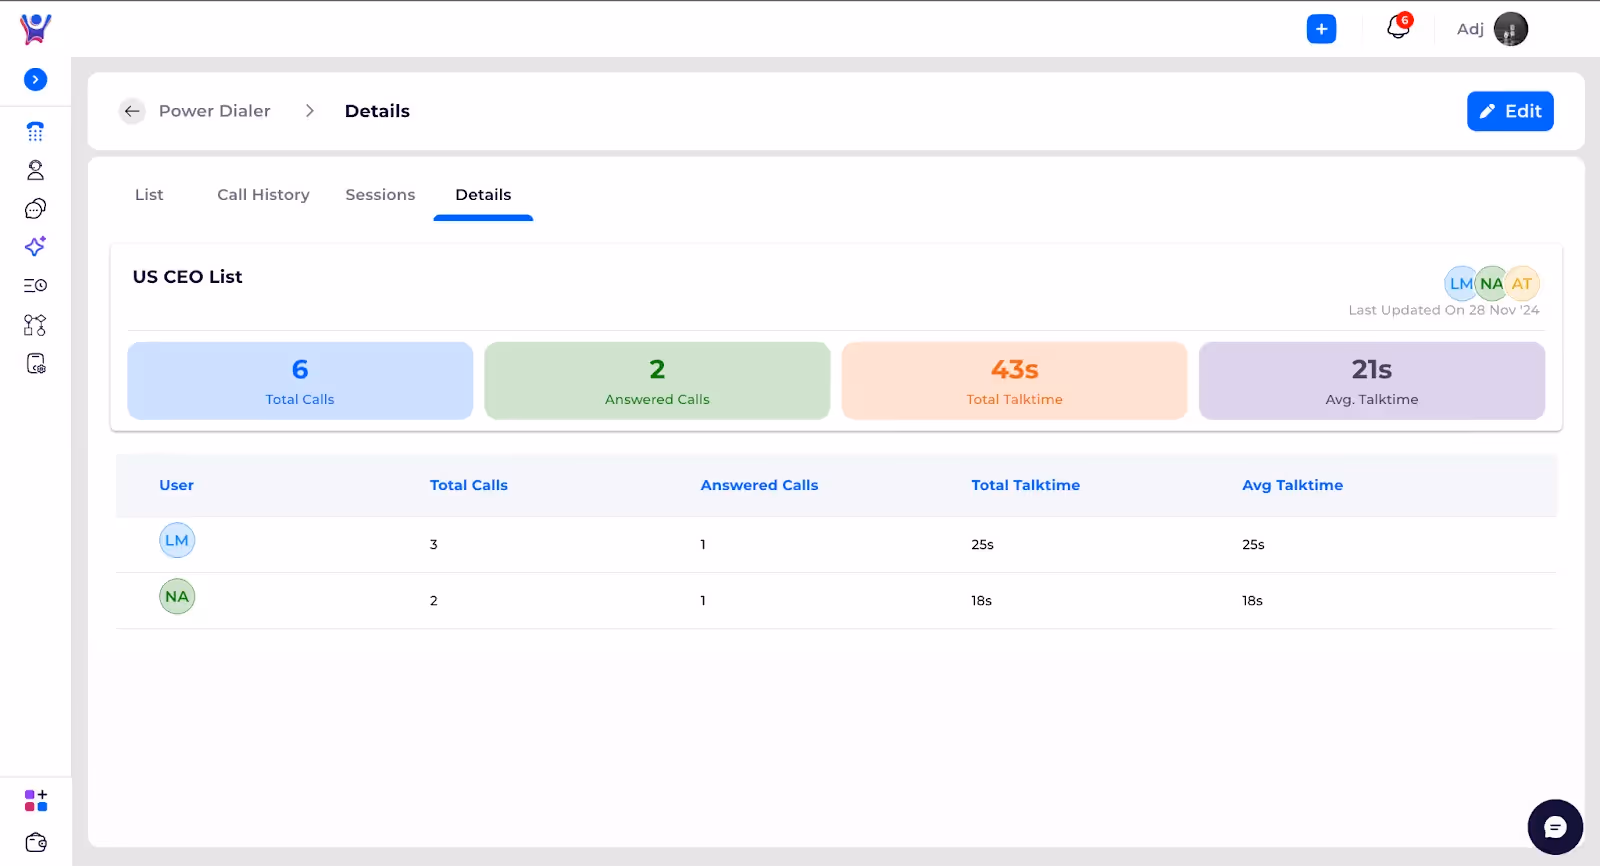
Step 5: Stats of All Users
- Description: Under the Power Dialer menu, you can:some text
- View KPIs: Track key performance indicators across all dialer lists.
- Monitor Sessions: Access details of ongoing and completed sessions.
- Review Call History: See the complete history of calls made on all dialer lists.
- Screenshot(1): KPIs

- Screenshot(2): Call History

- Screenshot(3): Sessions

Step 6: Dialer Settings
- Description: In Dialer Settings, you can configure the call interval, specifying the number of seconds between two consecutive calls. This allows you to control the pacing of outgoing calls.
- Screenshot:

FAQs: Power Dialer List Details
1. What information can I view in the Dialer List?
You can view:
- Basic details: List name, description, and assigned users.
- KPIs: Metrics like total calls, answered calls, total duration, and average call duration.
2. Can I see KPIs for individual users?
Yes, KPIs are available both for all users collectively and for each individual user.
3. Where can I see the call history for a dialer list?
The complete call history for all dialer lists can be found under the Power Dialer menu.
4. How do I track ongoing or past sessions?
Sessions are displayed under the Power Dialer menu, along with their statuses and details.
5. Can I customize the call interval between consecutive calls?
Yes, you can adjust the call interval in seconds under Dialer Settings.
6. Is there a way to see performance metrics for a specific list?
Yes, navigate to the specific dialer list, where you can view its performance metrics and details.
7. How can I identify which users are assigned to a particular dialer list?
Assigned users are listed under the Basic Details section of each dialer list.
Need More Help?
- Contact Support: For further queries, reach out to our support team.
Access and Manage Powerdialer
How to perform various Operations on powerdialer- Complete guide
A pipeline is a visual representation of the stages a potential deal progresses through in the sales process. We have seen creating deals , editing deals and deactivating deals all in a single pipeline . We can create a custom pipeline.
Note : Only Admins can add a pipeline.
Create Pipeline
- In Menu select others from channels and in that select admin settings from menu, from there select pipeline from the list of admin settings.
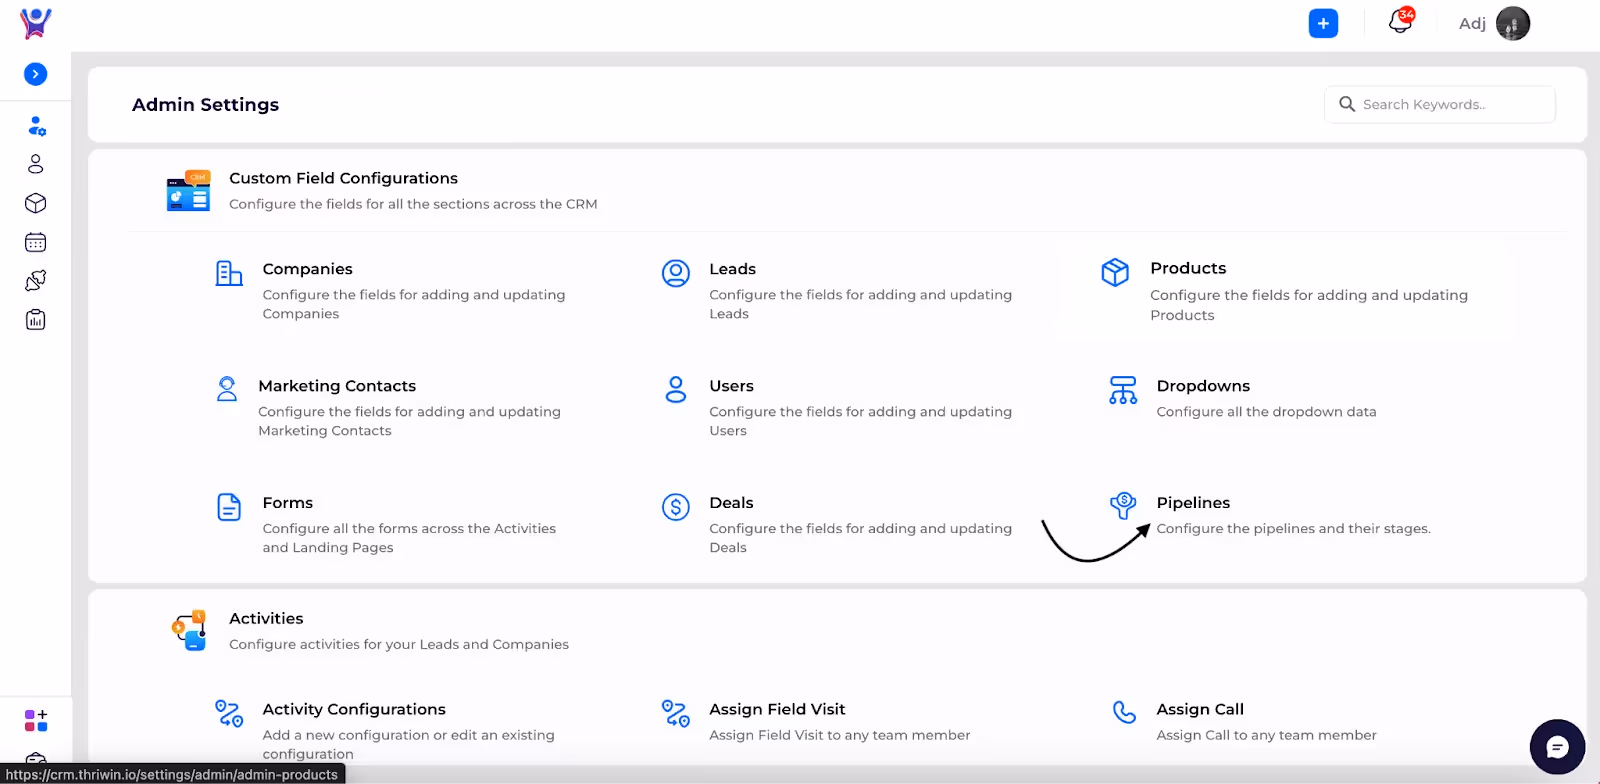
- You can click on the ADD button to create a pipeline.
- Here is the interface for creating the pipeline , you have a input box where you enter the pipeline name and using ADD STAGE button to add new stages ,
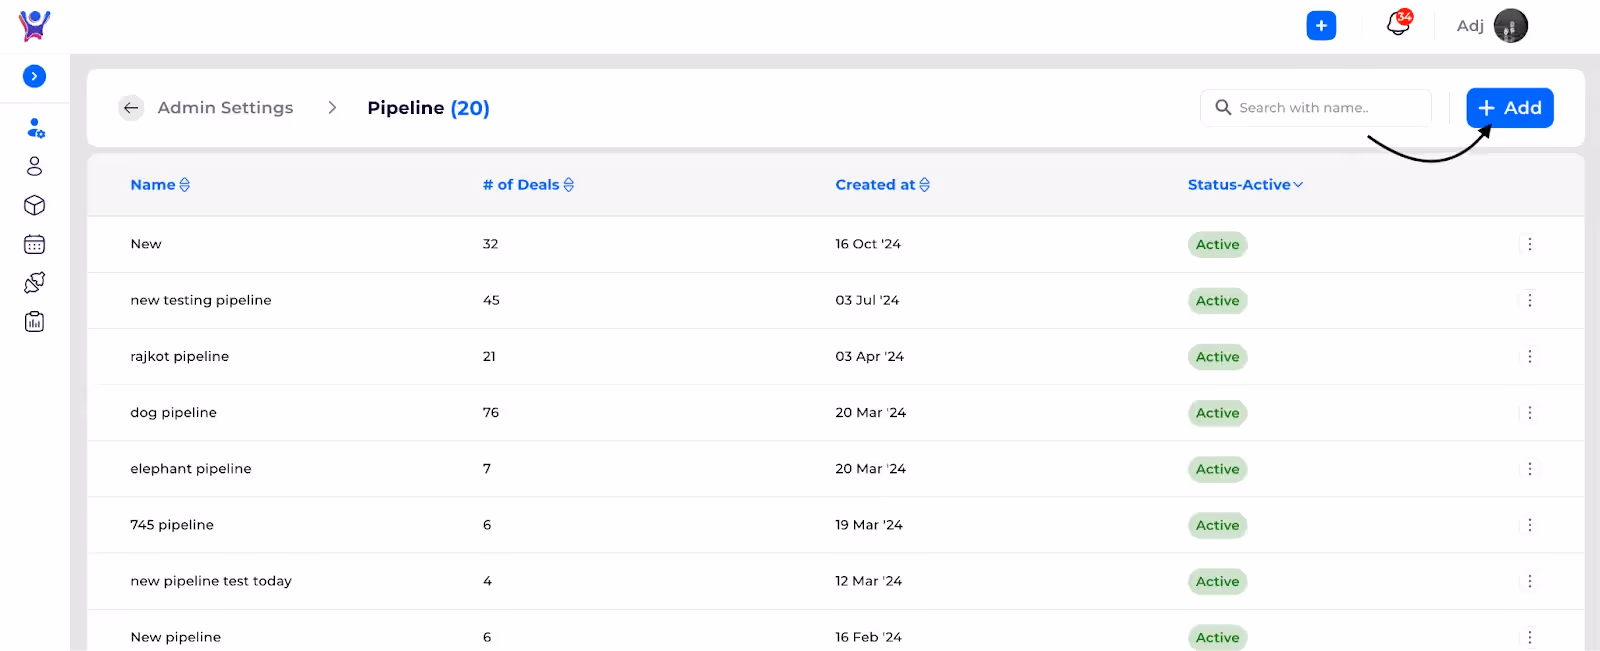
- We made it mandatory to mark ( any 2 ) stages in your custom pipeline as ‘demo’ & ‘commercial’ , so that we can still view its progress in our default pipeline.
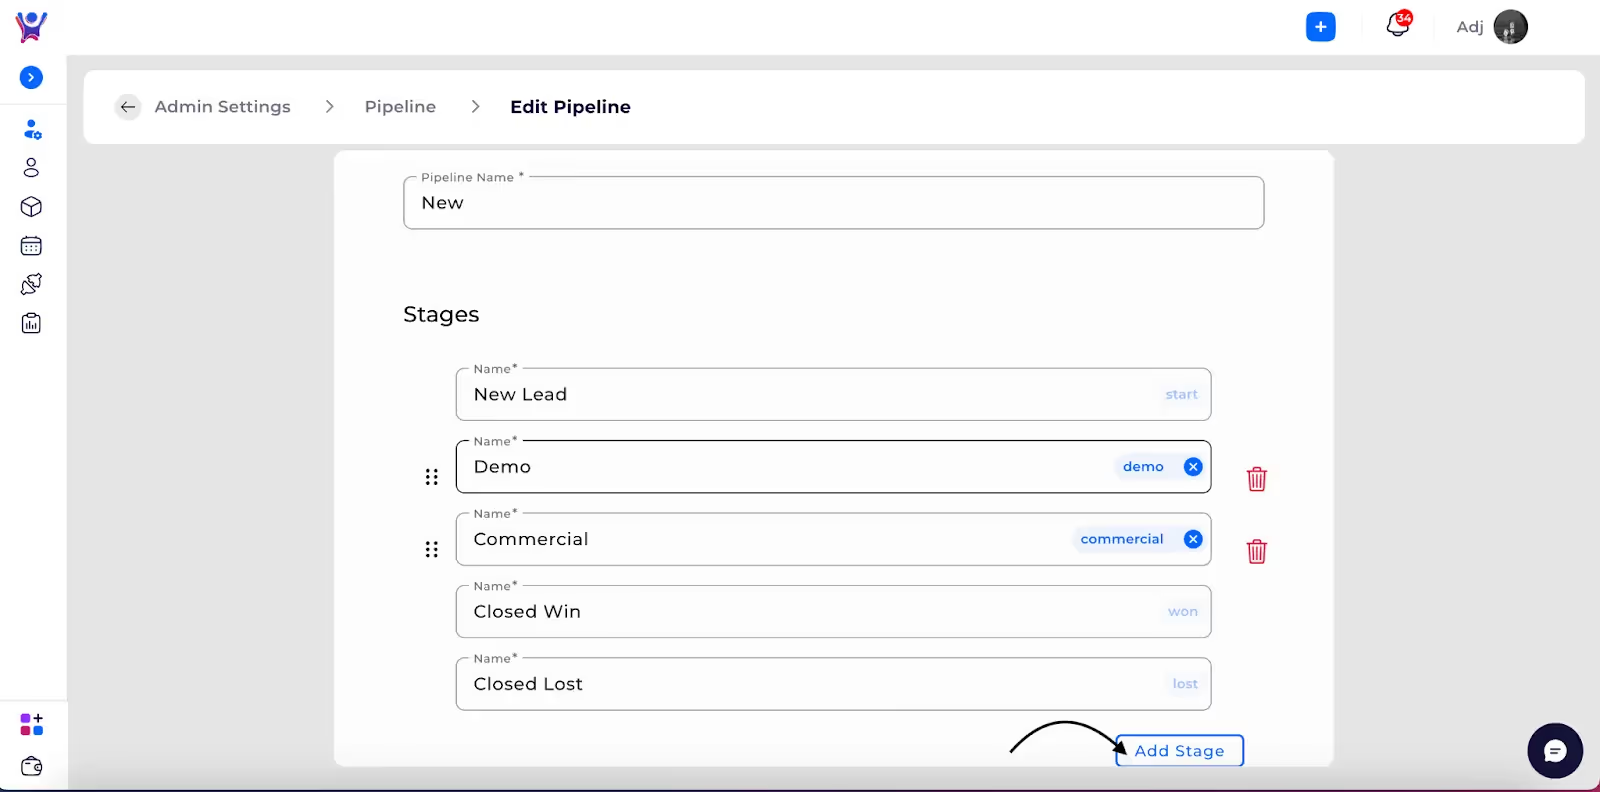
- Enter deal stages , hit the ‘submit’ button . That's it ! We have created a pipeline.
Note :
Consider the pipeline carefully before creating a deal, as once it's created, you won't be able to edit the pipeline. Choose the appropriate pipeline for the deal from the outset.
Create a Pipeline
Effortlessly create pipelines
Customize Columns
Scope: customize the columns .
This allows you to:
- Freeze the top 3 columns.
- Change the sequence of the columns.
- Select or deselect any number of columns as needed.
Step 1: Click on customize columns

Step 2: Select the column needed to be visible in list view
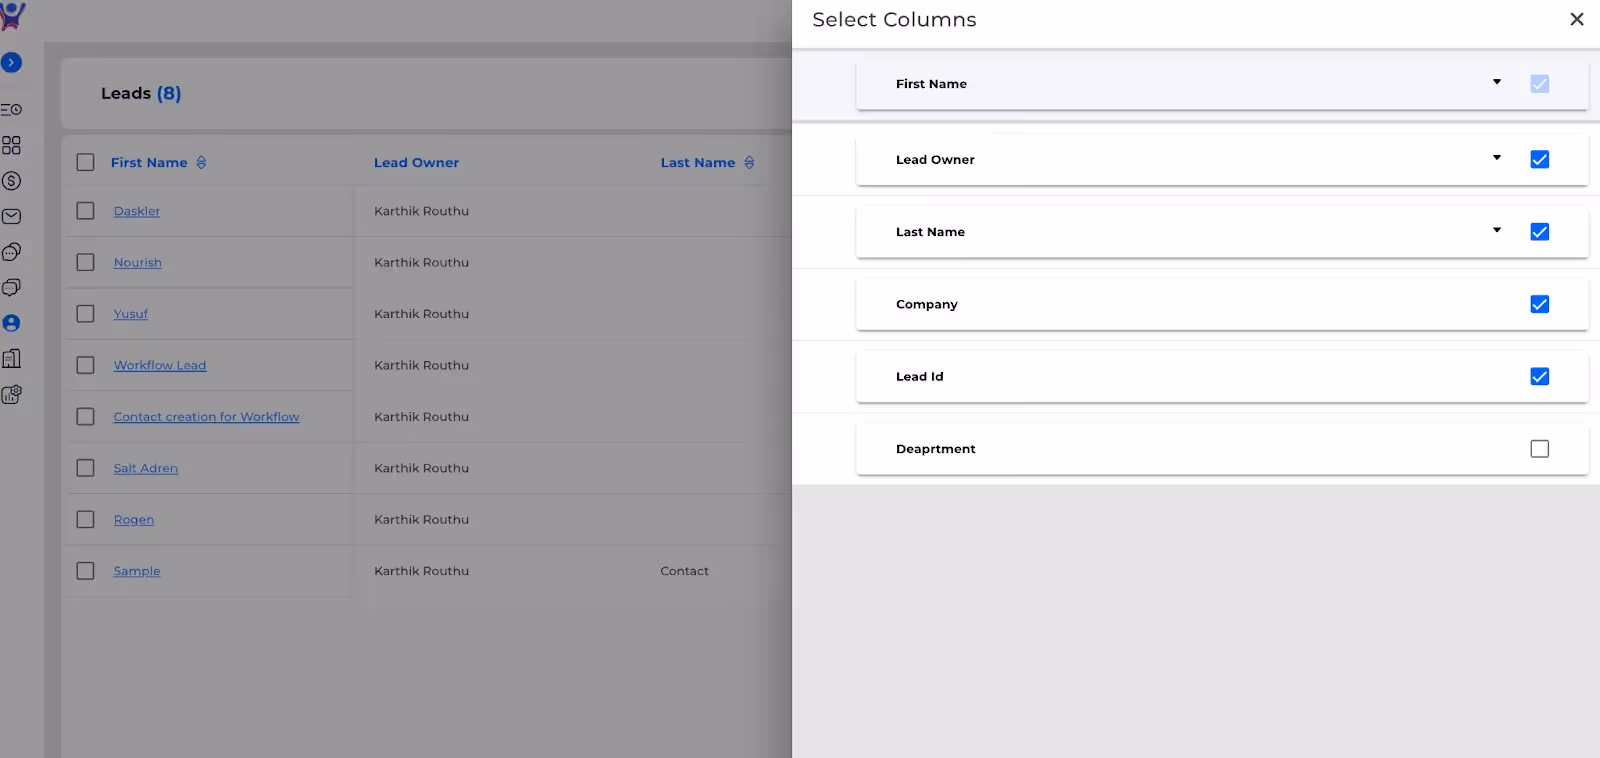
Step 3: You can able to freeze top 3 columns

Step 4: you can able to change sequence

Step 5: After all changes done click on submit

Customize Columns Of Leads list
Design your view, your way- customize columns for a Leads list
Bulk Actions
To perform bulk actions on Leads, follow these steps:
- Select the desired number of leads from the list.
- Choose one of the following bulk actions:some text
- Bulk Update: Update any field with the same value for all selected records.
- Bulk deactivate.
- Bulk Delete Companies: If selected, the system will ask whether to:some text
- Delete associated deals.
- Delete only associated open deals.
Ensure you review and confirm the prompts for associated deals before proceeding with deactivation or deletion.
Select any number of leads
To perform bulk actions on Leads, follow these steps:
- Select the desired number of leads from the list.
- Choose one of the following bulk actions:some text
- Bulk Update: Update any field with the same value for all selected records.
- Bulk deactivate.
- Bulk Delete Companies: If selected, the system will ask whether to:some text
- Delete associated deals.
- Delete only associated open deals.
Ensure you review and confirm the prompts for associated deals before proceeding with deactivation or deletion.

Step 2:Click on Bulk action

Step 3:Select any one of the bulk action
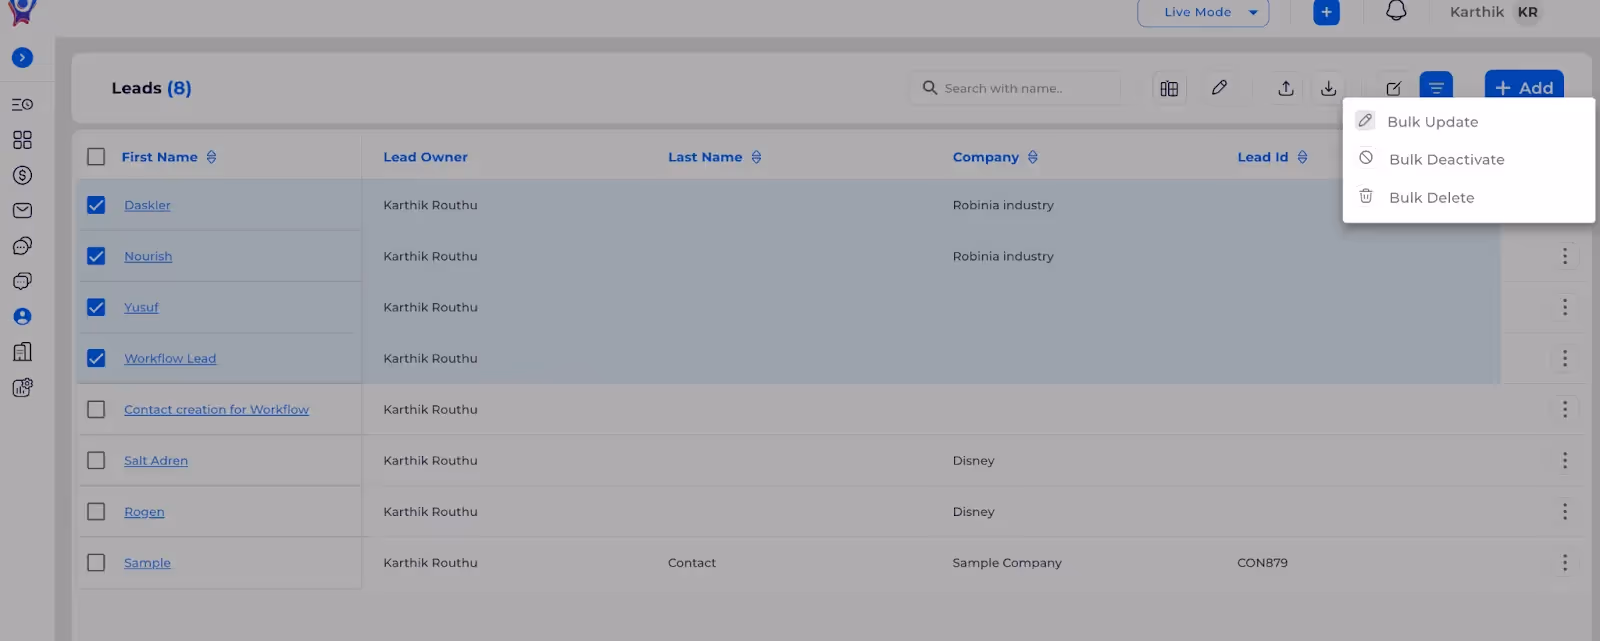
Bulk update
- Select any field

- Select a value to update

Bulk Deactivate
- Select bulk deactivate

- Click on deactivate
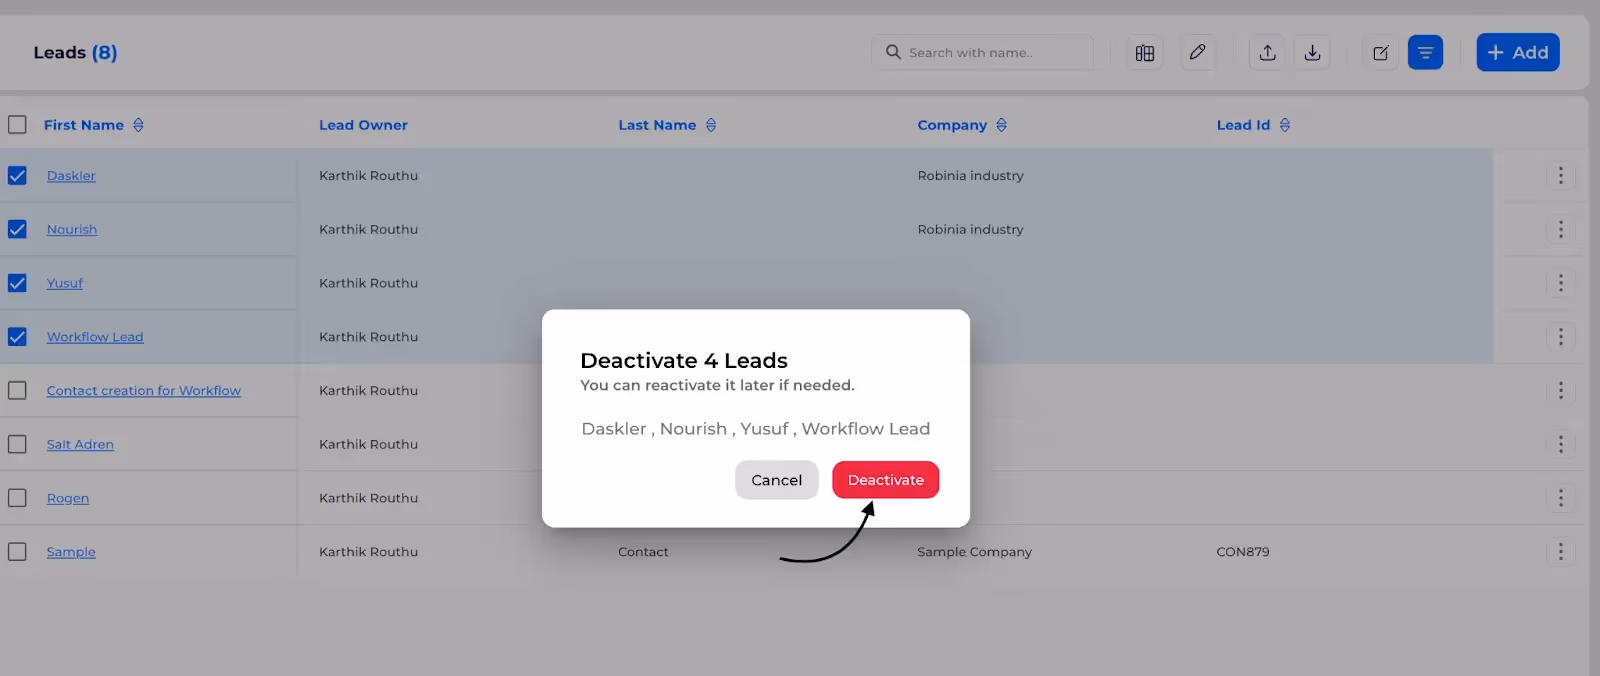
Bulk Delete
- Select Bulk delete

- Check if you want to delete associated deals
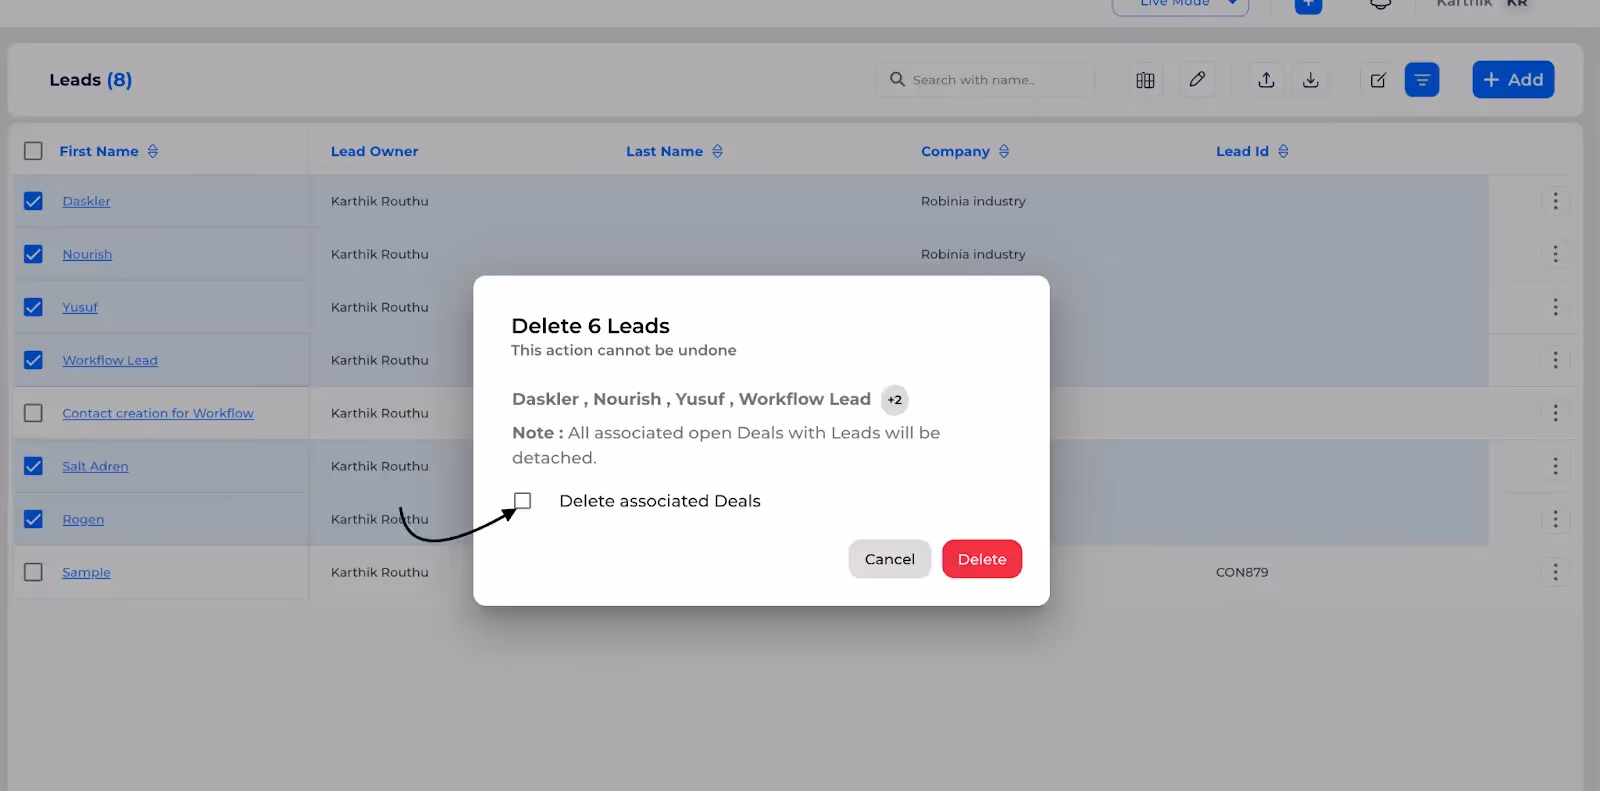
- Click on delete button

Bulk actions on Leads
Effortlessly Activate, Deactivate and Update Lead Records in Bulk
Bulk update of Leads through imports
Scope: update Leads records using Excel or CSV files by referencing the system-generated ID.
Follow these steps:
- Select the "Import" option and choose the "Update" mode.
- Map the columns in your file to the corresponding system field names.
- Click "Import" to initiate the update process.
Since this is a background task, wait for the acknowledgment email. If there are errors, the email will include an error message column with specific messages for each affected row. Rows with errors will be highlighted in orange.
Step 1:Click on import:

Step 2:Choose file
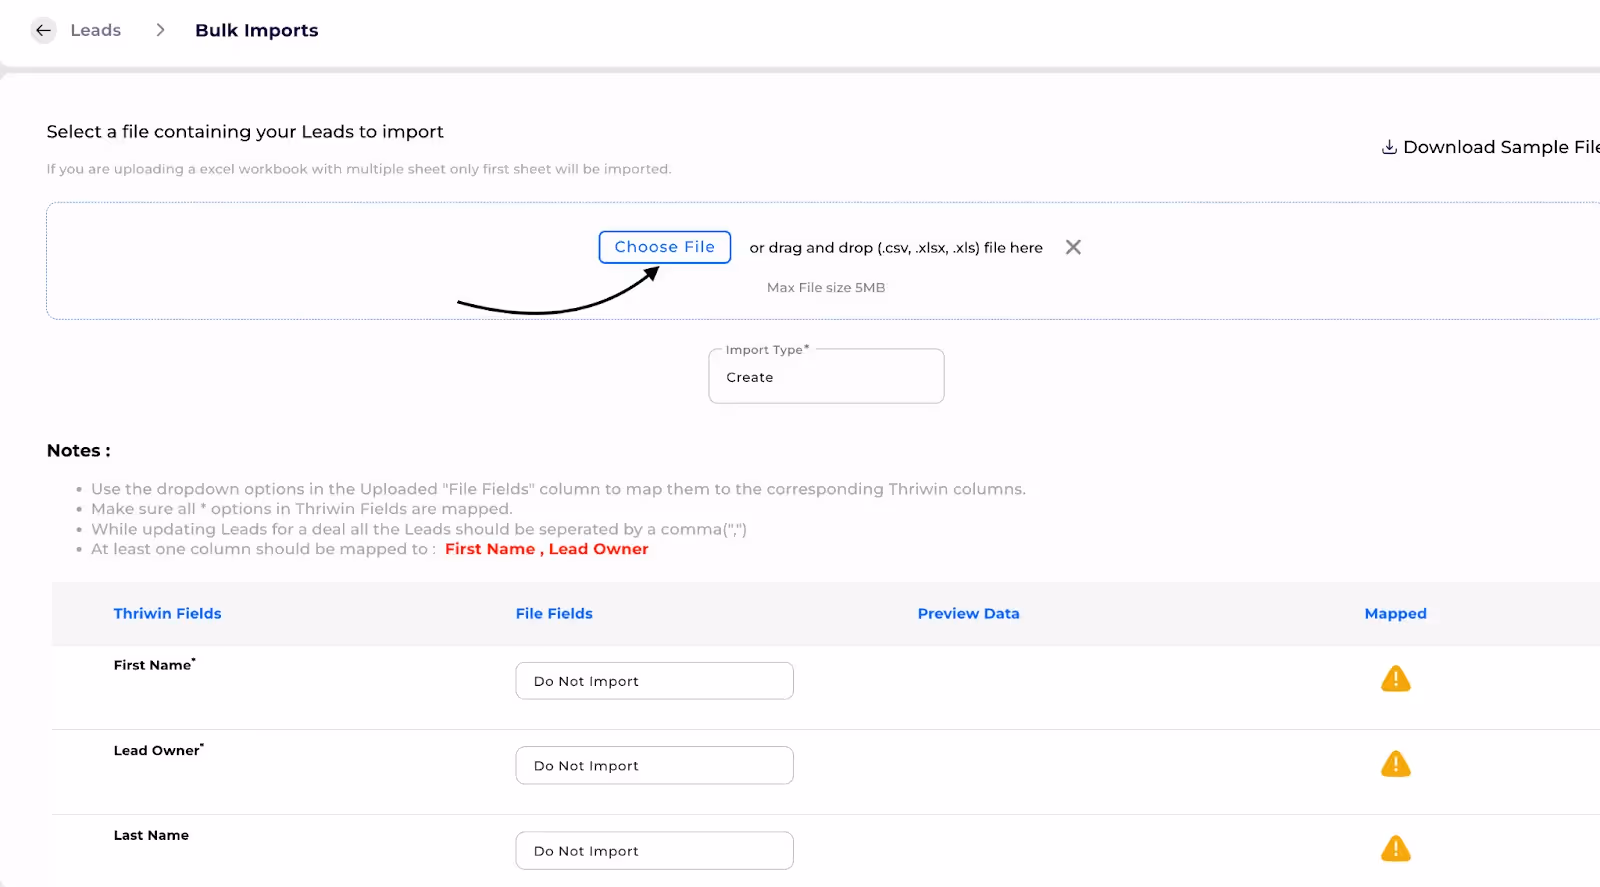
Step 3:Select import type as Update

Step 4:Map the file columns to the corresponding system fields. The "ID" field is mandatory for updating a contact, as the data will be updated based on this ID.
Step 5: Click on import button to start update of Leads
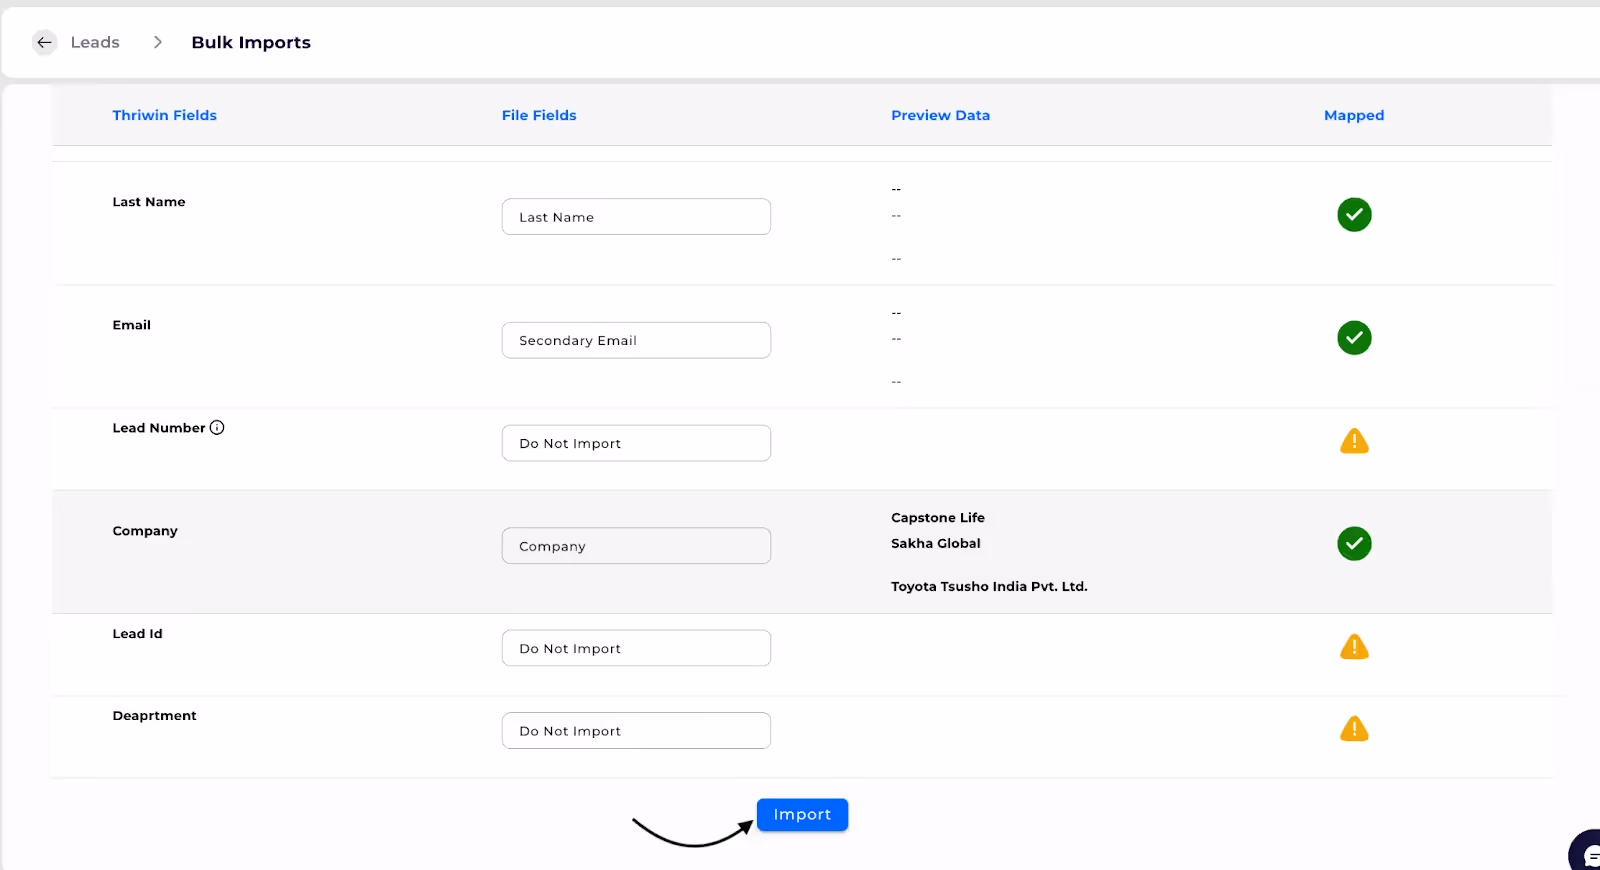
Bulk update Leads through Imports
Effortlessly Manage and Update Lead Records in Bulk
There are few features in Thriwin which are charged based on usage. You don’t have to pay a fixed fee and pay only per usage for these features. We call these usage based events. We offer straightforward, affordable and transparent pricing for these events. Whether it’s accessing phone numbers for calls, making calls, recording the calls, creating landing pages, intelligent AI Agents answering all your queries, or generating email content, our pricing is tailored to ensure you only pay for what you use. We just charge a small commission on top of the price provided by our service providers in these events to ensure quality outputs.
Usage rates for Calling
The call service is charged on a per-minute basis, and phone numbers are billed monthly according to Twilio's "Pay-as-you-go" Voice pricing. As per Twilio's pricing policy, all calls are rounded up to the nearest minute and cent (e.g., a 70-second call will be charged as a 2-minute call).
Call rates differ depending on the country and the type of phone number being used. The per-minute rate for each call may vary based on the destination number and the originating number.
Check Twilio's In Depth pricing section when looking at the particular country's voice pricing for potentially cheaper rates when making calls within your country. For example, there may be a significant difference in cost when making a call within the US compared to calling from the US to Germany. You can view the cost difference when called from the US to Canada and to other countries respectively.
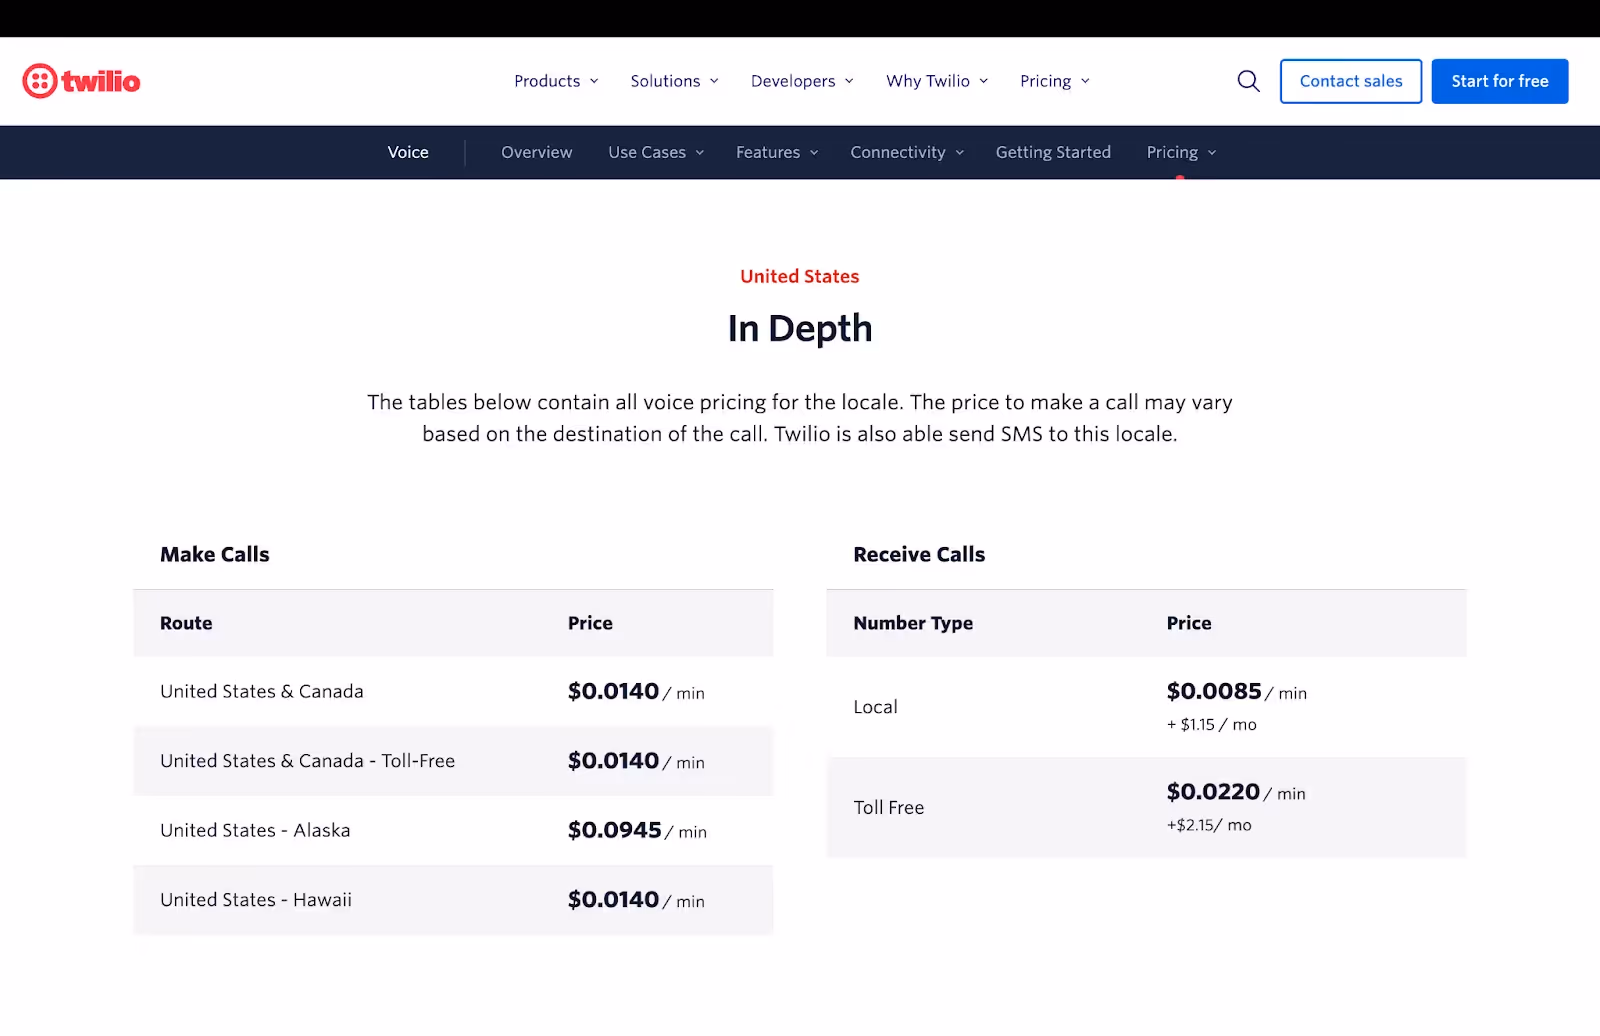
Usage rates for Phone Numbers
The price of a phone number depends on the country and type (local, toll-free, etc.). For a comprehensive list of phone number types and costs, click here.
Phone numbers are billed when they are purchased. Purchased numbers are renewed each month on the calendar day before the purchase date. For example, a number purchased on January 2nd would be renewed on February 1st. If the billing day doesn't exist in the current month (e.g., February 30th), the renewal will be billed on the last day of the month.
Usage rates for Meetings
We charge a rate of $0.031 per minute of video for the meetings scheduled and attended through Thriwin. This fee is designed to cover the cost of recording, processing, storage and delivering high-quality video content. Whether you're recording a brief meeting or a longer session, this transparent pricing ensures that you are billed fairly based on the length of the recording.
Conversation AI
In Thriwin, Conversation AI is available at a rate of $0.021 per minute, offering precise audio-to-text transcription and analytical services. This feature ensures seamless accessibility and accurate documentation for users.
AI-powered transcription provides highly accurate, real-time records of calls or meetings, automatically generates summaries and identifies action items to make your SDR’s life easy by escaping painful note taking process while ensuring every detail is captured with precision, as shown in the image below.
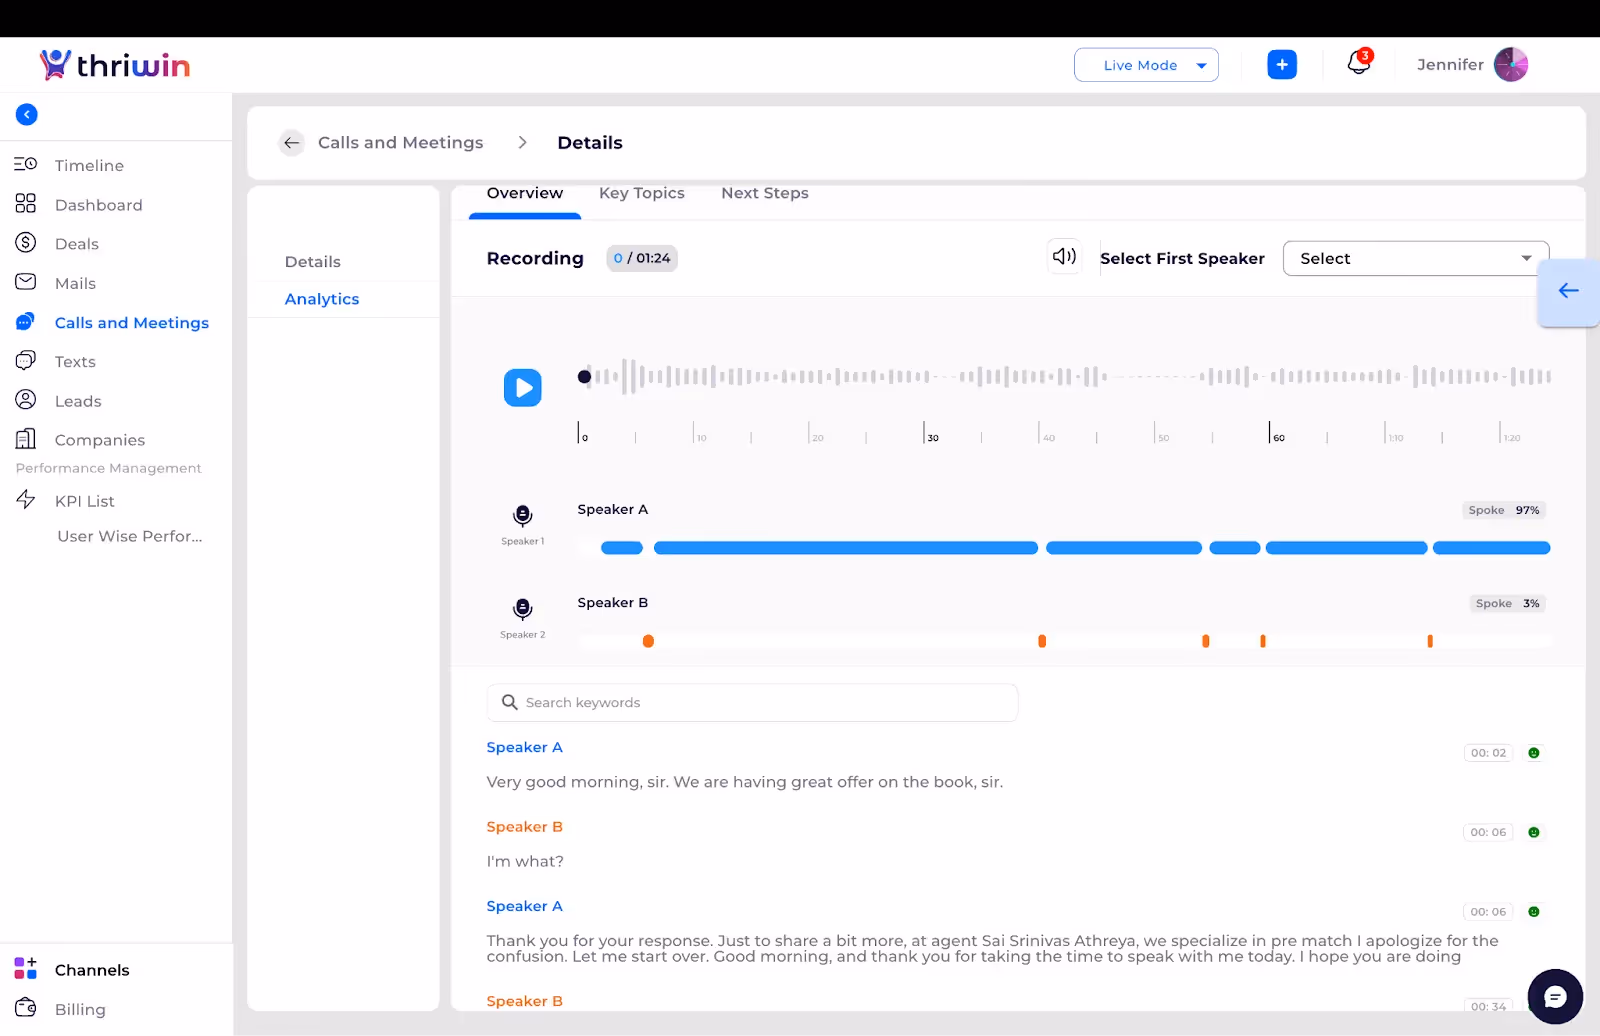
AI Agent
The AI Agent in Thriwin leverages different language models of ChatGPT API to provide intelligent solutions that start at a cost of $0.15 per 1M tokens consumed.. For a comprehensive list of costs, click here.
Below are the use cases and their functionalities:
Call Analytics in Conversation Intelligence
Functionality:
- AI agents provide detailed call analytics, offering a concise summary of the conversation along with clear next steps to guide follow-up actions.
.avif)
Benefits:
- Instant Access to Conversation Insights:
AI-powered transcription provides immediate access to full, accurate transcripts, automated summaries and action items discussed in the meeting, allowing you to review key topics, decisions, and action items without the need for manual note-taking. This will help you stay on top of conversations with your customers and give real time insights to have meaningful conversations later - Proactive Sales Coaching:
AI transcription not only captures conversations but also analyzes sales calls in real time, offering actionable suggestions to improve objection handling, questioning techniques, and overall performance.
Landing Page Creation
Functionality:
- The AI Agent generates dynamic landing pages tailored to user needs.
- It creates content, headlines, and layouts efficiently, reducing manual effort and ensuring engaging, conversion-optimized designs.
Benefits:
- Saves time by automating content generation.
- Delivers consistent and professional-quality landing pages.
Chatbot
Functionality:
- The AI Agent powers a chatbot to handle customer queries related to the CRM system.
- It provides accurate and context-aware responses to user questions and guides them through CRM-related functionalities.

Benefits:
- Enhances customer support with instant, accurate answers.
Email Template Creation
Functionality:
- The AI Agent generates email templates with customizable tones and styles.
- Users can create content for marketing, customer support, or transactional emails in seconds.
- As mentioned in below Image, you can create and reply to email with the help of AI, it generates context-specific email templates with remarkable accuracy.
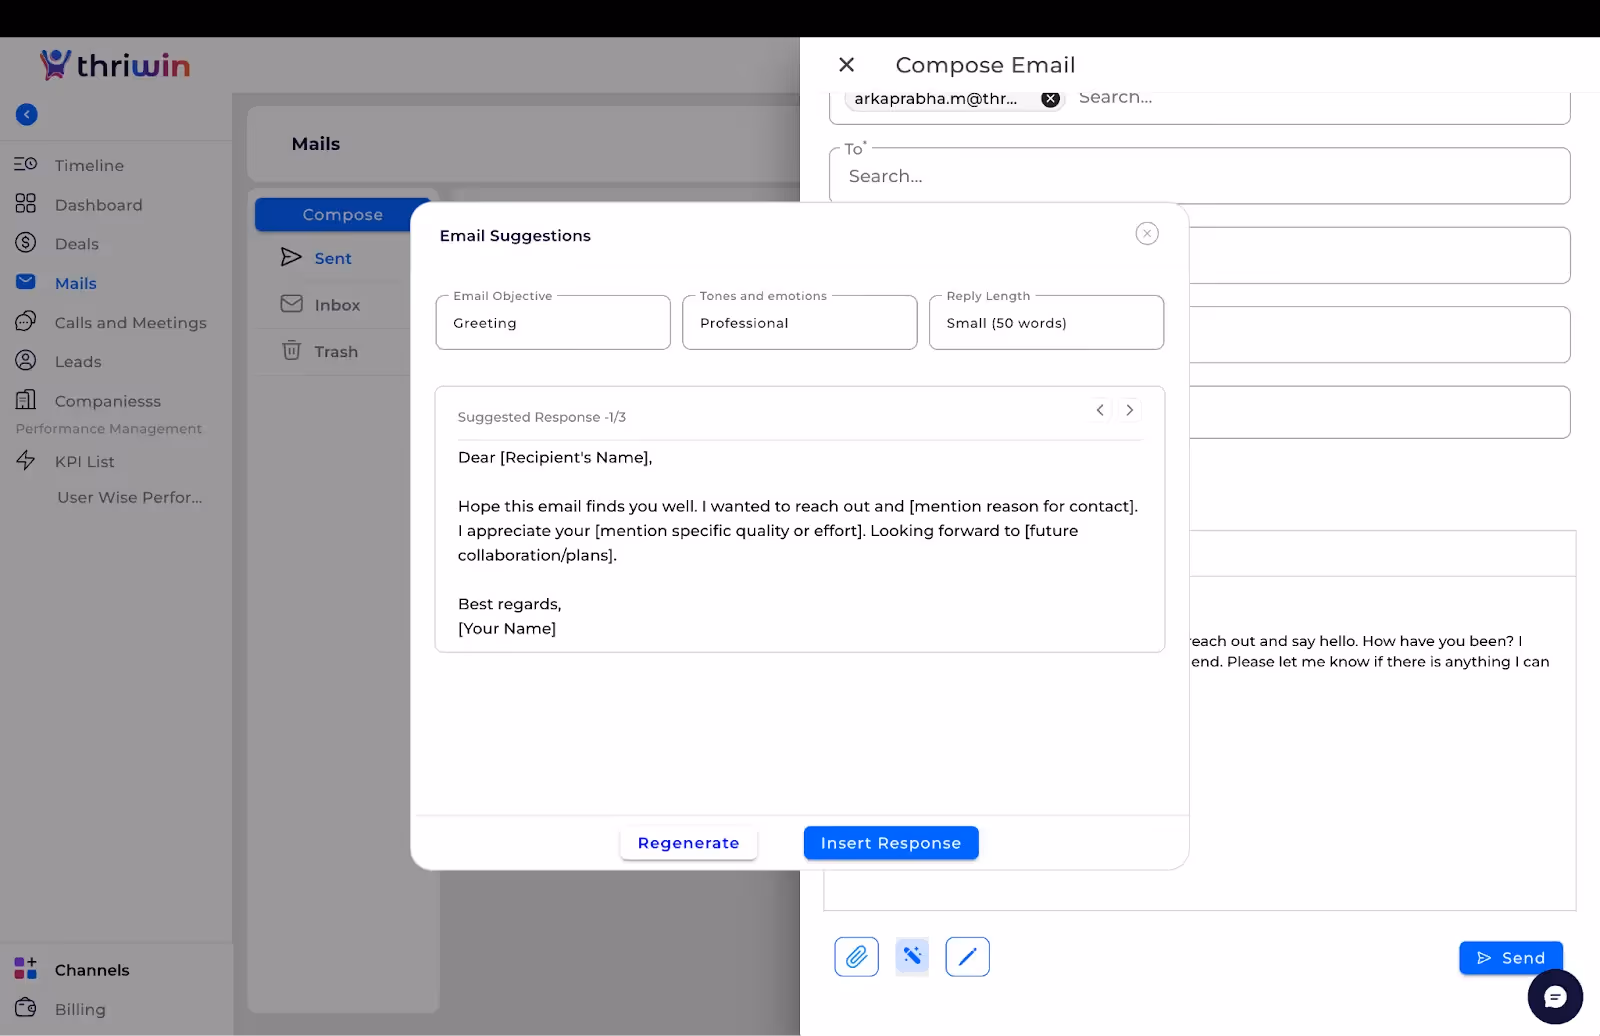
Tone Options:
- Formal: For professional communication.
- Casual: For engaging and approachable messaging.
- Persuasive: For marketing campaigns.

Benefits:
- Saves time on crafting email content.
- Ensures professional and tone-appropriate templates for different purposes.
Charges for Usage Based Events in Thriwin
Customization of Columns
Scope:Customize the columns by clicking on the Customize Column icon. This allows you to:
- Freeze the top 3 columns.
- Change the sequence of the columns.
- Select or deselect any number of columns as needed.
Click on Customize columns
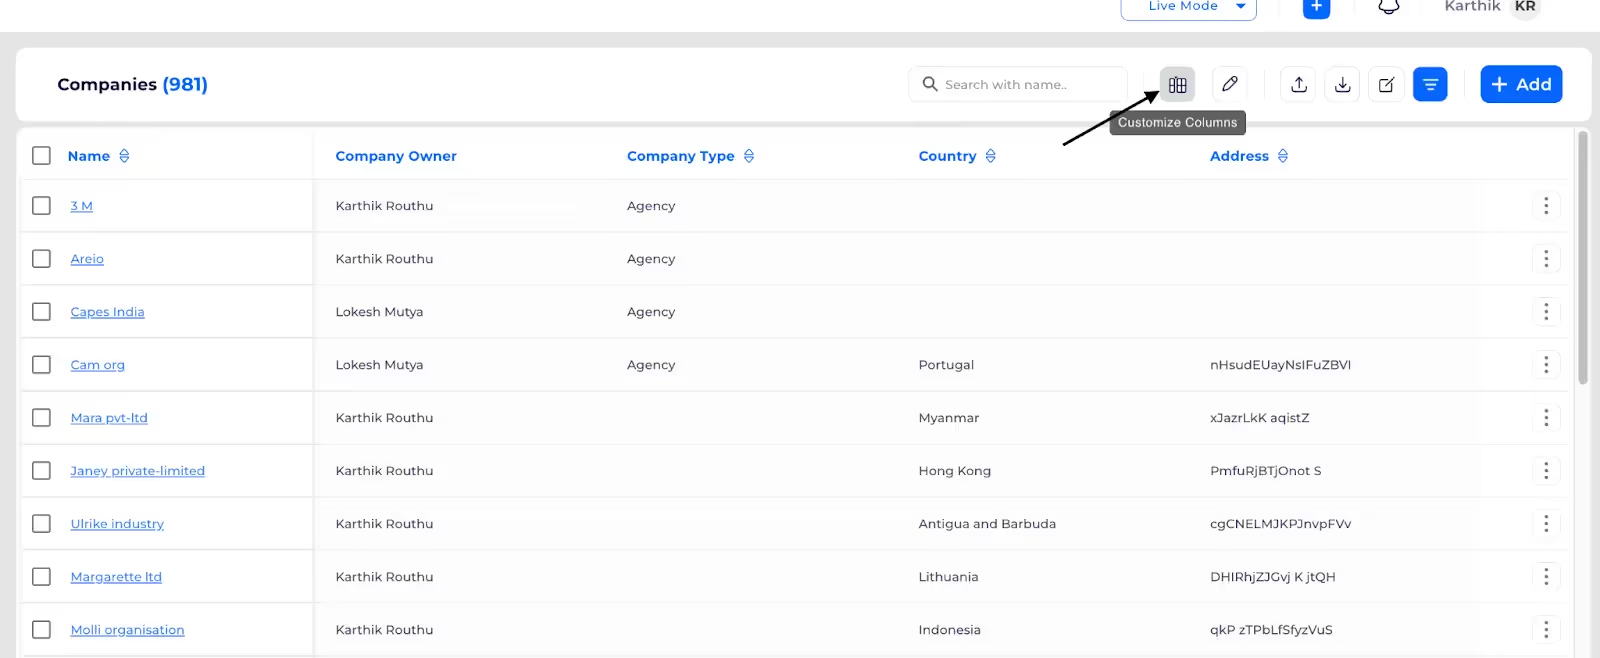
Check which columns need to shown
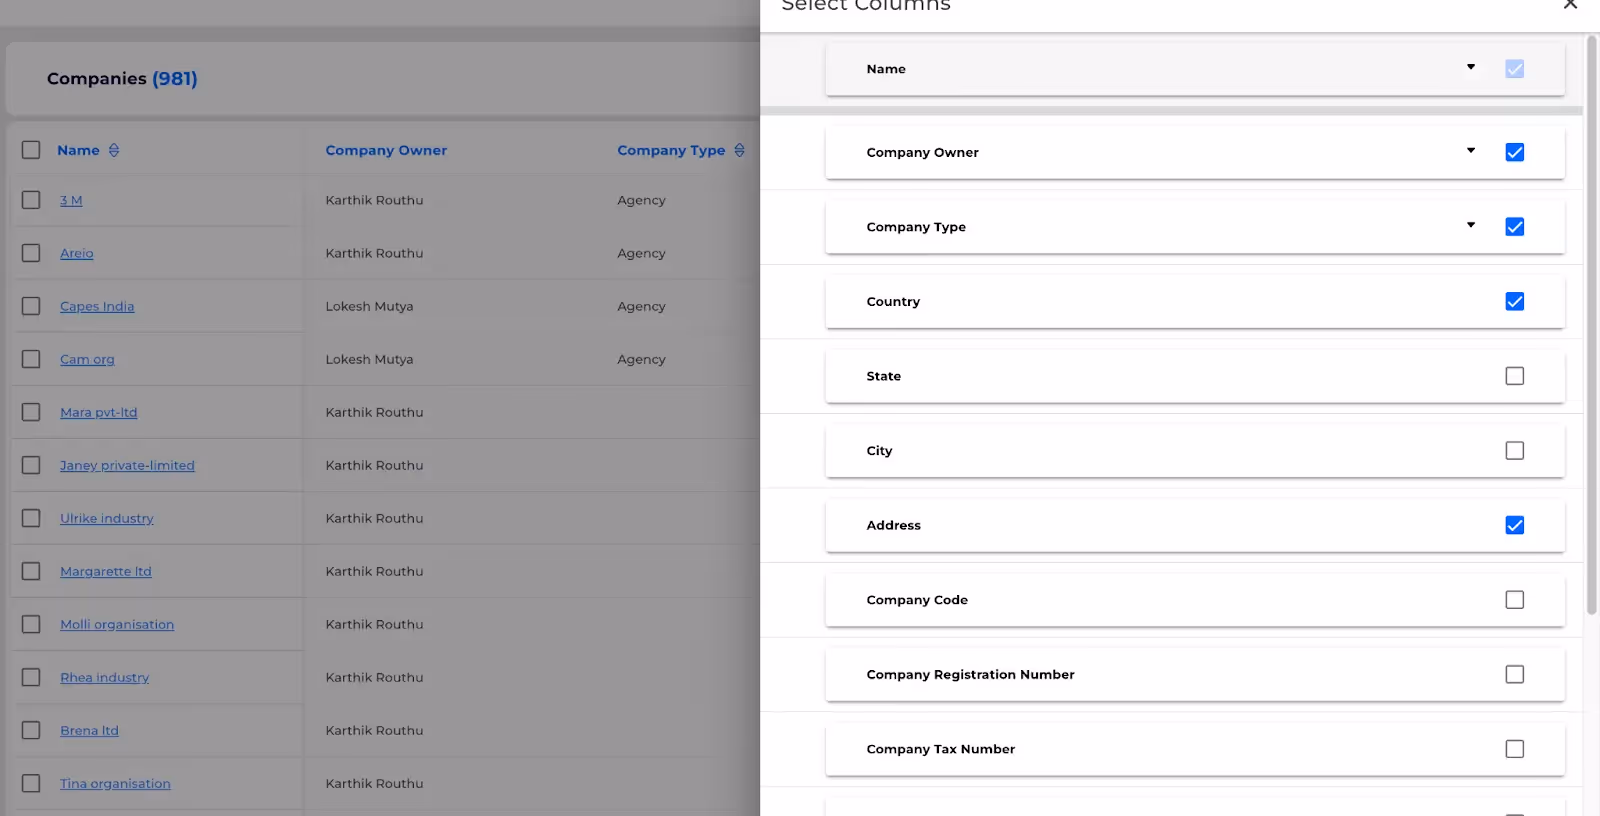
Use drag option to interchange the column sequence

You can freezer first three columns

Click on submit

Need More Help?
Contact Support: For further queries, reach out to our Support Team.
Customize Columns of the Company List
Design your view, your way- customize columns for a company list
Bulk Actions on Companies
Scope:To perform bulk actions on companies:
Steps:
- Select the desired number of companies from the list.
- Choose one of the following bulk actions:some text
- Bulk Update: Update any field with the same value for all selected records.
- Bulk Deactivate Companies: If selected, the system will prompt you to confirm whether to deactivate associated deals.
- Bulk Delete Companies: If selected, the system will ask whether to:some text
- Delete associated deals.
- Delete only associated open deals.
Ensure you review and confirm the prompts for associated deals before proceeding with deactivation or deletion.
Select companies in companies List

click on perform actions

Select any one of the action available

Action -Bulk update
- Select a field to update

- Select a field and give a value to update

- Click on update
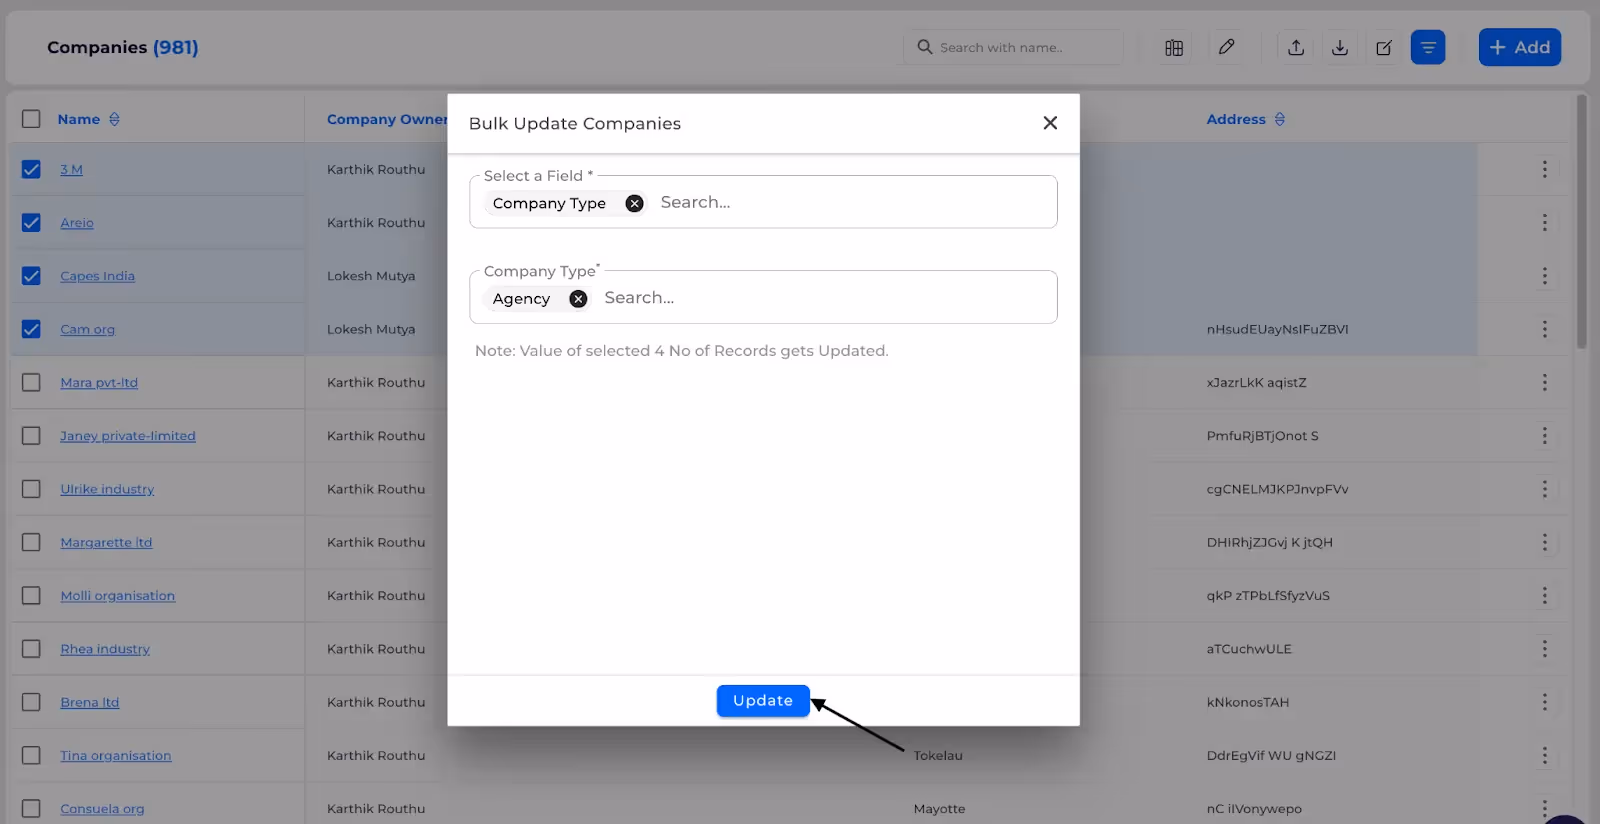
Bulk action- deactivate
- After selecting deactivate

- Check if you want to deactivate associated deals

- Click on deactivate

Bulk delete
- After clicking bulk delete
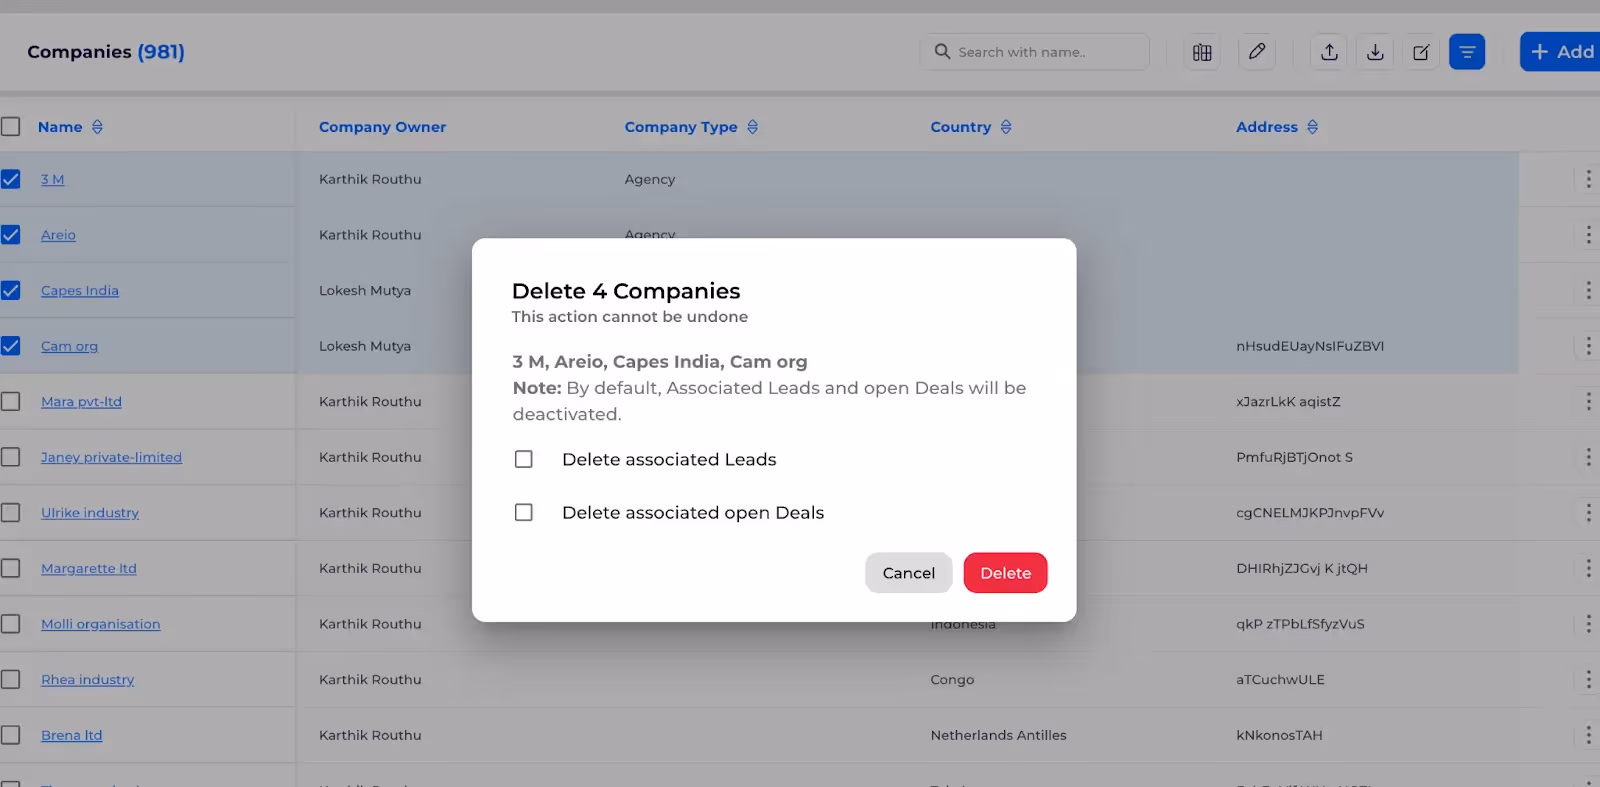
- Check if you want to delete associated deals
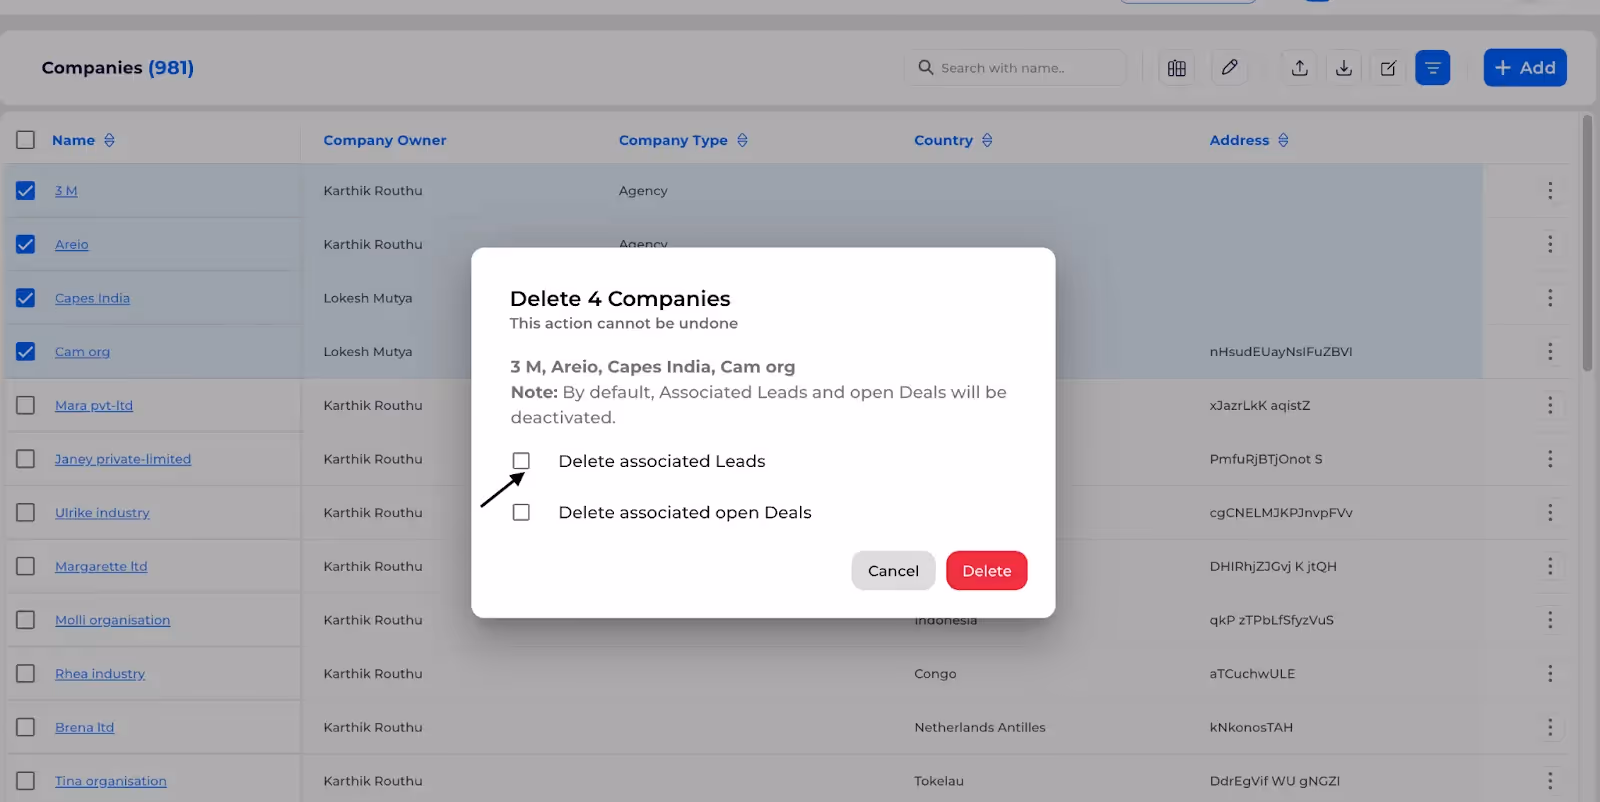
- Check if you want to delete associated open deals i.e., not closed deals win /lost.

- Click on delete
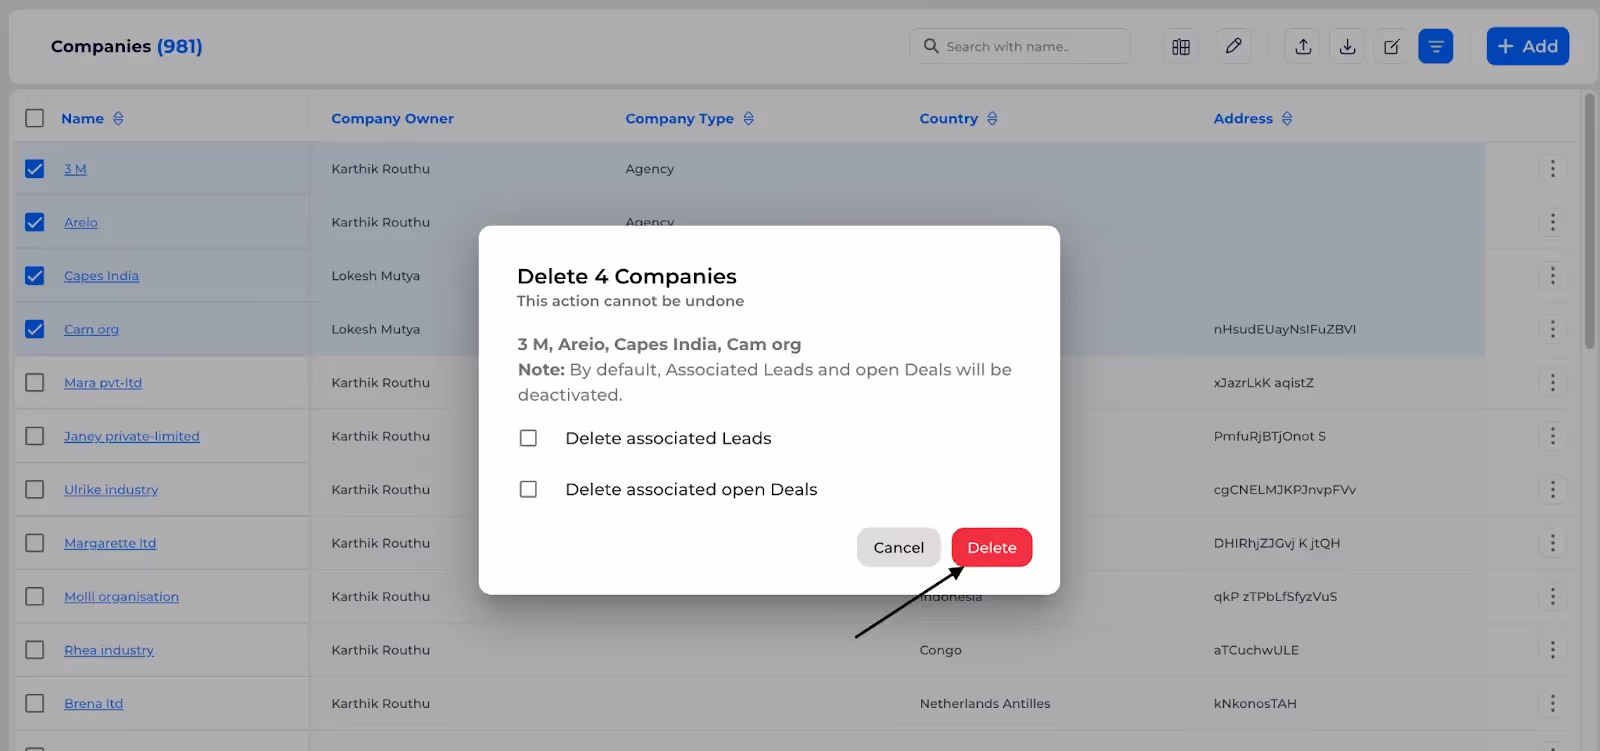
Bulk Actions on Companies
Effortlessly Activate, Deactivate and Update Company Records in Bulk
Bulk updation of Companies
Scope:update company records using Excel or CSV files by referencing the system-generated ID.
Steps:
- Select the "Import" option and choose the "Update" mode.
- Map the columns in your file to the corresponding system field names.
- Click "Import" to initiate the update process.
Since this is a background task, wait for the acknowledgment email. If there are errors, the email will include an error message column with specific messages for each affected row. Rows with errors will be highlighted in orange.
Step 1: Import
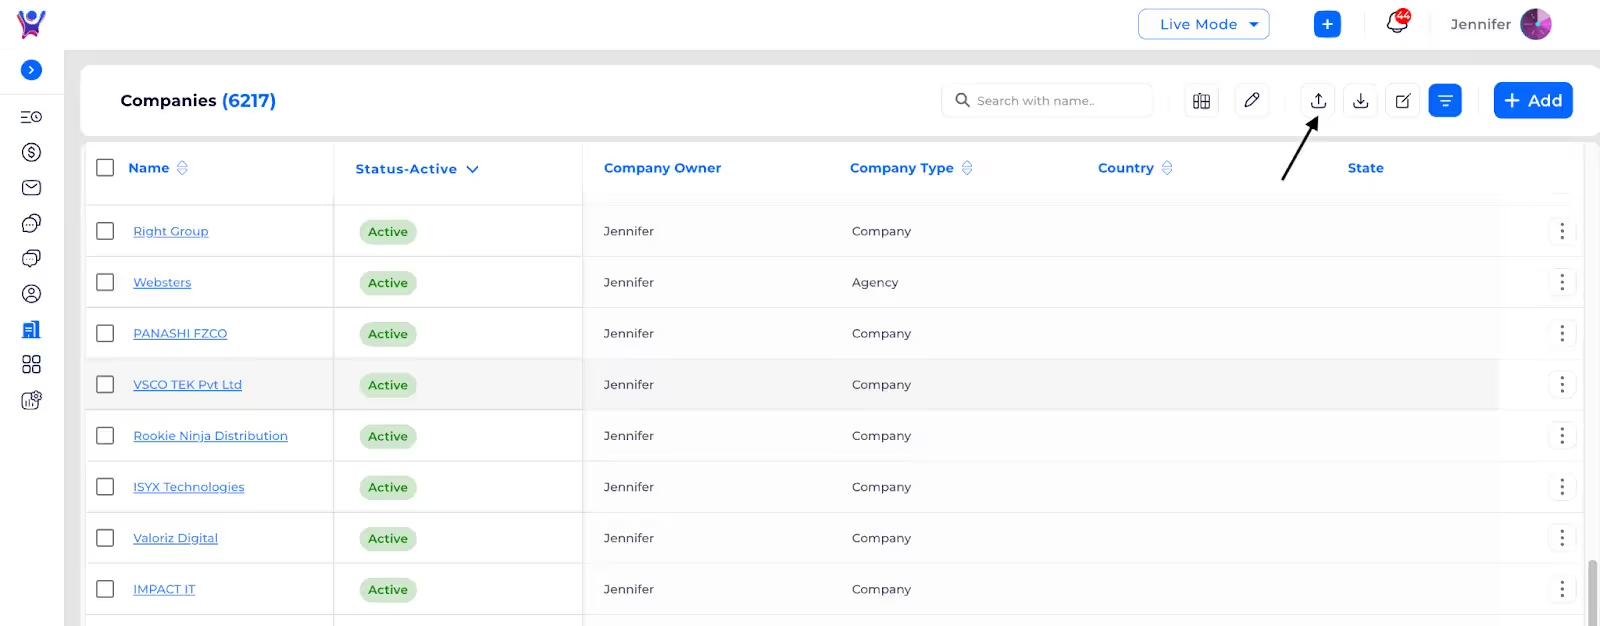
Step 2: Choose file
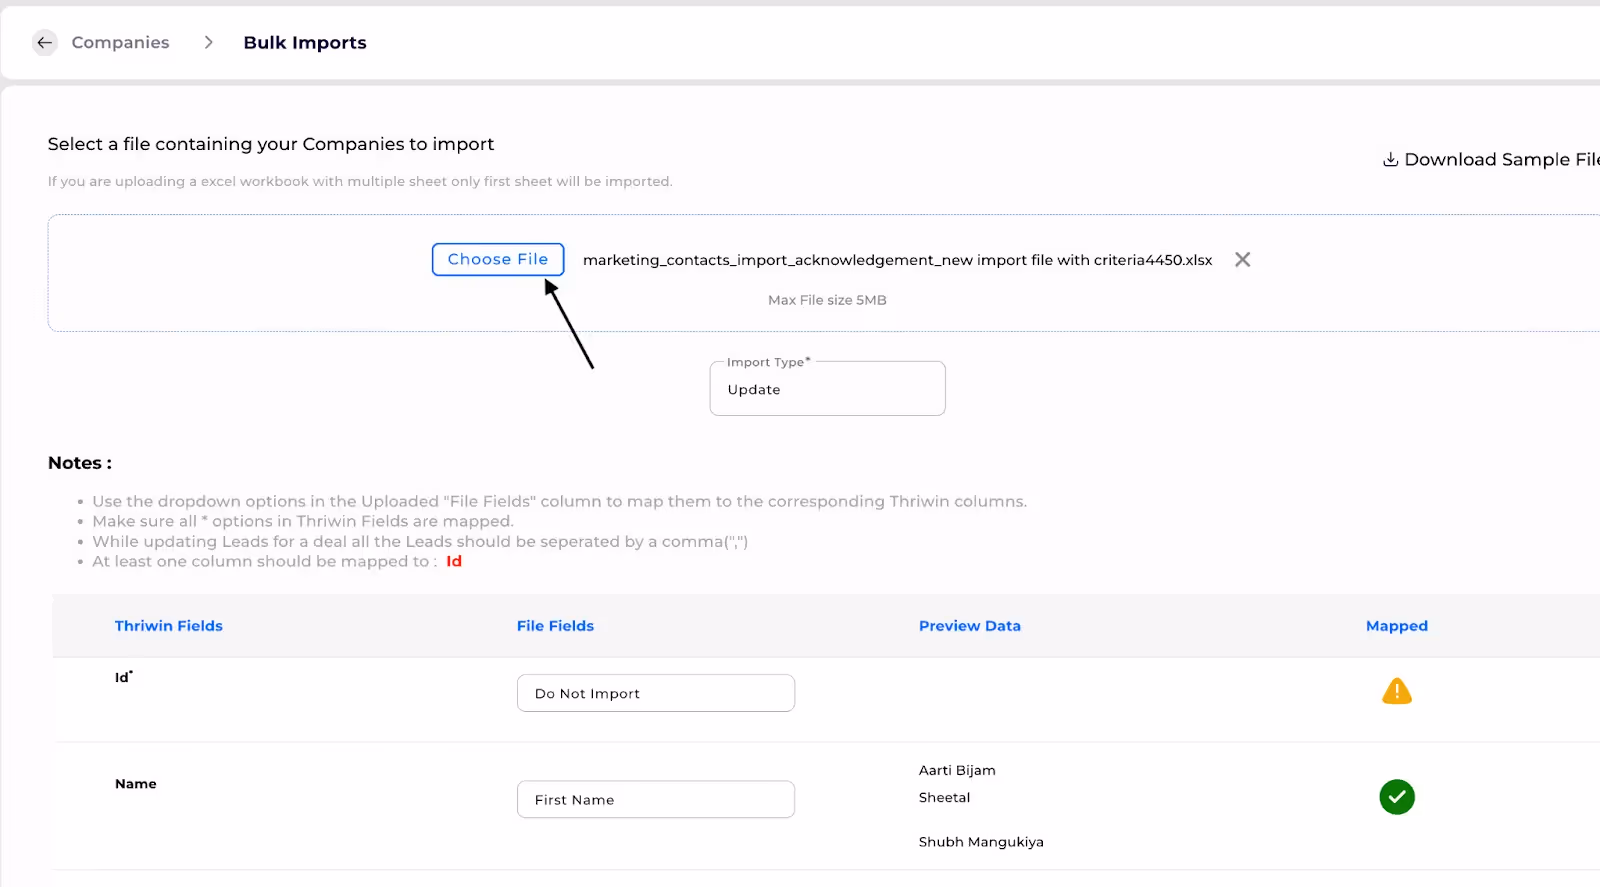
Step 3: Select update
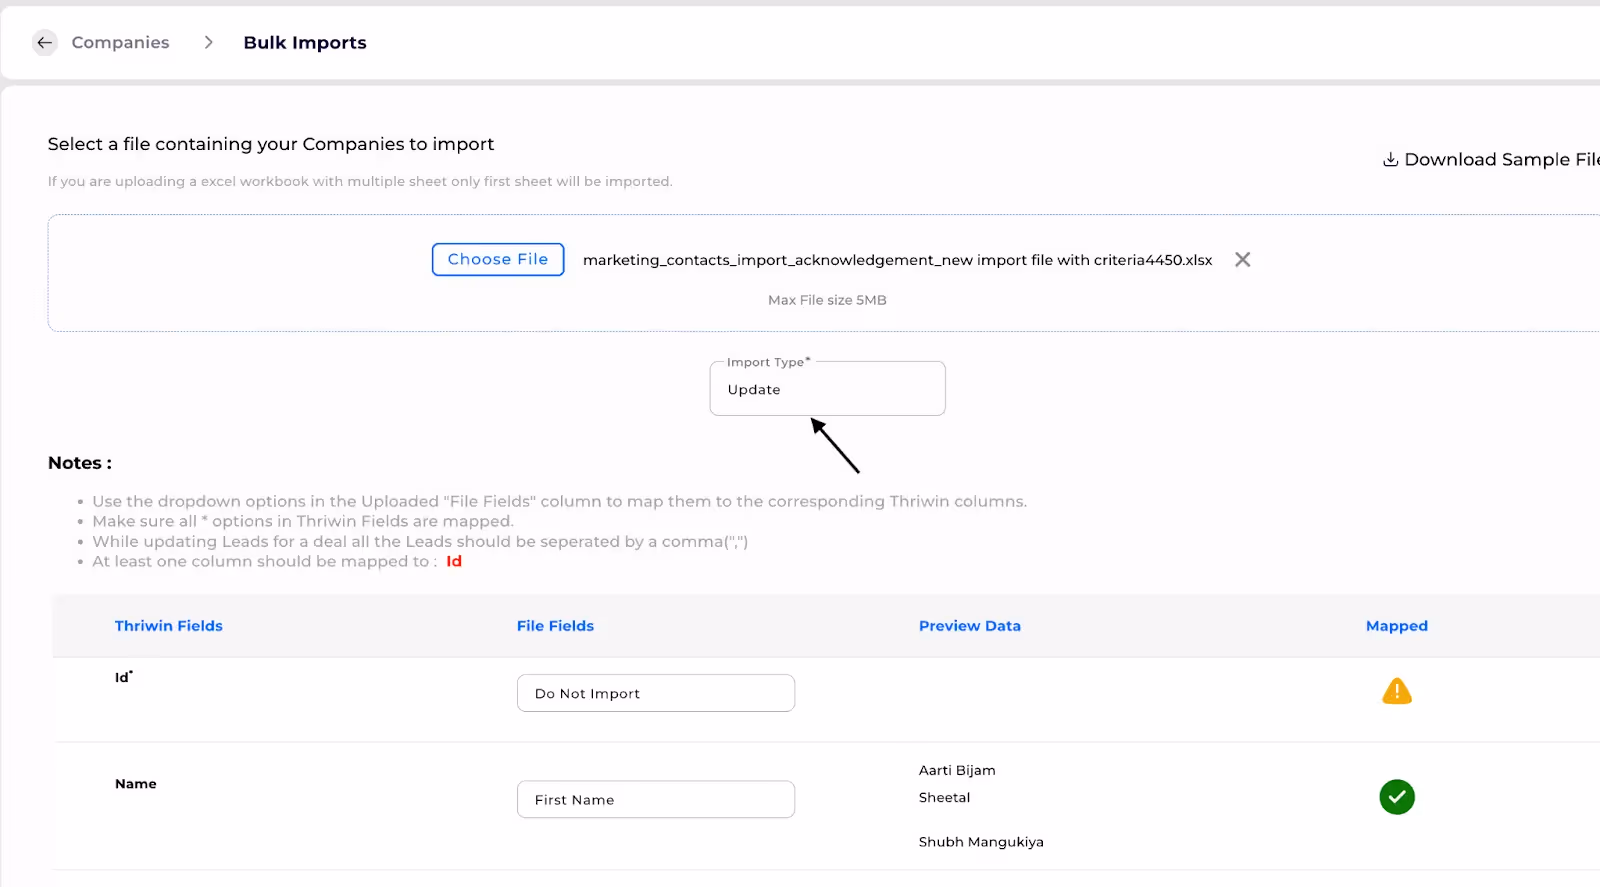
Step 4:Map fields
- Map file fields with system fields ( Id is the system generated unique id which is required to update a contact, you can get it by exporting the company data)
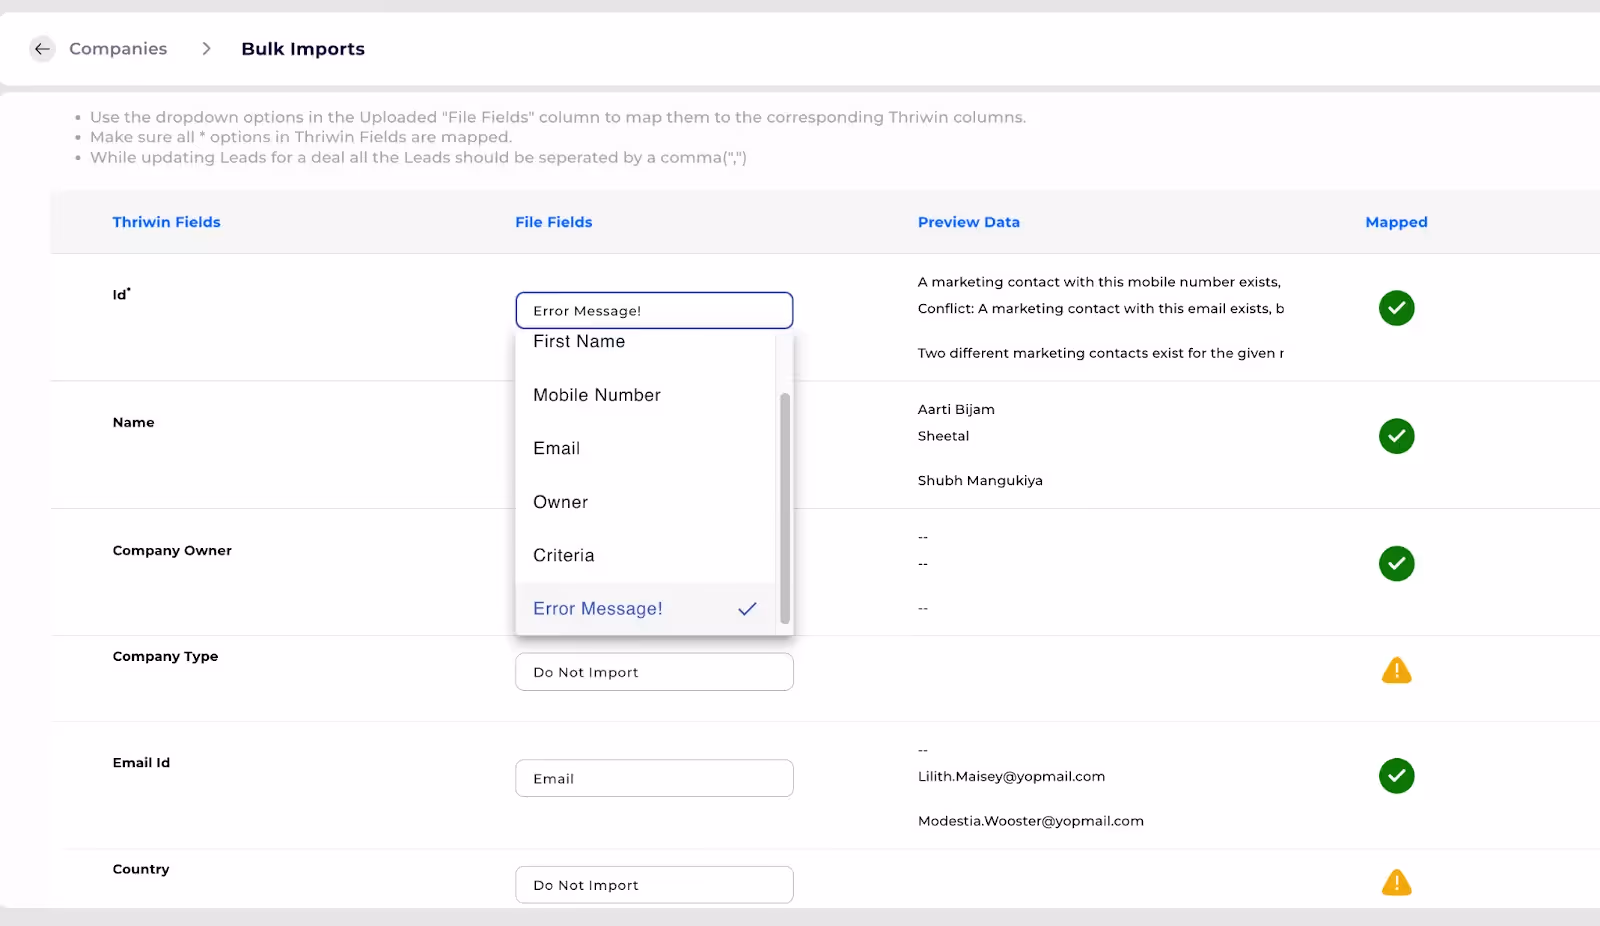
Step 5:Confirm Importing
- After mapping Click on Import to start update of companies.

Bulk updation of companies
Effortlessly Manage and Update Company Records in Bulk
Creating Sequences
How to create sequences for marketing campaigns
Introduction
- Purpose: This guide will walk you through creating a new sequence in Thriwin. You'll learn how to prepare marketing lists, templates, and email senders before configuring the sequence using the Sequence Creator tool.
Step 1: Prepare Prerequisites
- Description: Before creating a sequence, ensure the following steps are completed: some text
- Create a Marketing List: Add the list of contacts to target.
- Add Templates: Set up email templates to be used in the sequence.
- Configure Email Senders: Ensure the email senders are properly configured and verified.
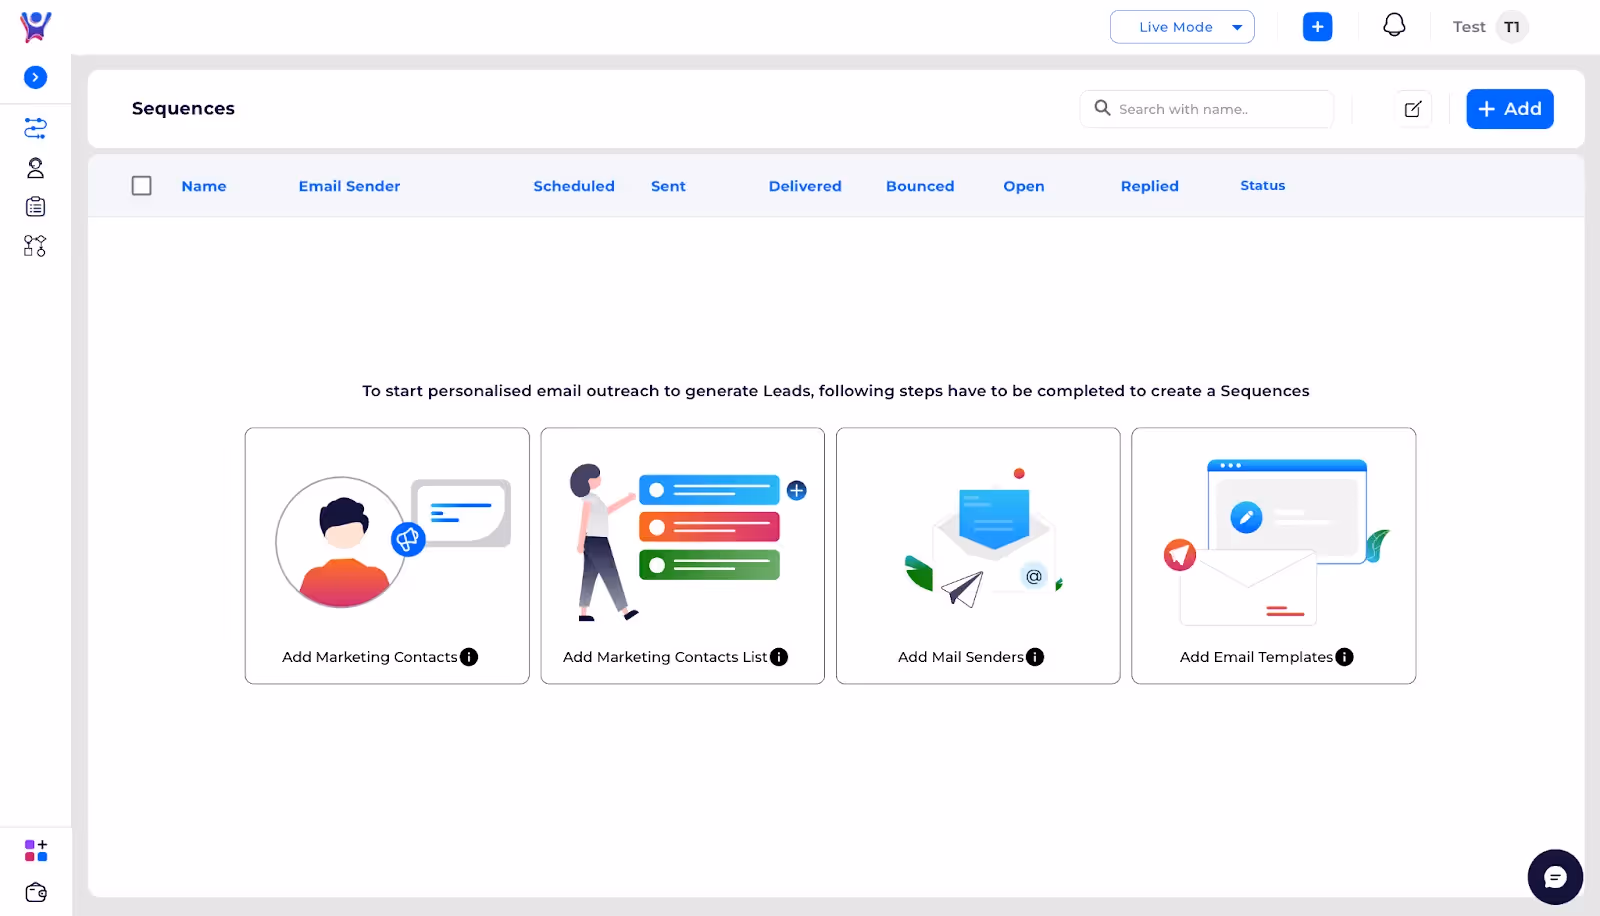
Step 2: Open the Sequence Creator
- Description: Navigate to the Sequences List Page and click on the Add (+) button to open the Sequence Creator tool.
- Screenshot:

Step 3: Configure Sequence Details
- Name the Sequence: Enter a meaningful name for your sequence in the Name field to easily identify it later.
- Set the Start Date: Select the Start Date for when the sequence should begin sending emails.
- Configure the Schedule: Choose the days and times for the sequence to be active: Use the toggle buttons to enable or disable specific days of the week.Set the From and Till times for email sending within each active day.
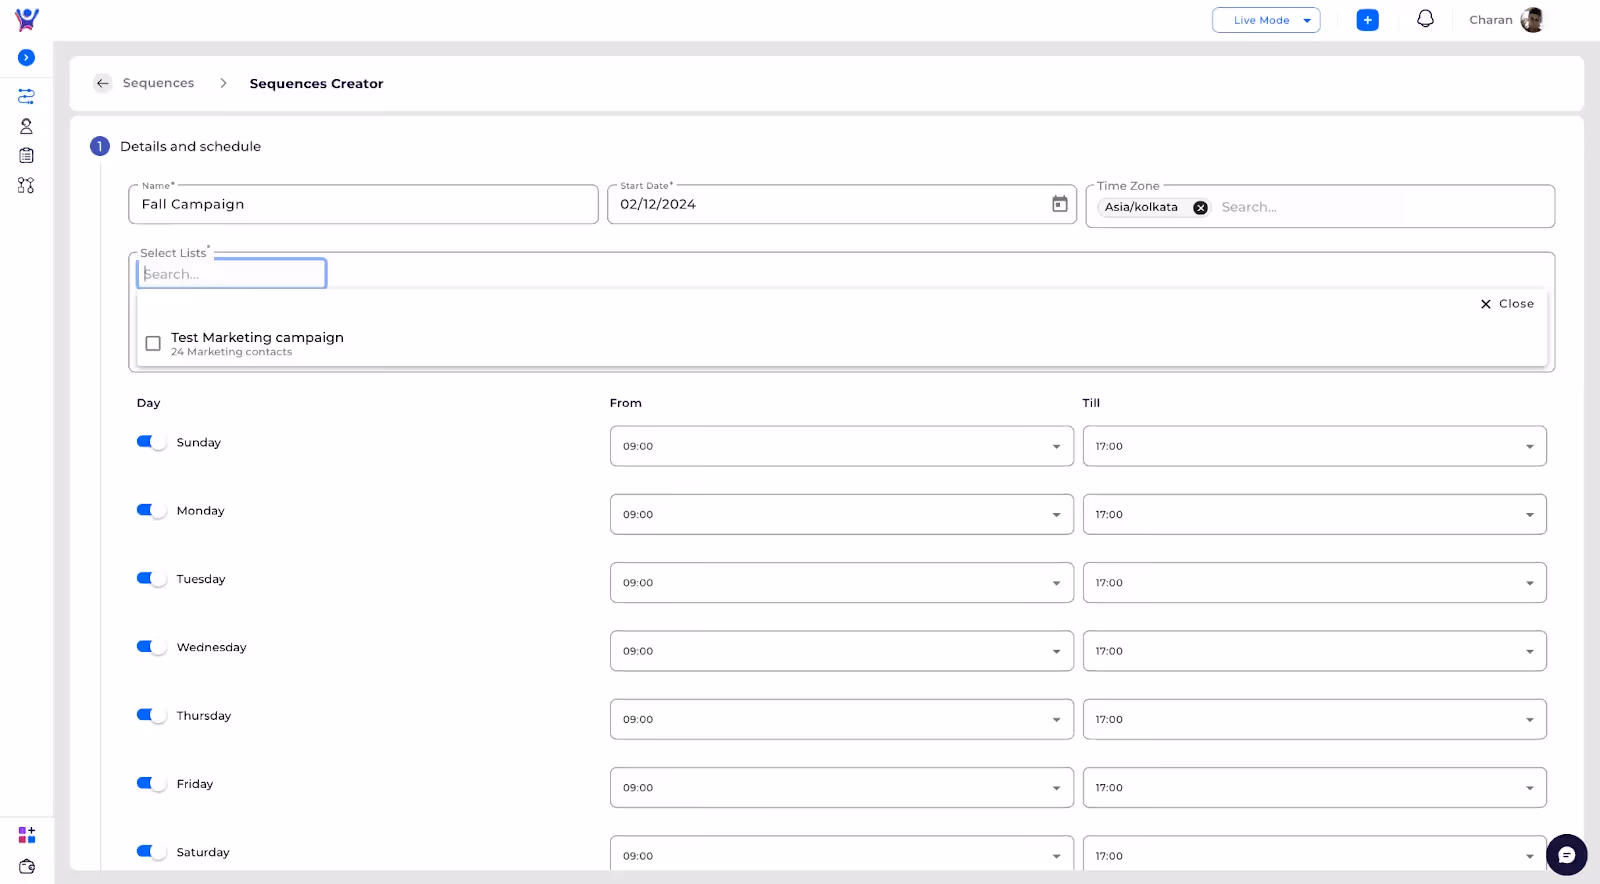
Step 4: Create Sequence Steps
- Add the First Step
- Select an email template for the first step in the sequence.

- Optionally, use AI to generate variations of the original template. You can edit and select the AI-generated templates based on your requirements.

- Add Delays and Subsequent Stepssome text
- Insert a delay between the first and second steps. This defines the time gap before the next email is sent.
- Select a new template for the subsequent step.

- Action 3: Use A/B Testingsome text
- In any step, enable A/B Testing to compare the performance of two different templates.
{{screenshot}} (A/B testing setup screen) - Add two templates for the test and track their KPIs (e.g., open rates, click rates) to determine the better-performing version.
{{screenshot}} (KPI comparison for A/B testing)
- In any step, enable A/B Testing to compare the performance of two different templates.
Step 5: Email Senders and Tracking
- Description: In this step, you will configure the email sender, set tracking preferences, and customize unsubscribe options for your sequence.
Action 1: Select an Email Sender
- Choose an email sender from the Email Sender's dropdown list.some text
- The availability of the sender is displayed below their name.
- For example, "Sender available from [date]."
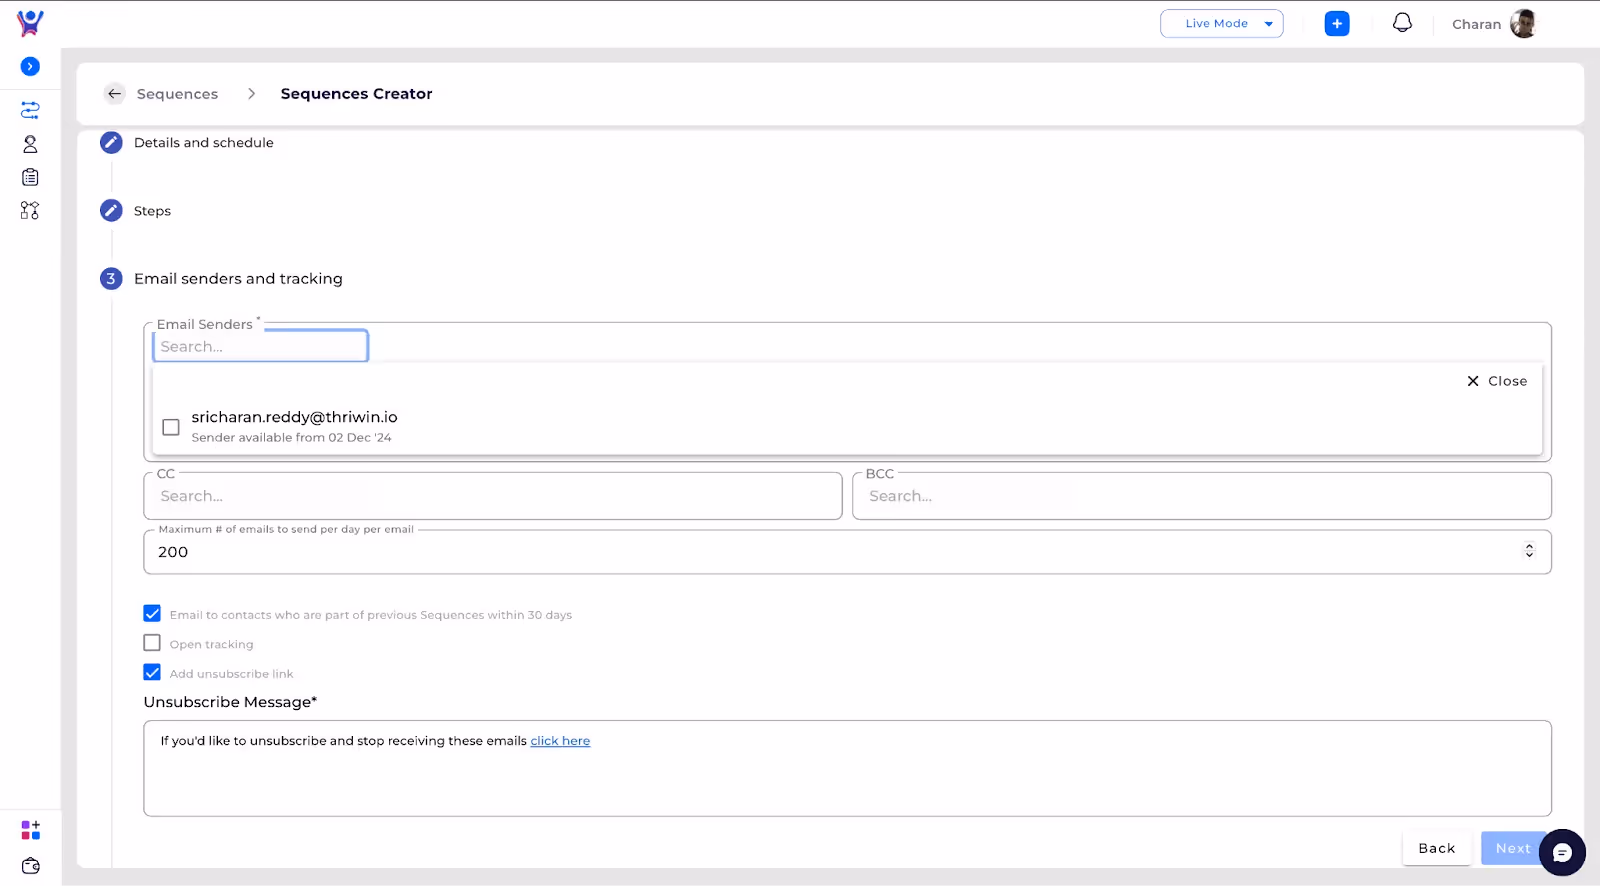
(Optional) Add CC and BCC recipients to send copies of the sequence emails to additional addresses.
Action 2: Configure Email Sending Limits
- Specify the Maximum number of emails to be sent per day per email sender.
- For example, enter 200 to cap the daily limit at 200 emails.
- You can see the sender limit of each email in Email Senders List page
Action 3: Enable Tracking and Unsubscribe Options
- Enable Open Tracking to monitor whether recipients open the emails.
- Check Add Unsubscribe Link to include an unsubscribe option in every email.some text
- Customize the Unsubscribe Message to match your communication style. For example:
"If you'd like to unsubscribe and stop receiving these emails, click here."
- Customize the Unsubscribe Message to match your communication style. For example:
- (Optional) Check "Email to contacts who are part of previous sequences within 30 days" if needed.

Action 4: Proceed to the Next Step
Once all configurations are complete, click the Next button to continue to the final step.
Step 6: Email Senders and Tracking
- Description: Review all the details of your sequence in this step:
- Verify the sequence name, schedule, and steps.
- Confirm sender configurations and tracking options.
- Once satisfied, click Submit to activate your sequence.

FAQs
- Question 1: When will my emails be scheduled?
- Answer: Emails will be scheduled on every valid date specified in your sequence.
- Question 2: What happens if I add multiple senders, but only one is available?some text
- Answer: Emails will be sent from the available sender until the next one becomes active.
- Question 3: What if I set the email limit higher than the sender's actual limit?
- Answer: The email limit for each sender will always take precedence, ensuring the platform respects the limits configured for the sender.
Best Practices
- Use Different Senders for Different Sequences:
To avoid overloading a single sender and improve deliverability, assign different senders to different sequences. - Test Templates Before Launch:
Use A/B testing to determine which email template performs best before sending it to the full audience. - Monitor Sender Availability:
Regularly check the availability of email senders to ensure continuous delivery without interruptions. - Keep Unsubscribe Options Transparent:
A clear unsubscribe message improves user trust and reduces the chances of your emails being marked as spam. - Limit Frequency of Emails:
Avoid sending too many emails within a short period to prevent overwhelming your audience.
Need More Help?
- Contact Support: Reach out our Support Team
How to create a Sequence
Effortlessly create sequences- Step-by-Step guide
Creating Templates
How to create templates and add dynamic variables for email sequencing.
- Purpose: This article will guide you through creating email templates for your sequences in Thriwin. This is designed for users who need to personalize their email communication using dynamic variables.
Open the Template Creation Window
- Navigate to the templates section and click on "Create Template" to open the template creation window.

Fill in the Template Fields
- Instructions for filling each field are given below:
- Template Name: Enter a descriptive name for your template.
- Subject: Add a subject line. You can use dynamic variables like {{first_name}} or {{last_name}} to personalize the subject.
- Body: Use the Markdown text editor to compose your email body. Dynamic variables can be added here as well to tailor emails to each contact.
- Attachments: Click on the attachment icon to upload files.

Preview the Template
- The template preview pane allows you to see how the email will look with sample contact data, ensuring your dynamic variables render correctly.
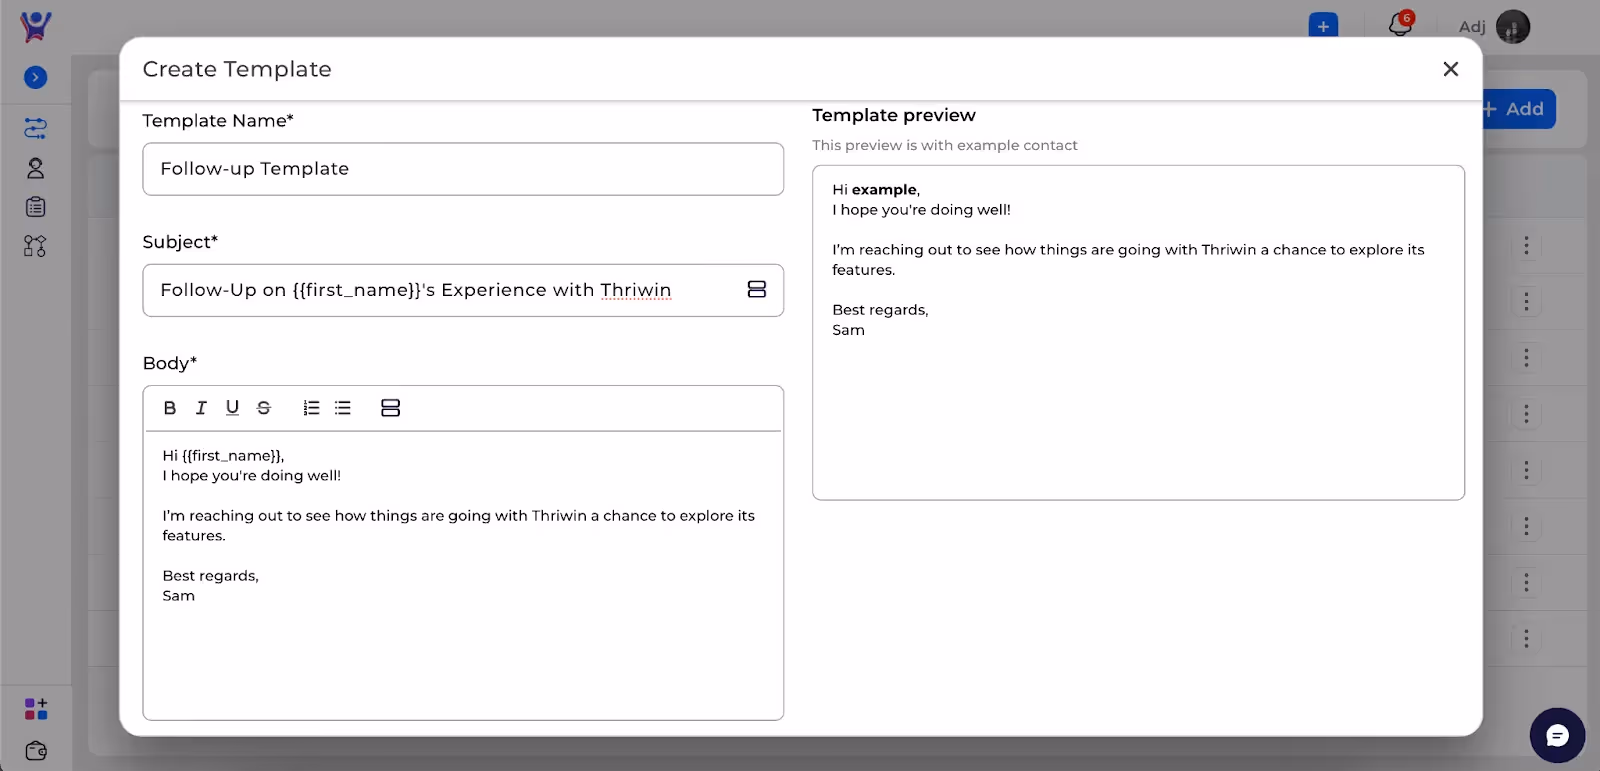
Common Issues and Troubleshooting
- Issue 1: Dynamic Variables Not Rendering Correctly
- Solution: Ensure that the dynamic variables used in the subject and body are correctly formatted and match the variable names in your contact list.
FAQs
- Question 1: Can I add multiple attachments?
- Answer: Yes, you can upload multiple attachments by clicking on the attachment icon multiple times.
- Question 2: What formats are supported for attachments?
- Answer: Supported formats include PDF, DOCX, and image files like PNG and JPG.
Need More Help?
- Contact Support: Reach out to our Support Team
How to create Email templates
The Ultimate Guide to Creating Personalized Email Templates
Manage Products
- To edit a product , Click on

- in the product row and choose

- to edit the product
- To sort products, click on the respective column header
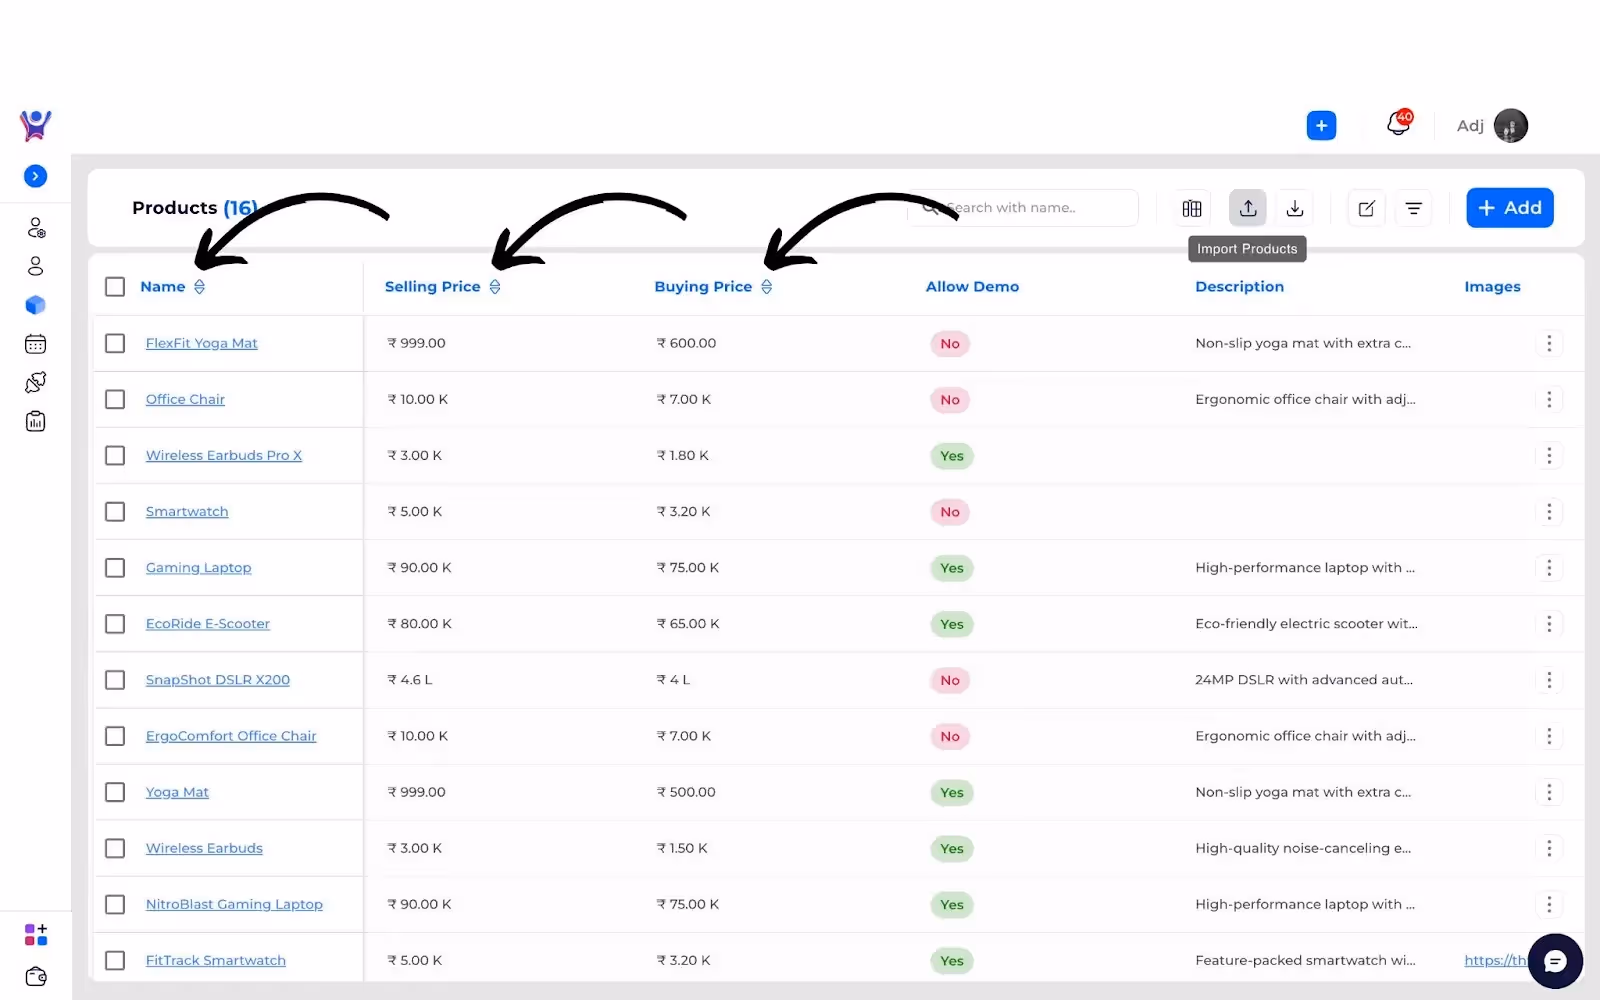
- To filter products , click on

- in the upper right corner above the header and input the desired field values to apply the filter.
- To add or remove table columns, click

- in the top right of the table to edit columns.
To update multiple products at once , Select the checkboxes next to the products and click on bulk update

in the upper right corner above the column header.
- To deactivate a specific product click on
- in the same row then choose

to deactivate the product .
- You can reactivate it later by clicking on
- in the same row then choose

- to reactivate the deactivated product.
- To permanently delete a product click on
- in the same row then choose

. This action will delete the product permanently.
- To export products , click on

- and the downloaded file will be mailed once its ready .
Note : To download products with specific properties apply filters , then download .Need More Help?For further assistance, feel free to contact our support team. Visit our Support Center for detailed help and FAQs.
Operations on Products
Effortless Edit, Filter, and Sort Operations
Products
- A product is a good or service that you sell.
- The Products section is a module for managing and tracking an organization's products.
- Purpose: This article will guide you through understanding the Products module in Zoho CRM. It is designed for sales looking to effectively manage and track their company's product information.
Create a Product
You can import multiple products or create a single product
Step 1 : In your Thriwin account in side navbar , navigate to channels > others > products
Step 2 : In the upper right, click Add. Or, to import multiple products, click

to import
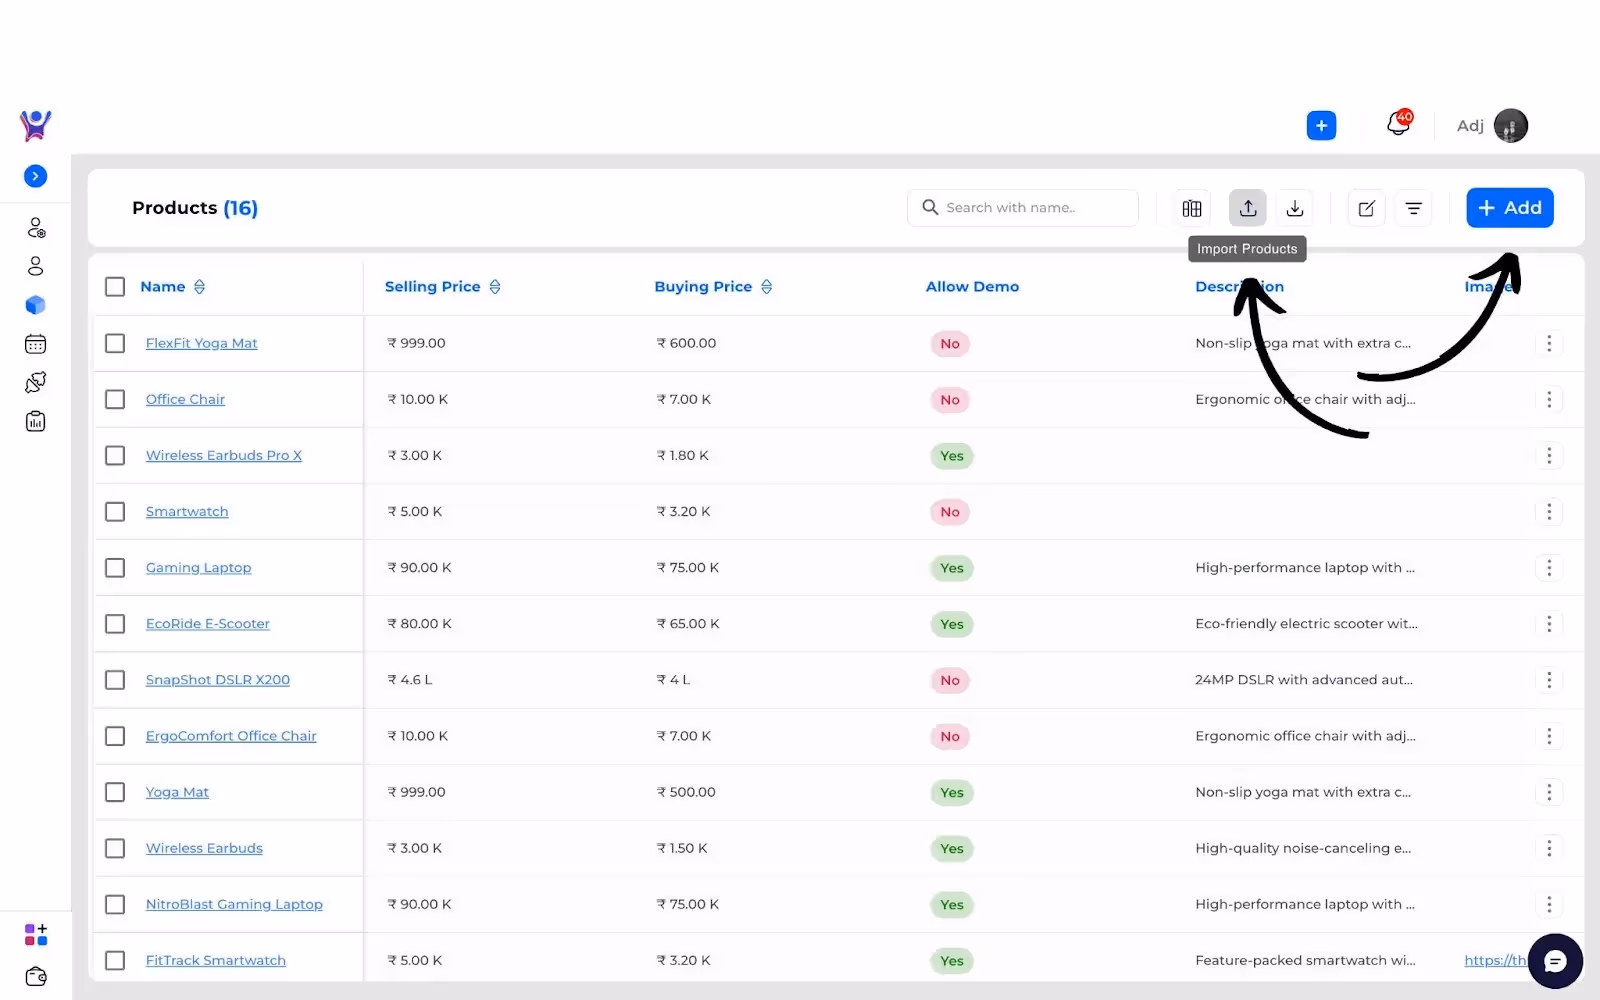
Step 3 : In the form , customize your product details

Name: Enter the name of the product or service.
Selling Price: The price at which the product/service will be sold to customers.
Buying Price: The cost incurred to procure or manufacture the product/service.
Allow Demo: Toggle this field to indicate whether customers can get a demonstration of the product/service.
Description: Provide a brief overview of the product/service, highlighting its features or benefits.
Video URL: Add a URL linking to a promotional or demo video of the product/service.
Images: Upload an image of the product (JPEG, PNG, etc.), which will be displayed on the product page.
Status: Indicate whether the product/service is active or inactive.
Brochure: Upload a brochure file (PDF, DOC, etc.) containing detailed information about the product/service.
- Click Save to save the product, or click Save and Add Another to save and additionally create a new product.
Need More Help?
For further assistance, feel free to contact our support team. Visit our Support Center for detailed help and FAQs.
Create a Product
How to create a product- Step-by-Step Guide
Timeline
The Timeline section serves as a comprehensive overview, displaying all activities performed by the users. It helps users track completed, pending, and overdue tasks, providing a clear view of their work progress. Each task is listed with relevant details like scheduled times and completion status, enabling better task management and ensuring that no activity is overlooked.
- Purpose: This article will guide you through understanding the Products module in Zoho CRM. It is designed for sales looking to effectively manage and track their company's product information.
Step by Step Instructions for creating and managing tasks
Create task
Step 1 : Click on Add button on the top right as shown below and choose any task you want to create
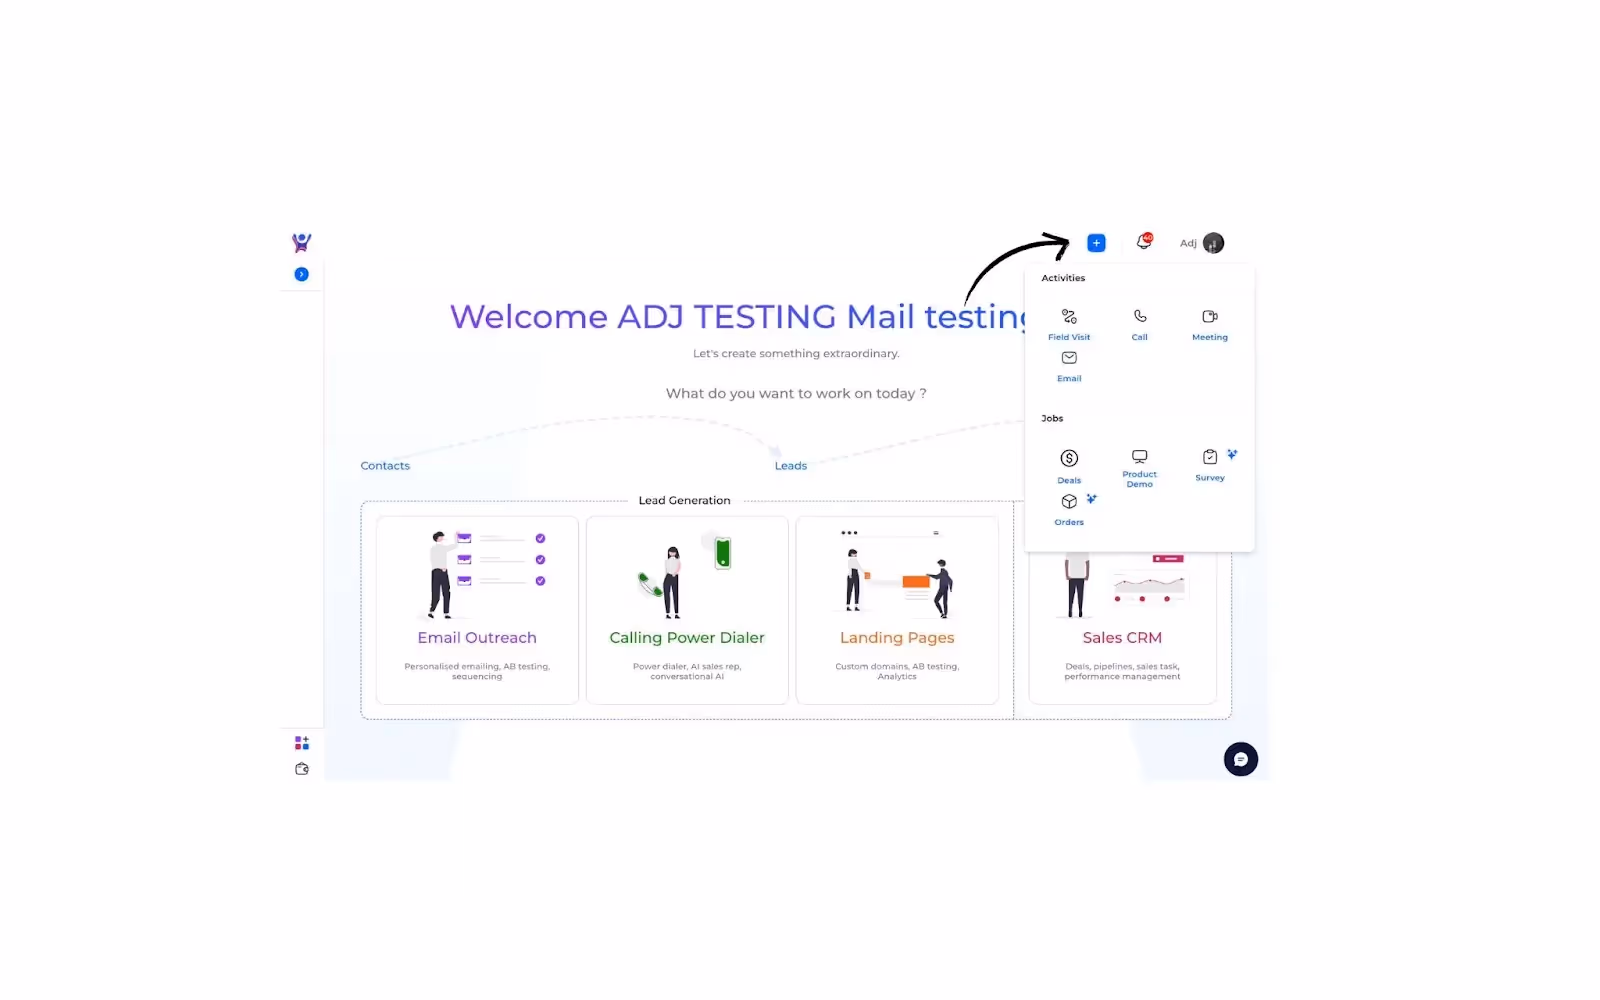
Step 2 : As a next step , a task popup opens up , The task pop-up allows users to create and schedule activities. It contains the following key fields:
- Details:some text
- Name: The title or name of the task.
- Description: A brief description of the task.
- Schedule for Later: A toggle to set the task for a later date, if needed.
- Form: Allows the user to link a specific form to the task.
- Jobs: Enables linking the task to specific job categories like Deals , Product demos, etc.
- Participants: Assigns participants to the task (the first selected participant is considered the primary one)..
Step 3 : The pop-up also includes options to add follow-up tasks and a SUBMIT button to finalize the task creation.
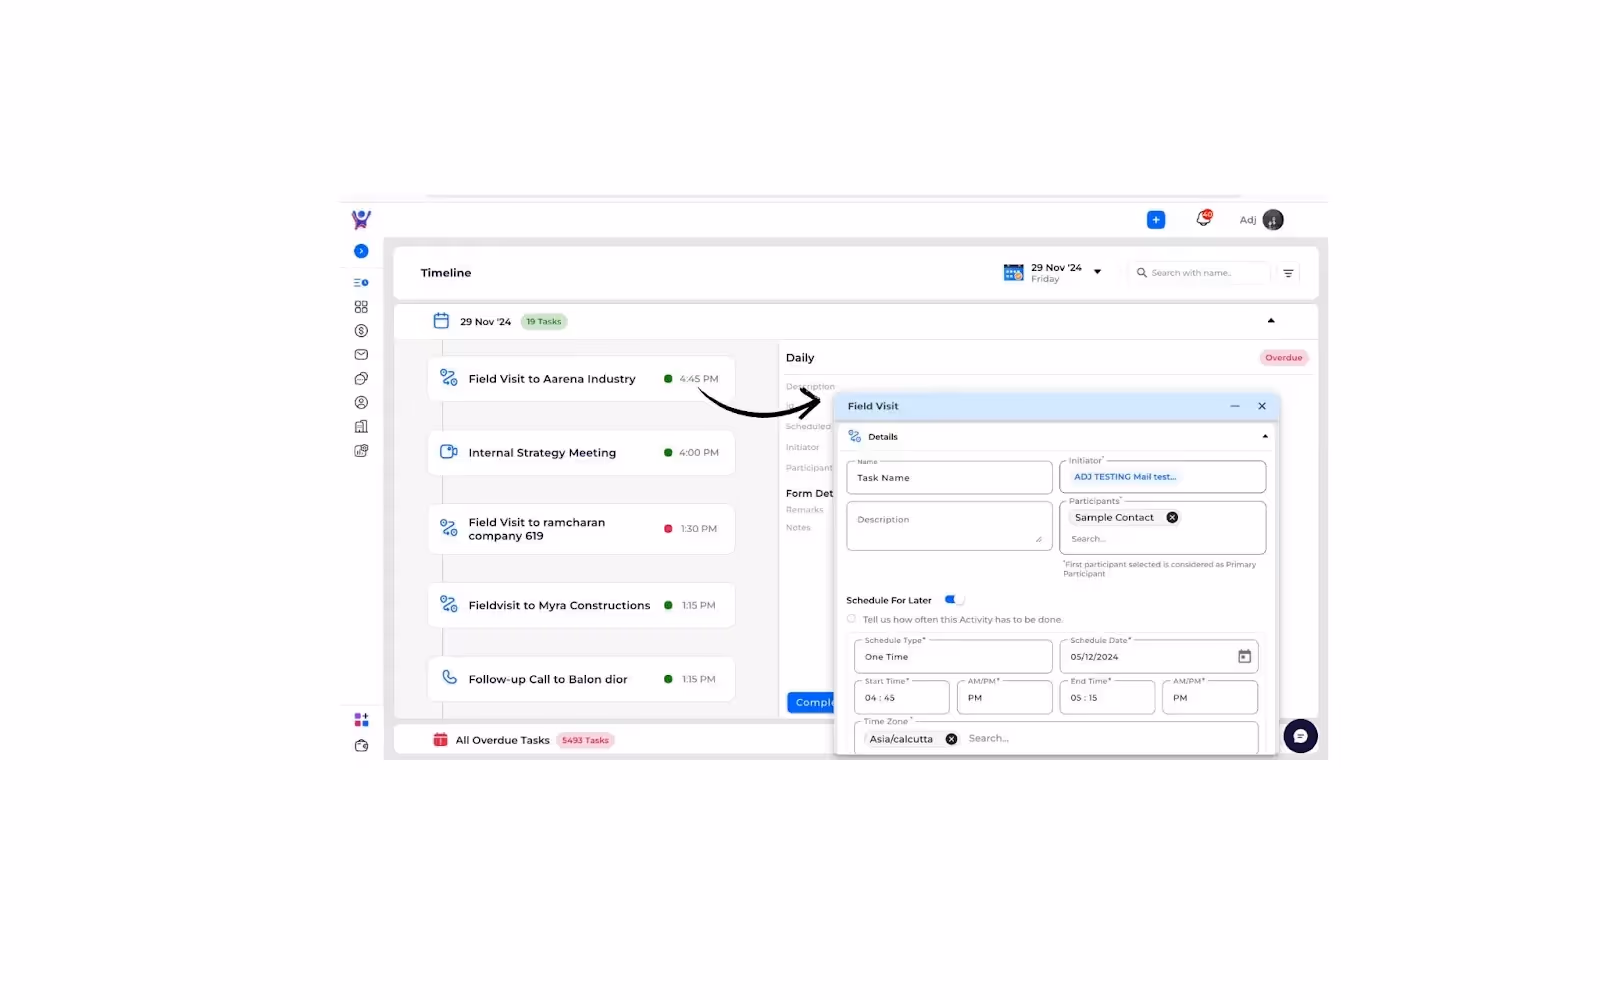
Manage Tasks
- Visit timeline to manage tasks. To visit the timeline navigate to Channels > Sales CRM > Timeline.

- As shown above , it has two main sections:
- Tasks Section: Displays today's tasks, listed according to their scheduled or completed times.
- Overdue Section: Displays tasks that have passed their scheduled time but have not been completed, organized by their original scheduled time, with the most recent overdue tasks shown first.
- A calendar allows you to select specific dates to view today's tasks, but it does not affect the overdue tasks. You can find it in top right corner.
- To filter tasks , clicking on
- it opens a pop-up with multiple fields for refining task views.
Task Notifications
- To ensure users stay on top of their tasks, push notifications will be sent at predefined intervals before the scheduled task time.
- The exact notification intervals can be customized to help users manage their schedules effectively, ensuring they never miss a task.
Need More Help?
For further assistance, feel free to contact our support team. Visit our Support Center for detailed help and FAQs.
Guide to Create and Manage Tasks
Guide to Creating and Managing Tasks
Threads & Mails
This is an explanation regarding the threads and mails in thriwin.
- Purpose: This is a step by step explanation on how to read a thread, mails, reply to mails and also get AI based mail summary.
Step-by-Step Instructions
Mail Thread
- Description: This is a step by step explanation on how to follow mail thread and see the details of it.
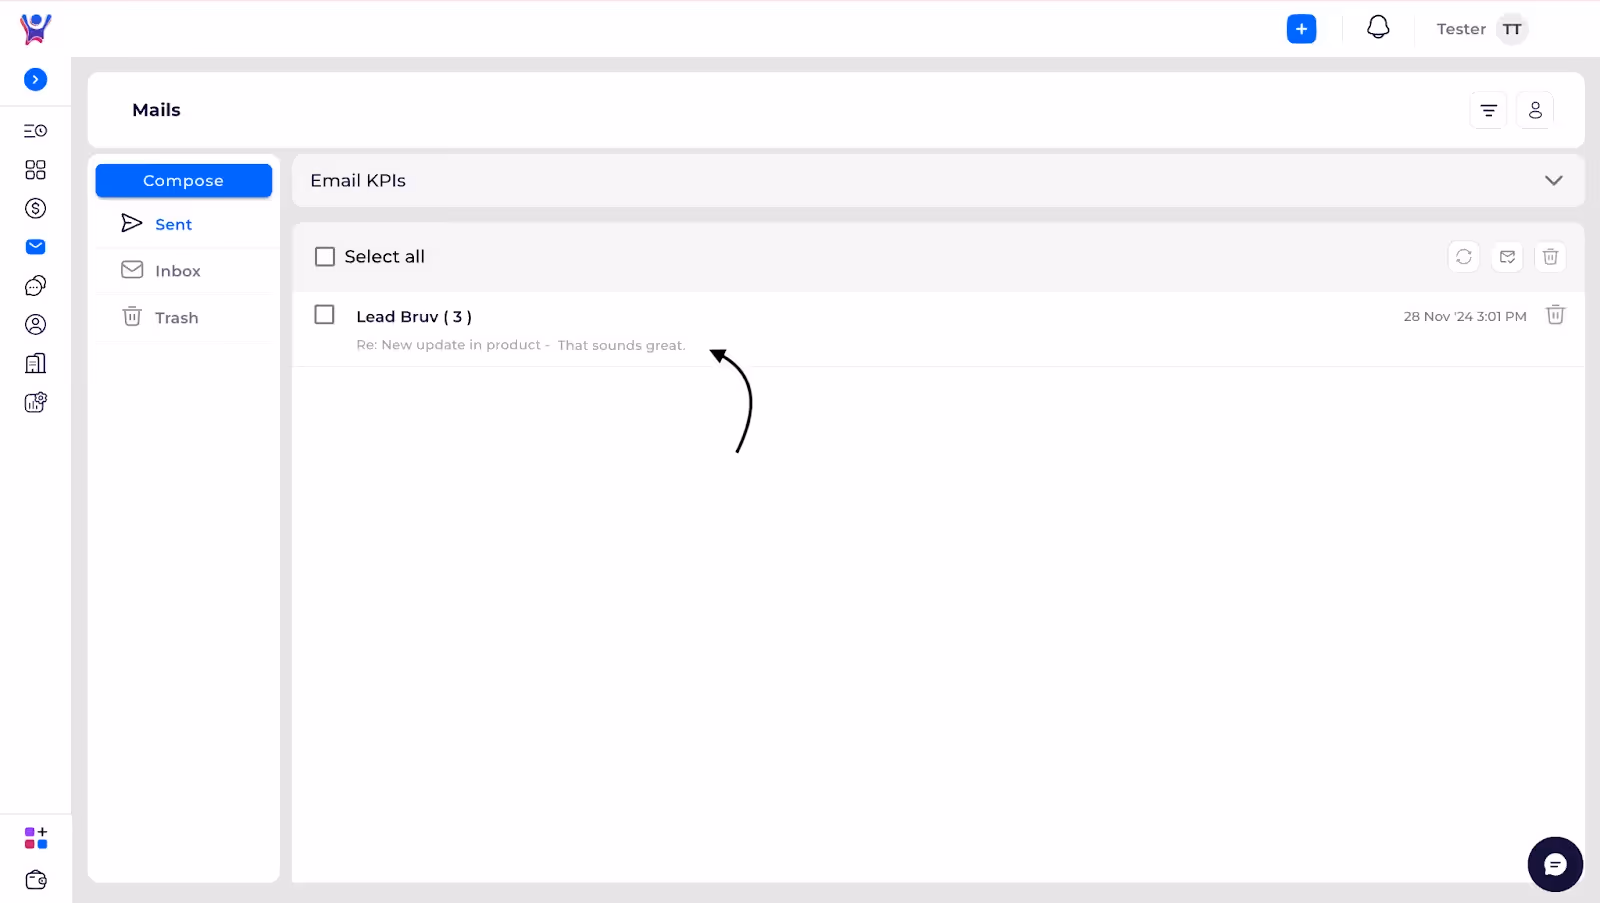
- The above screenshot depicts how a thread looks in Thriwin. It shows the name of the user whom you are having a conversation with, and the number of mails in the thread.
- Below that it displays the subject followed by the body.
Thread details
- This is to explain how a thread looks with all emails and the process in which you can reply to individual messages.
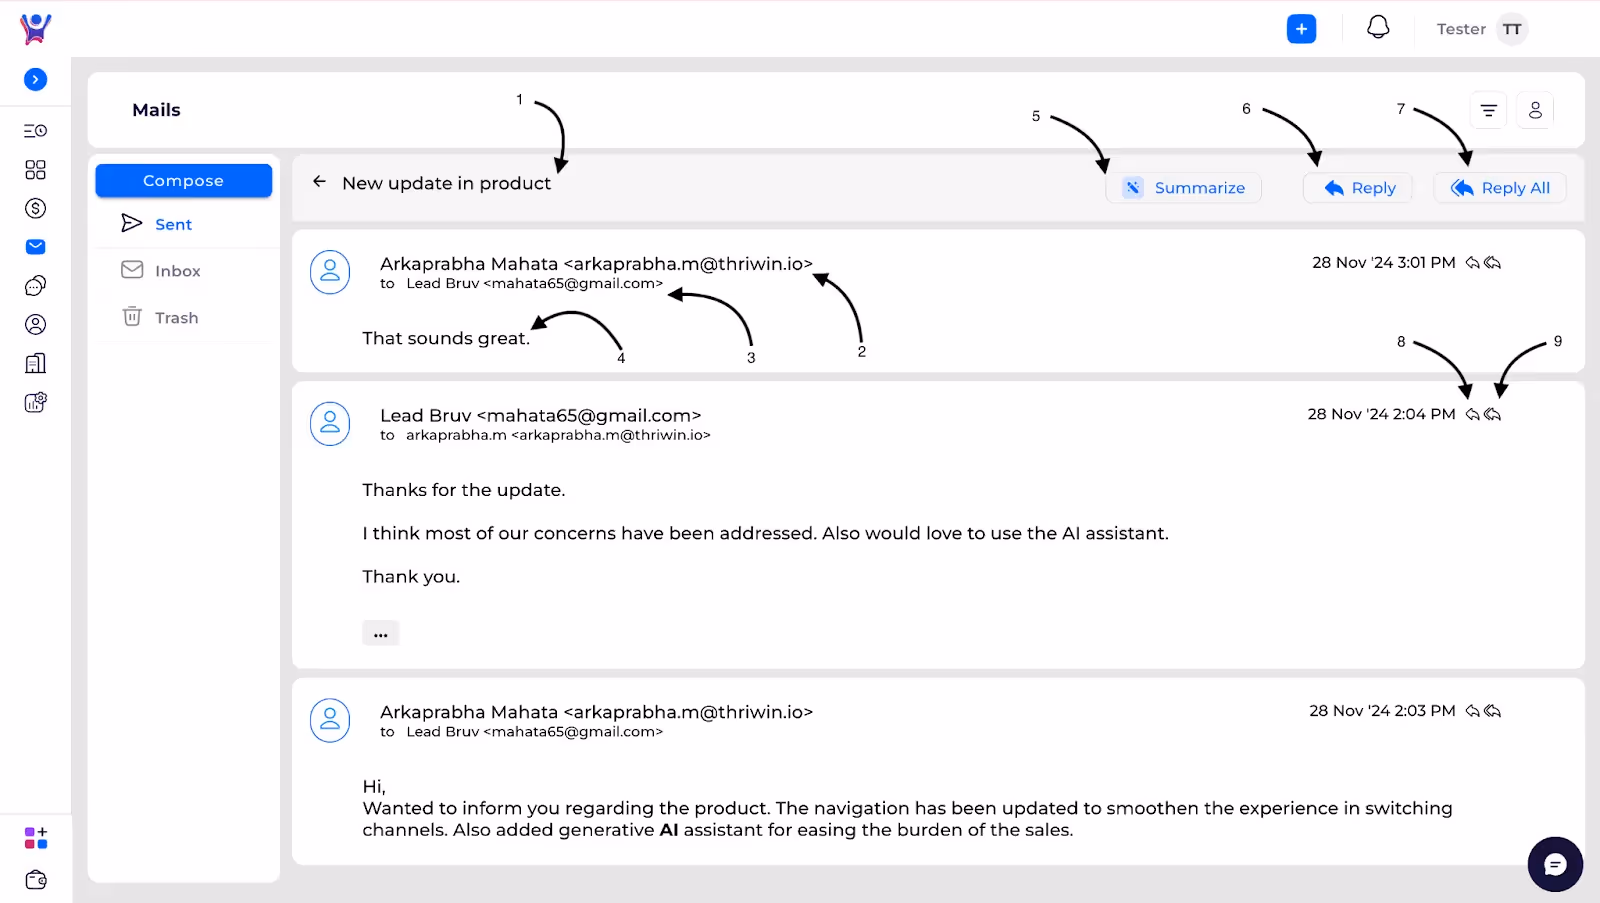
The above screenshot depicts all the mails in the thread.
- 1 -The subject of the thread
- 2 - Sender of mail in thread
- 3 - Recipient of mail in thread
- 4 - Body of the mail in thread
- 5 - Mail summarize, it’s an AI option that will summarize the conversation in the thread once clicked
- 6,7 - Reply and reply all to the last mail in the thread once clicked will open the reply section as seen below.
- 8,9 - Reply and reply all to any individual mail in the thread once clicked will open the reply section as seen below.

Need More Help?
- Contact Support: For further queries, reach out to our Support Center
how to read a thread
How to read a thread -Clear Step by Step guide
Manage Signature
- User can add signatures for the connected email which will be accessible to the user while sending the email. This feature can be accessible in the profile section under “Manage Signatures” as can be seen from the screenshot below.

- This will open the signature list page where users can add, edit or remove any signature as required.

Add a Signature
- Add signature - Click on the add button which will open the add signature popup where you can enter the “Name” and “Signature” with formatting according to the user and we can also mark it as a default signature so that it appears for every email.

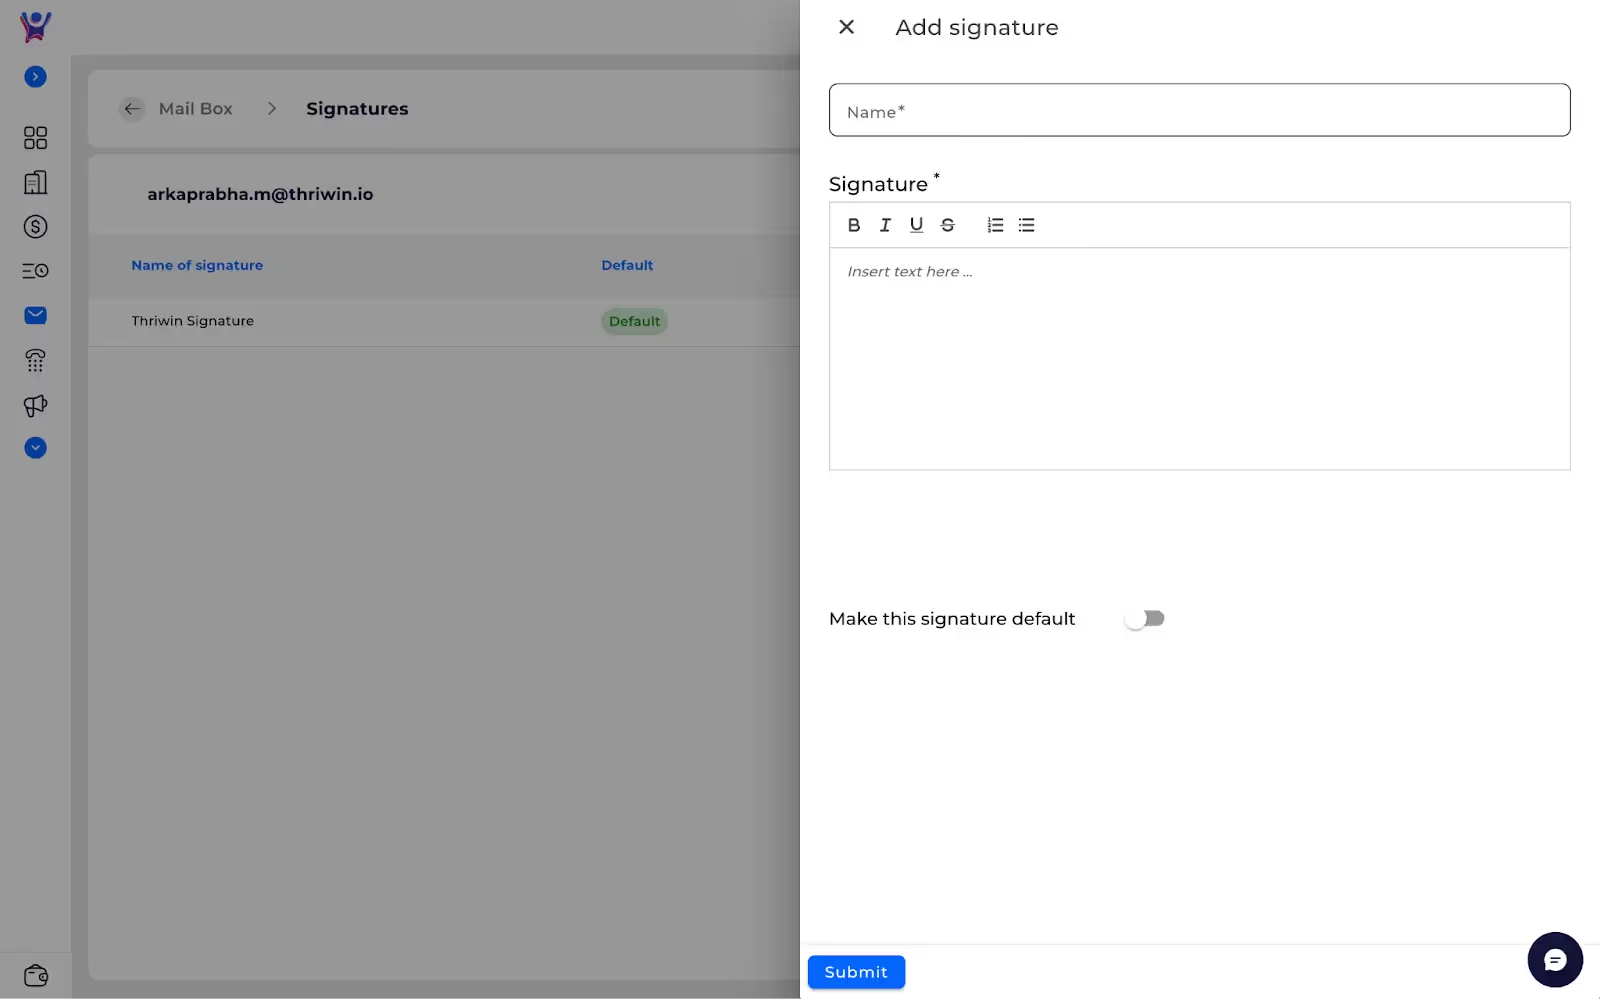
Delete a Signature
- Deleting signature - Users can delete signature by clicking the delete icon next to the signature row as seen in the screenshot below.
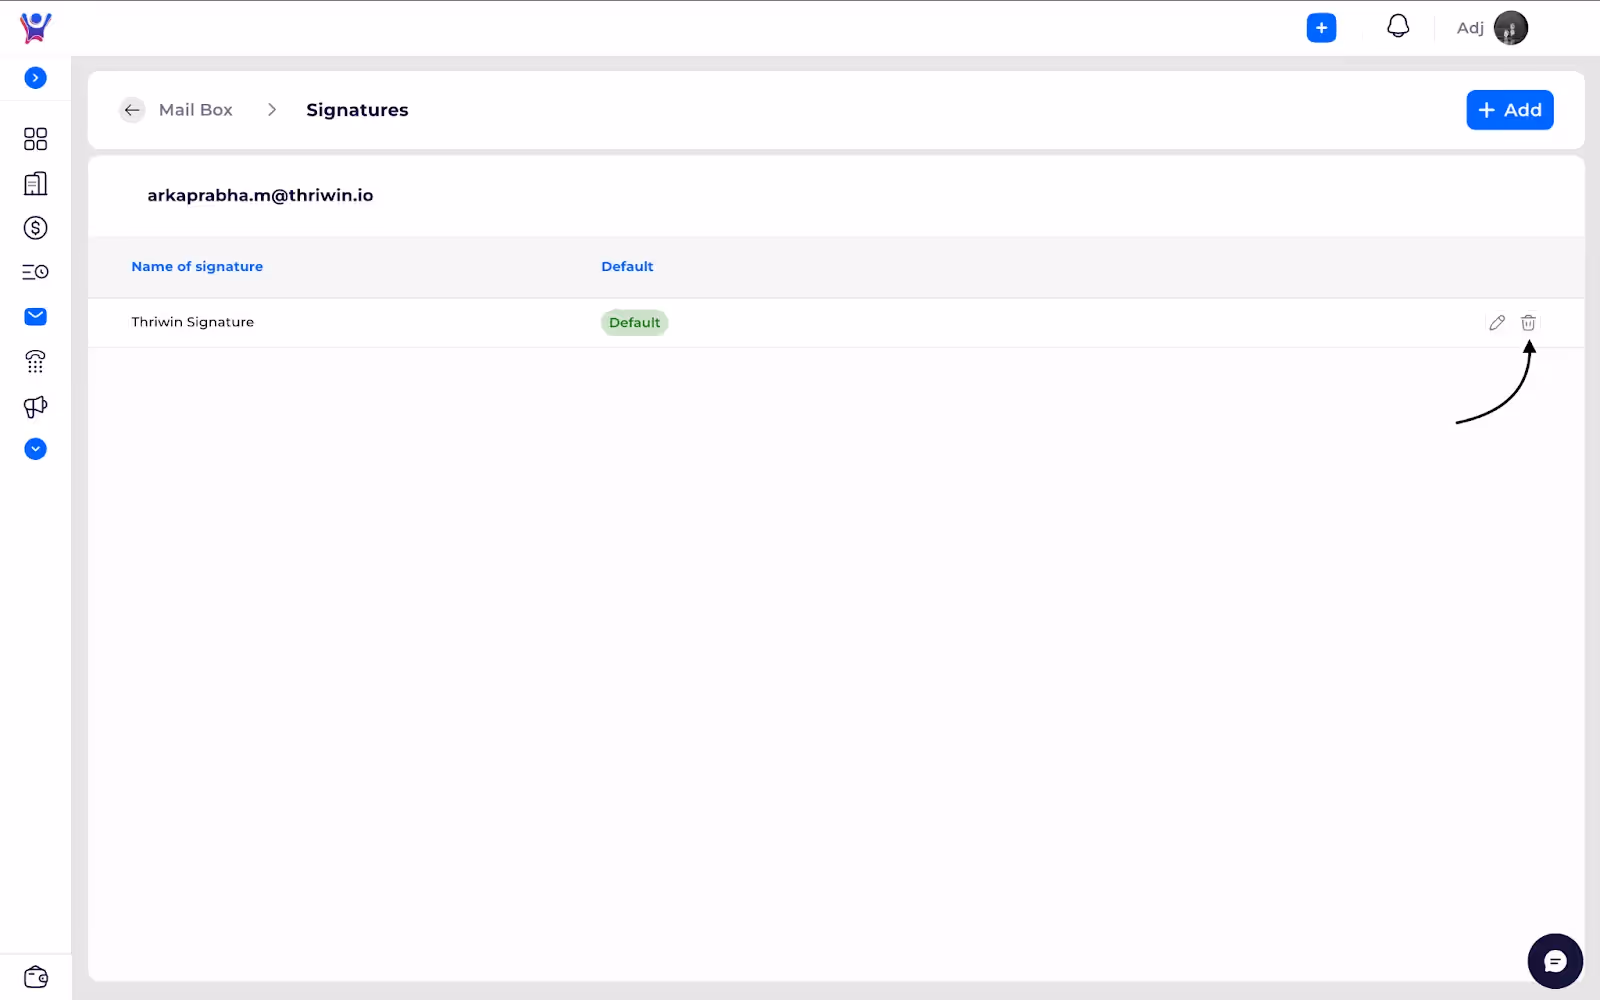
Edit a Signature
- Editing signature - To edit an existing signature click on the edit icon next to the signature row, the earlier signature will get populated in the previous pop up. You can edit accordingly and save it.
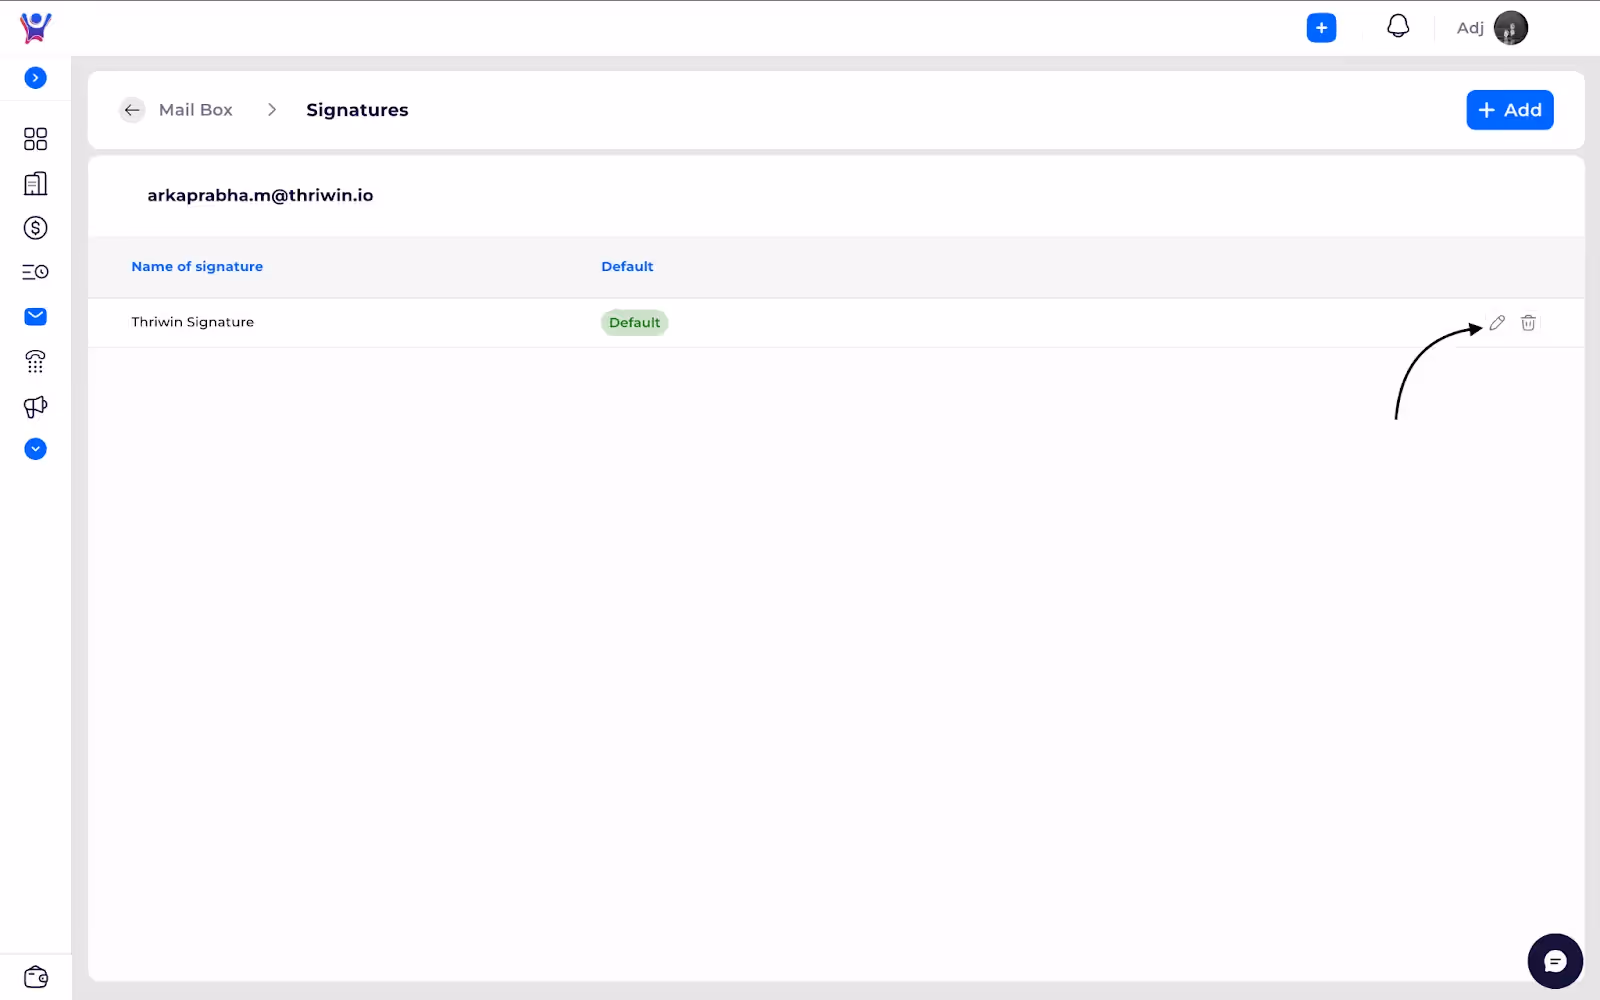
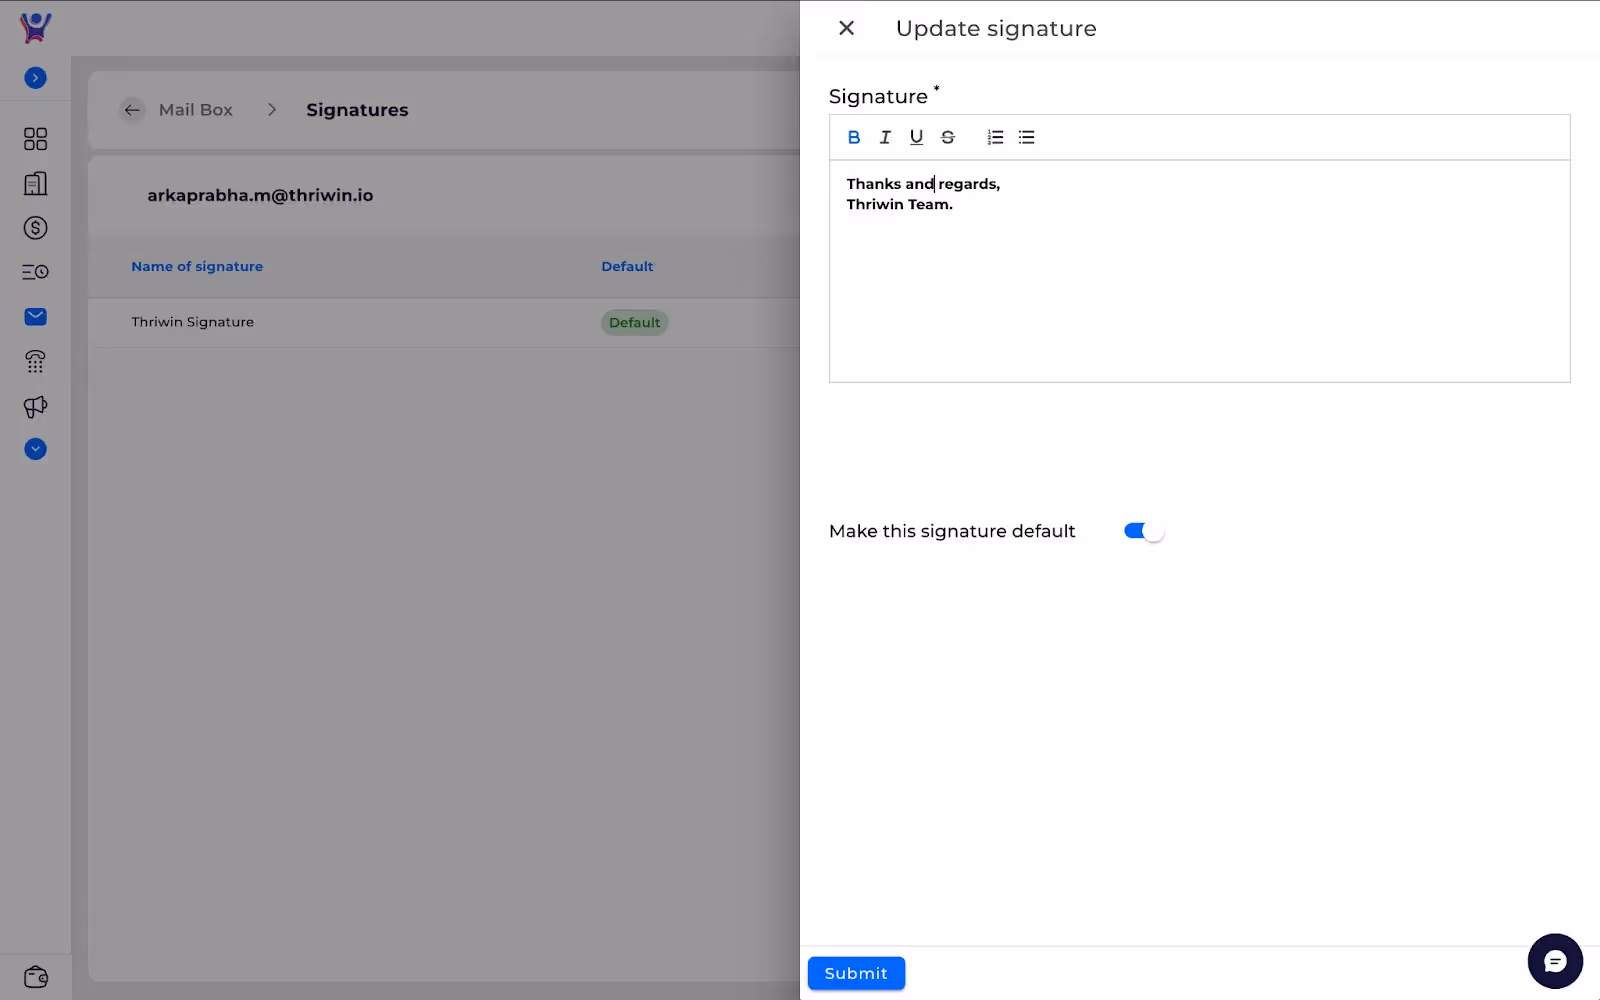
Manage Signatures for Mailbox
Manage Signatures - Clear Step by Step guide
Bulk Action
- You can perform bulk actions on mail by checking multiple emails or with Select all options as shown below.
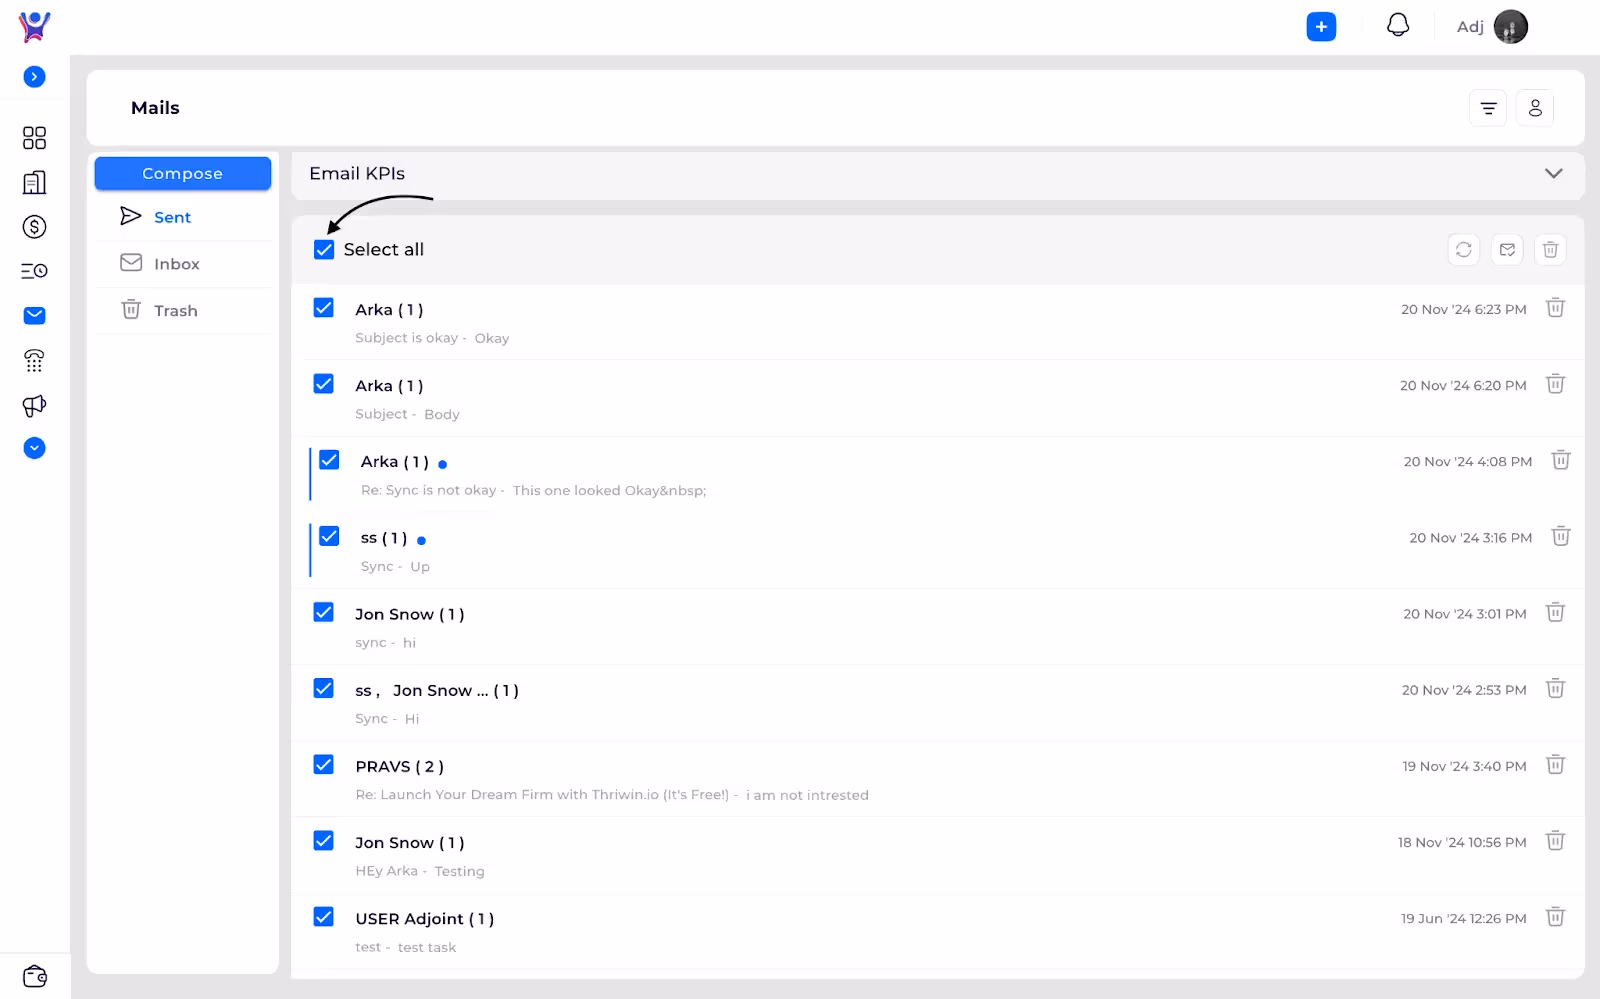
- At this point you can perform specific actions on all specific emails
- Trash - To move all selected emails to trash.
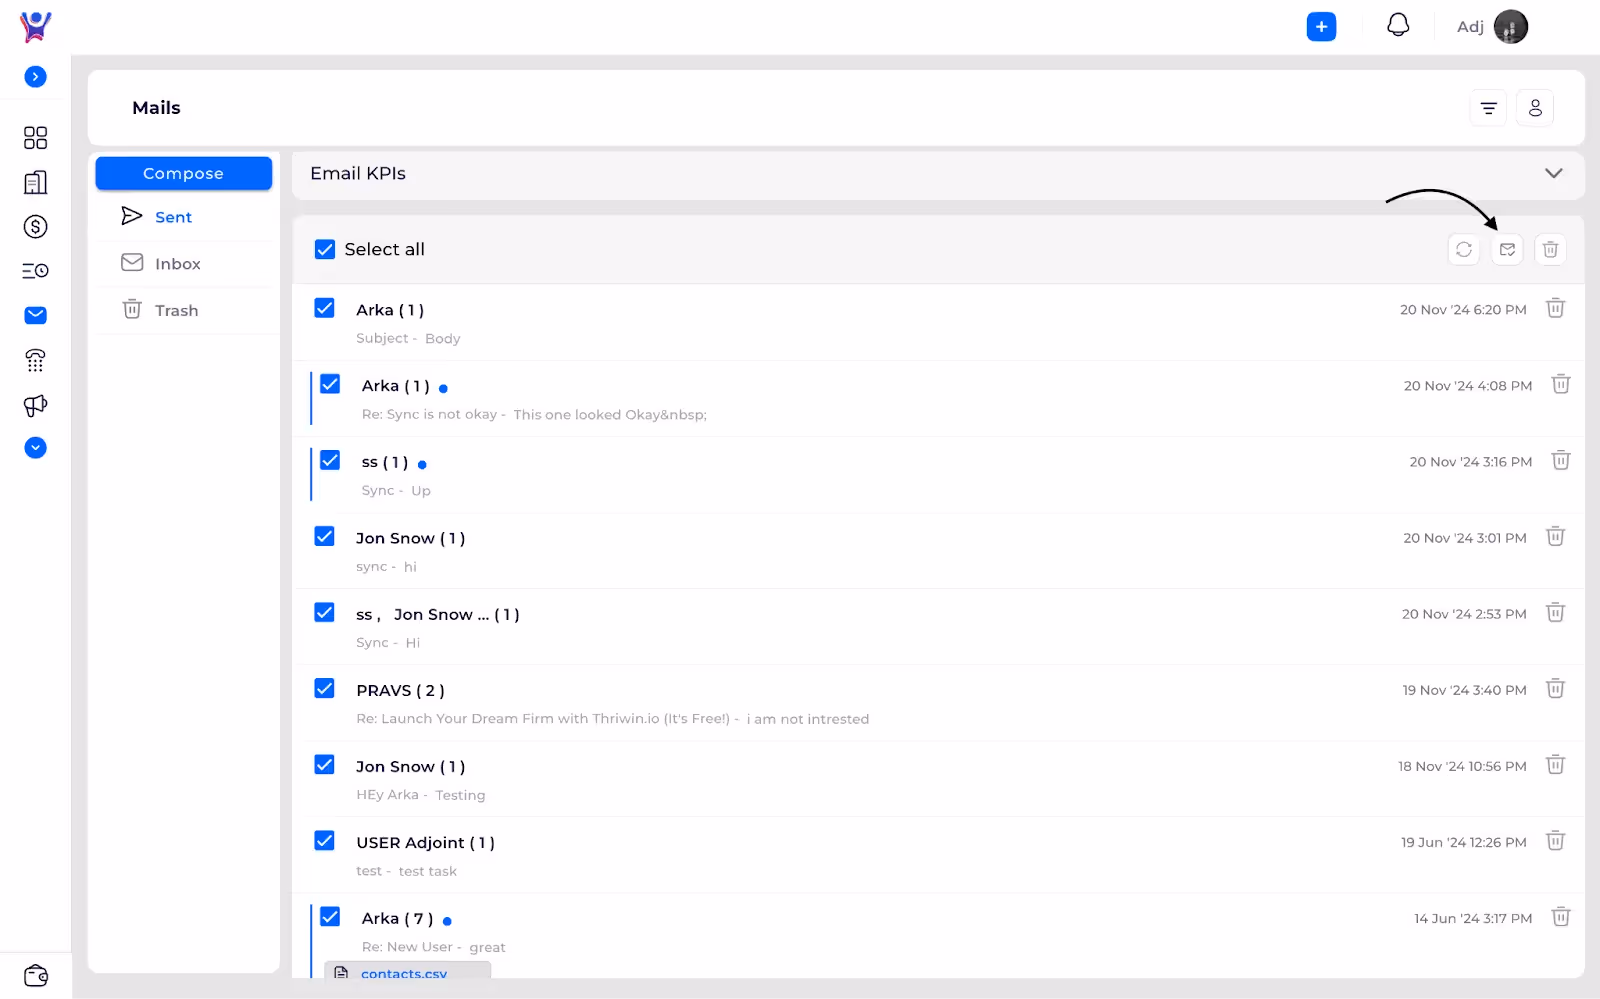
- Mark as Read - To mark all emails as read you can click on mark as read as shown in the screenshot below.
Mailbox Bulk Actions
Perform bulk action on emails- Clear Step by Step guide
Navigate to reports page
Scope: To download respective report data.
Step 1: Click on others icon
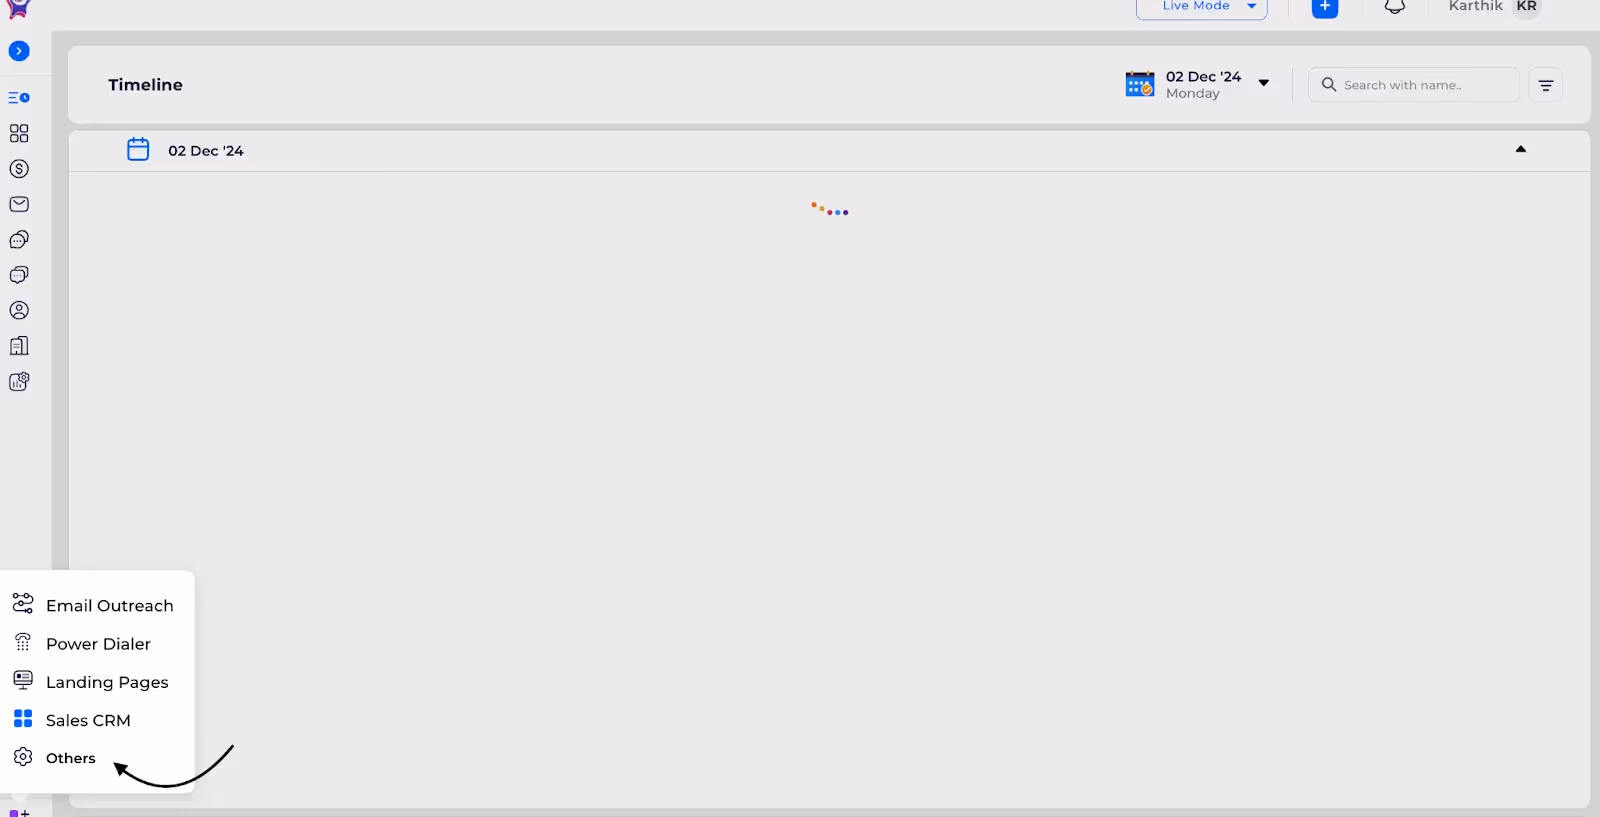
Step 2:Click on reports icon
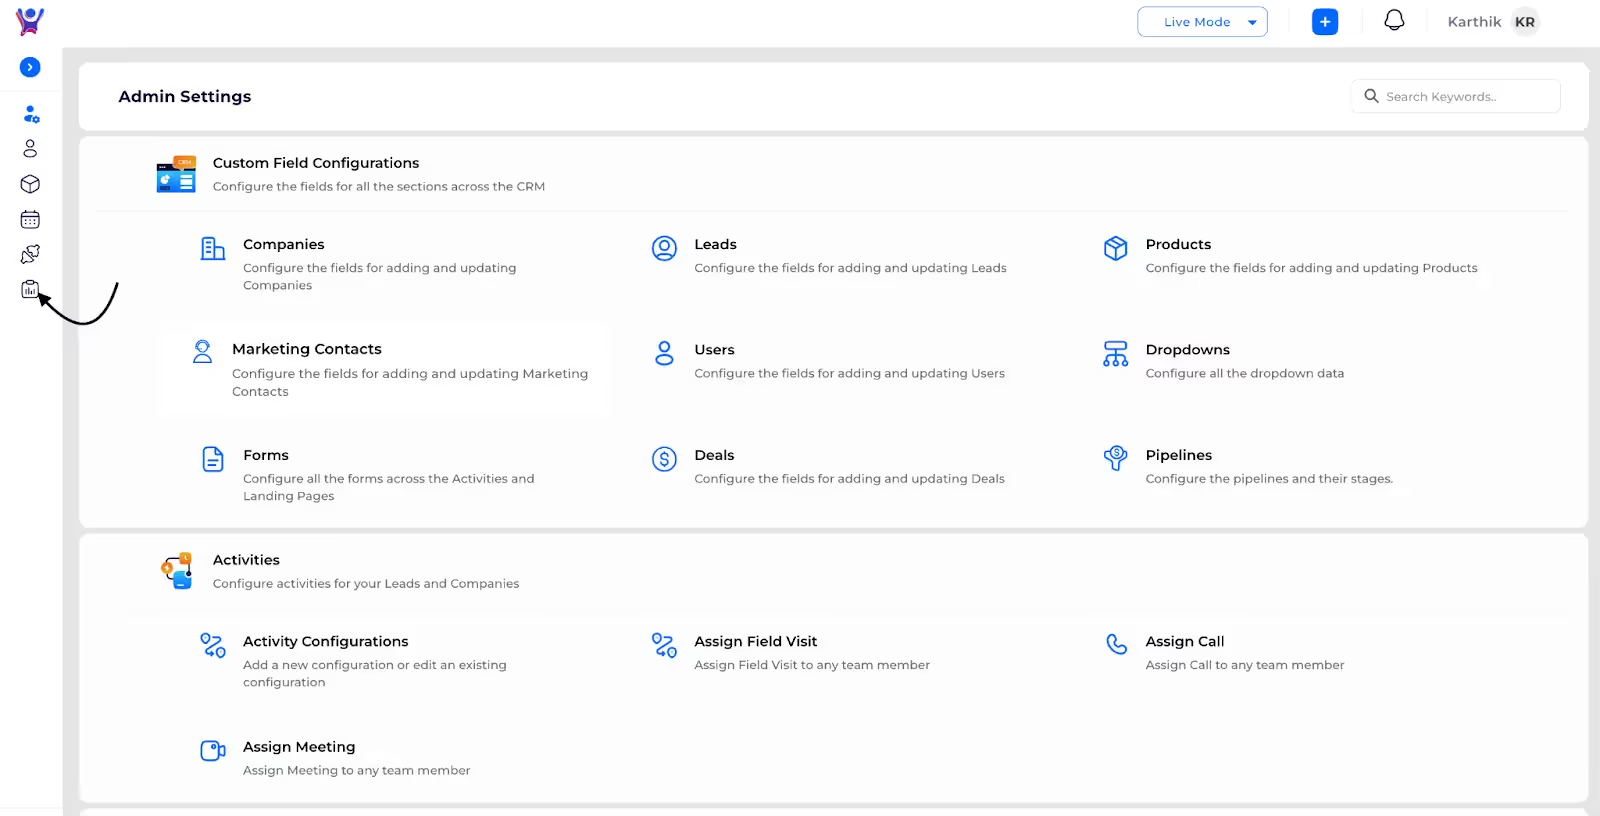
Step 3:Download respective report
For example Leads.
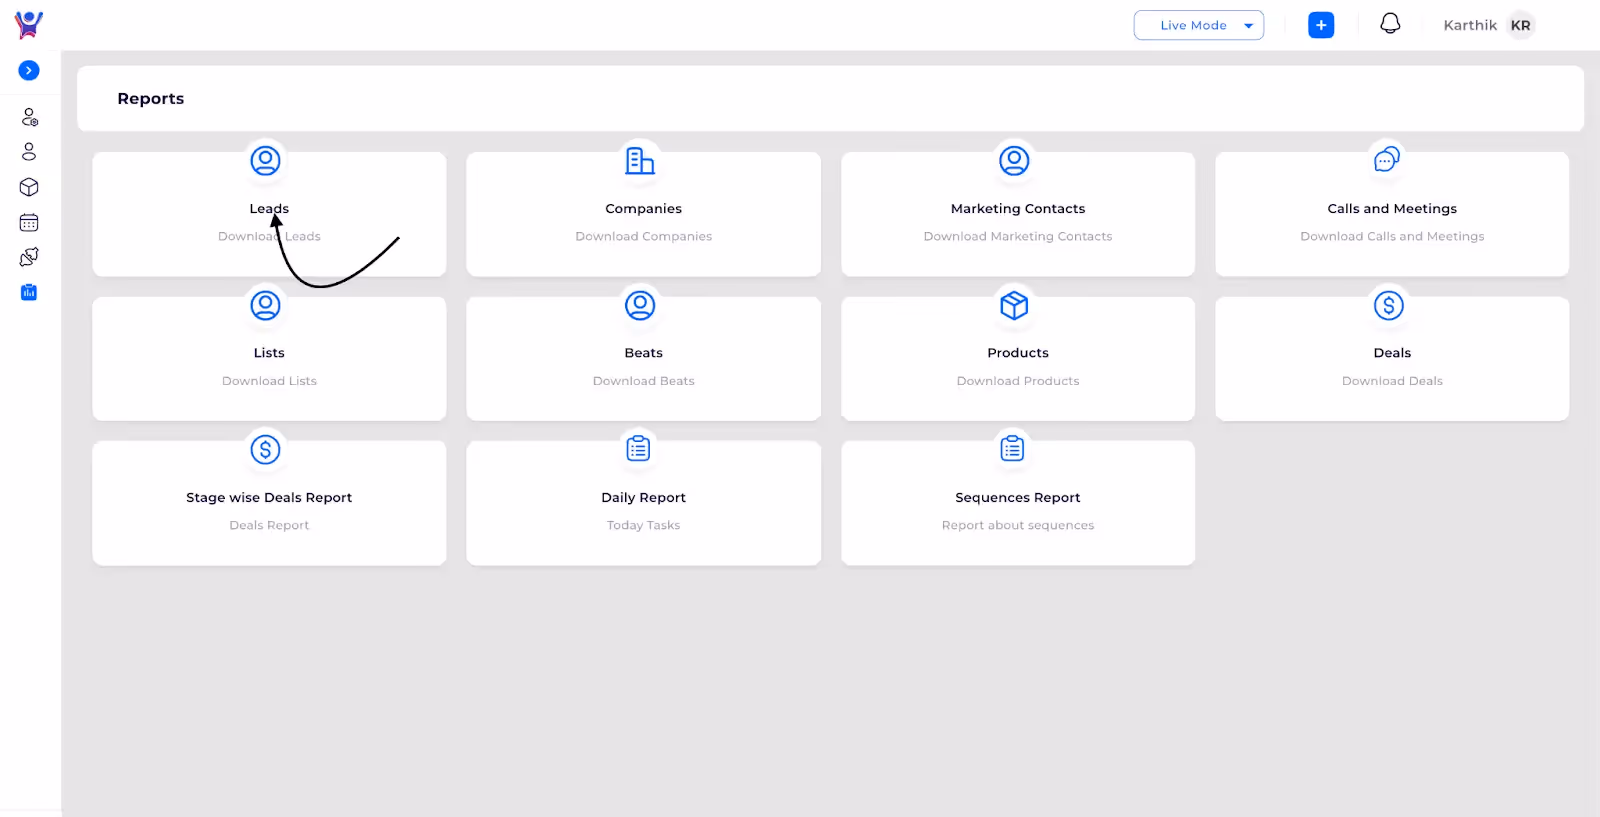
Step 4: Click on export:
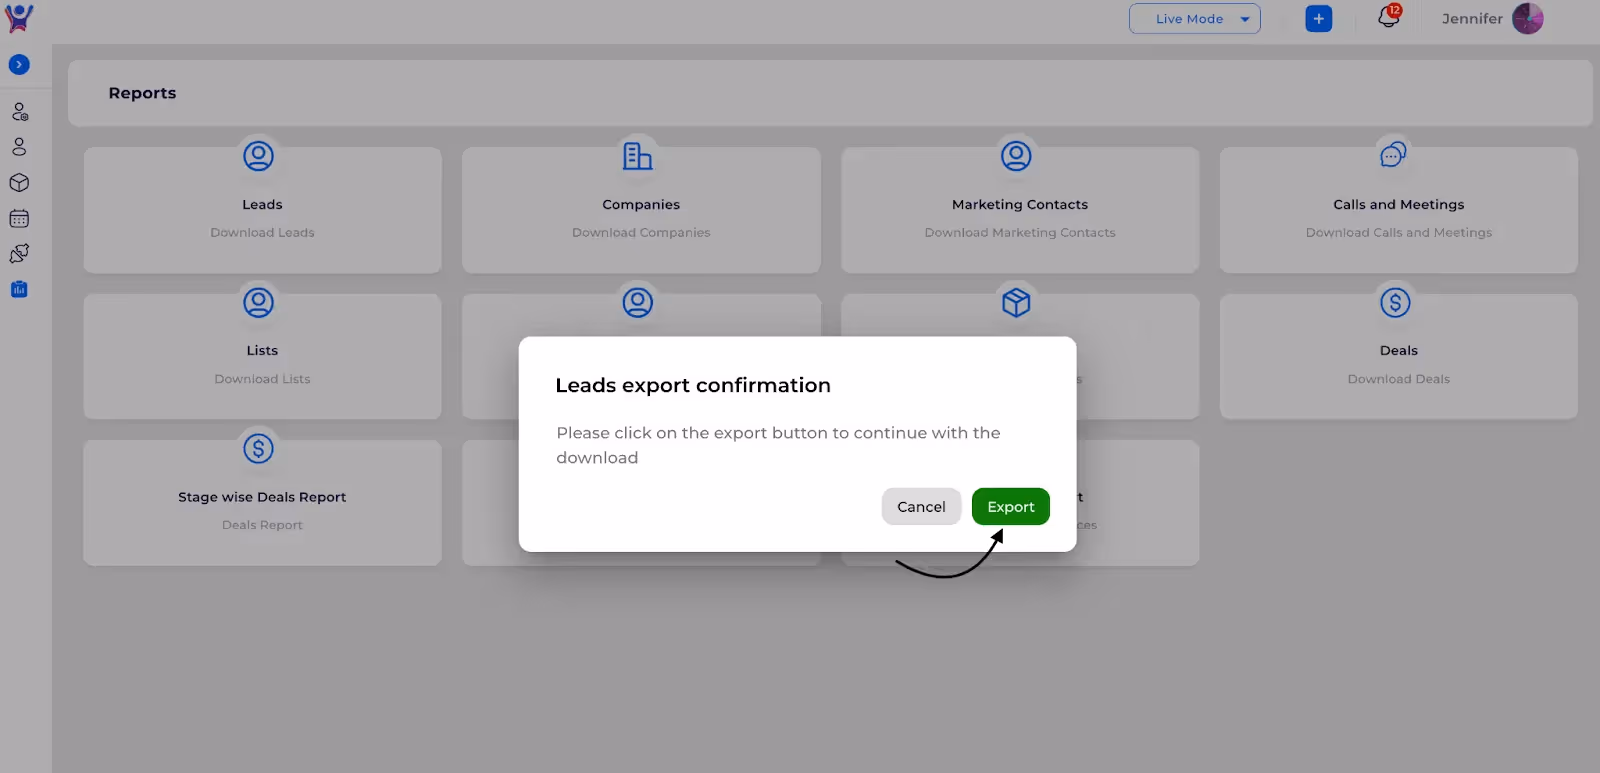
Reports Overview
Download Reports effortlessly!
Download a List
- Beside that there is a download button which helps to download all the lists.
- On clicking the download button a confirmation pop up comes over, before downloading the whole list.

- On clicking EXPORT the list download will get added to the queue.
- And after some time the list of lists are sent to the email in a pdf format.
How to Download a List
Step by Step guide- Download a list
How to edit a list
- On clicking the edit icon beside every list, a list can be edited.

- On clicking the EDIT icon the list will be opened in an editable form like below.
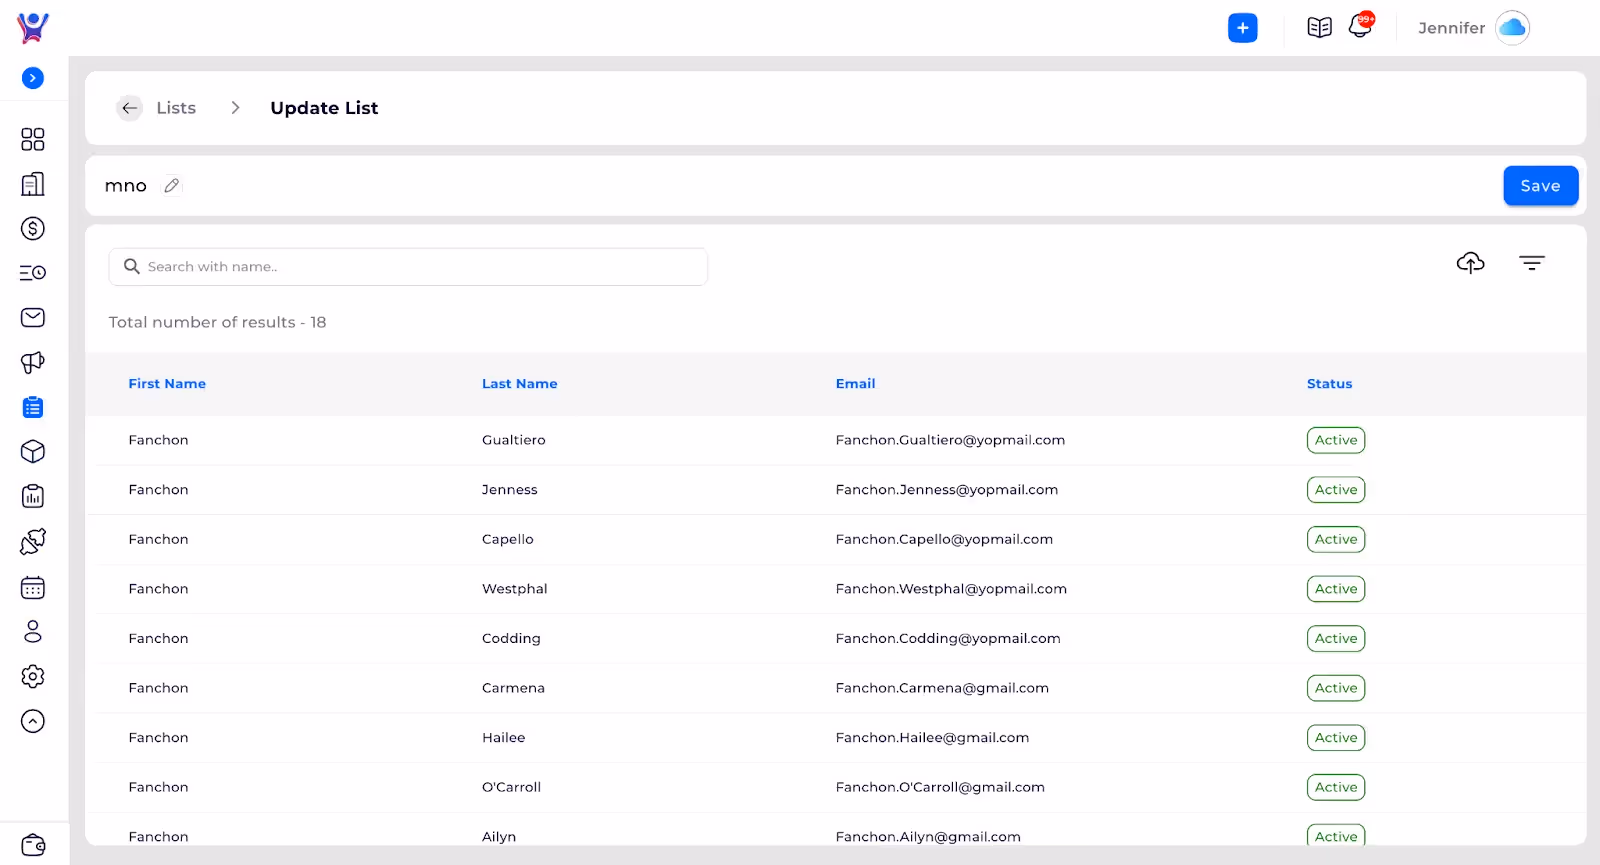
- On clicking the filter icon filters screen will get added with the prefilled filters which are applied when the list was created.
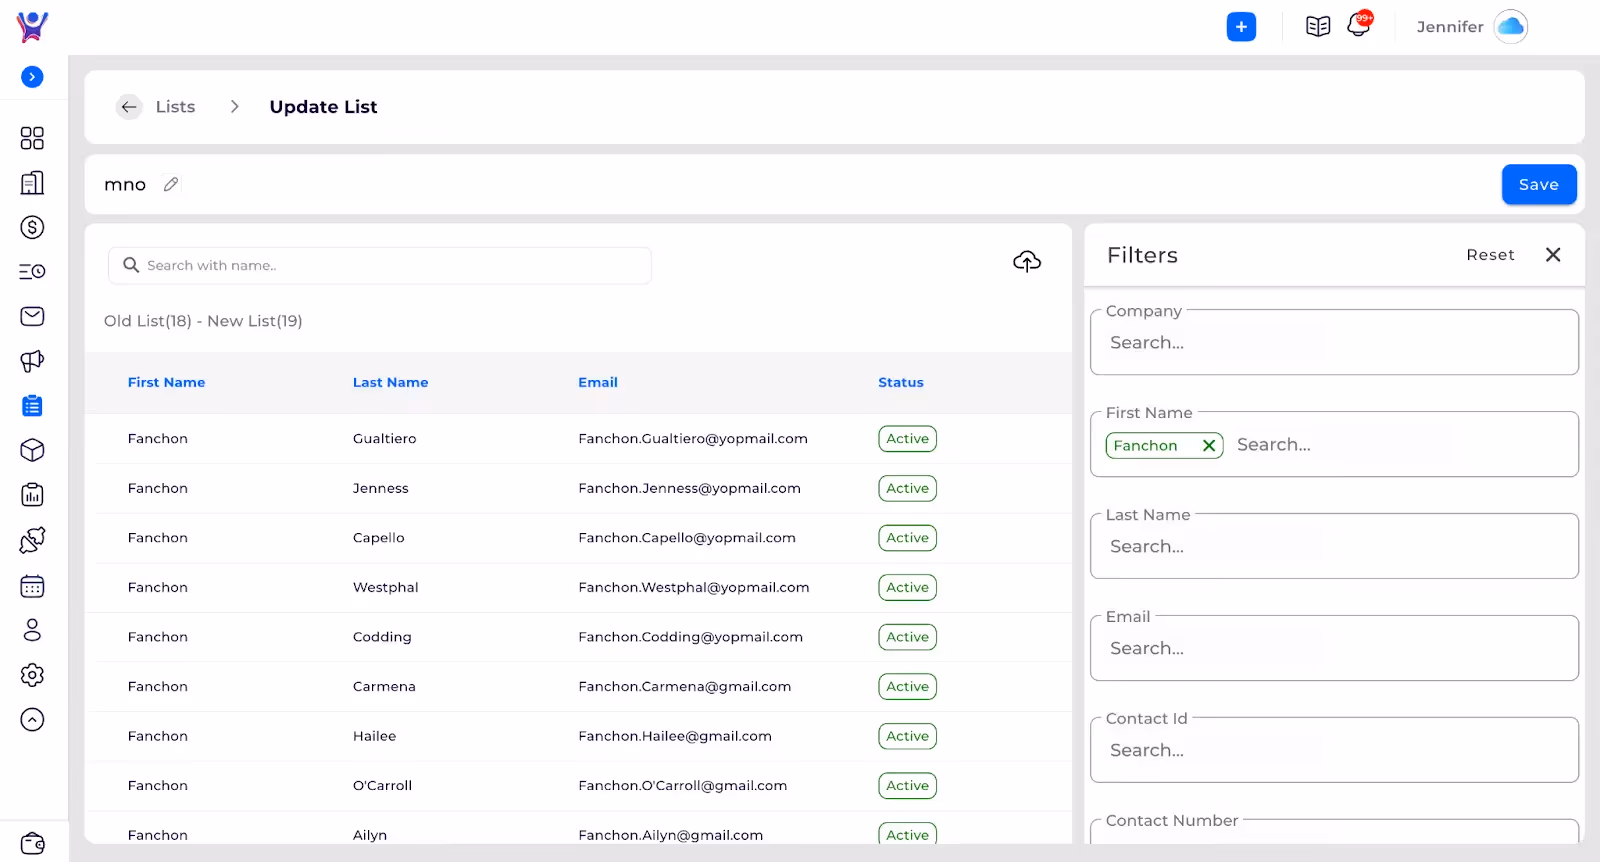
- The list can be updated with required filters or by uploading a csv file.
- It clearly shows the number of results in the list before and after update.
- On clicking the SAVE button the list gets updated with the latest filters.
How to Edit a List
Edit a list effortlessly
Delete a List
- Firstly, Go to Lists.
- On clicking the delete icon on each row of the lists we can delete individual lists.

- But before deleting a list it asks for the confirmation for deleting the list permanently.
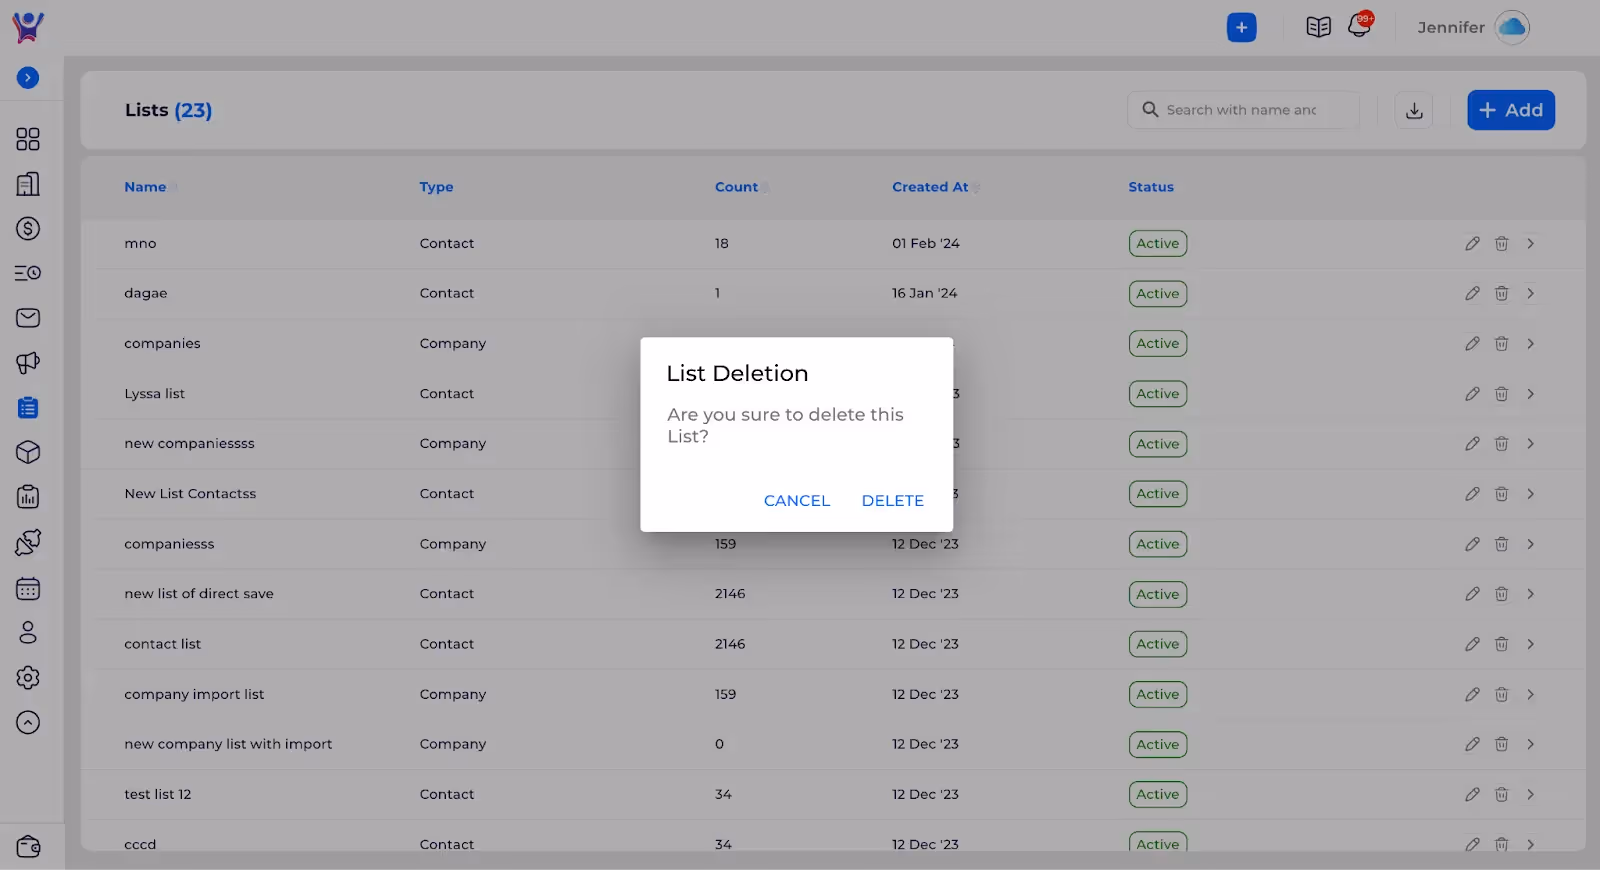
How to Delete a List
Delete a List Effortlessly
Navigation to Lists
- Lists are a collection or group of companies or contacts together.
- This helps to maintain similar or frequently used companies or contacts at one place which can be accessed easily to create activities.

- In the lists page search enables you to search for any particular list with its name quickly.
Creating New List
- Beside the download icon there is an ADD button, which helps to create a new list.
- On clicking the ADD button a pop up comes over for the name of the list and the type of the list.
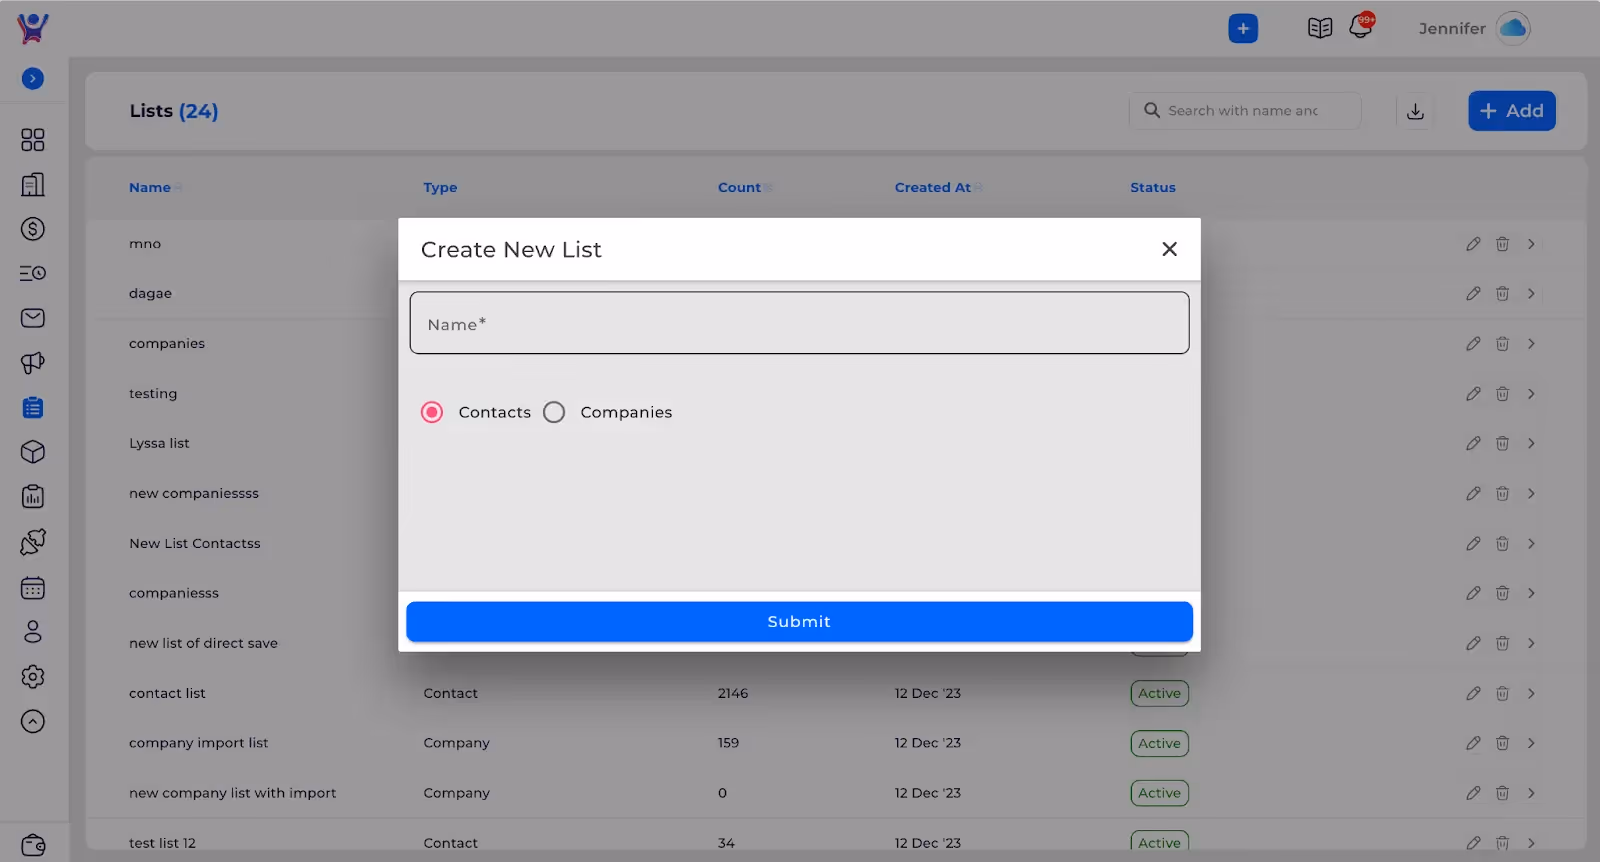
- After giving a name and selecting the list type, the SUBMIT button should be clicked to move forward.
- After clicking SUBMIT a screen will be shown like this.
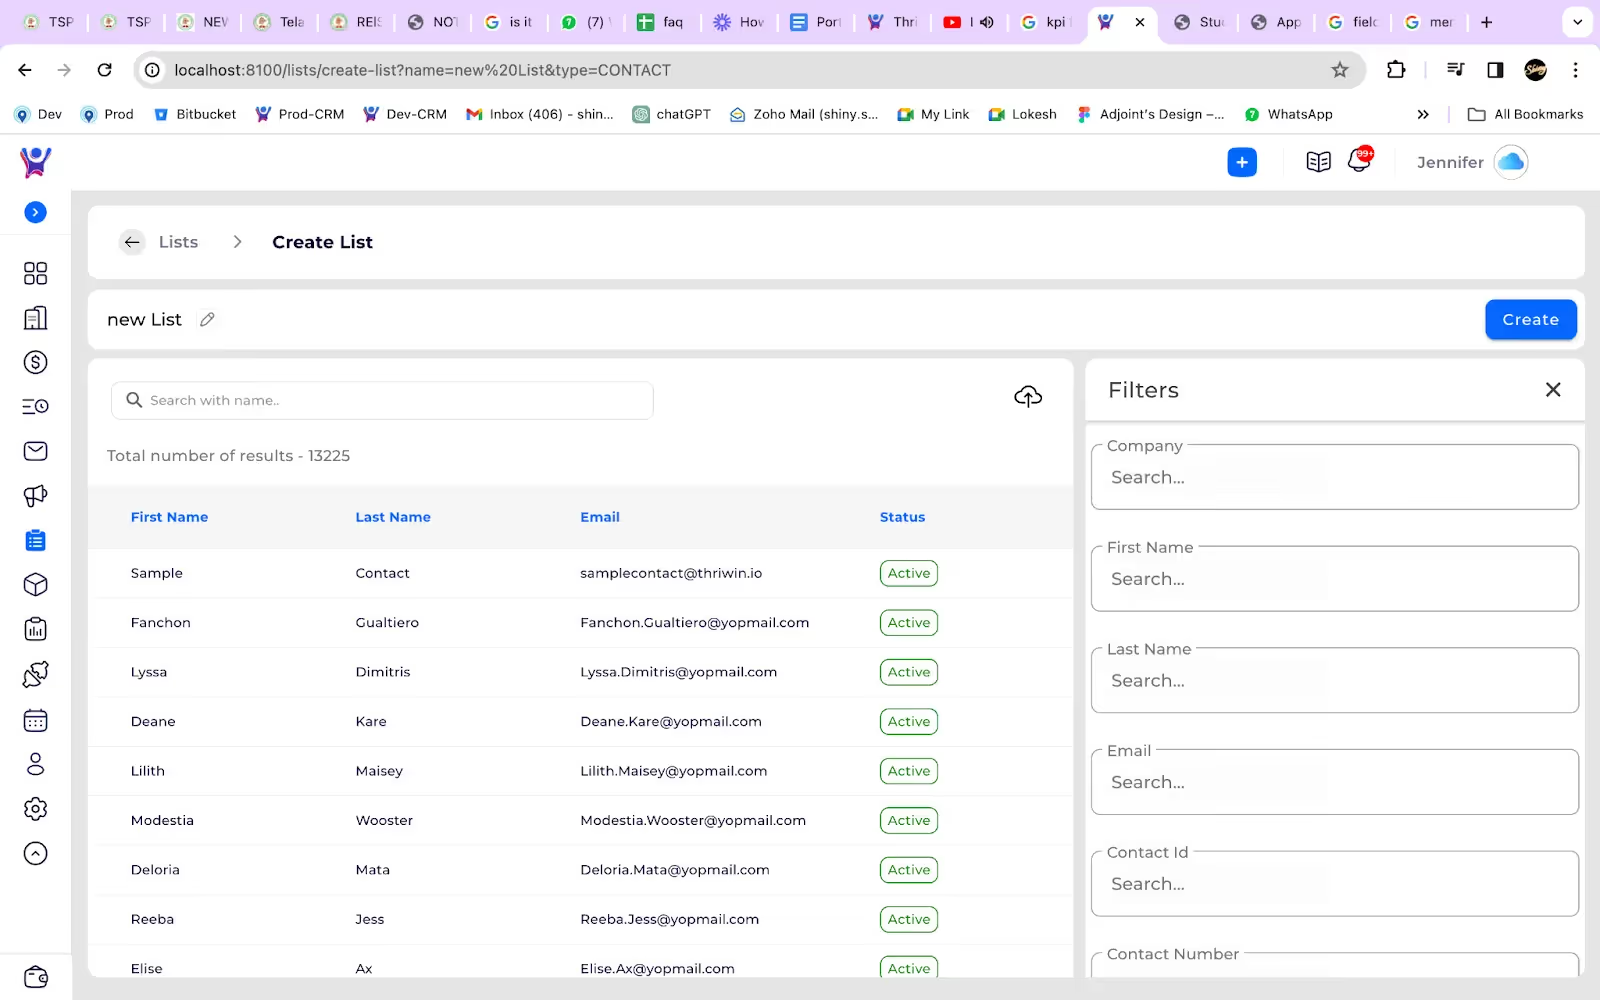
- Here at the right side there are filters which are applicable to the list type which was selected before between companies and contacts.
- Initially all the companies or contacts are shown in the right side box without any filters.
- When you start applying any filters the right side data will be updated based on the filters.
- After you get all the required companies or contacts by applying filters, clicking the CREATE button creates the list with the selected filters and the data.
- Along with this there is an UPLOAD button which can be seen, using which we can upload a csv file which contains required companies or contacts.
- Doing this we can create a list of selected companies or contacts without filters.
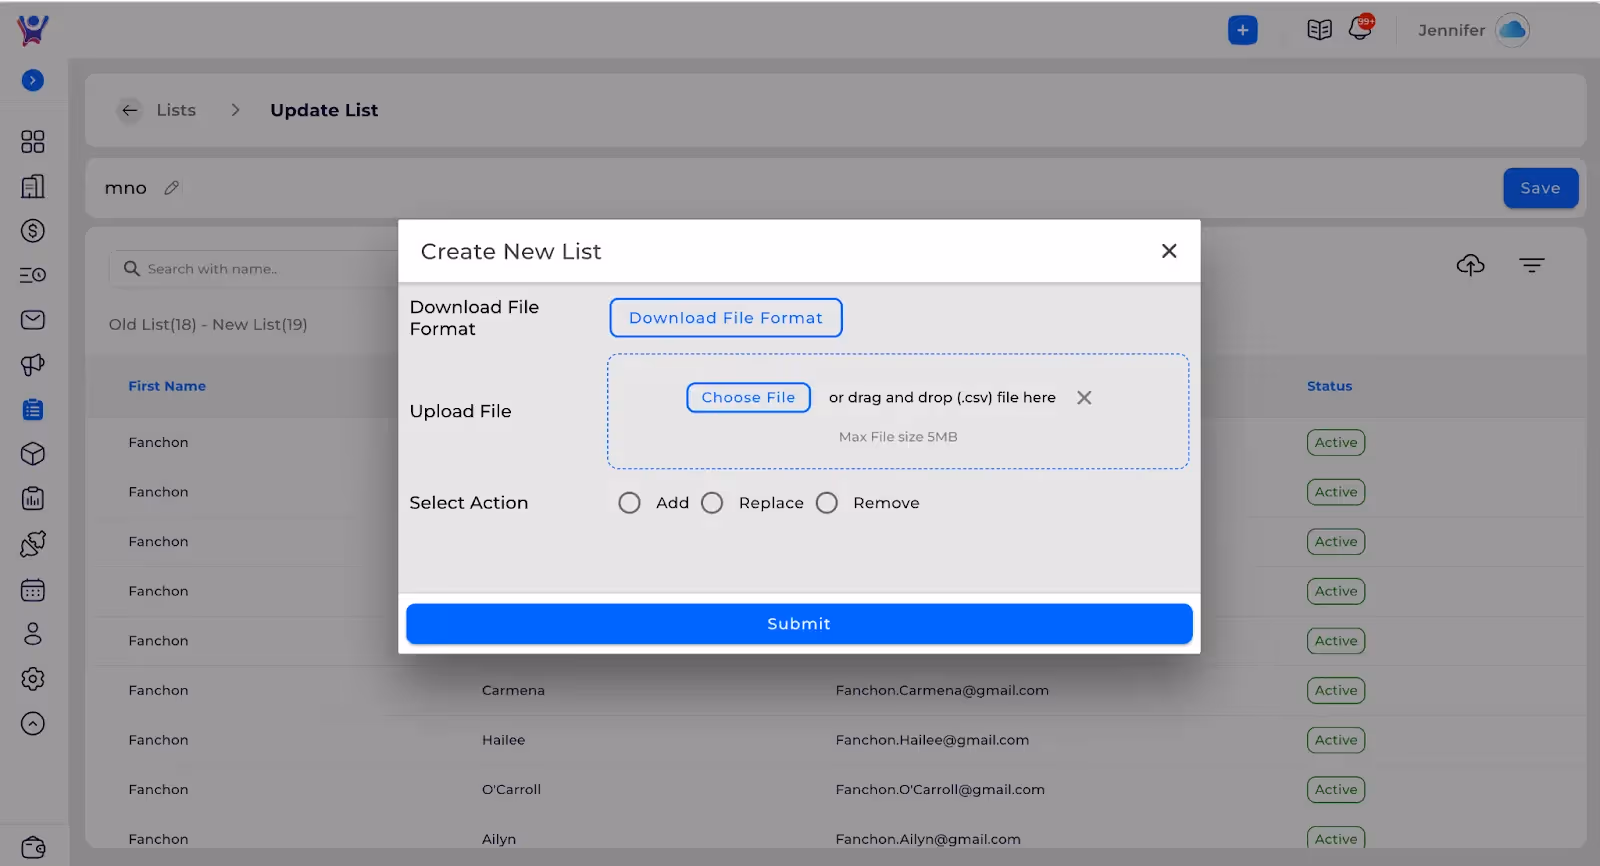
- Here first we can download the format of the csv file.
- Then we add the required data in the csv file and can upload it here.
- Then we can choose options from ADD, REPLACE and REMOVE.
- ADD: this action adds the csv data to the list directly.
- REPLACE: this action replaces the data from the list with the csv uploaded data.
- REMOVE: this action removes the data from the list which matches the data with the csv file which is uploaded.
- The REPLACE and REMOVE are mostly used when editing a list.
List Details
- On clicking any of the list row or the icon shown below, can see the details of the list.
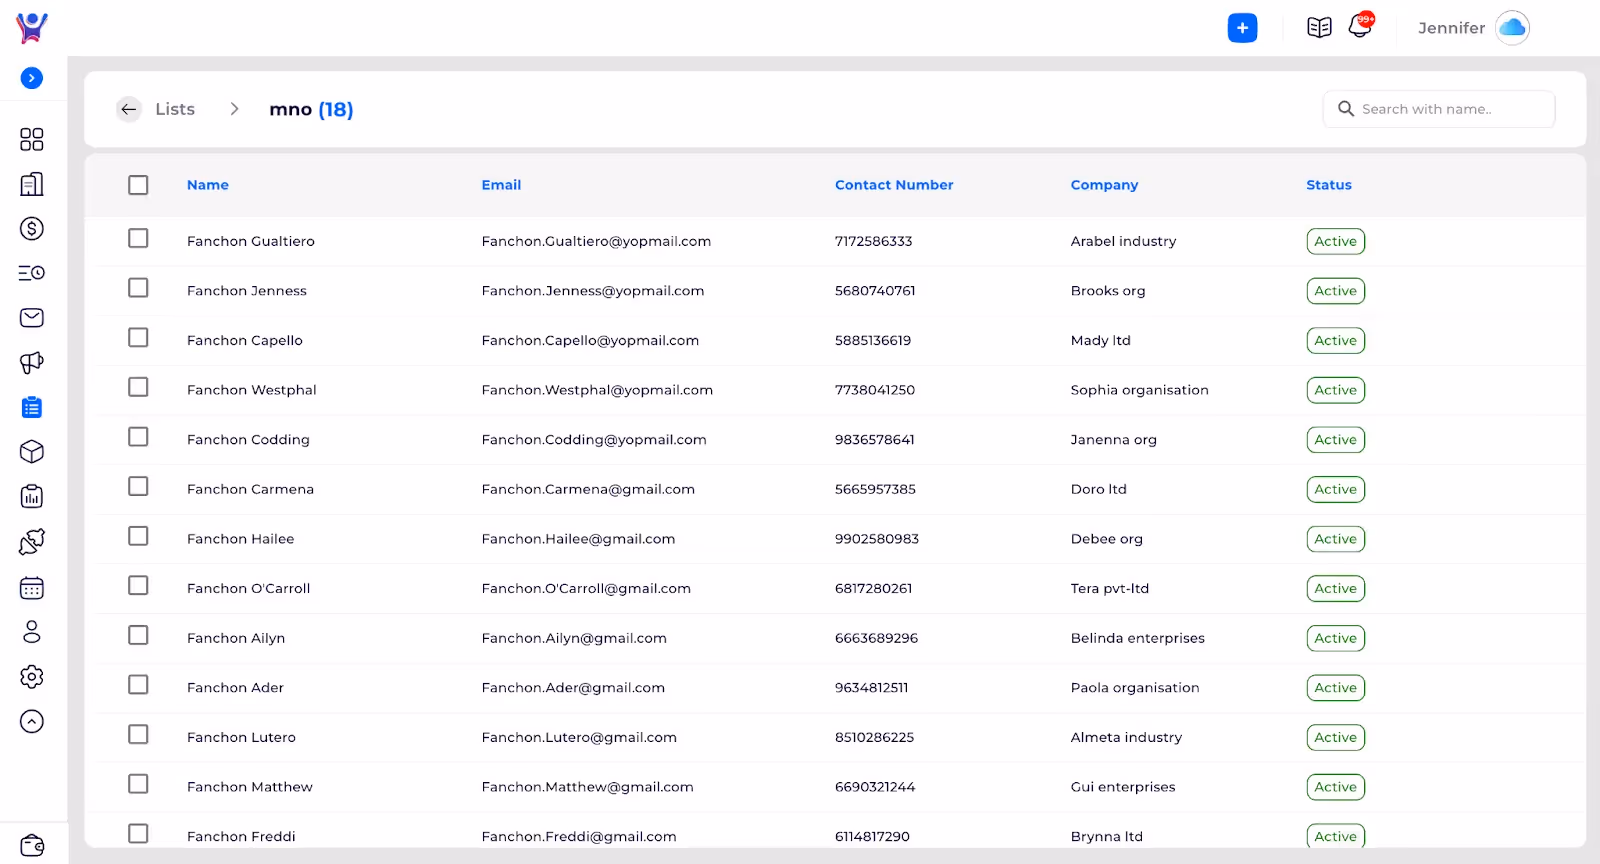
- On clicking the square box in the header section we can select the page or the total results.

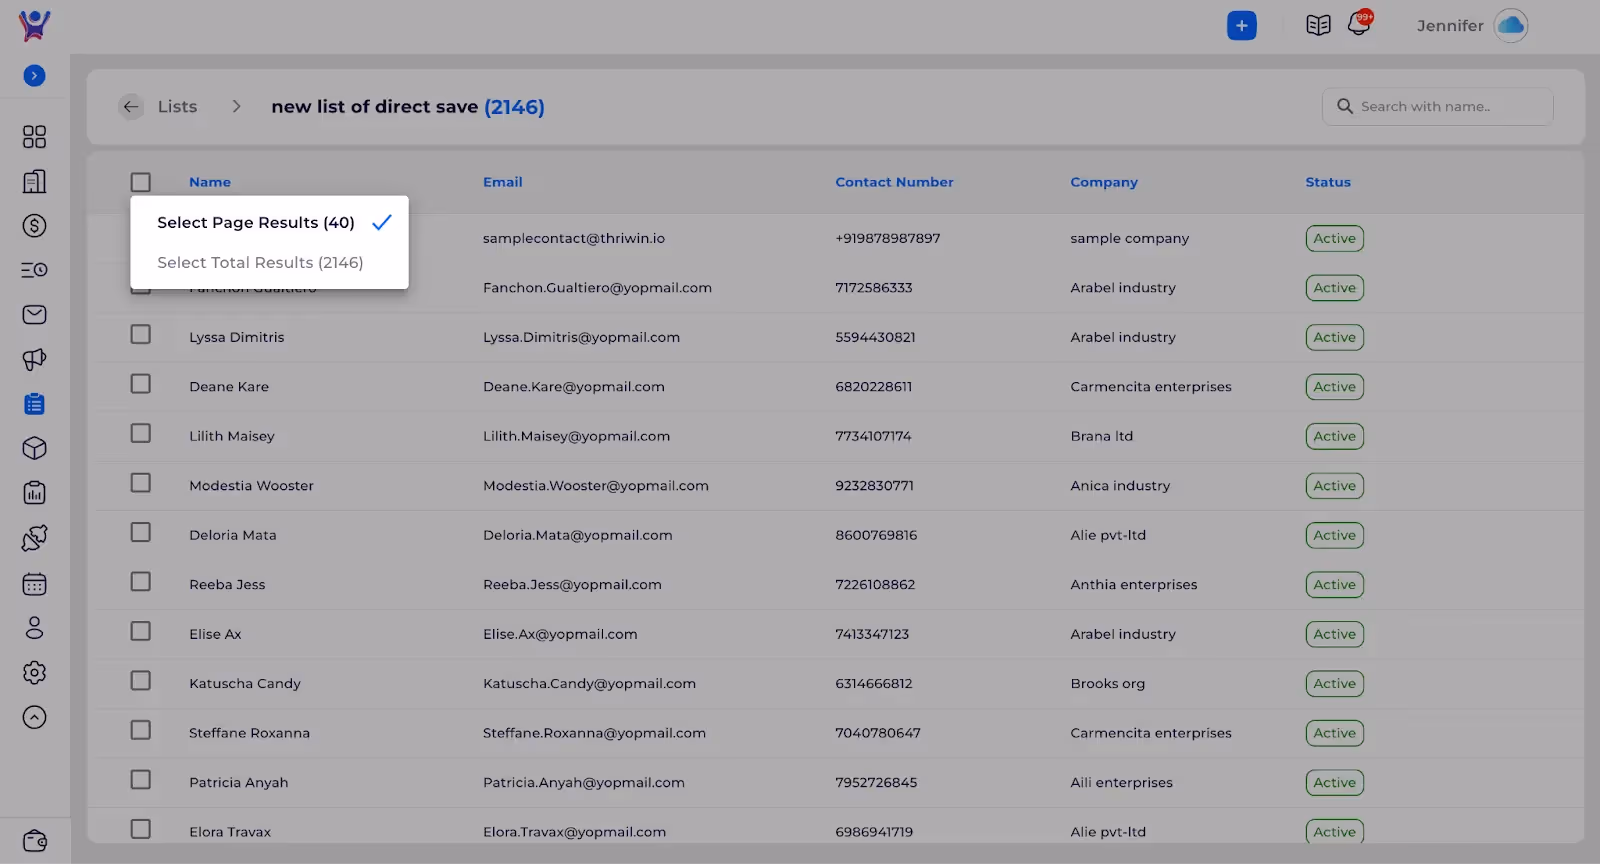
- On selecting required results we can perform any required action on the selected companies or contacts.
How to Create and Access a List
Creating Lists Made Simpler: A Step-by-Step Guide
How to View and Edit your Organization Details
You can view and edit your Organization details from within your admin settings page.
- Click on settings icon, inorder to navigate to admin settings page and then click on organization details.
NOTE: Organization Details can only be changed by a user , who has been assigned with role of[ADMIN]
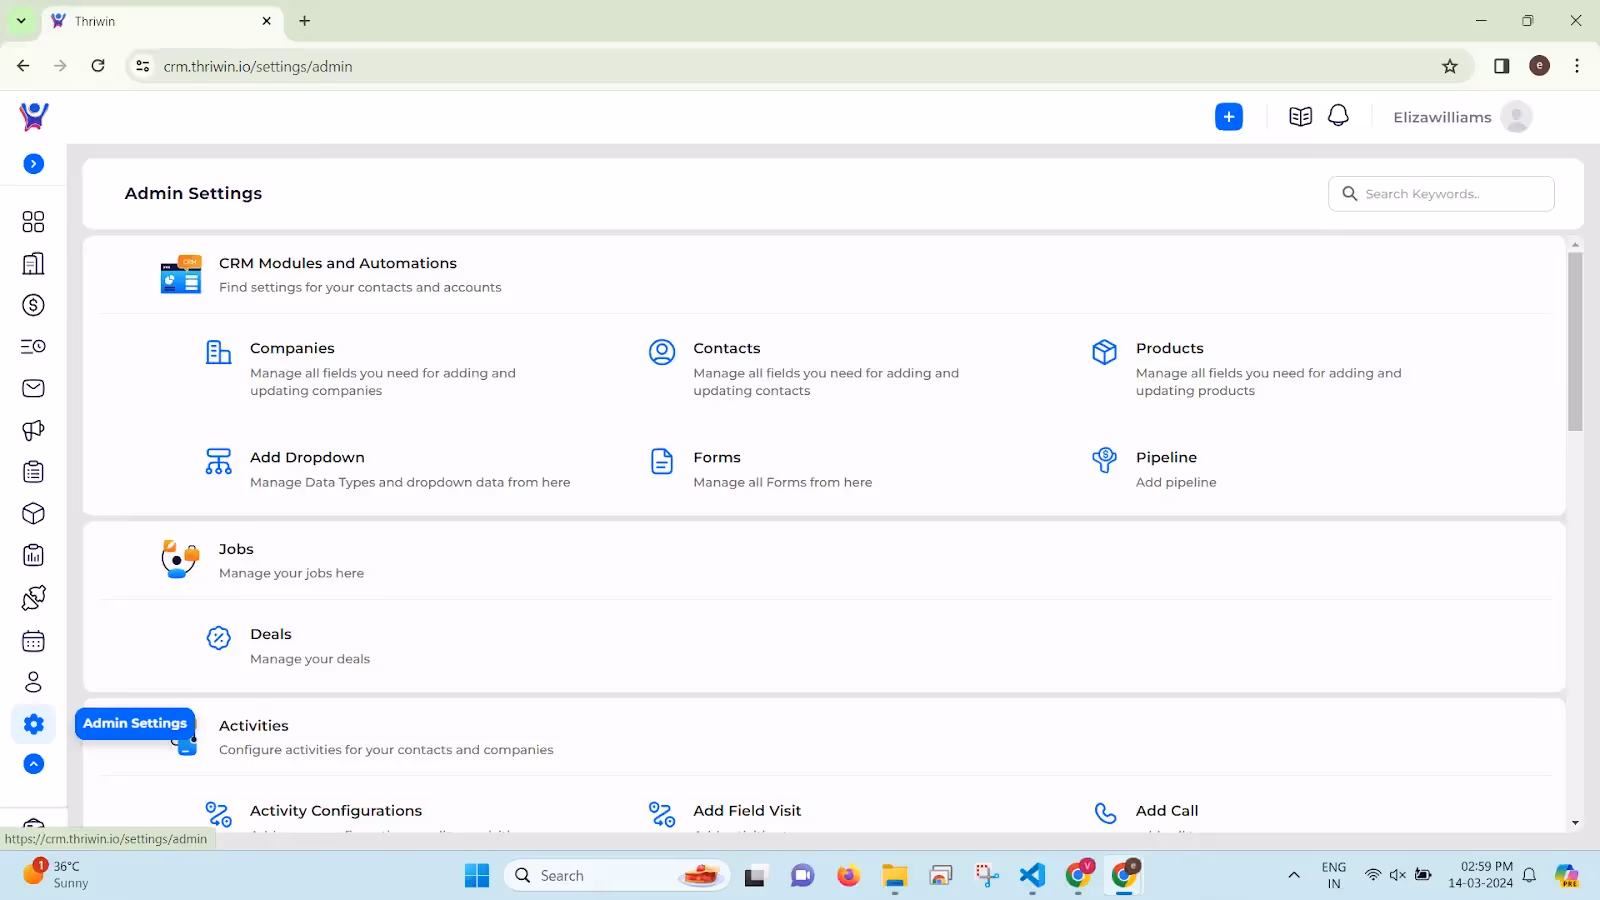
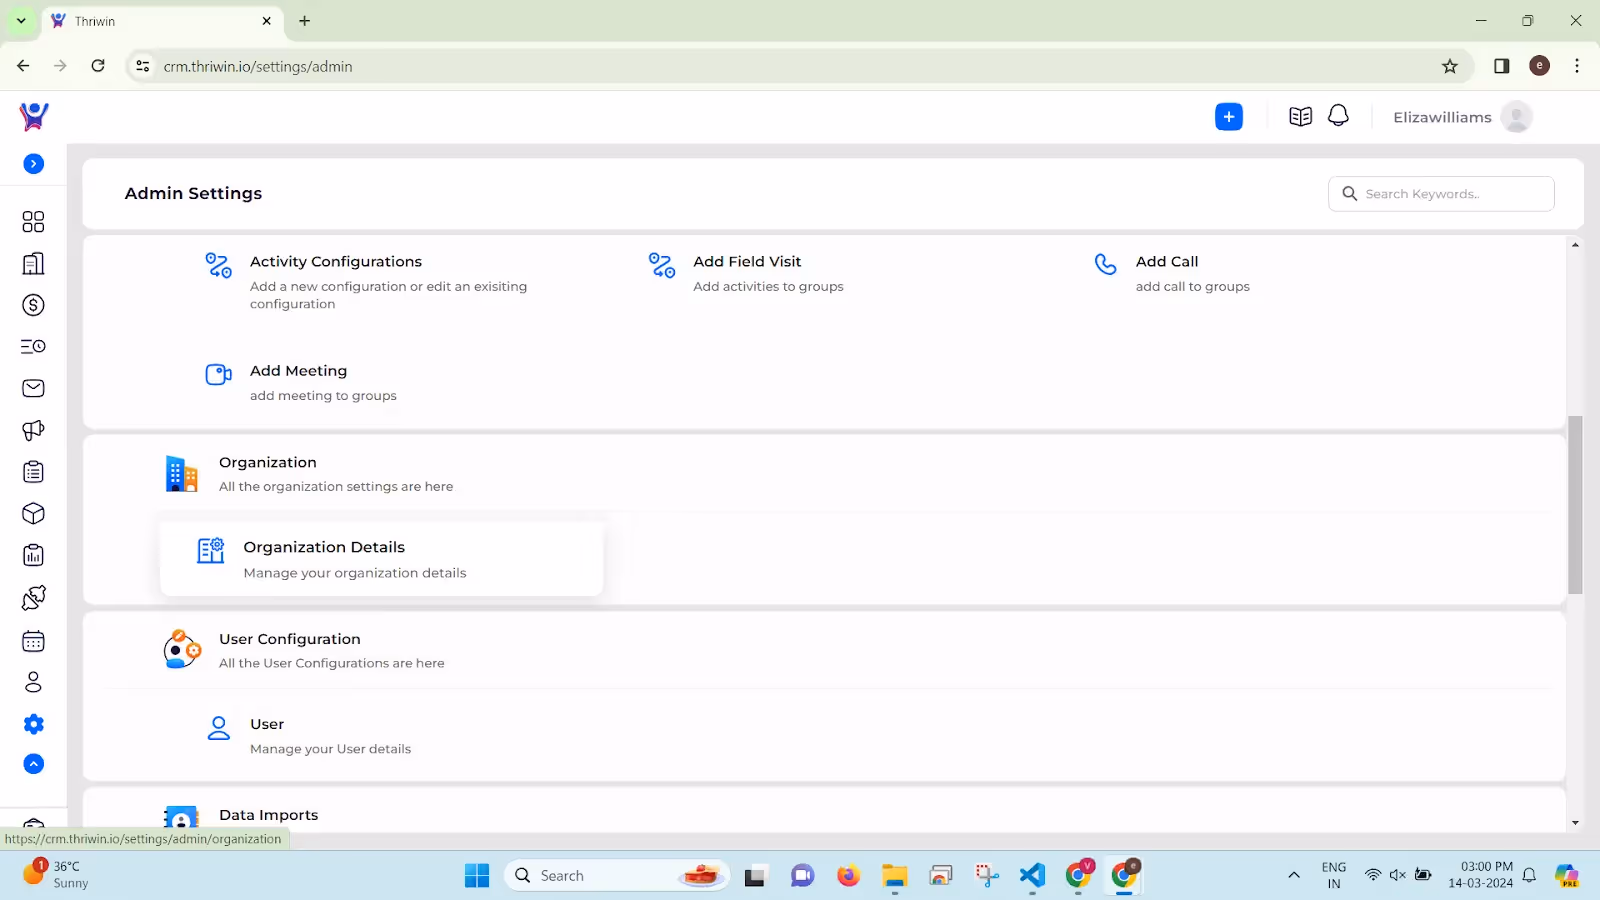
View Organization Details:
- You can view the organization details on the screen, similar to the below screen.
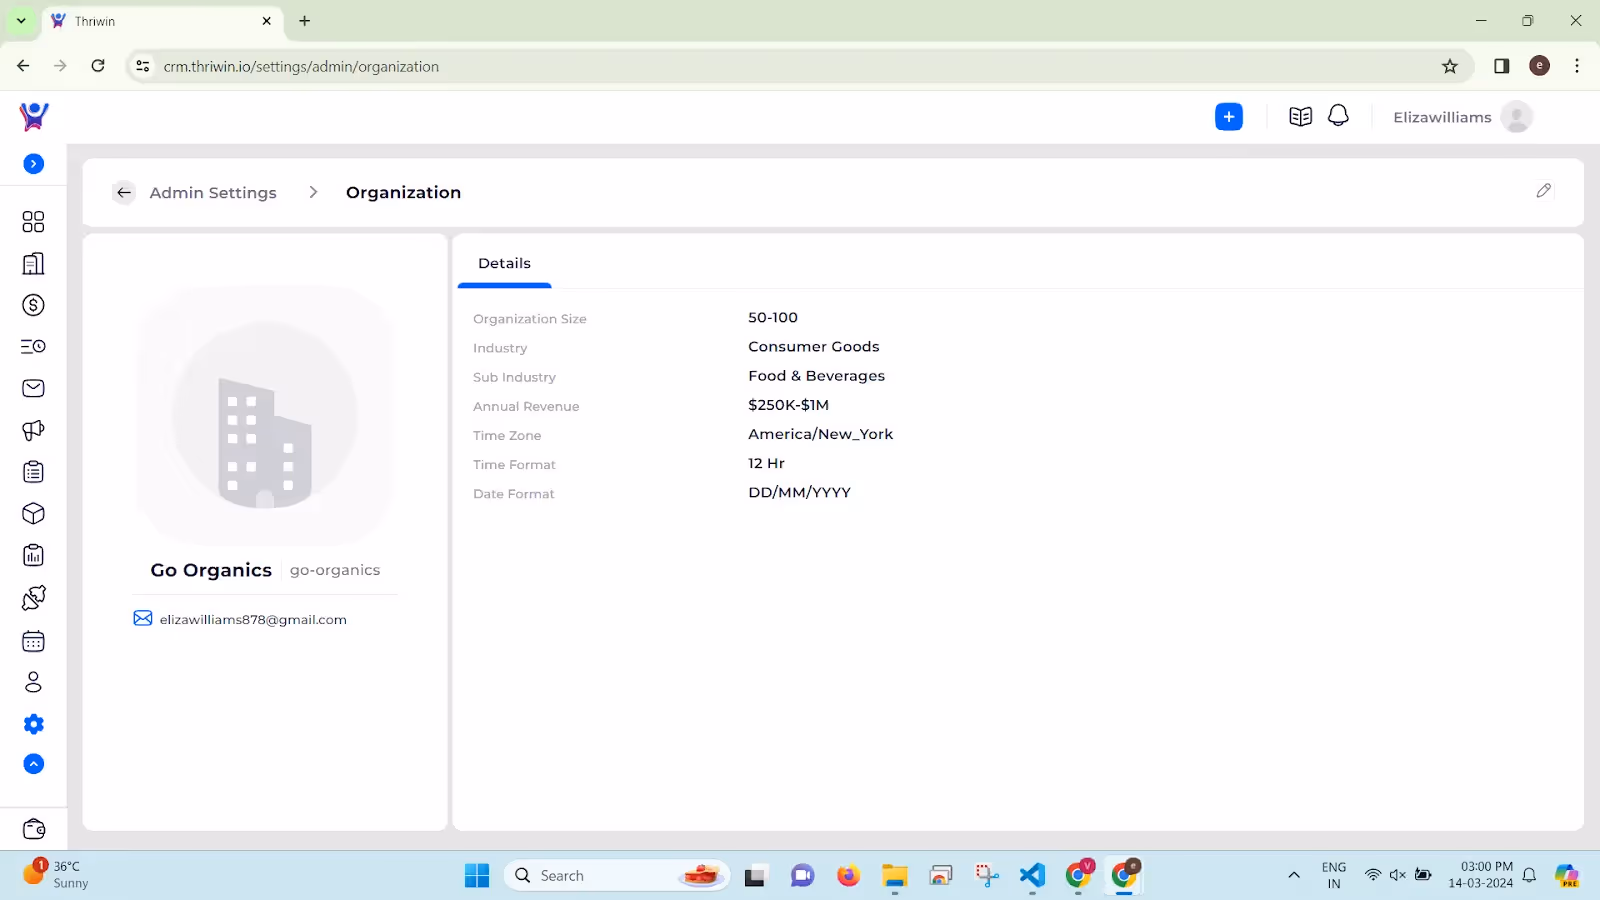
Edit Organization Details
- Click on the edit button, which is present in the right side of the screen.
- You can update all the fields that are present under details, such as organization size, industry, sub industry, Annual Revenue, Time zone, Time Format, Date Format and change your organization profile picture.
You can update all the fields that are present under details, such as organization size, industry, sub industry, Annual Revenue, Time zone, Time Format, Date Format and change your organization profile picture.
After you click on the edit button, you will be directed to edit page (similar to below attached screen ), where you can edit your organization details.

- Click on fields, which you would like to change and type or select the value respectively.
- Click on the Update Details Button.
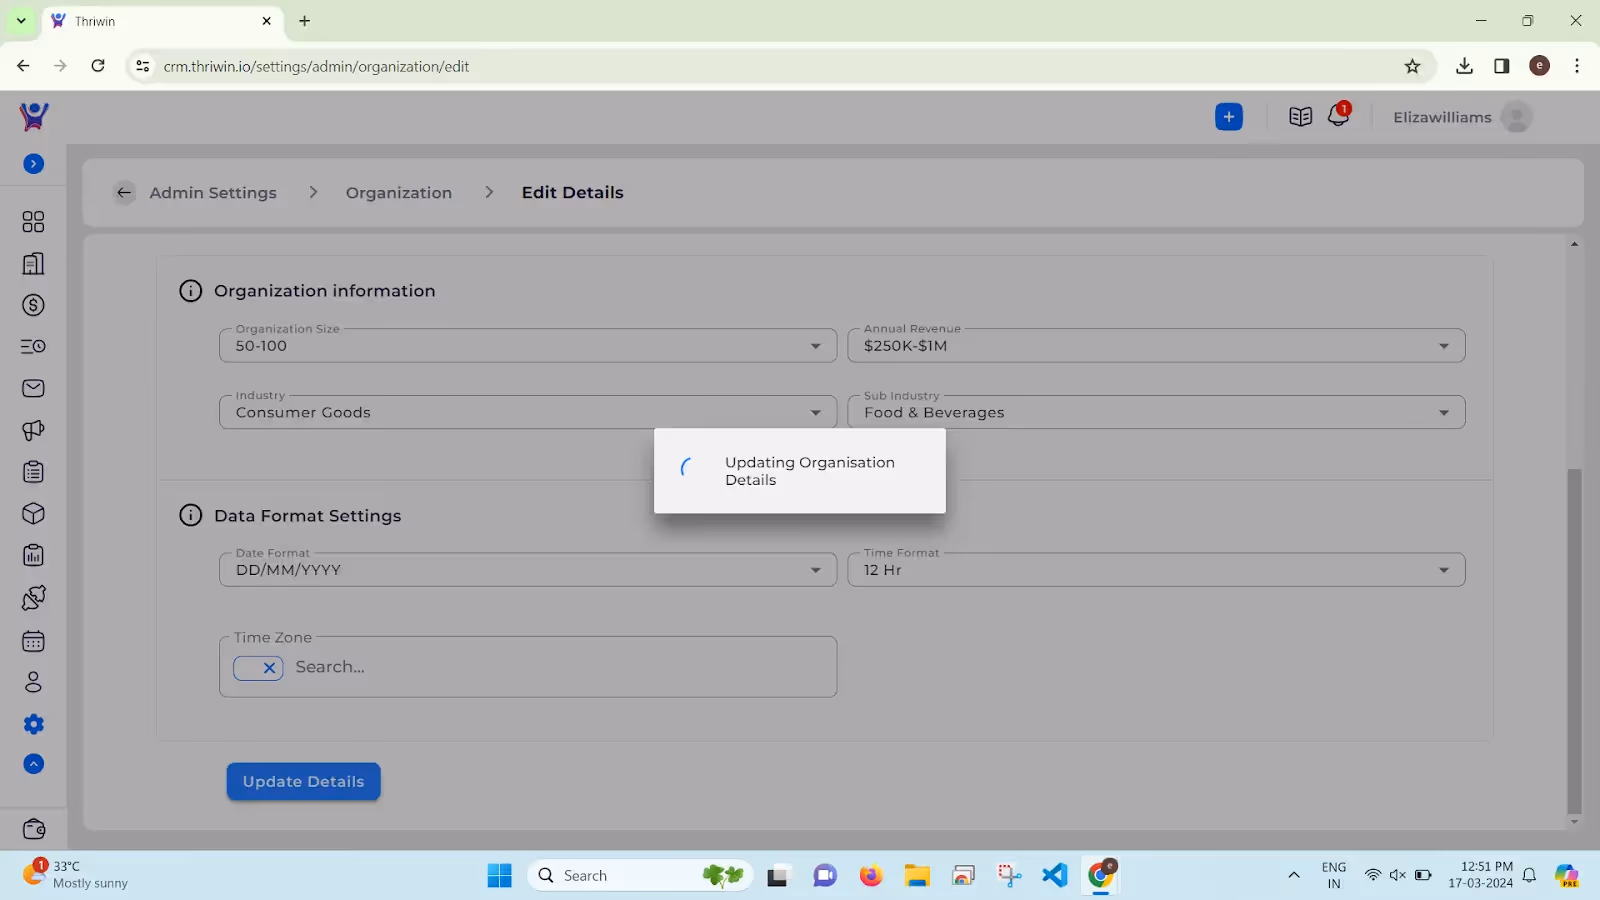
- Once it is successfully updated, You will be redirected to view details page, with a successful toast message.
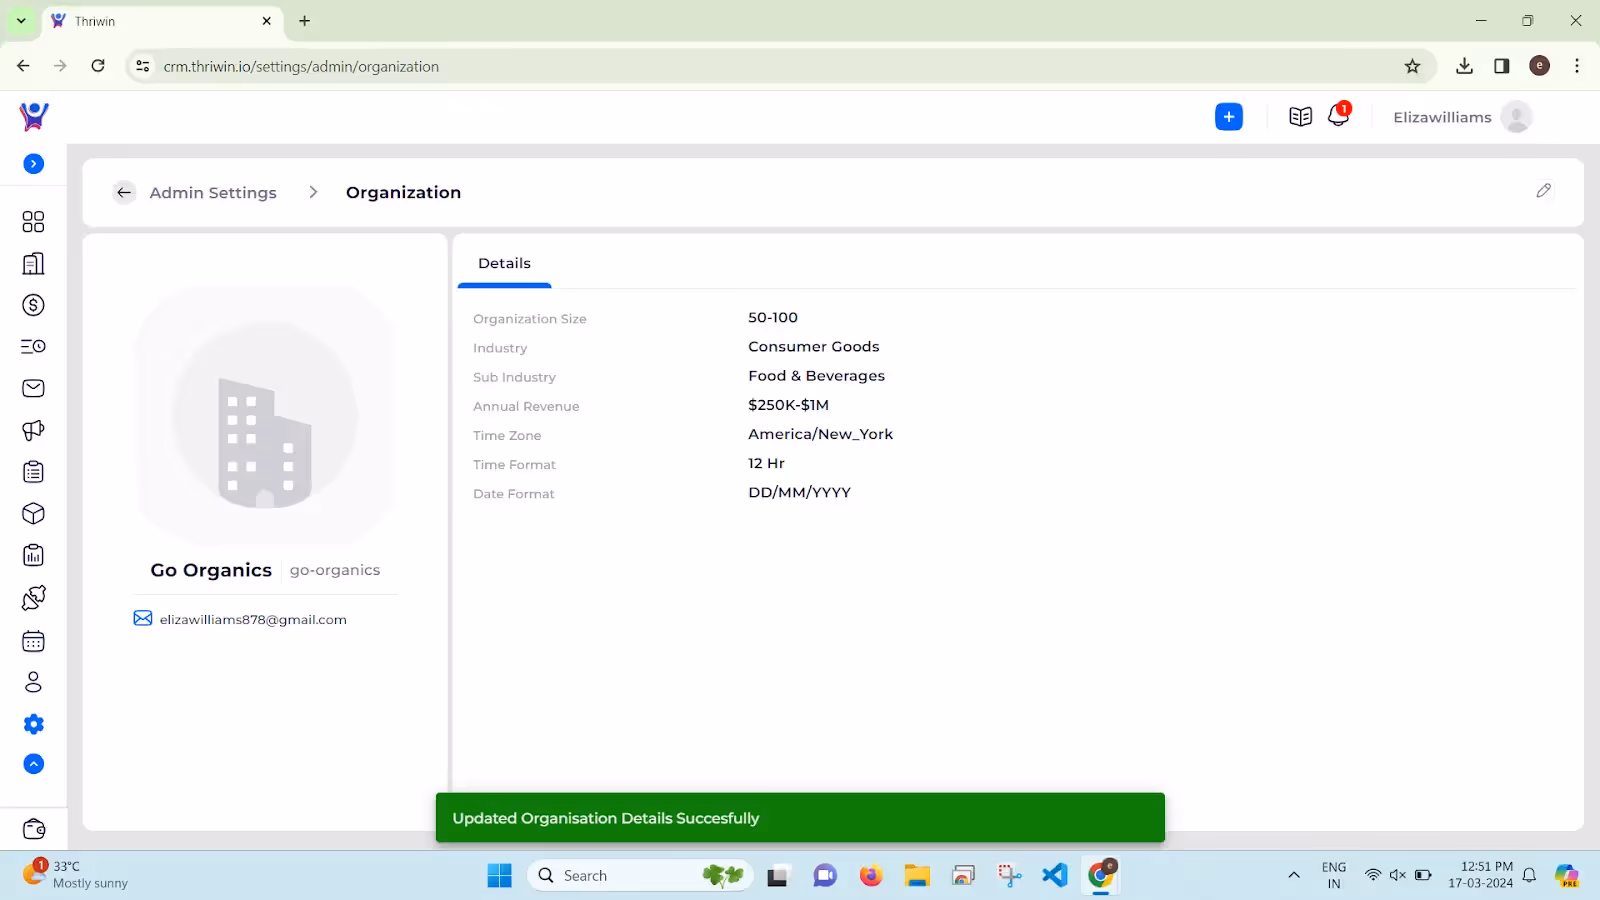
How to View and Edit your Organization Details
Step by Step to View and Edit Organization detail
Configure Activities
You can view and configure activities from within your admin settings page.
- You can find Activities section, similar to screen found below in admin settings.
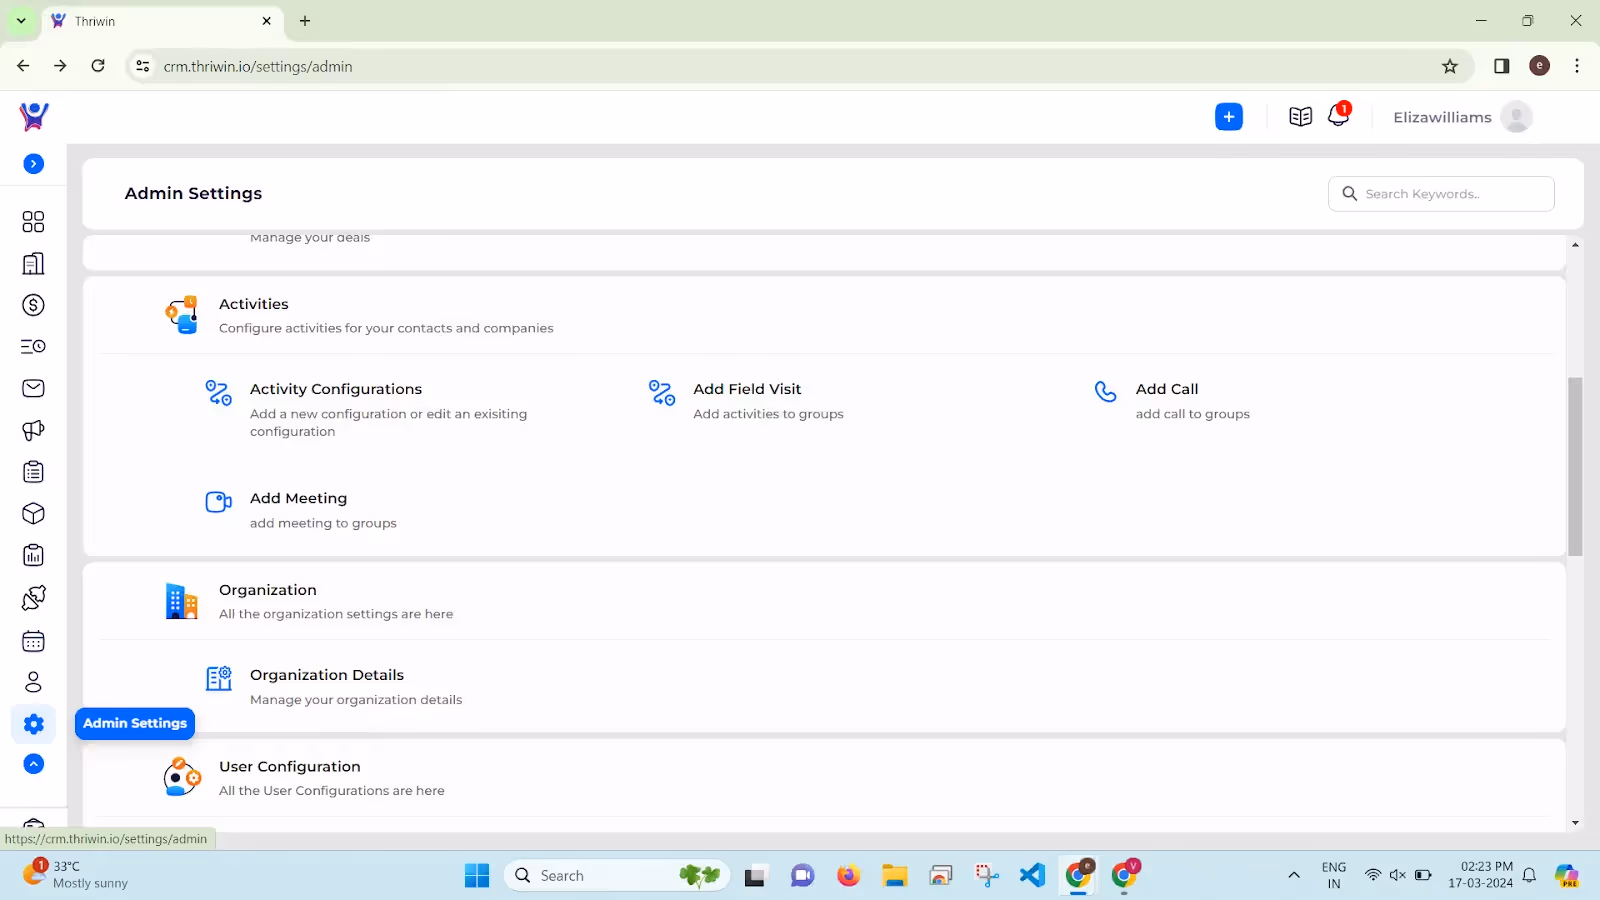
- You can configure activity forms, that needs to be filled when an activity is finished, suppose you are going to create a field visit, before creating a task, you need to create respective form so that, user gets it to fill when he records a field visit, in similar way you can create form for, Calls, Meetings.
- You can also add a field visit, call and meeting directly from here.
- Suppose, you would want to add a call ,you can click on Call card and then you will be directed to calls configuration page.
Activites Overview
Overview of different Activities
You can view and configure activities from within your admin settings page.
NOTE:
Activities can be configured by a user, if user is assigned with role [ADMIN]
In activities section, you can configure activities (such as fieldvisit, calls, and meetings), you can add a task that has been finished or is going to be accomplished in future, task can be a field visit, making a call or a meeting.
- You can view the activities section in admin settings page.
View an Activity Configuration Details:
- Click on the Activity Configurations card.
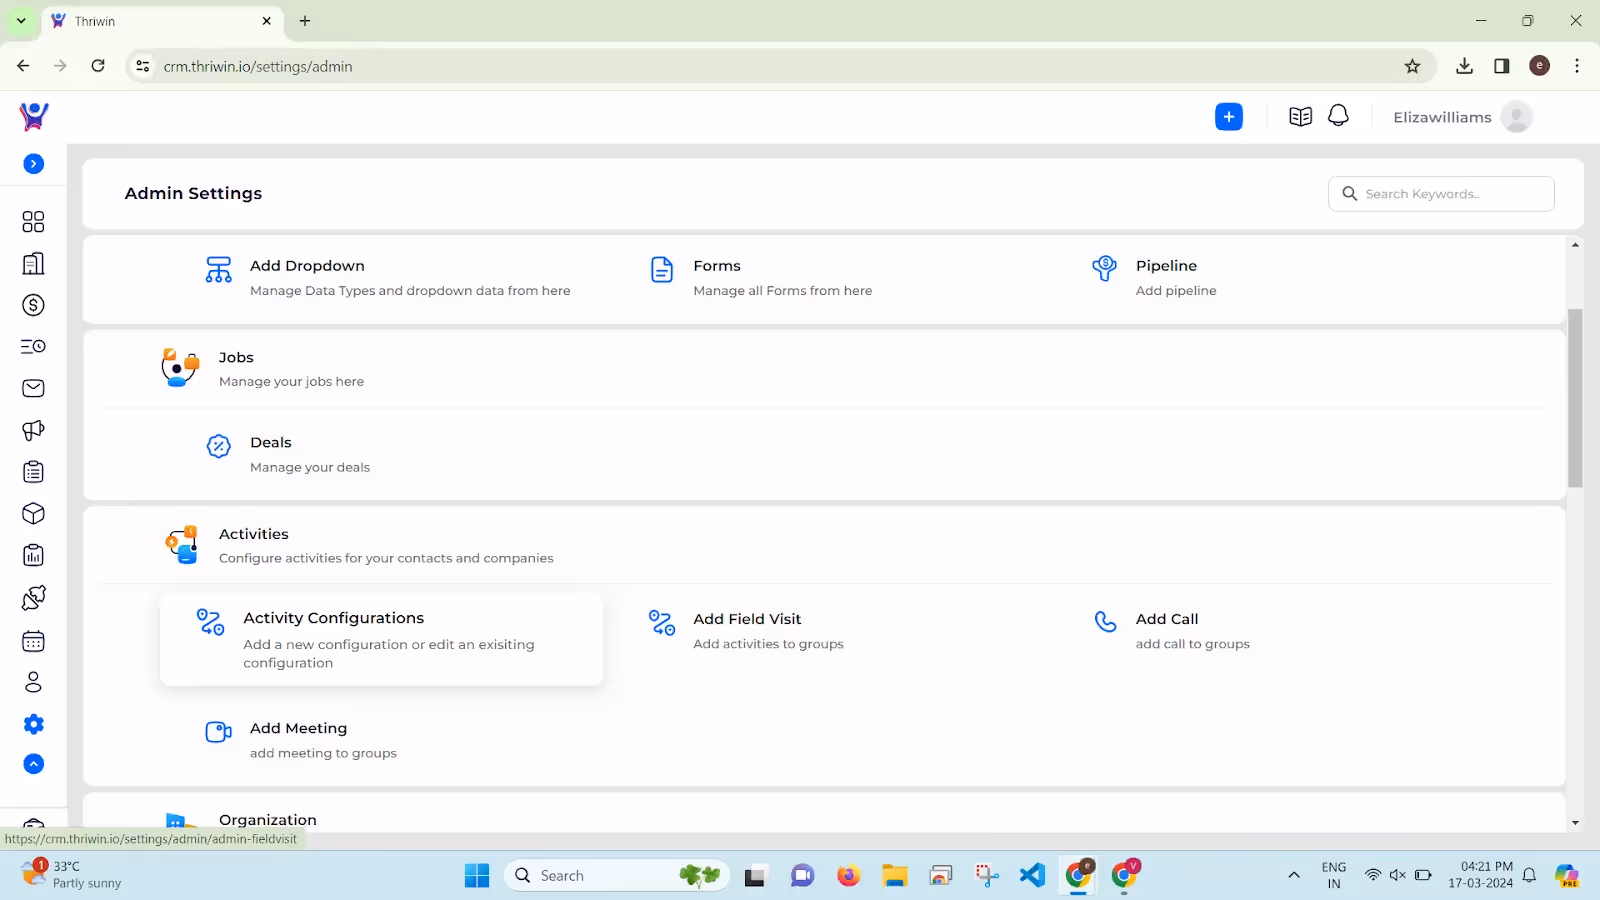
- By default, you will see three activity configurations done for Field visit, Calls, and Meetings. You can add a custom configuration for a respective activity, by clicking on the add button.
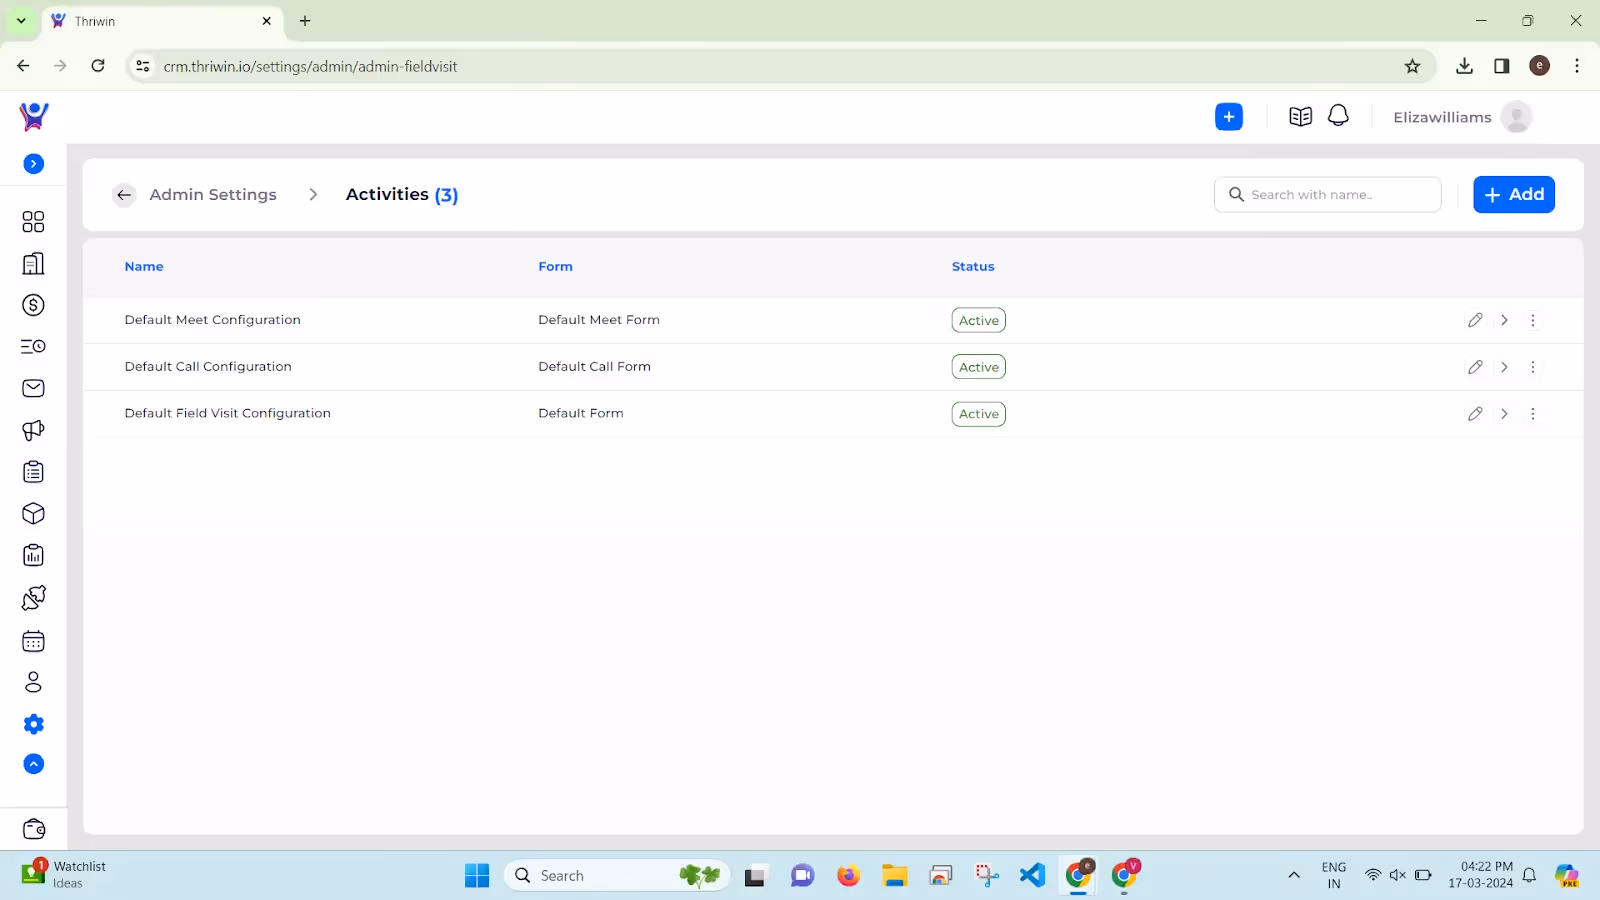
- Click on the ‘>’ symbol present in the respective row of the activation configuration, or click on row, to view the configuration details.
- You would see a screen like mentioned below,with respective configured data.
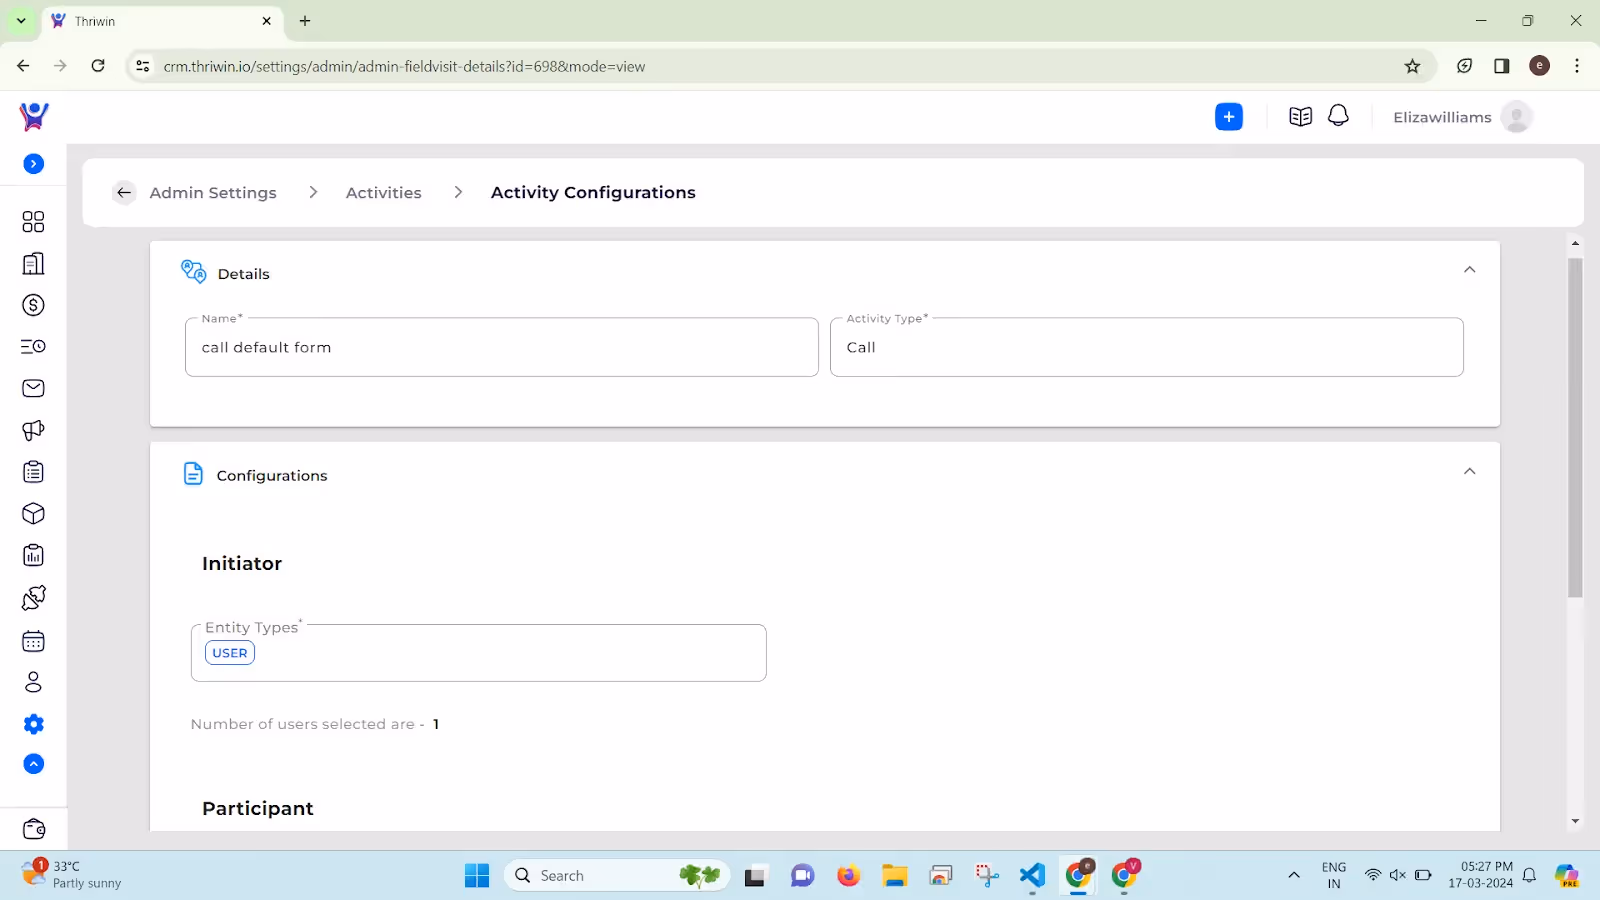
Add an activity Configuration
- Click on the add button, present in the top right side of the activities configuration screen.
- You would be directed to an activity configure page(similar to screen given below).

- You can add different constraints, such as adding different initiators, you can configure who can be the participants and configure details like adding a form, which is filled after the activity is finished.
- Forms, that are shown in the dropdown, is the list of forms that you can create in forms, which is present in CRM Modules and Automations section.
How to View, Configure activities for your Leads and Companies
View and Configure activities from within your admin settings easily
Accessing Forms
- To access different forms in the Thriwin portal head over to the admin settings and in CRM modules and automations you can find forms.

- Once you click on the forms section this will give a list of all the forms that are created in the organization. This forms can be customizable by admin. We can also add new forms from this section by clicking on the add button.

- Then form name is asked in a popsection and after submitting that it will take you to the form builder section where you will be able to create a new form by selecting which type of fields will be there in the form.

- In this screen we are able to see all types of fields that can be added in the form like text-field,email,date,drop-down,etc
Types of Form fields
Text field
- When adding a text-field we are able to add the label field which will be the name of the field while filling the form what type of information should be filled in the field.
- There are other options as well like placeholders which will help the user for more information on what to fill that text-field.
- Admin can also restrict the in the text-field for how many characters the field should be limited to if admin does not give any restriction it will be 256 character limit as default.
- Default values for fields can also be given by admin which is optional.
- Admin can mark these fields as required so that this will become mandatory while filling the form and also mark these fields as unique so that they should be unique throughout all form submissions.

Date field
- Date field is to take date input from the user who are filling the form.
- There are extra options as well in dates like can past date be filled, which is allowing only future dates from form filing otherwise past dates are also allowed.

Radio field
- While the user fills these options only one of the options can be selected by the user.
- There are extra options for the radio field like addition of options which will be visible while using these fields in the form so that the user can select one of these.
- Admin can also decide upon whether these options can be vertically aligned or horizontally aligned.
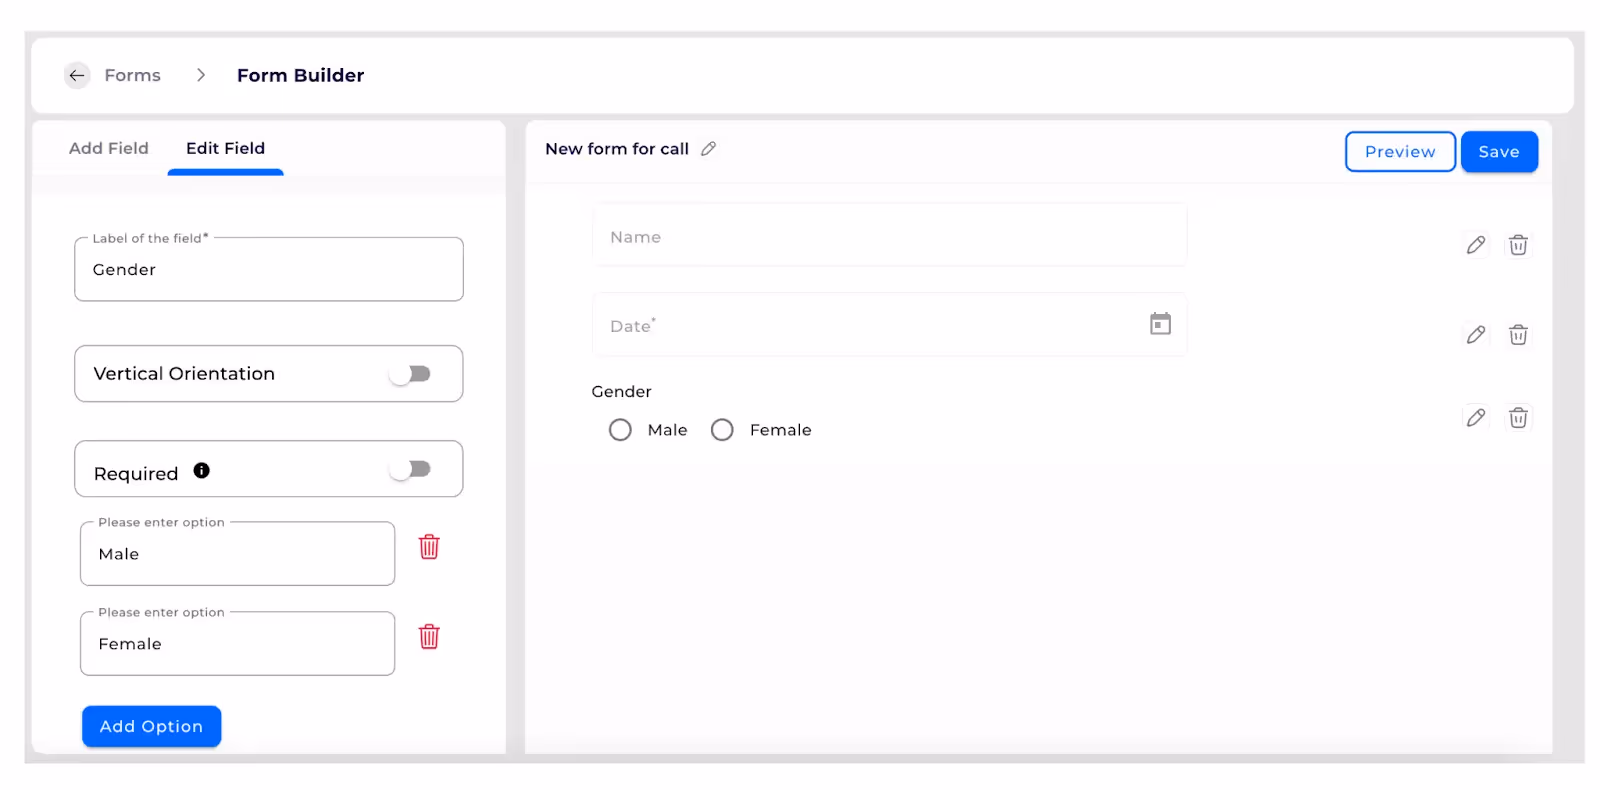
Check box field
- When a user can be given an option for selecting multiple options from the list of options this field is used.
- This will have similar options as the radio field.
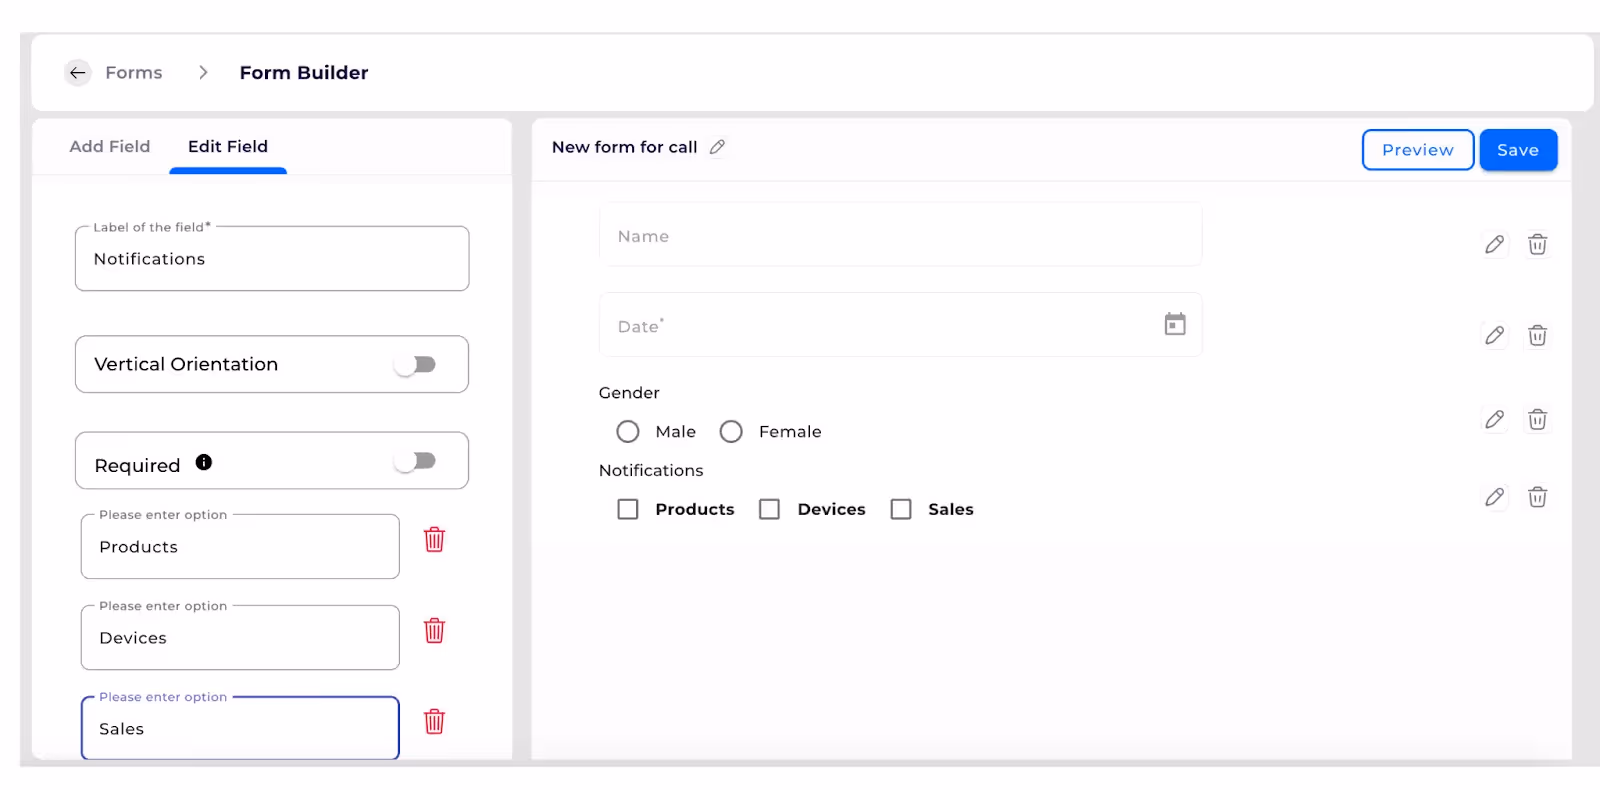
Drop down
- Users can select one of the options from these drop down options which can be customisable.
- Admin can add his own options similar to radio field for these dropdown options.
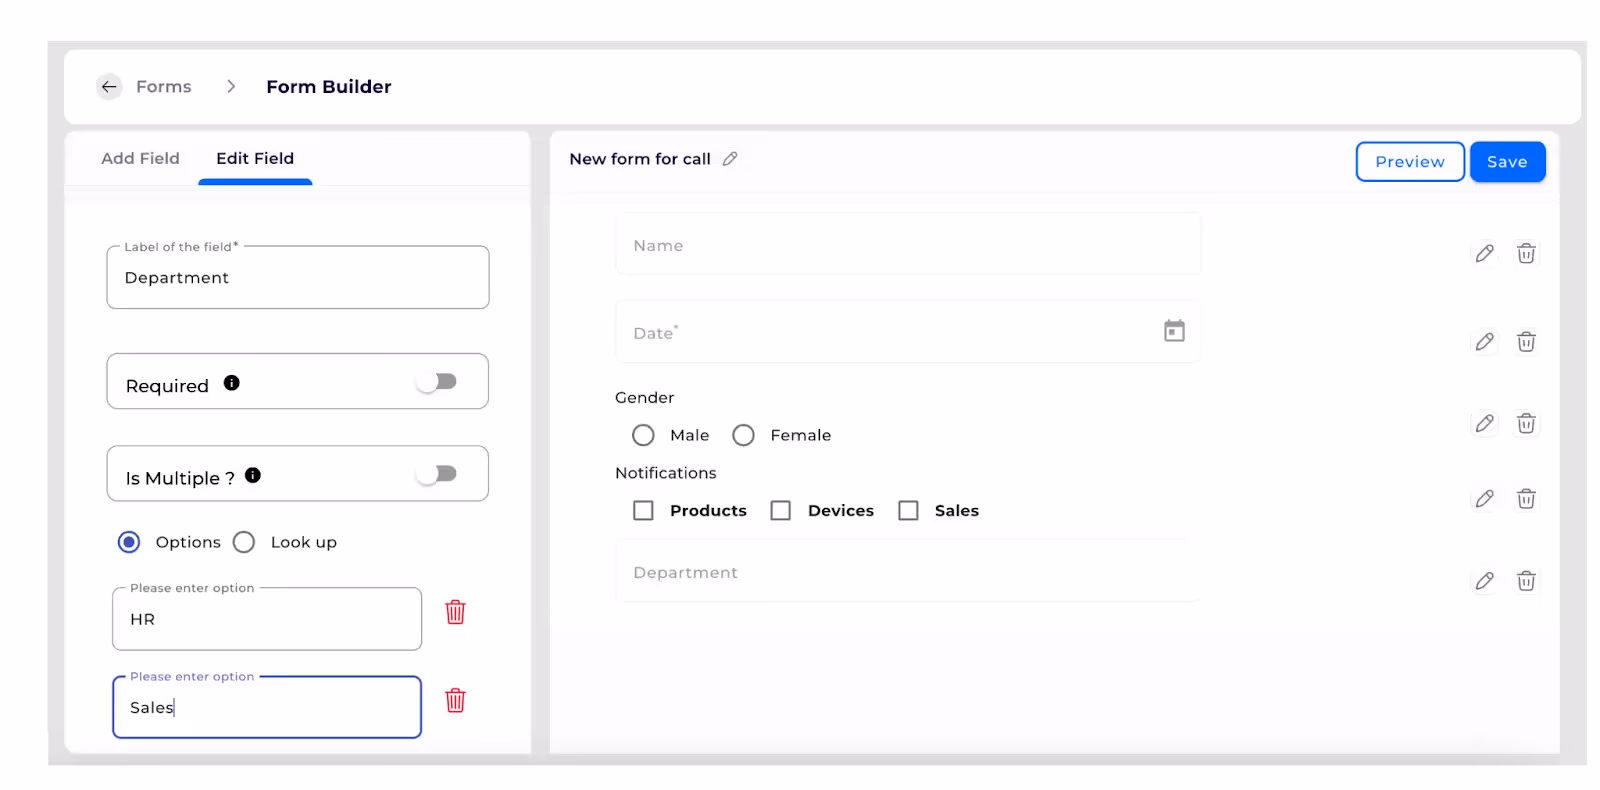
- Admin can select the “lookup” option which will be a list of dropdown types which can be added from admin settings.

- Taking input for mail from the user of the form.
- It has similar attributes as a text field.

Mobile number
- Taking the phone number input from the user of the form.
- It has similar attributes as a text field.
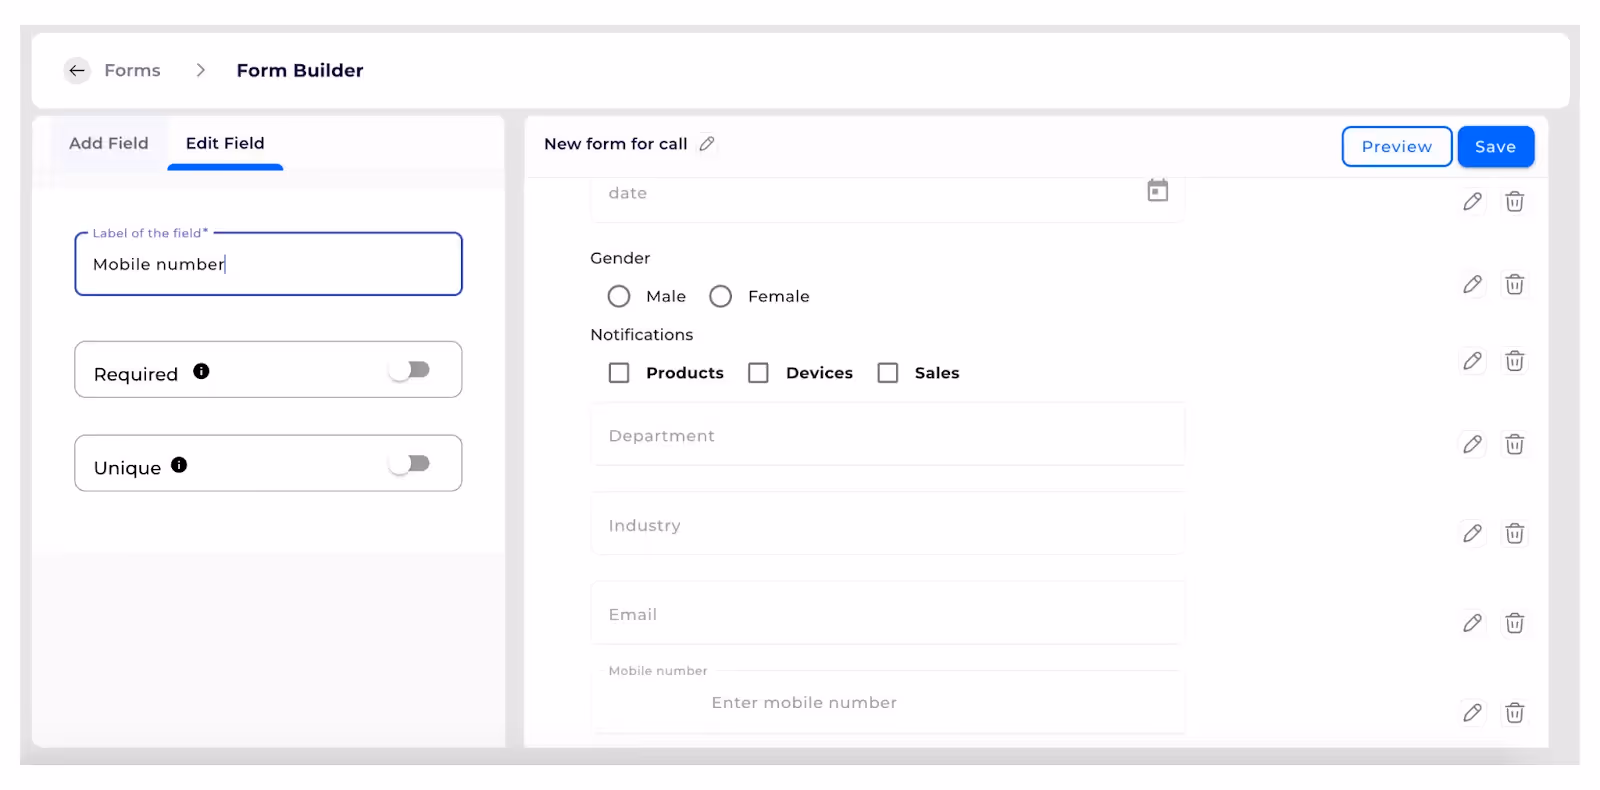
File upload field
- Any file uploading in form will be collected from this field.
- There are extra options like size of the file that is being uploaded can be restricted and type of files that can be uploaded can also be restricted.
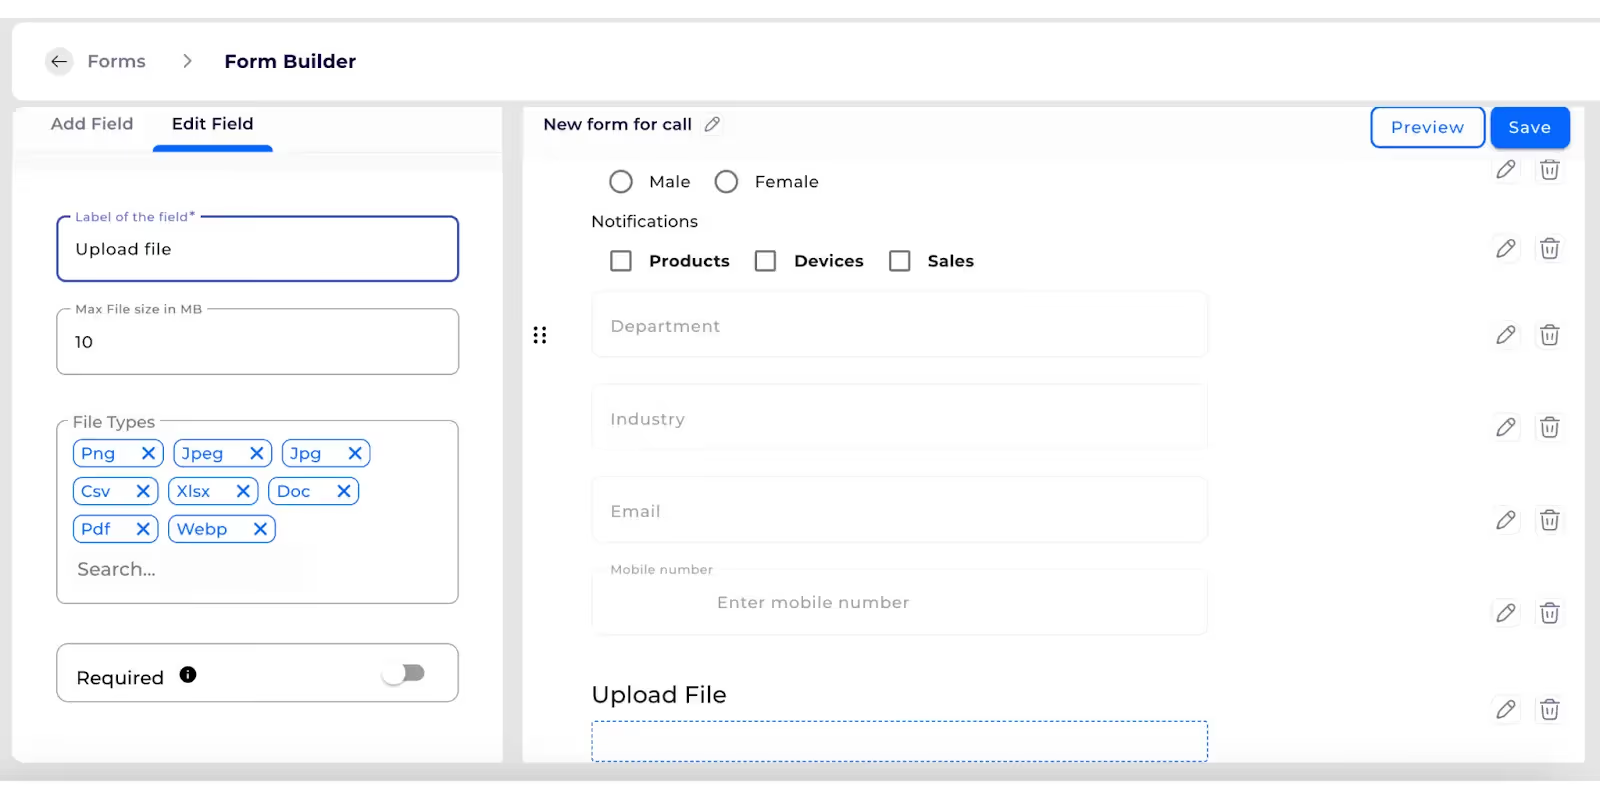
Number field
- For collecting only number characteristics from users.
- There are extra options like max and min number restrictions which can be used.

Toggle field
- For collecting just true or false information from users.
- Limited options like mandatory or not.

Text Area
- Which is for collecting more information on single data input.
- Limited options like mandatory or not.

Create Custom Form
Create forms, and embed it in landing pages, Companies, Contacts, Calls, field Visit and many more places.
Customize User Form fields
- You can customize the user fields by going to the admin settings and click on the user configurations and click on user as shown below:
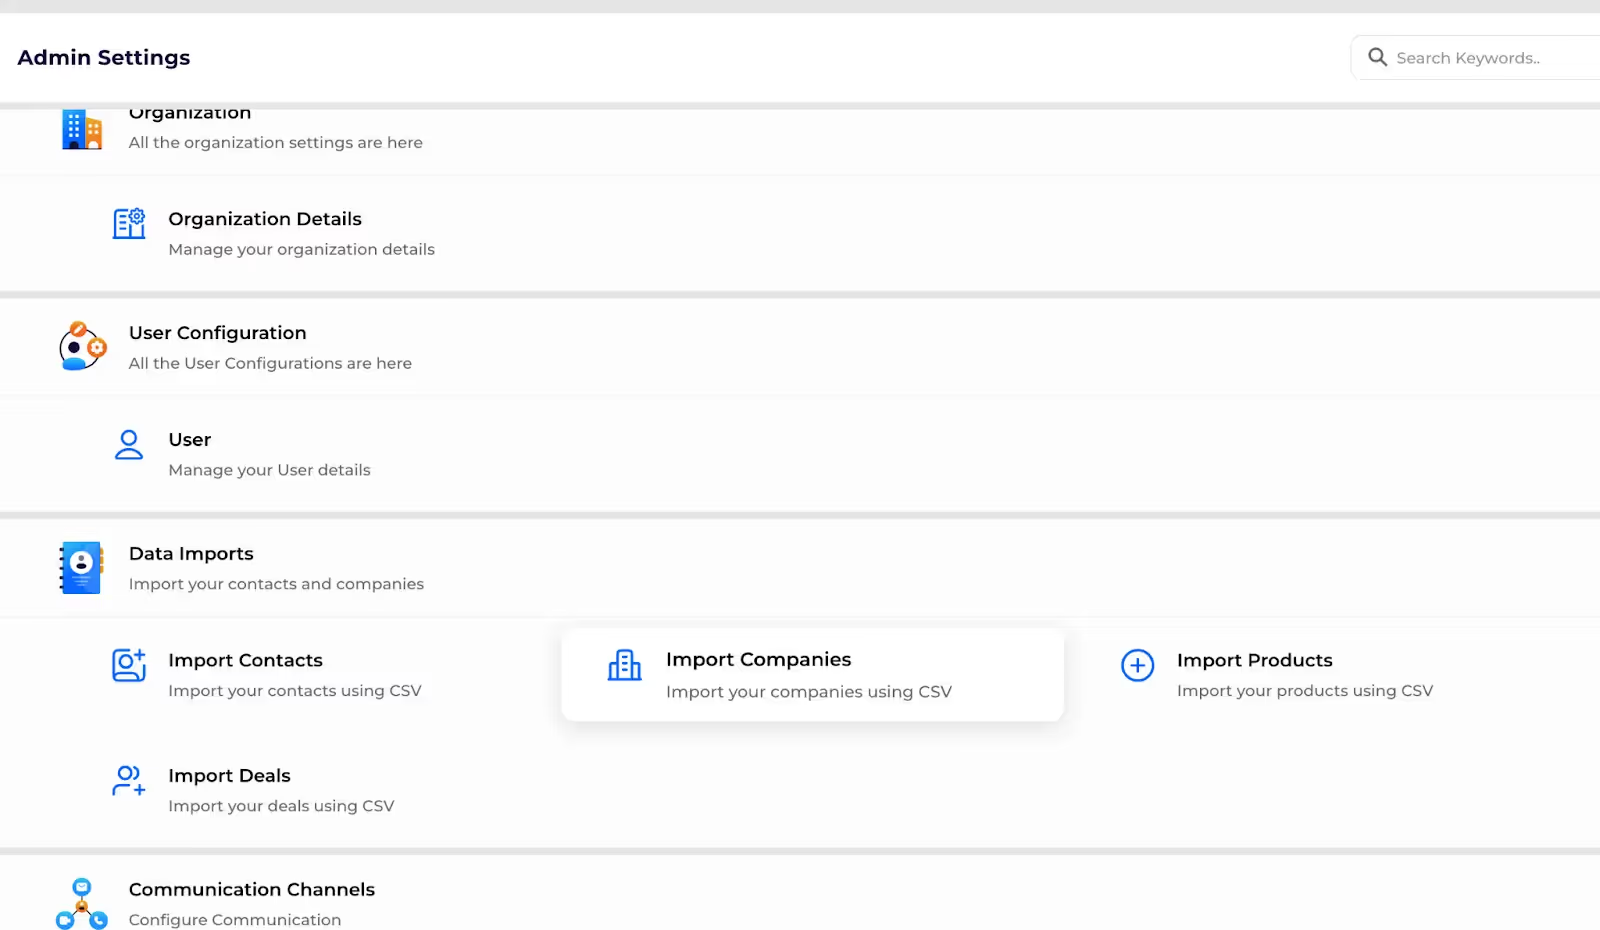
- You can view the already existing user fields as below:

- If you want to customize then click on the customize icon, then in next page you can see the page builder where you can add a new field or update the existing fields.
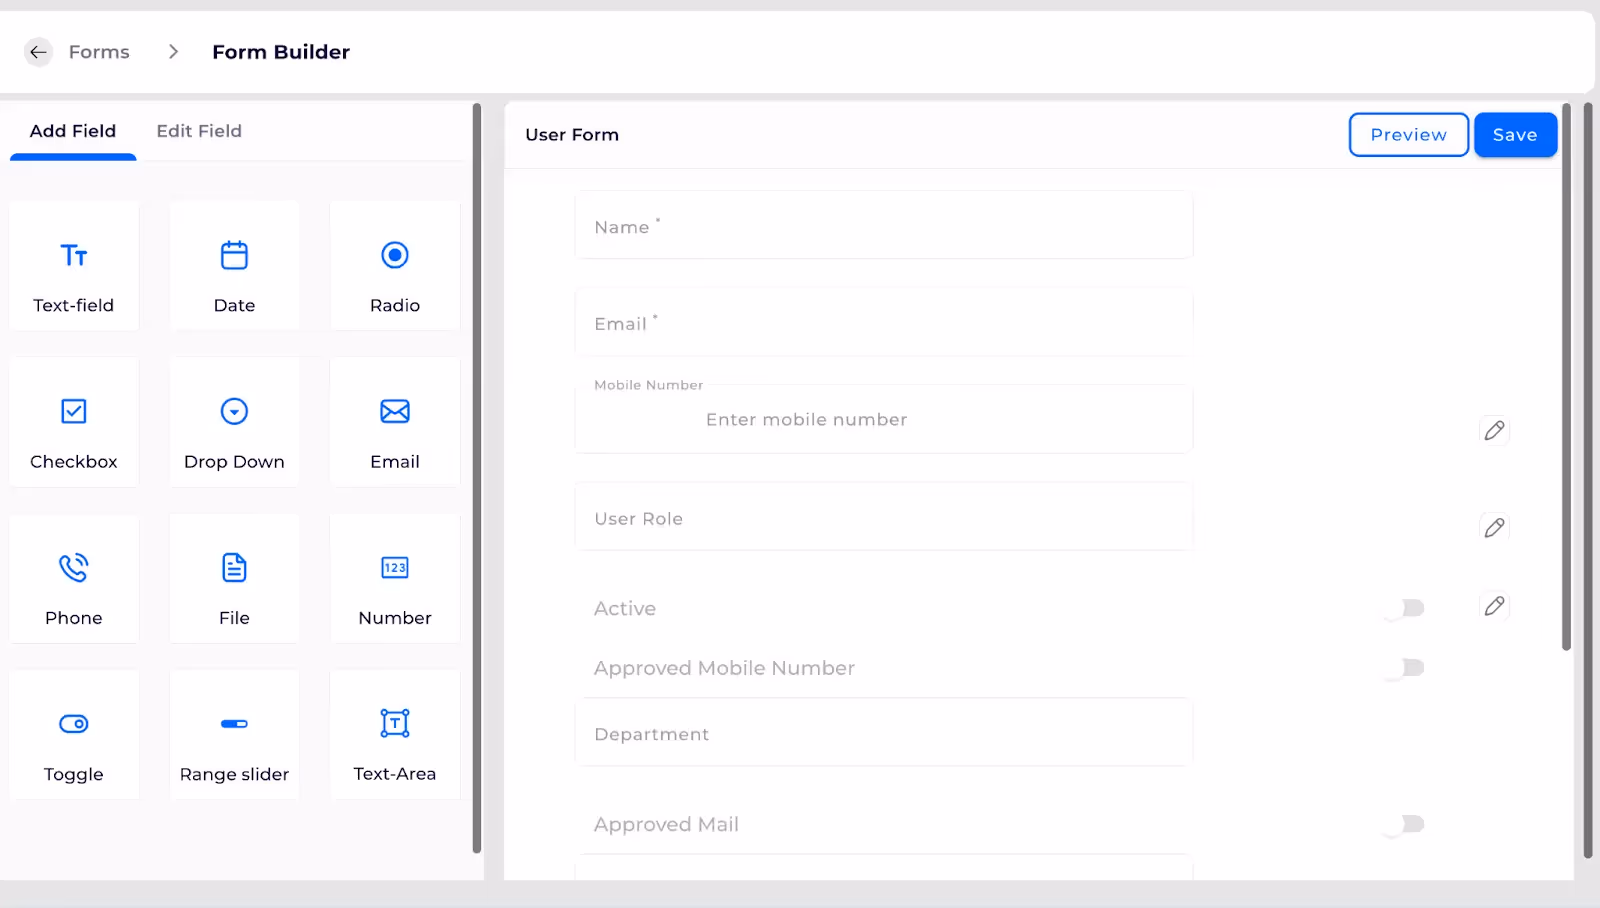
- For an example I am adding a text field then click on text field and give the details of new fields and should make it as required field and in the middle if you are creating a new field then for already existing users what default value should be set also should be given:

- After giving the details click on save as shown below:

- Then after saving this fields will be seen in the user creation or form updation, from next time onwards as shown below:

How to Customize the User Form fields
Customize the User Form fields
View User Permissions
- For admin users hierarchy is not followed but for staff users hierarchy is followed.

- Click on View button, now you can see a screen similar to below.

Edit User Permissions
Note:
Only a user with ADMIN(role) can edit user permissions.
- Click on edit user permissions to edit groups and permissions to a user.
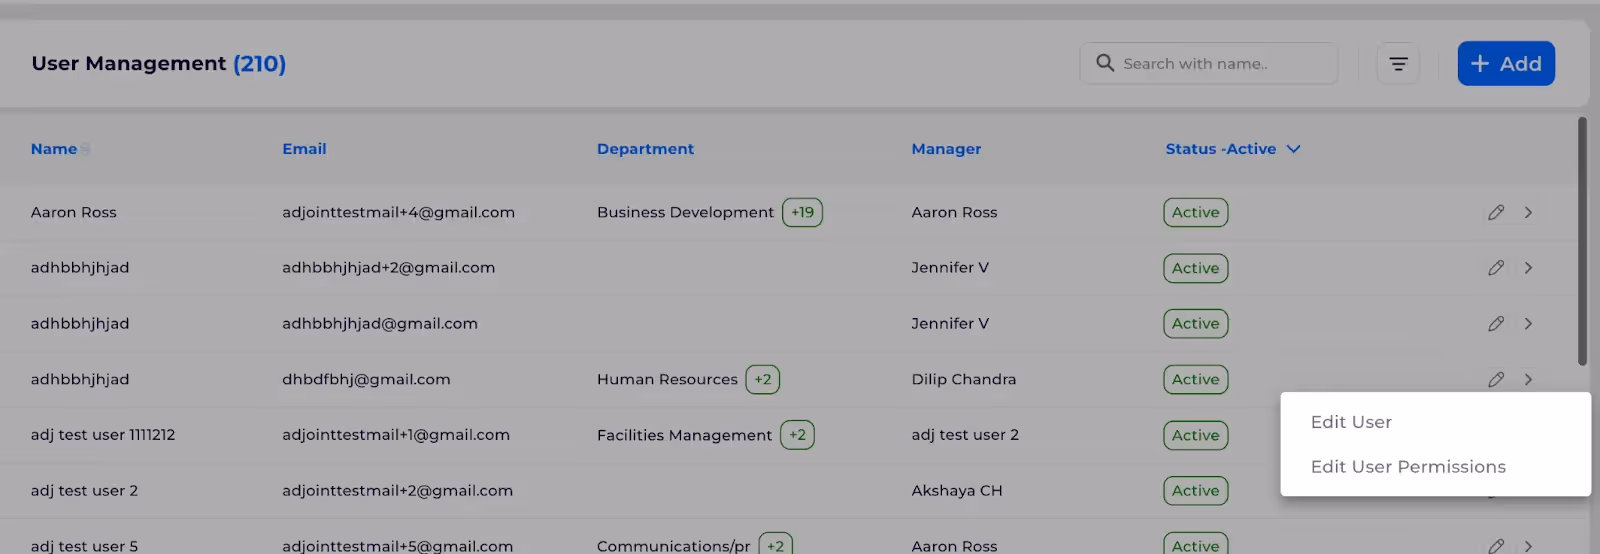
- A user can select only one group at a time, edit group or permissions.
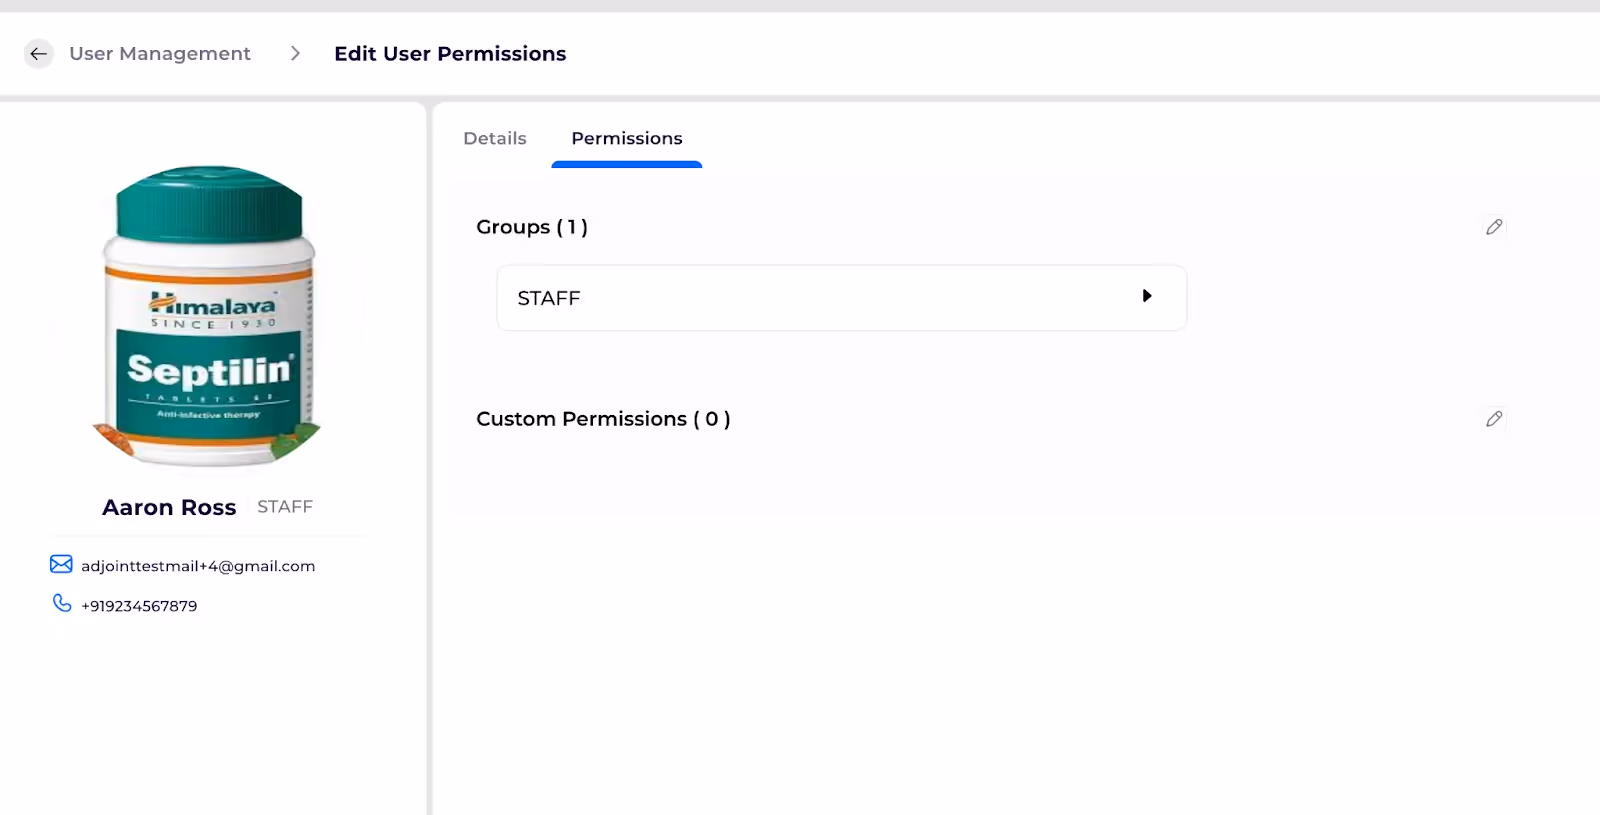
- Groups edit is like below, after selecting the group click on submit to assign group to you:
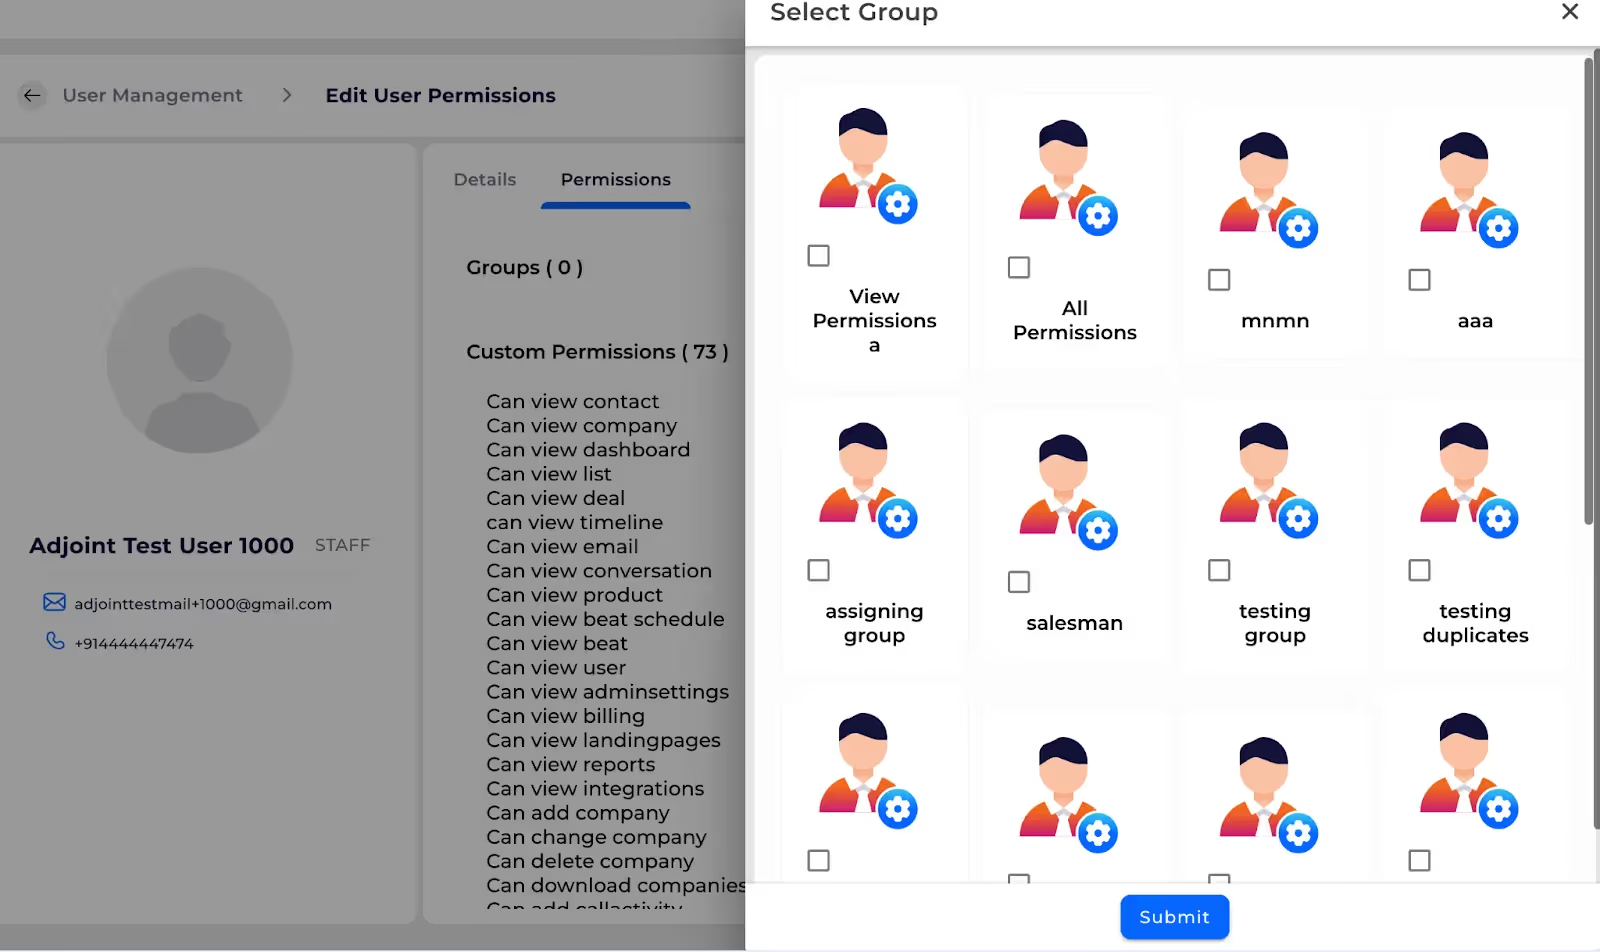
- You can edit user permissions and click on submit to save and assign permissions to you:
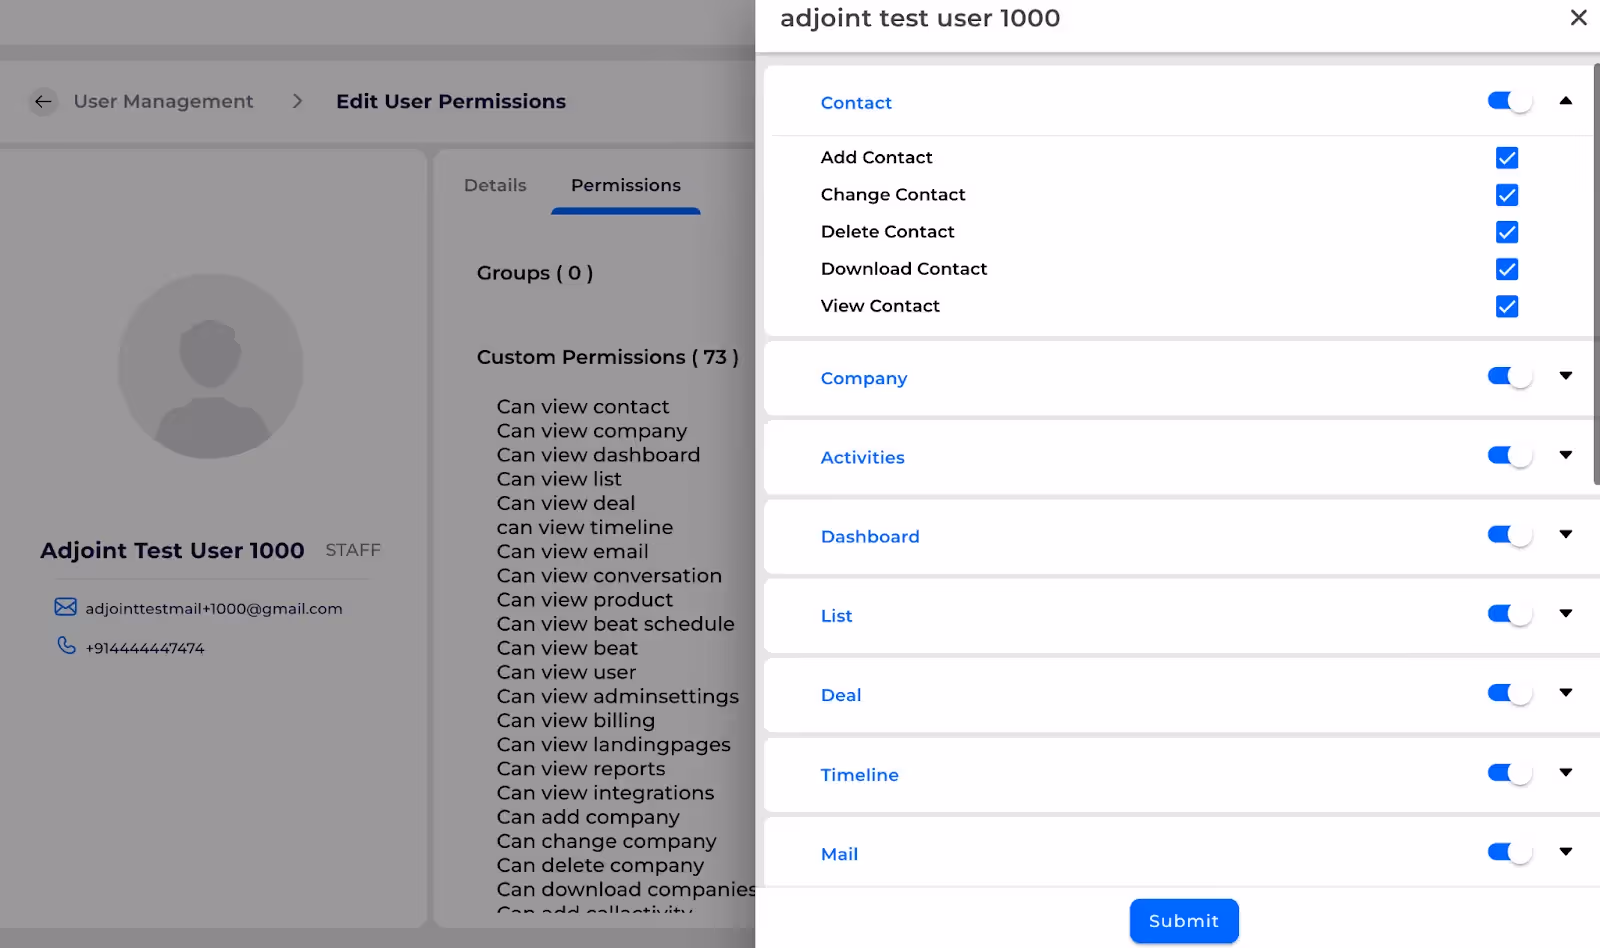
View and Edit User Permissions
Viewing, editing User Permissions made easy
Search a user
After creating the user, you can view the user in the user list ,you can search the user with its name as shown below.
.avif)
Sort the User List
Note: You can sort the user list with respective one column at a time. If sorting is set on one column, then if you try to sort using another column, you will find that sorting gets applied on the latest picked column and sorting that has been previously applied on another column, gets removed.
- In the header, you can see the arrow marks, you can sort the list with respective to the column chosen. If either of the arrows are not highlighted, that means no sort order is applied on the column.
- In the header, you can see the upper arrow mark is highlighted, that means sort order is set in descending order.
.avif)
- In the header, you can see the downward arrow mark is highlighted, that means sort order is set in ascending order.
.avif)
Filter a User List
- You can apply user filters like department filters and manager, approved mail and approved mobile number by clicking on the filters icon and filters will be as shown, we can apply filters as shown:
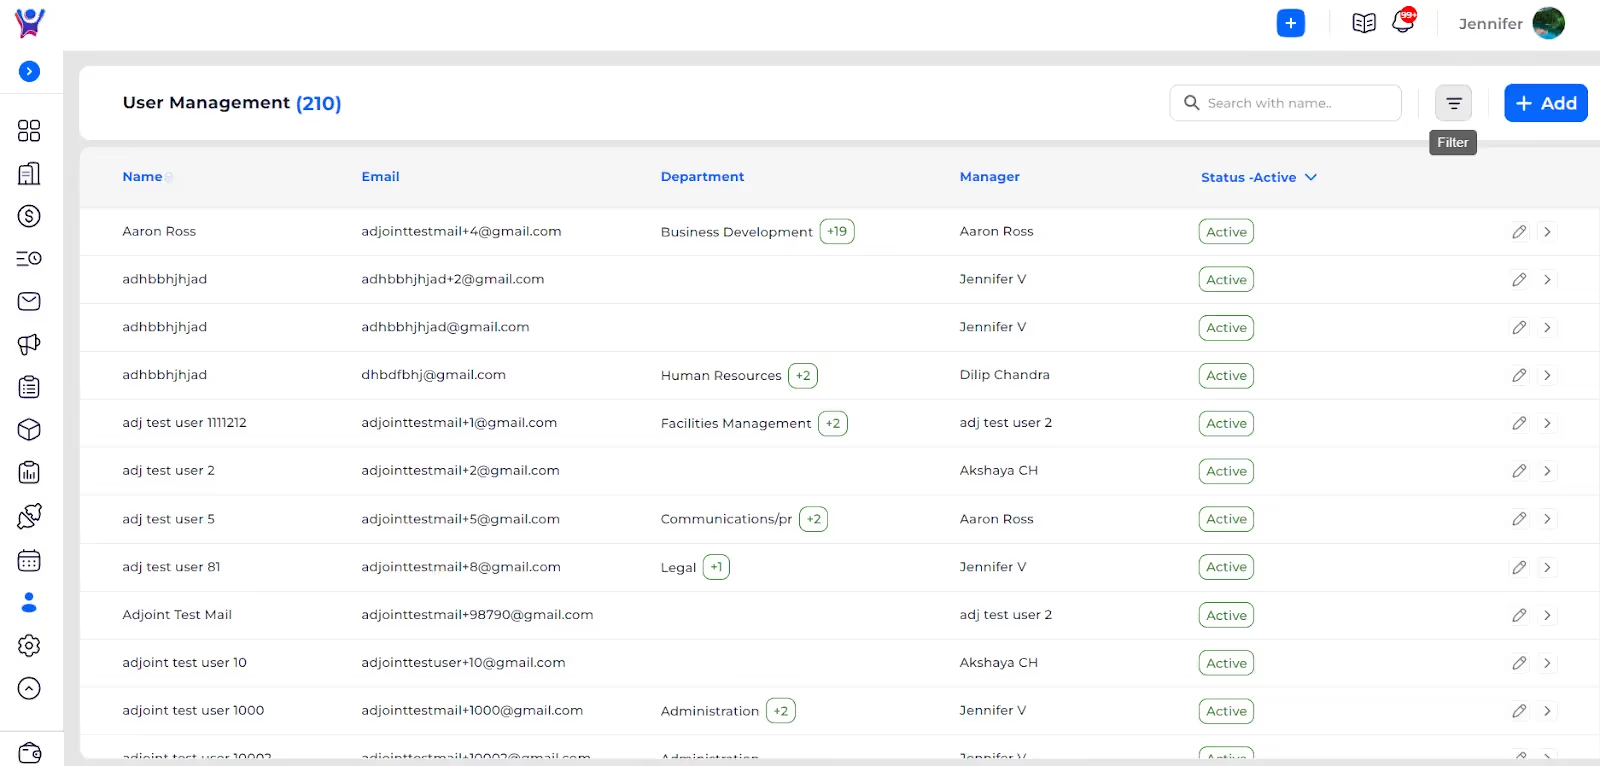

- After applying the filters we will get the users list who are having the given departments and aaron ross as manager as shown below:
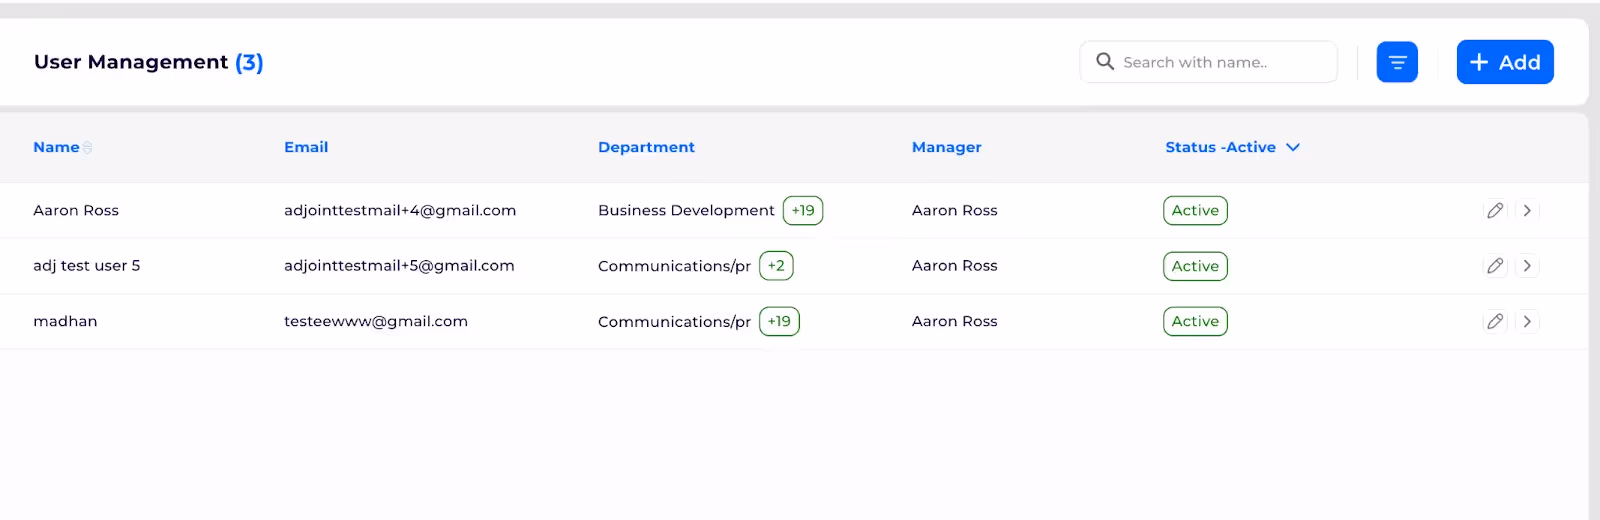
- You can reset the filters and apply new filters like below.
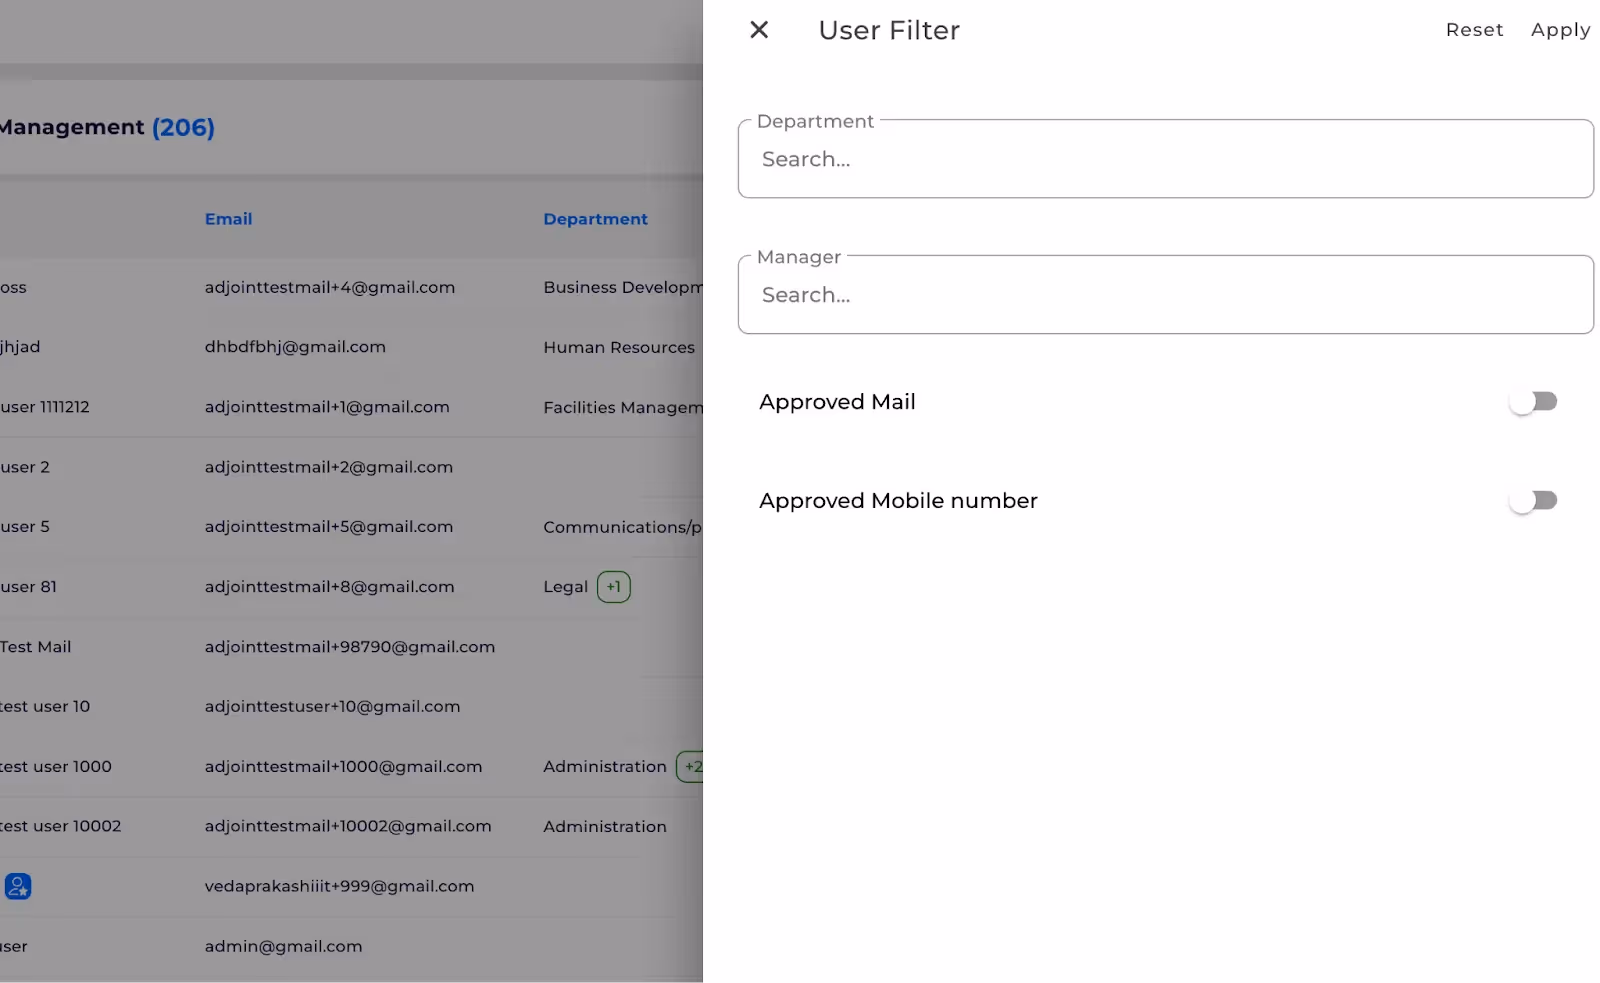
How to Search, Sort and Filter a User list
Step by Step guide to filter User list effortlessly
View User Details
- For admin users hierarchy is not followed but for staff users hierarchy is followed.
- Click on view user details and you can see user details as shown:

How to View User Details
Step by Step guide to view User details
Edit a User Details
- You can edit the user details or edit user permissions
- Click on edit icon for editing the particular user
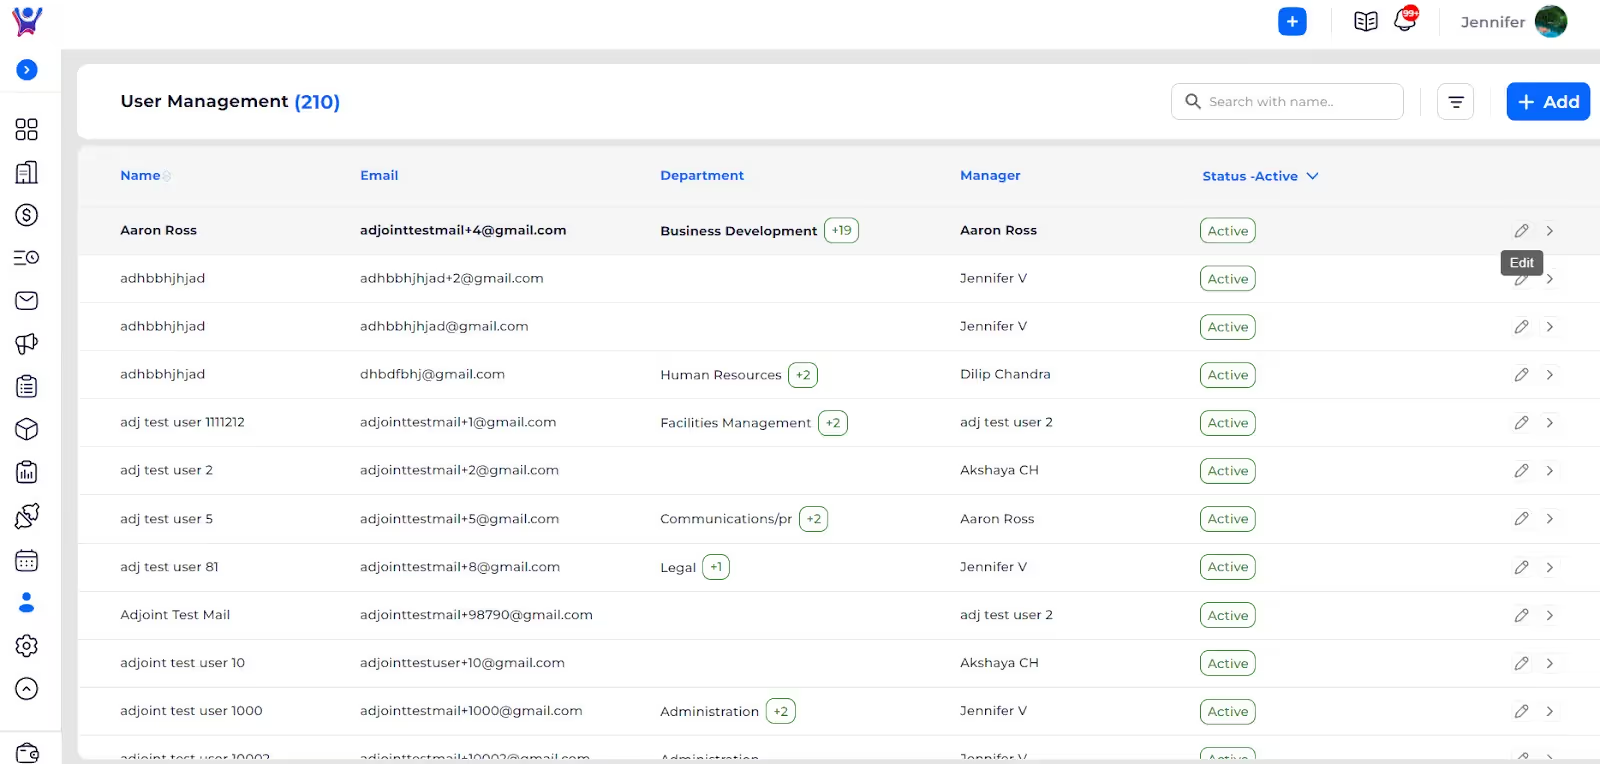
- Click on edit user then edit the user details:
Some conditions regarding editing user should be followed:
- If you are admin then you cant edit your active status as it will deactivate your account.
- By default two groups are created to tenant , they are staff and admin groups.
- If you edit role then the corresponding group is assigned to you by default ,if you want to edit it then you can go to the edit user permissions and can edit permissions and groups.
- While editing manager, then you cant select yourself as your manager or you cannot select your child users as manager.
- Edit user form will be as shown below, update the form and submit the form to save details.
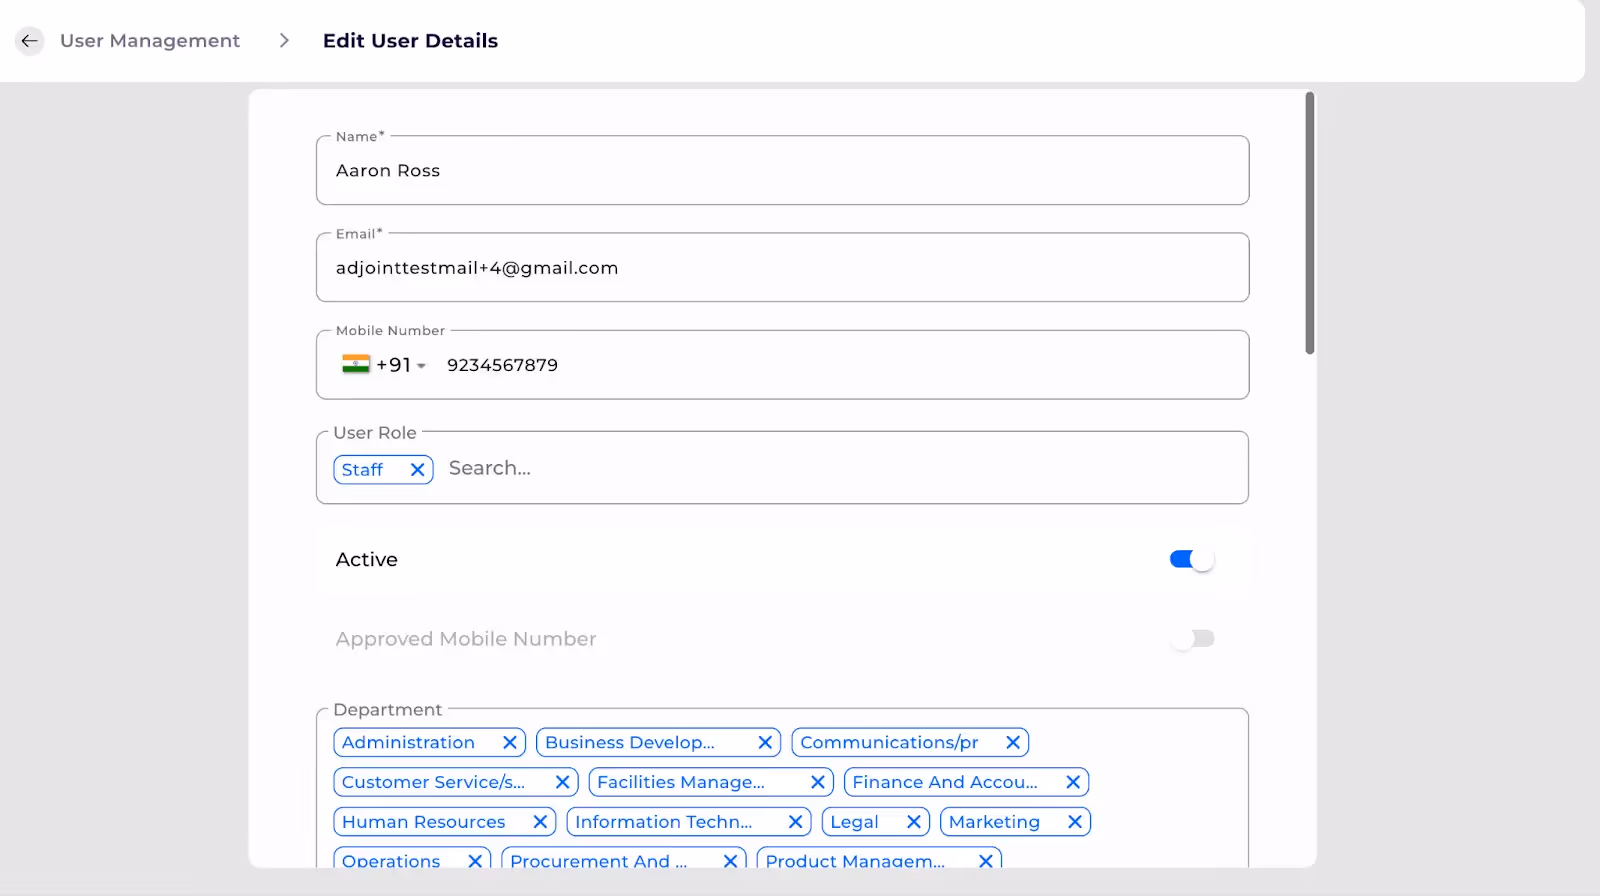
How to Edit a User
Step by Step guide to edit User Details
Step-by-Step Instructions to add a User
Accessing User Management
- In home page click on the channels icon.
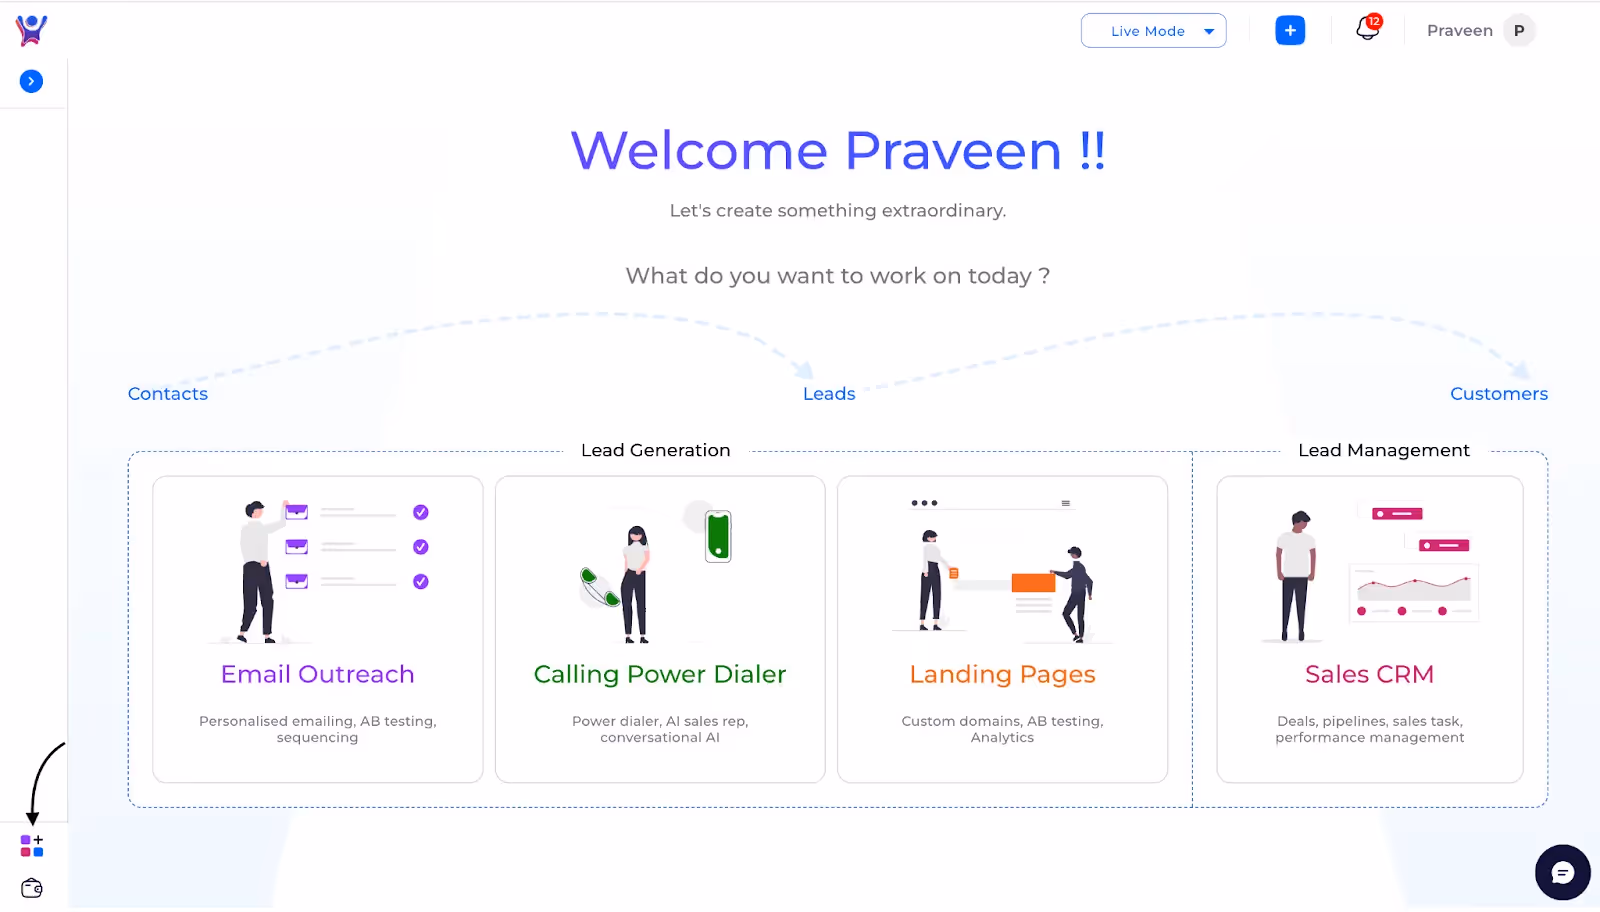
- Click on the others option.

- Click on the user management icon.
Creating a User
- Users can be created through three methods:some text
- Enter user details manually
- Invite user with email
- Copy registration URL
Entering User Details Manually
1.Click on the Add Icon
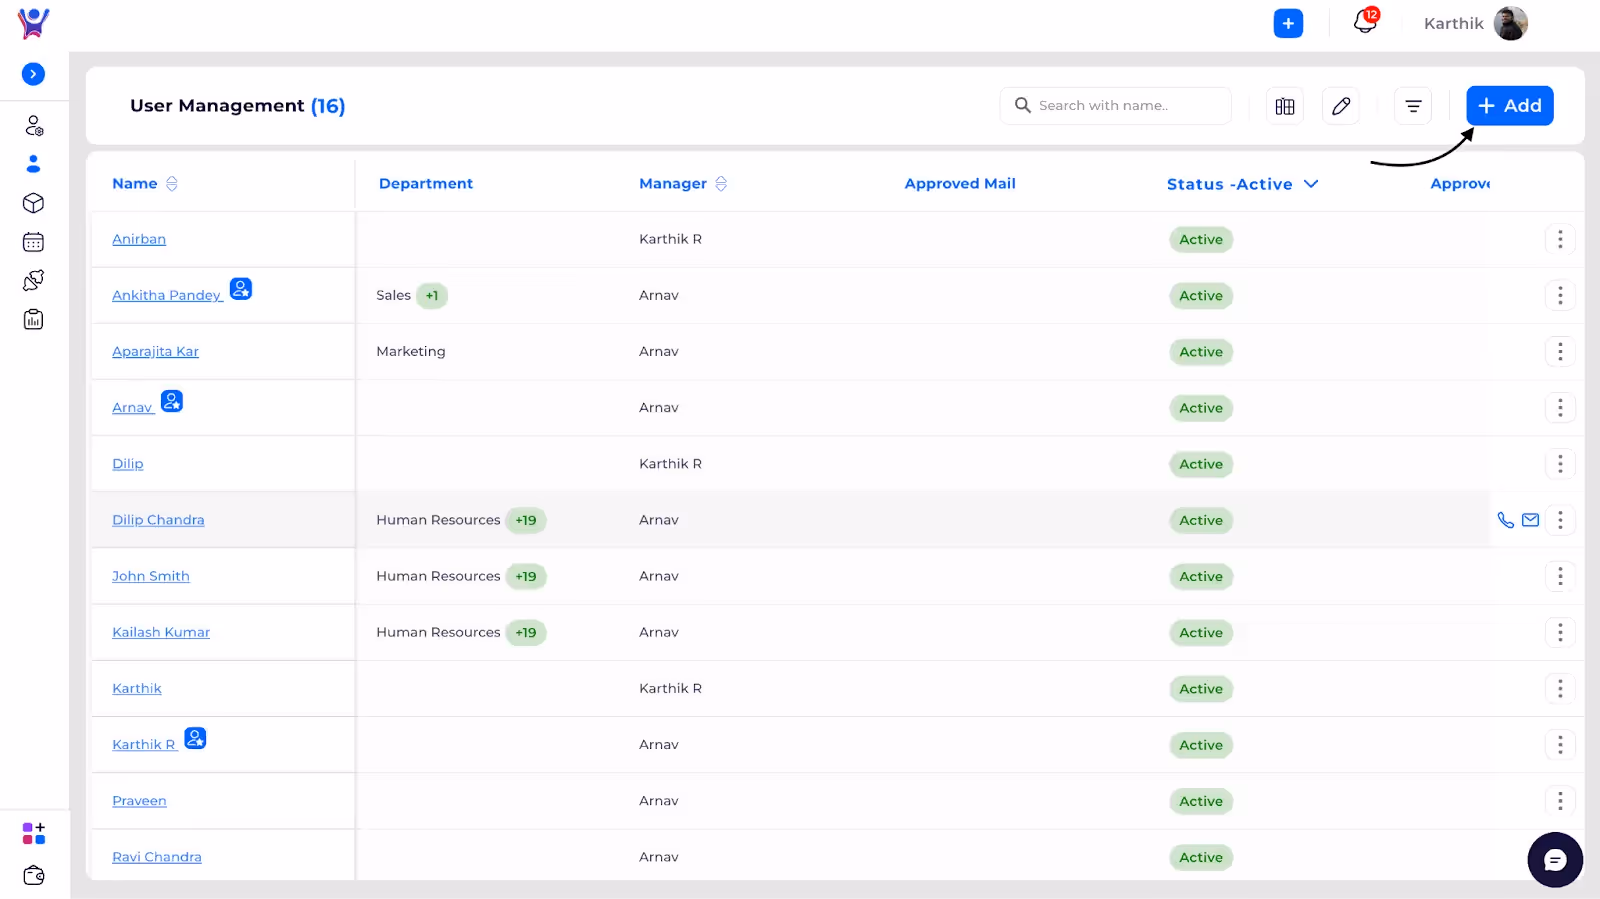
- Select "Enter User Details"

- Fill in the required information and Optionally view additional fields by clicking View Optional Fields.
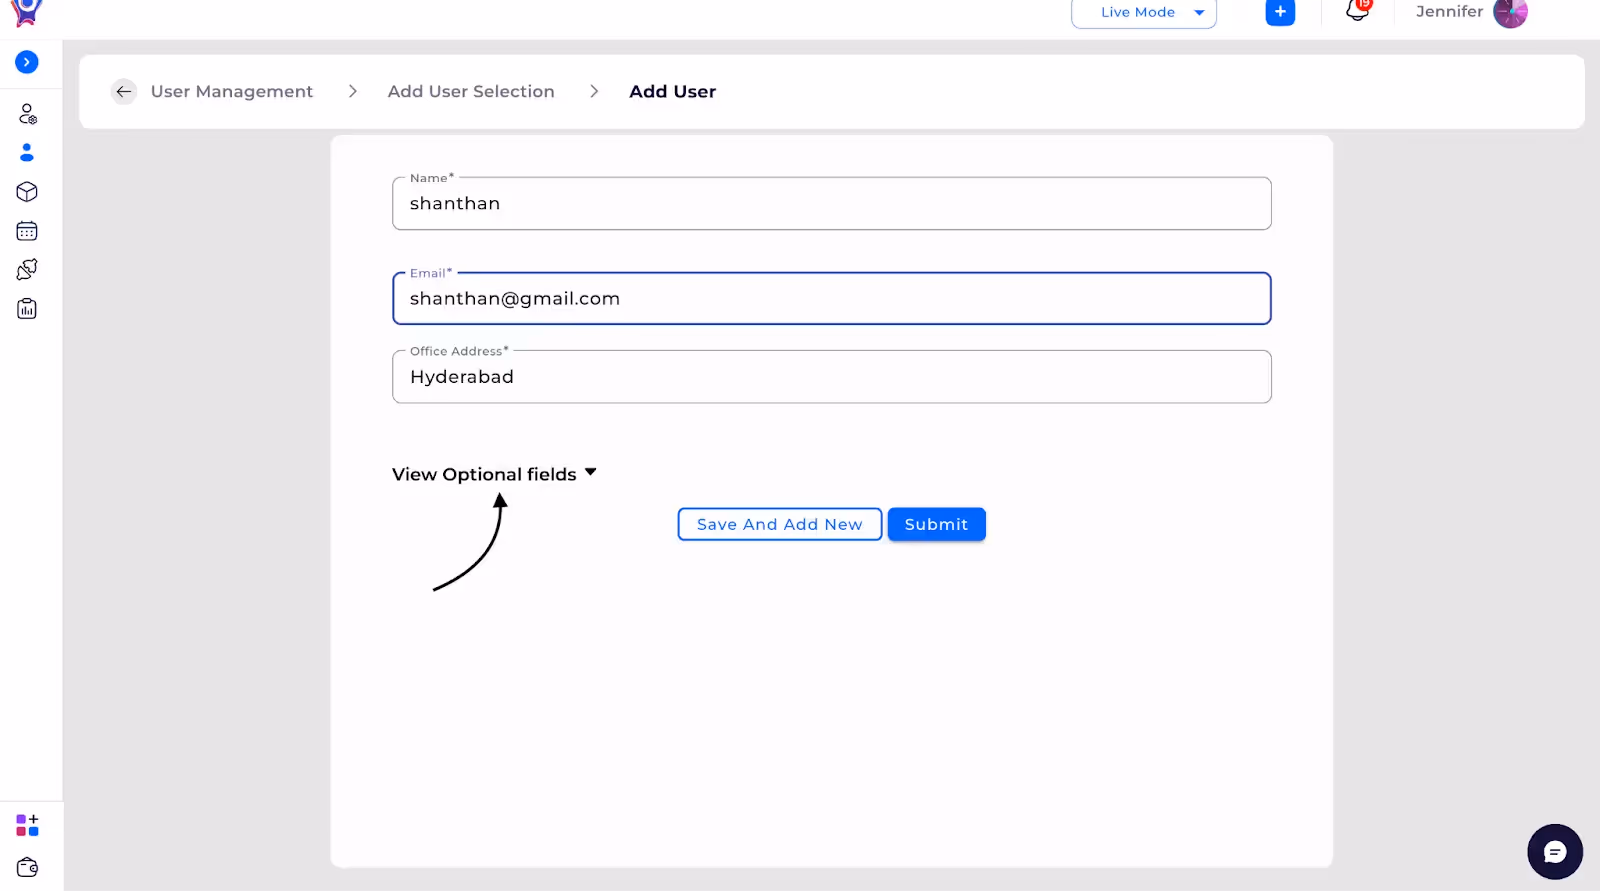
- Click the Submit Icon
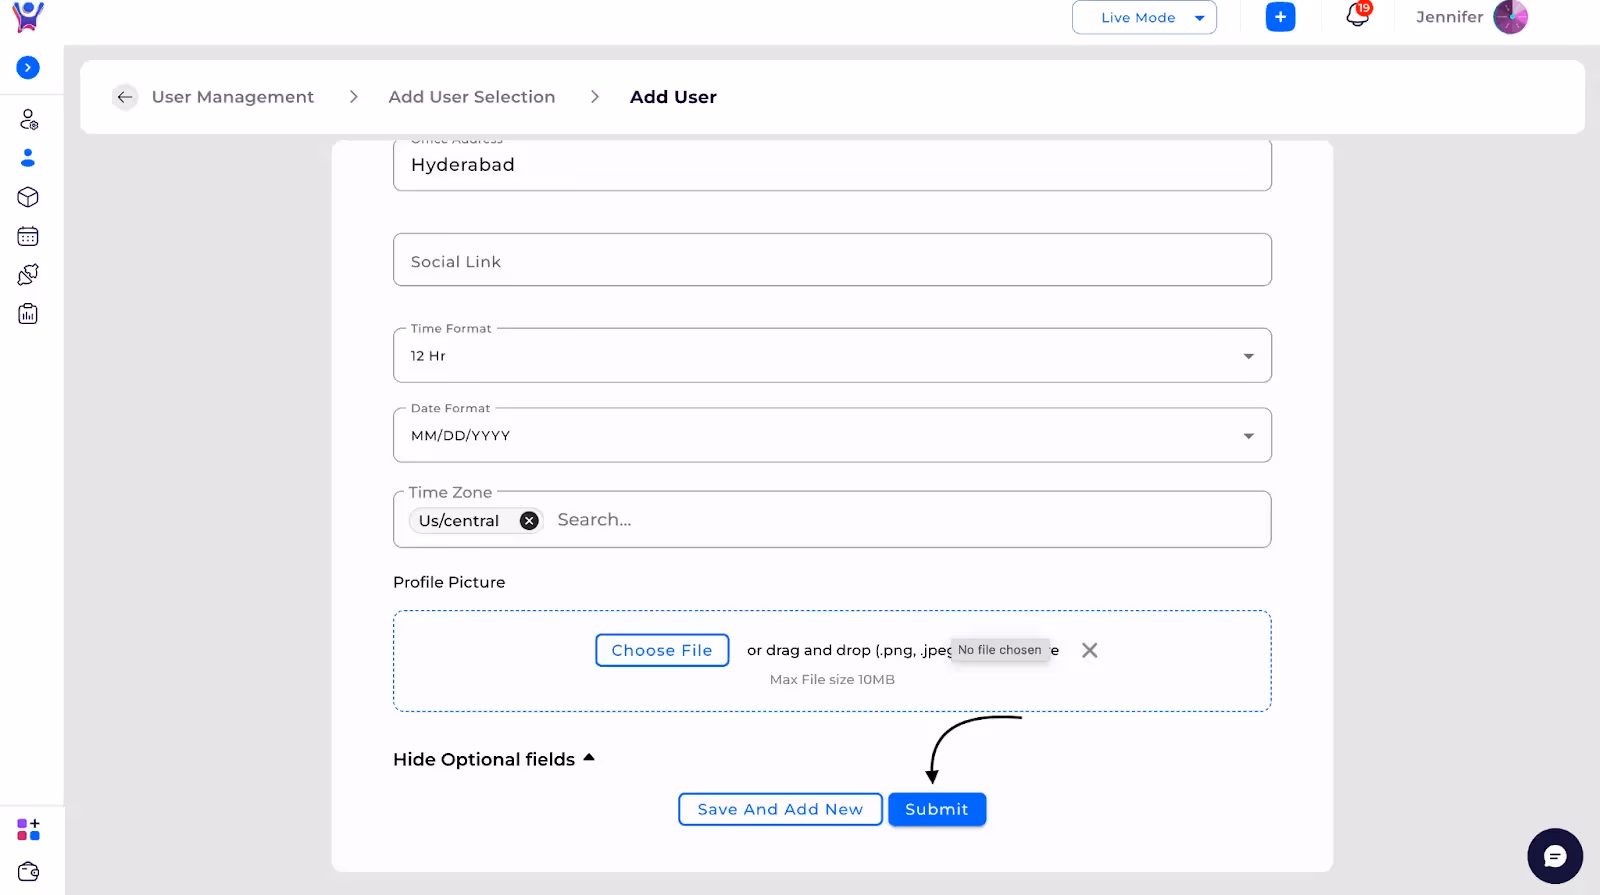
Inviting via Email
- Click "Invite with Email".
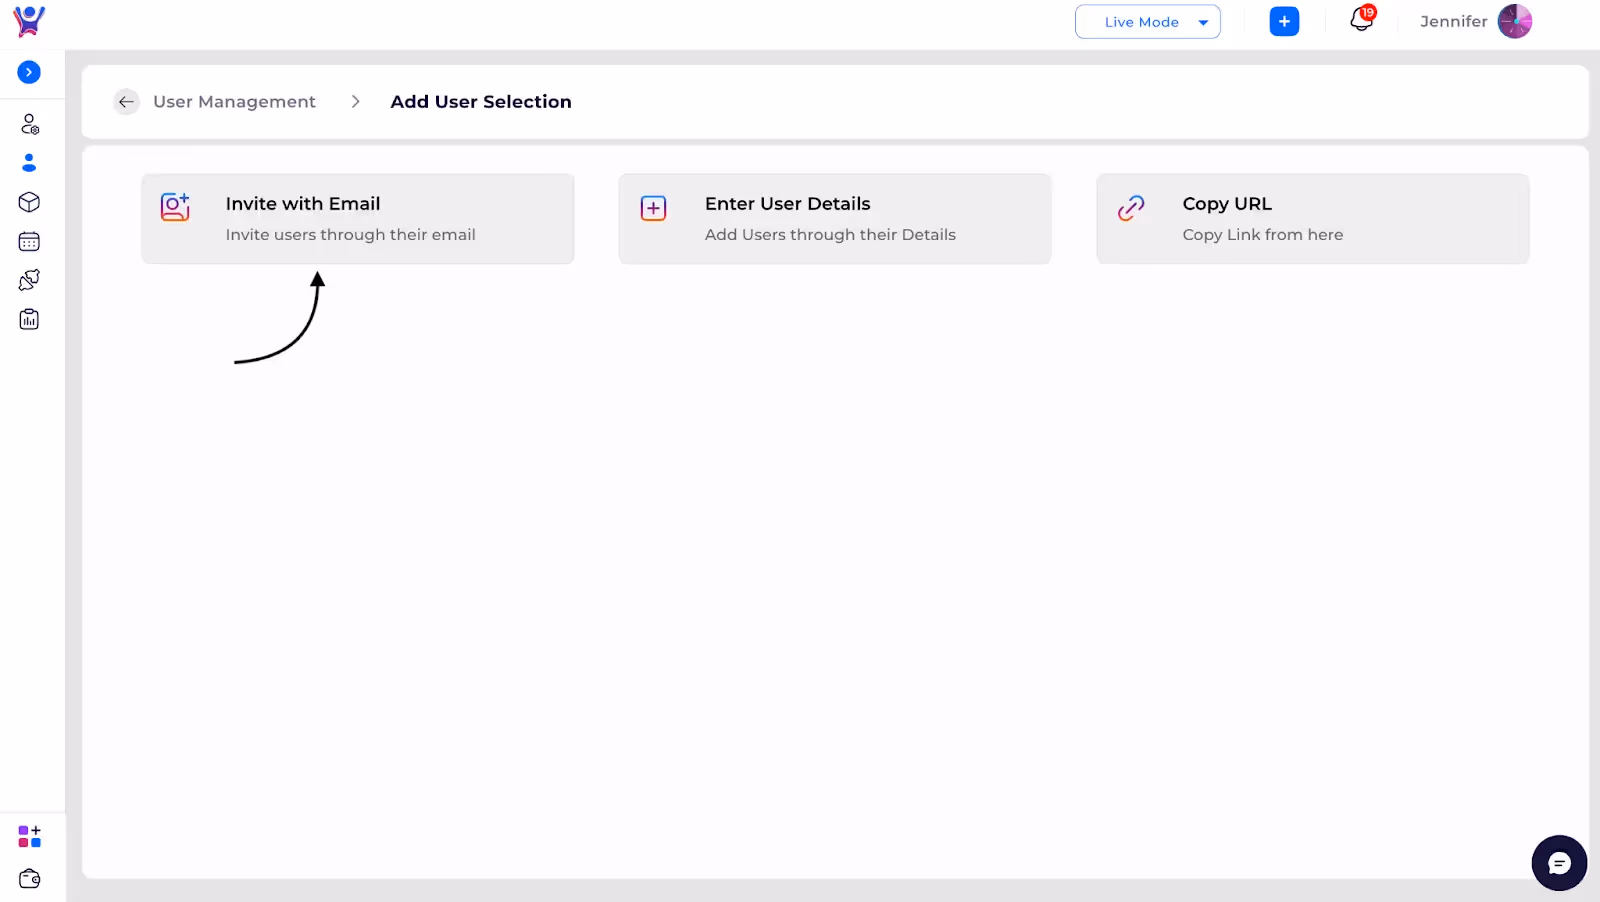
- Enter the user's work email address and click on invite to send invitation link.

- User receives an email with registration instructions.
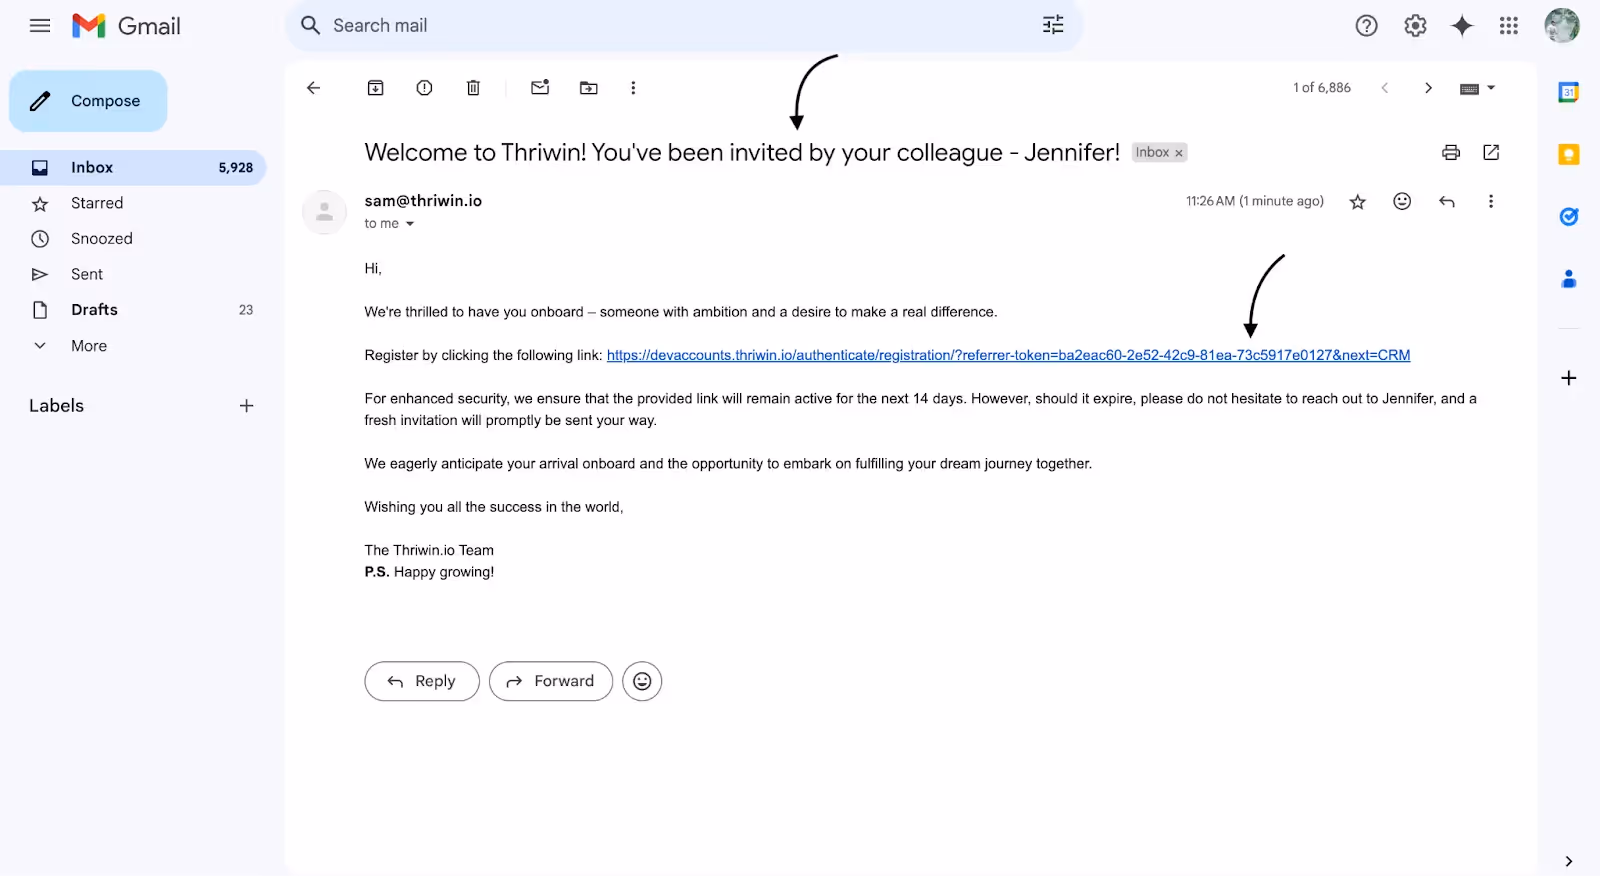
- Now, User has to complete registration, enter name, mobile number and then click on continue.

- Now, the user has to complete the verification.
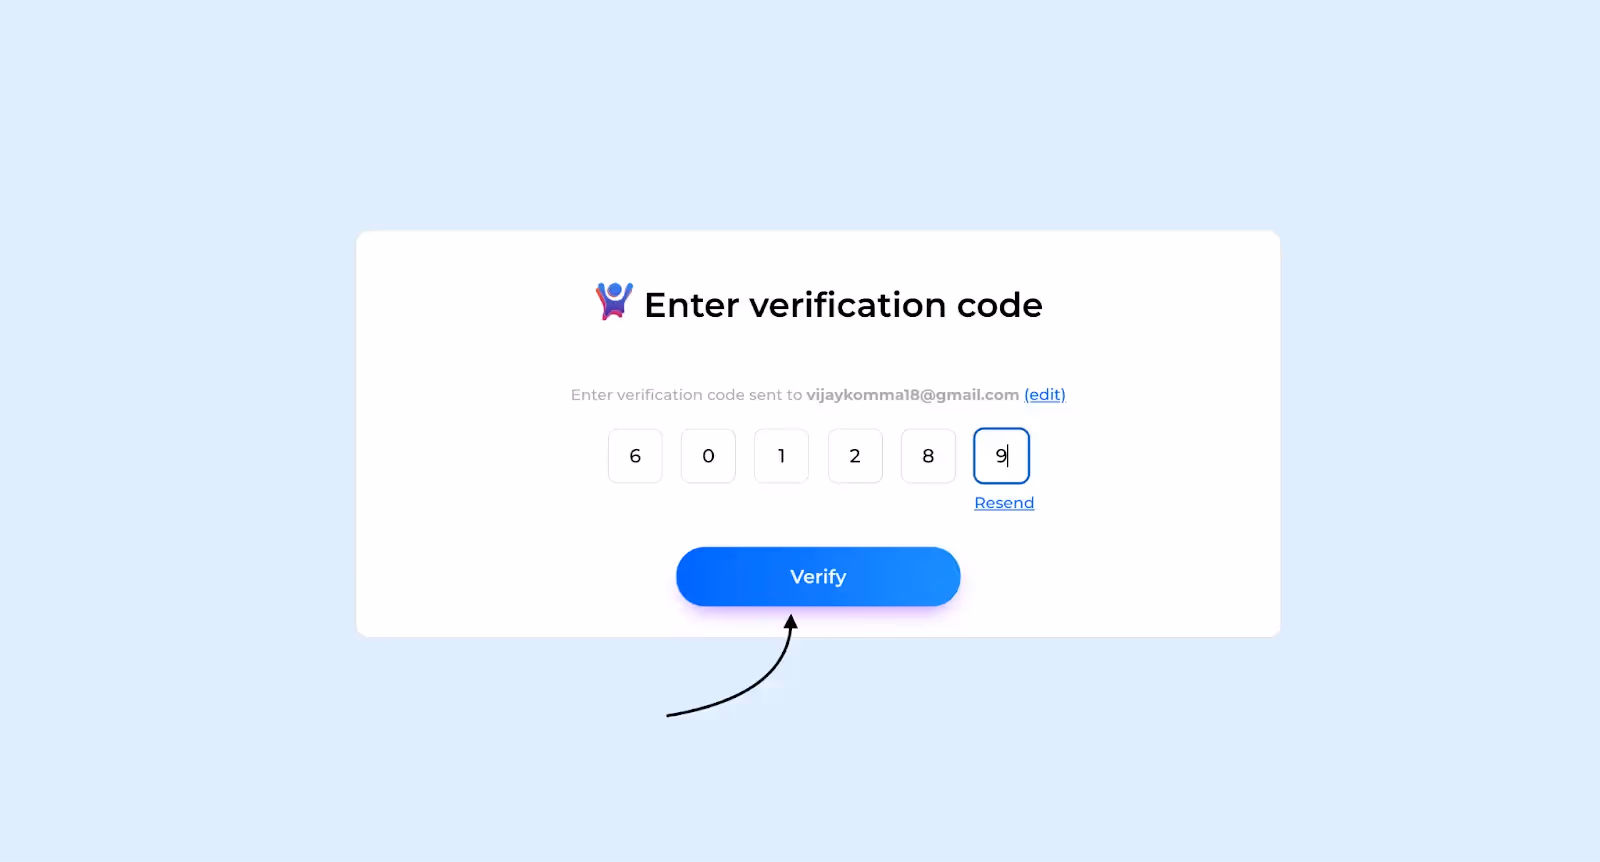
- The user will be taken to the homepage of the CRM Portal.

Copying Registration URL
- Click "Copy URL".
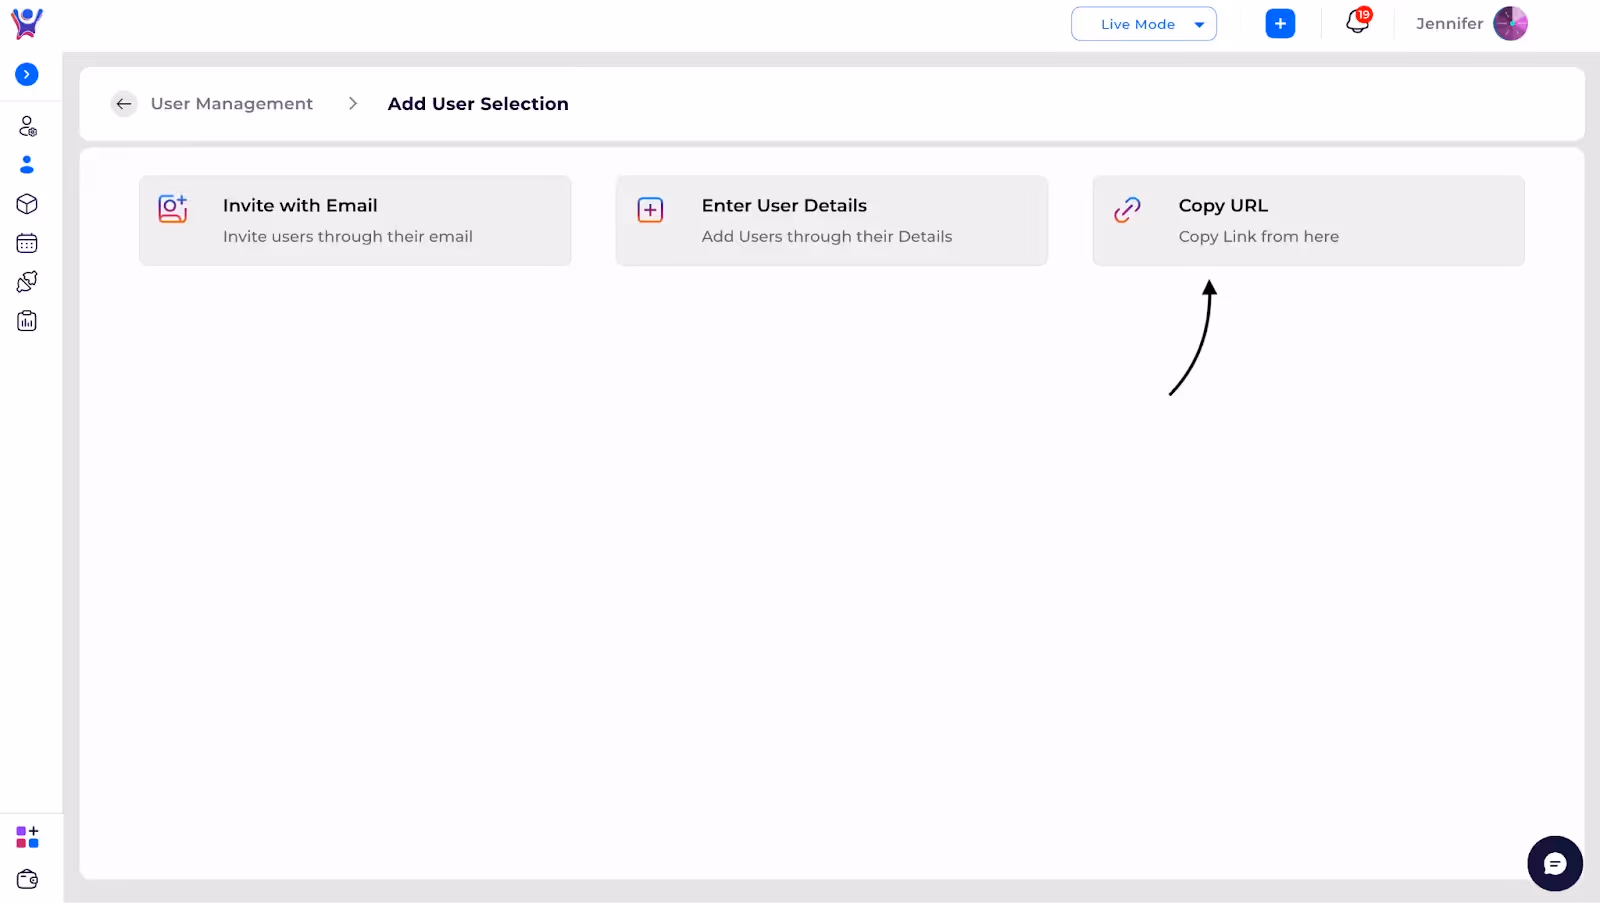
- Share the generated link with new users.
- Now user has to open the respective link,he will be redirected to registration page.

- User has to complete the registration process, by giving personal details and then verifying the email.


- User form will be opened, enter respective details and click on submit.
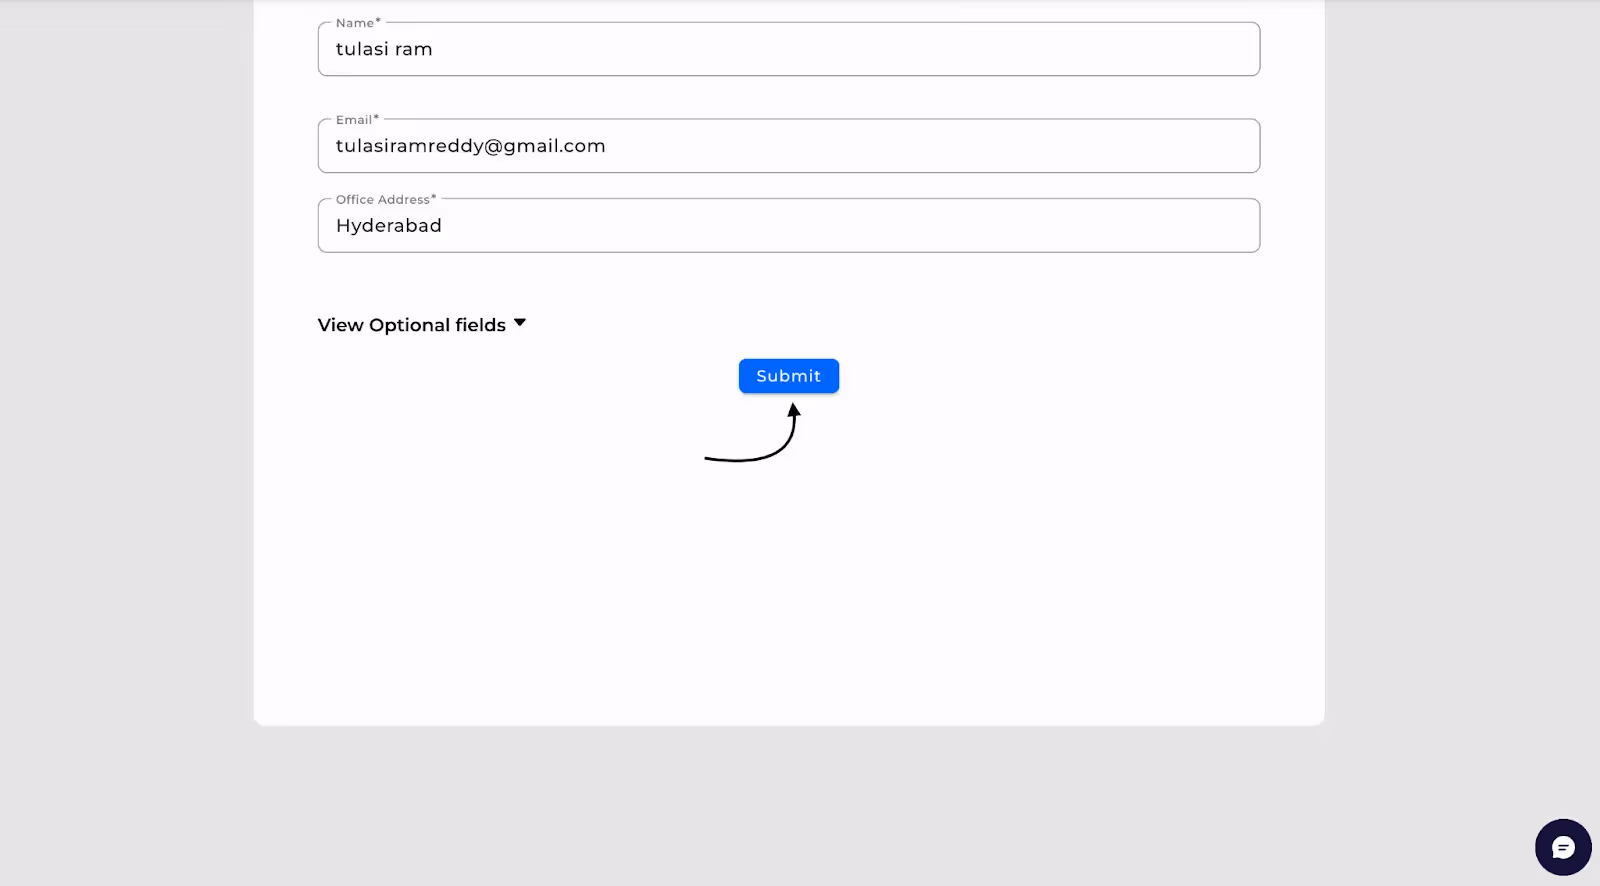
- Hurrah! The user account will be created and user will be redirected to home page.

How to Add a User
Step by Step guide to add a user
Edit a Beat
- An already created beat can be edited to modify the schedule or to remove/add the tasks in the beat.
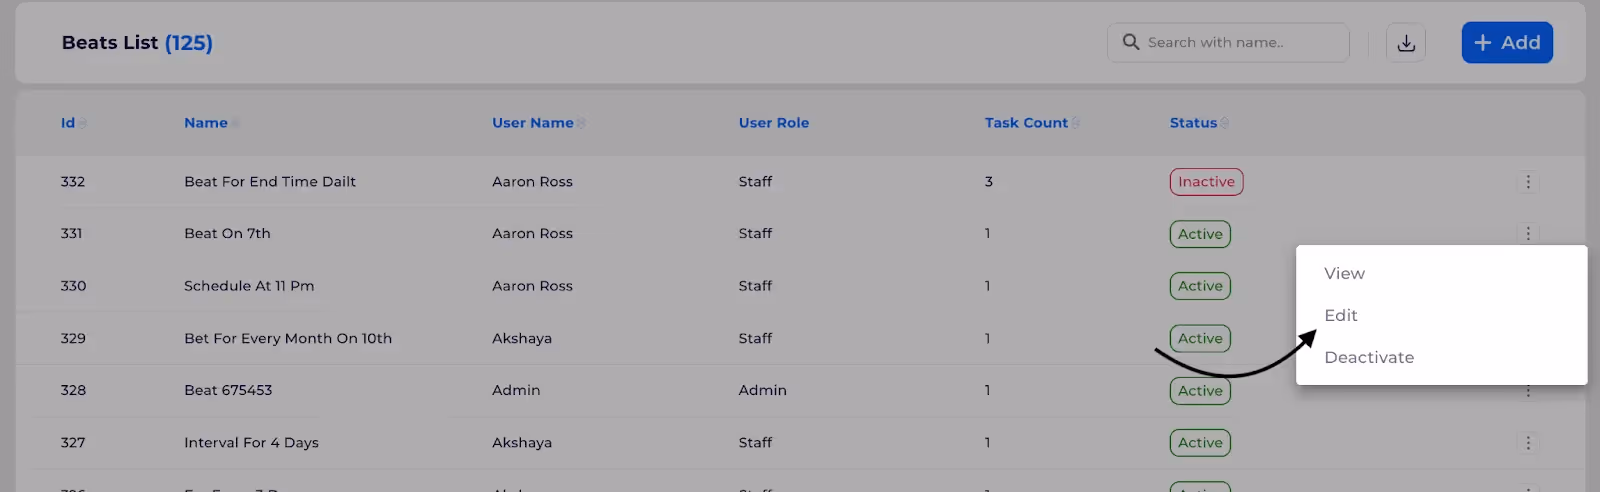
- On clicking the EDIT button shown above, the screen will be navigated to a beat edit screen where the beat schedule details and the tasks in the beat are shown to edit.


- After updating required schedule details and the tasks on clicking Save button will update the beat.
- The tasks in the beat are created according to the updated beat.
How to Edit a Beat
Editing a beat made easy with Step by Step guide
Deactivate a Beat
- Deactivating a beat is temporarily deactivating a beat which stops the creation of the tasks in the beat from the beat deactivated date.
- Already created tasks from the beat are not affected with this action.
- The future tasks will not be created on beat deactivation.
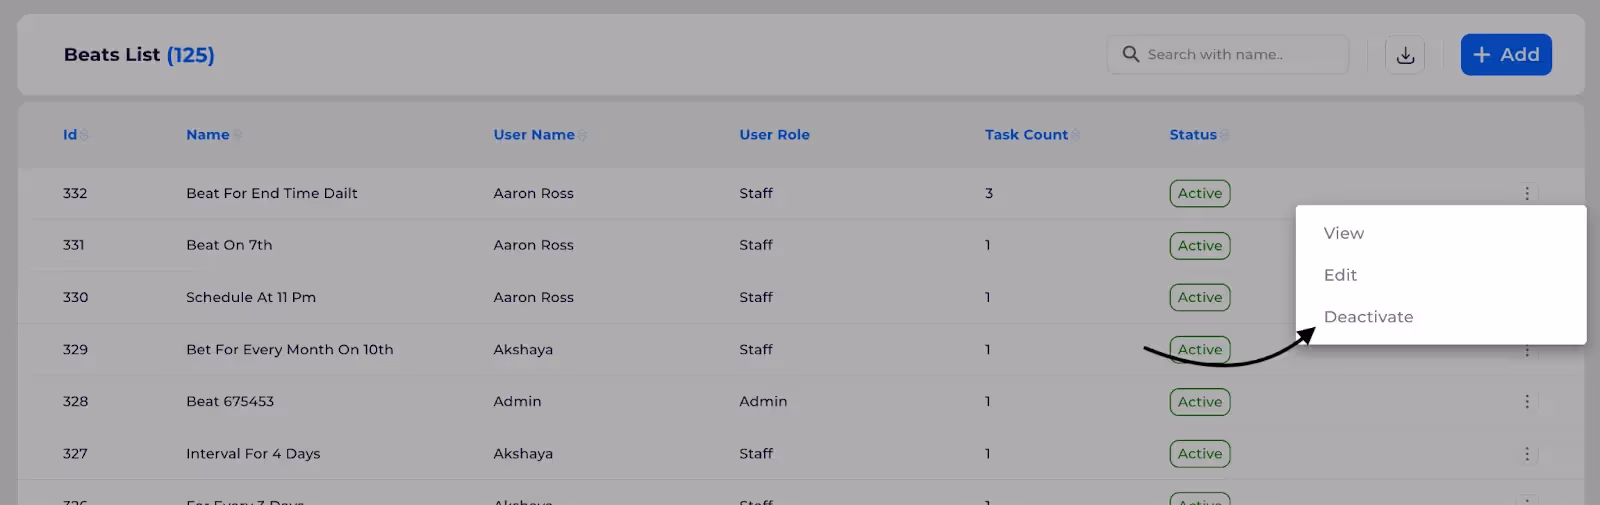
- On clicking the Deactivate button shown above will help to deactivate a beat.
- Before performing deactivation this action will show a confirmation popup.

- On clicking DEACTIVATE , the beat will be deactivated and the status of the beat will be updated in the beats list page.
REACTIVATING BEAT
- Similarly a beat can be reactivated with the same procedure.
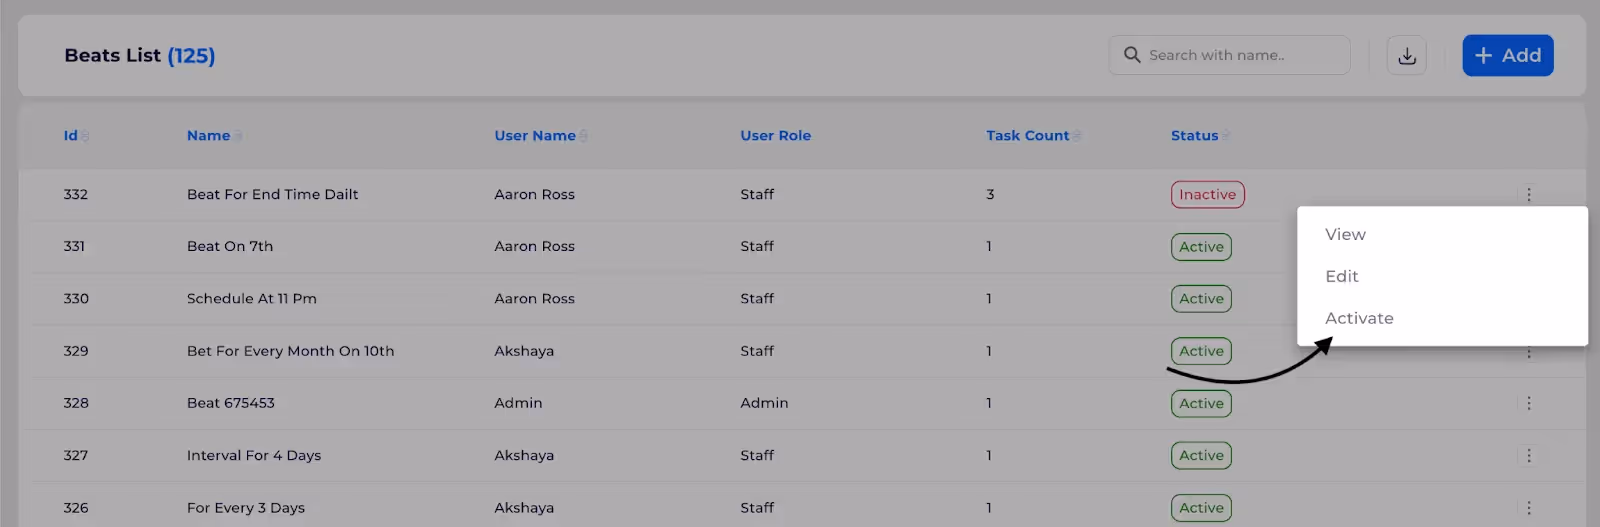
- On clicking the Activate button shown above, a beat can be reactivated and the tasks in the beat will get resumed from the day of the beat reactivation.
- The beat status will be updated accordingly.
How to Activate and Deactivate a Beat
Step by Step guide to activate and deactivate a beat
Download Beats
- On clicking the download button shown below, we can download the list of beats.
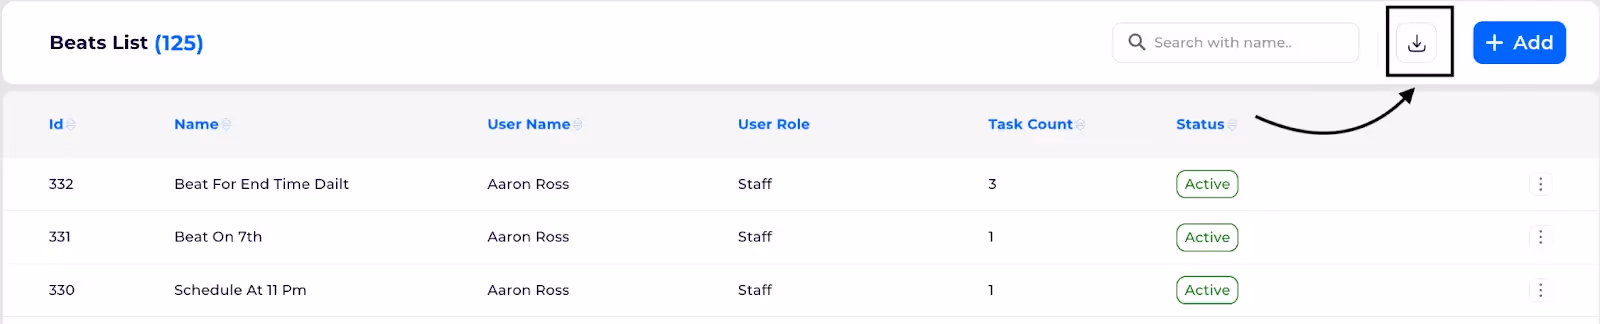
- On clicking the DOWNLOAD button a confirmation pop up is shown before downloading the beats list.
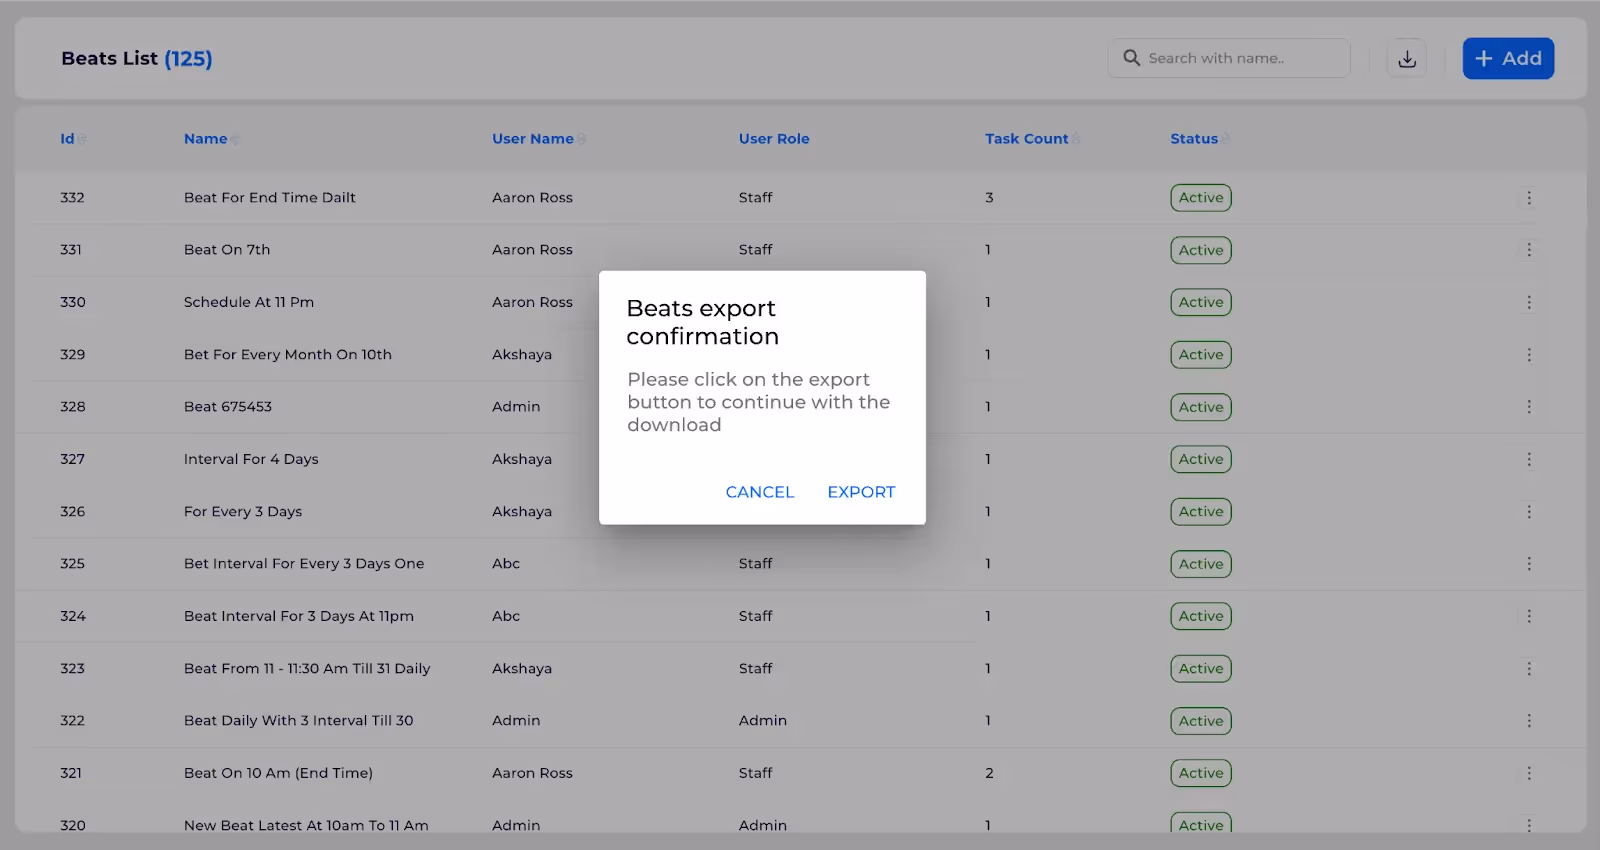
- On clicking EXPORT the downloaded excel file with all the beats will be sent to the registered email in a few minutes.
How to Download Beats
Step by Step Guide to download beats
Beats Overview
- Beat is a defined schedule with required frequency, which can be used for creating or scheduling activities in a recurring manner.
- Beats helps to create multiple activities in a recurring manner instead creating each activity manually.
- Beats are similar to schedules, but a beat can be assigned to a single user unlike schedules.
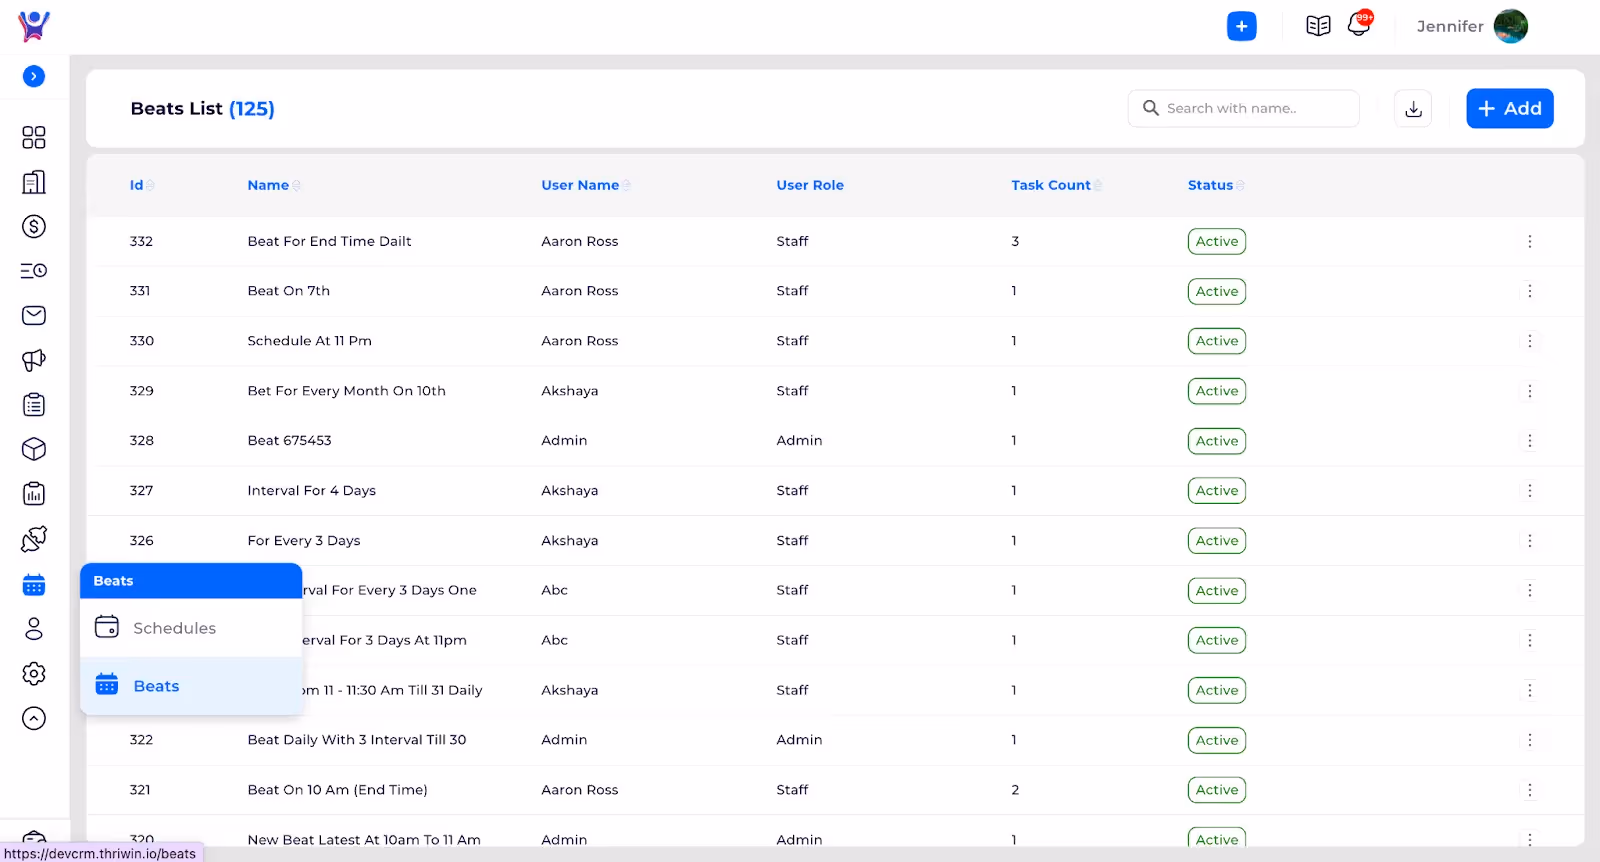
- On clicking Beats from the side menu, we can see the list of beats which are created.
Beat Details
- On clicking any of the beat rows or selecting the view option from clicking the three dots the details of the beat can be seen.
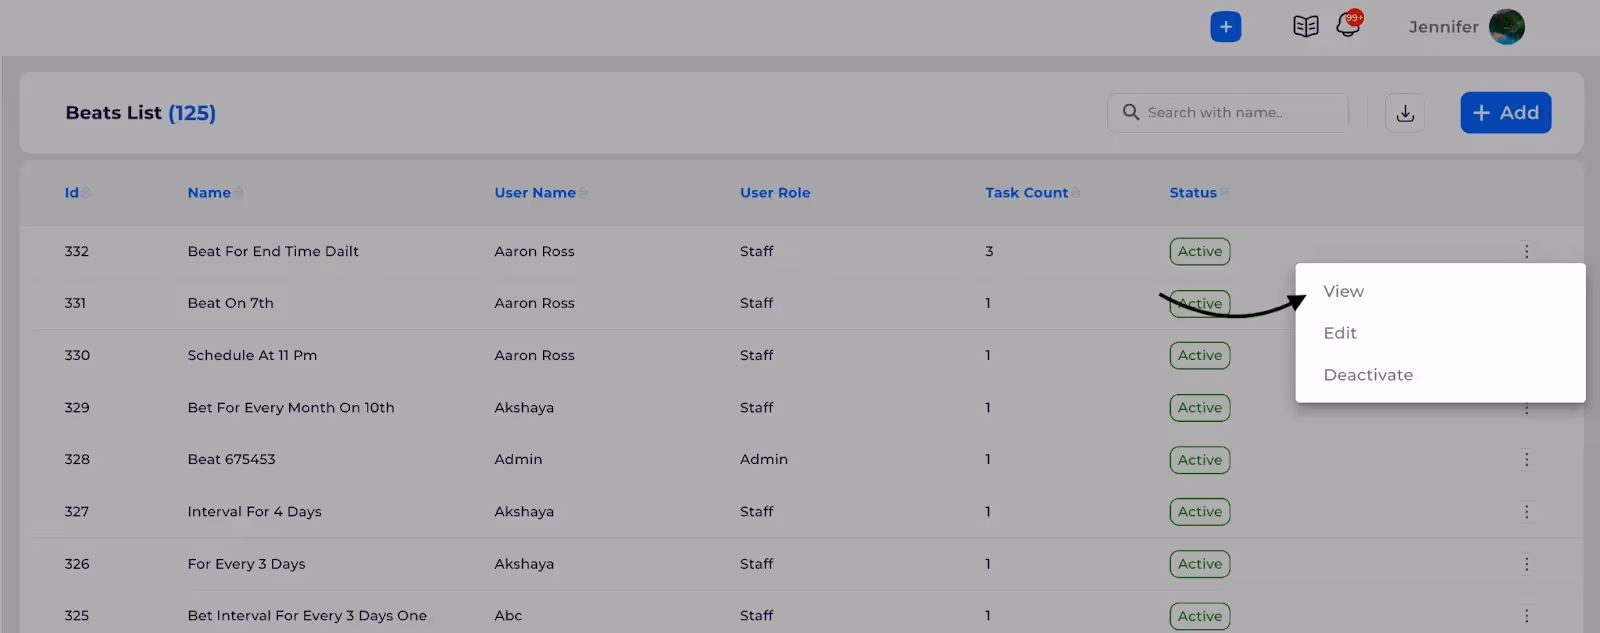
- On clicking the VIEW button, the beat details along with the tasks associated with the beat are shown.
In Beat details there are two sections:
- First one is Beat Details, which shows the schedule related information which is used to create the beat.

- Second one is Tasks, this shows the list of tasks associated with the beat.

- Deleting a task from the beat is done here.
- The delete button associated with each of the activity will help to delete the activity.
- On clicking the Delete icon show below

- This will ask for a confirmation before deleting the activity permanently from the beat.

- Deleting a task from beat will not affect the already completed tasks but will not create the new tasks after deleting.
How to Access Beats
Step by Step guide to access beats
Adding New Beat
Beats refer to recurring schedules or patterns used to manage tasks or activities, often in sales and service contexts.
Schedules: A separate section for accessing and managing schedules.
- Beats are similar to schedules, but a beat can be assigned to a single user unlike schedules.
You can create a beat, in two different ways.
In your Thriwin account in side navbar, navigate to channels > others > beats.
Creating a beat in beats section
In your Thriwin account in side navbar, navigate to channels > others > beats.
- Adding a new beat is creating a schedule as required and adding tasks in the beat.
- On clicking the ADD button we can add a new beat.

- On clicking the ADD button, the screen will be navigated to beat addition which consists of two sections.
- First one is schedule information for the beat.

- In this section the schedule information is taken, the summary of the schedule is shown at the end in Summary.
- In the second section the task addition to the beat is done.

- On clicking the Add Task button a popup is opened which takes the task information
- We can add multiple participants at a time to create activities with all the participants.
- We can use LISTS here.
- On selecting lists from entities and selecting a required list in participants will create the activity individually with all the members in the list.

- After clicking on the Add button, all the added tasks will be shown in the Tasks section.

- After all the tasks are listed as above, we can delete a task if not necessary in the beat from here.

- On clicking the delete icon beside every task, a task can be deleted from the beat.
- Before deleting the task a confirmation pop up is shown.
- After adding all the required tasks, clicking on the SUBMIT button creates the beat with the tasks added.
- Beat can be used to schedule different activities to different contacts / companies
Creating a beat by configuring schedule
- Add and configure a schedule or configure an existing schedule.
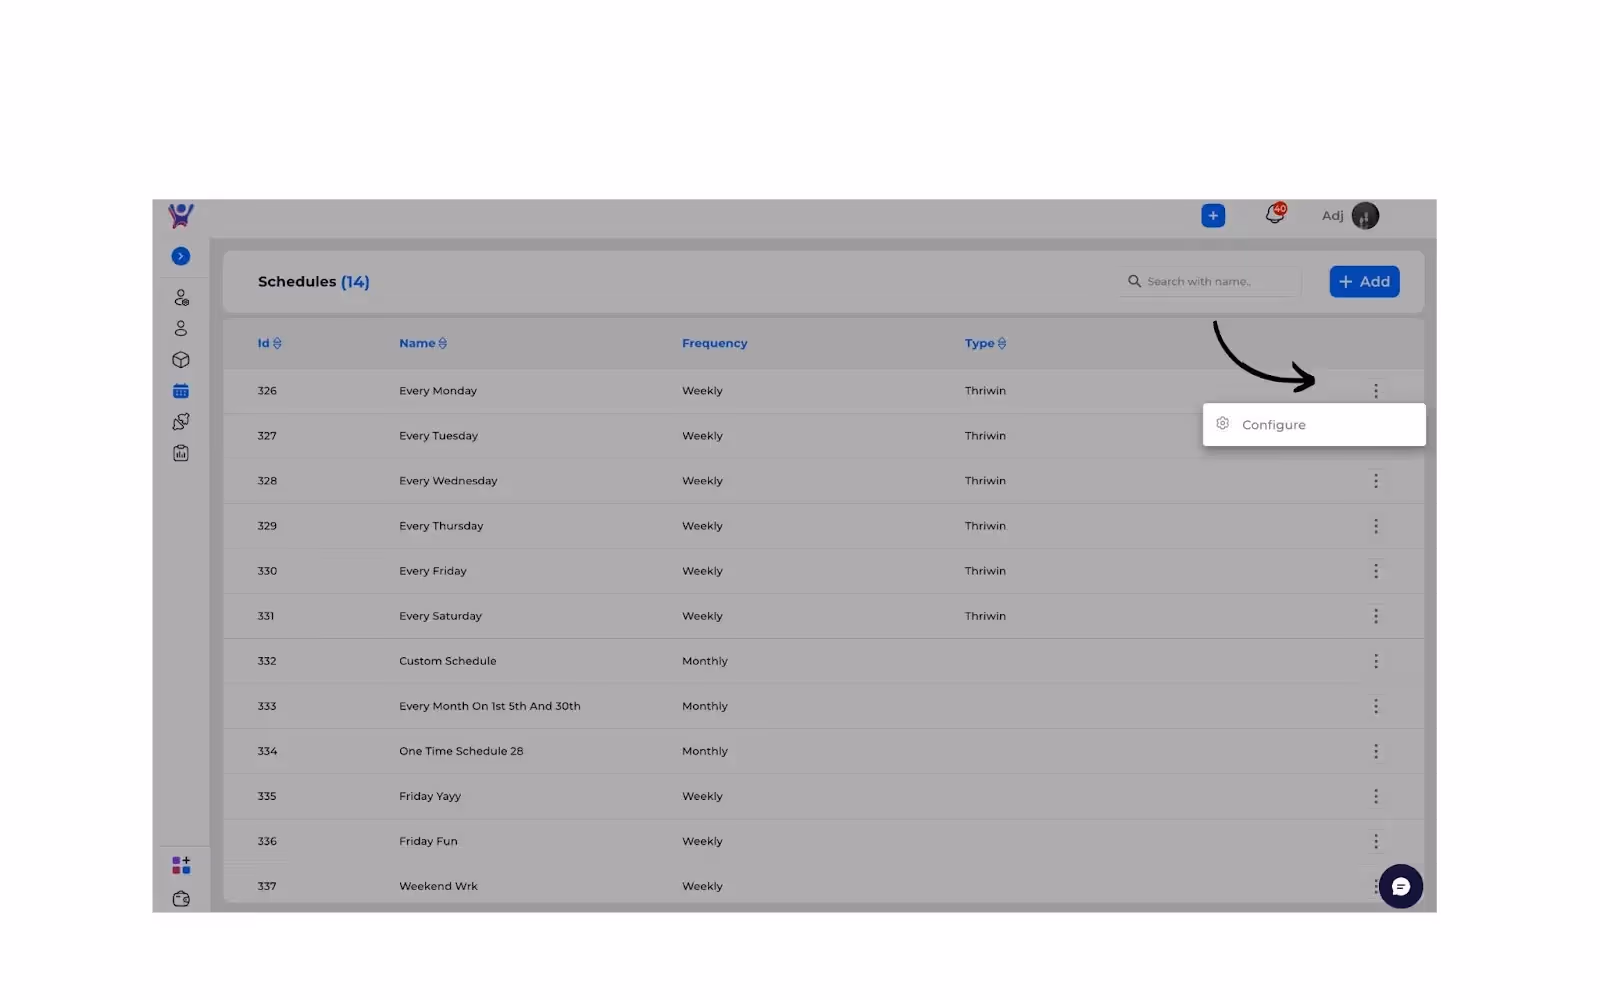
- Now as we are directly configuring a schedule we can skip schedule section and add tasks as said in the first approach.
Note: You cannot assign duplicate i.e.; same activity and same entity like company or contact to same user for a beat.
Clone Beat
Cloning a Beat copies its tasks to today's timeline, allowing for quick replication of activities scheduled for a future date. This helps streamline task management by automatically adding them to the current day's agenda without re-entering each task manually.
To clone a beat, Click on
in the beat’s row and choose
to clone a beat.
Need More Help?
For further assistance, feel free to contact our support team. Visit our Support Center for detailed help and FAQs.
How to Create a Beat
Creation of a beat made simple - Step by Step Guide
Access Schedule
- Schedules are the defined routines which can be used to create recurring activities.
- The Schedules page shows the list of default and created schedules.
- By default THRIWIN provides 6 schedules which are repeated for every day in a week.

Adding Schedule
- On clicking the ADD button the screen navigates to the schedule screen where we can select the schedule accordingly and submit.

Editing Schedule
- On clicking the edit button in the schedule, which is shown in below.

- The same schedule screen will appear with filled details of the schedule which we are editing.
- We can change the required fields and click SAVE to edit the schedule.

Configuring Schedule
- Configuring a schedule is like editing the schedule if necessary and giving it a required name and adding tasks to that schedule.
- A schedule can be configured with many users.
- With this the tasks get created according to the schedule.
- The settings icon provided for every schedule is for configuring the schedule.

- On clicking the settings icon it navigates to a screen where the schedule information along with task addition is shown.
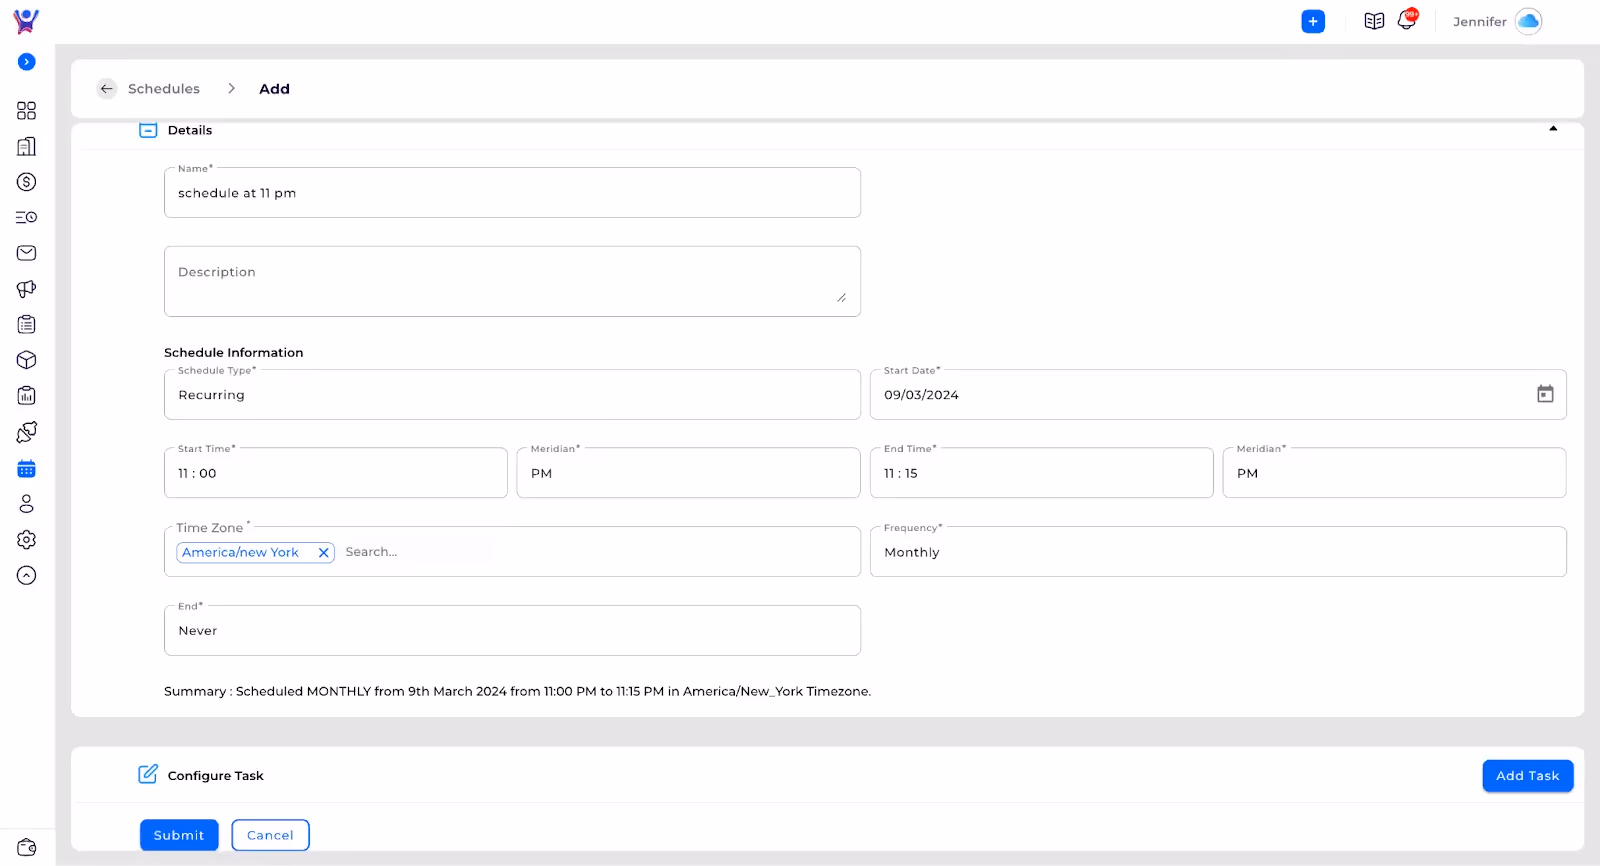
- The schedule can be edited if required.
- On clicking the Add Task button a pop is shown to add required fields to the task.

- After adding the required number of tasks in the schedule, the tasks will be shown like this.

- After adding all the tasks and on clicking SUBMIT, the configuration of the schedule gets completed.
- This will create a new beat in the Beats page and the tasks will get created according to the schedule.
- The scheduled tasks are shown in the TIMELINE accordingly.
Access and Manage Schedule
Right from configuring a schedule to accessing -Step by Step Guide
Mailbox settings
- When you click on the mailbox settings you can see all your integrated mails the mail which you have connected.

- You can also add another mail by clicking on the add button and connect another mail account.
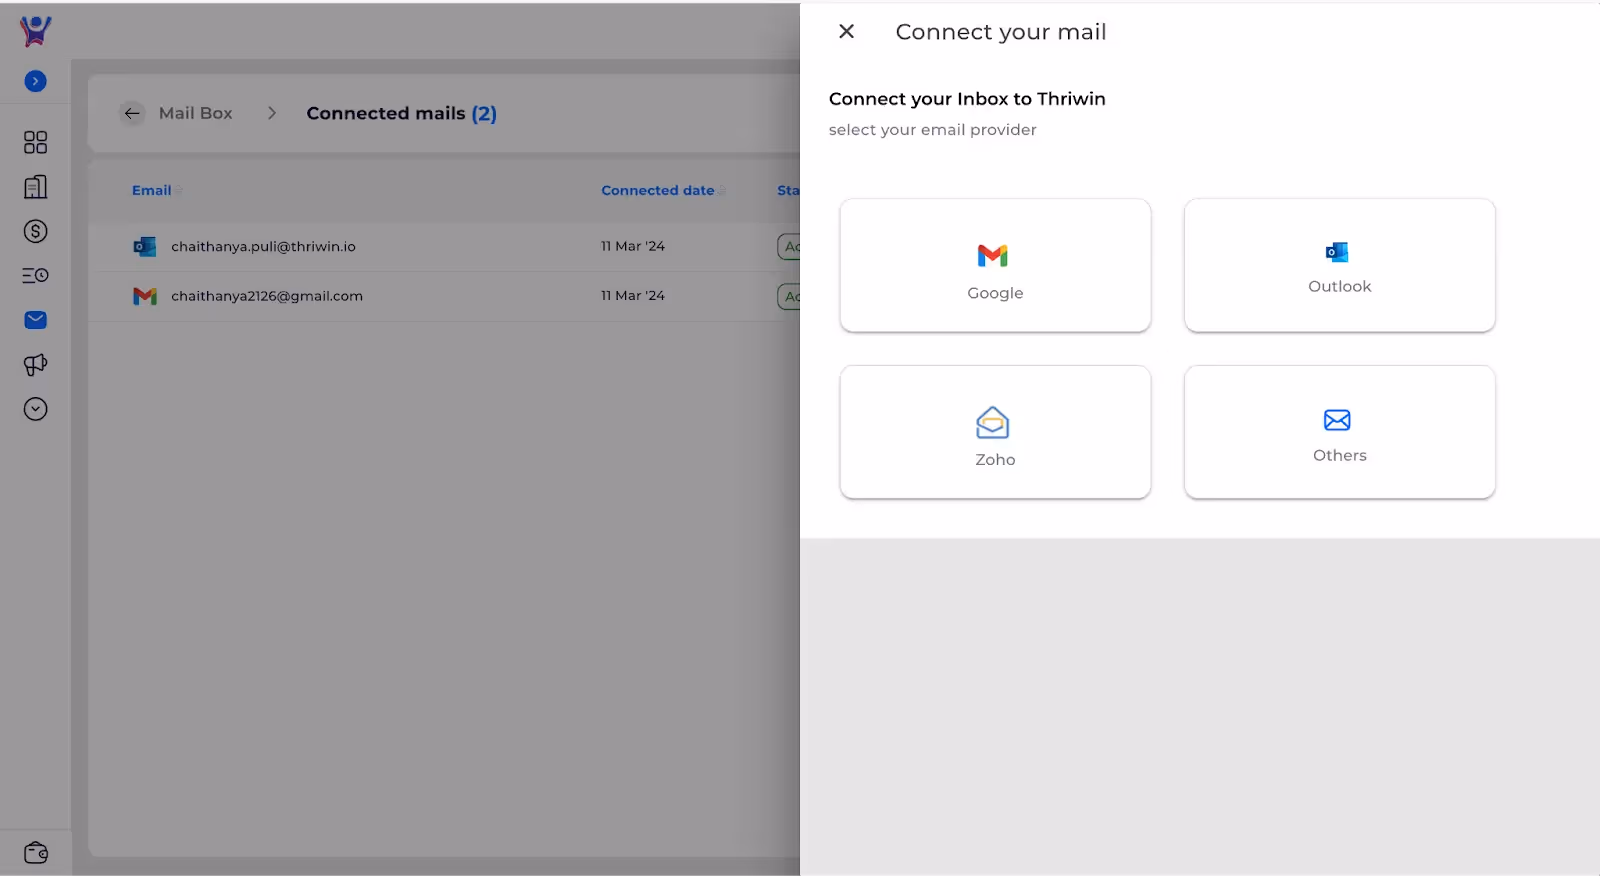
Mail actions
- There are different actions available for each mail you connected.

- When you click on the three dots icon you can see all the actions
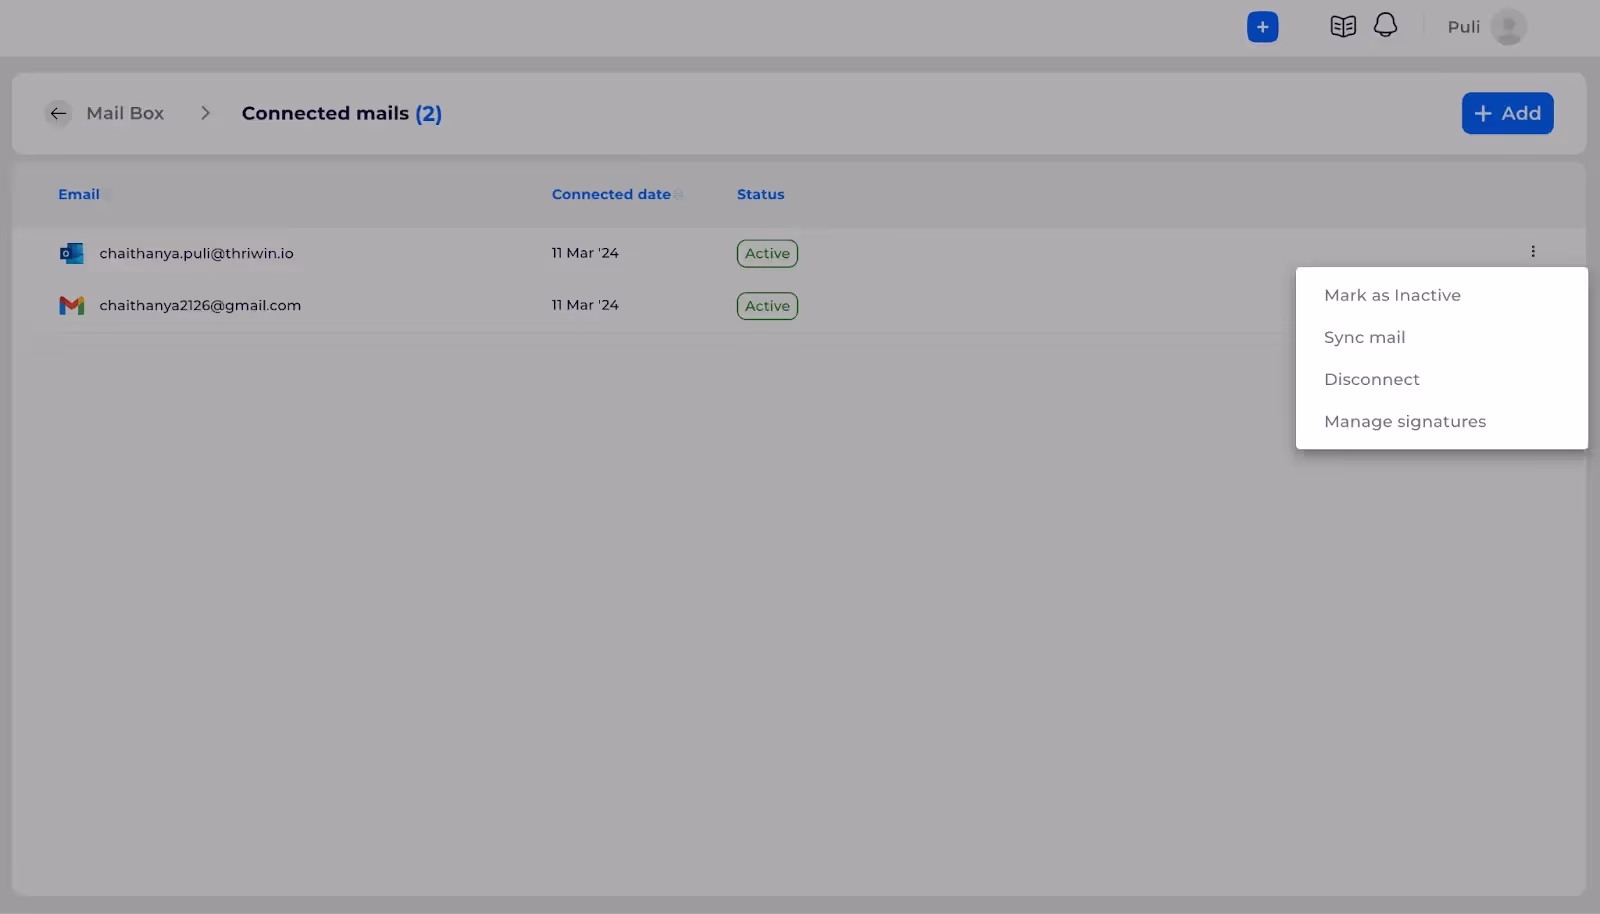
- Mark as Inactive: when you mark the mail as inactive ,you won’t be able to get the replies and messages for the mail you made inactive and you won’t be able to sync the mail.
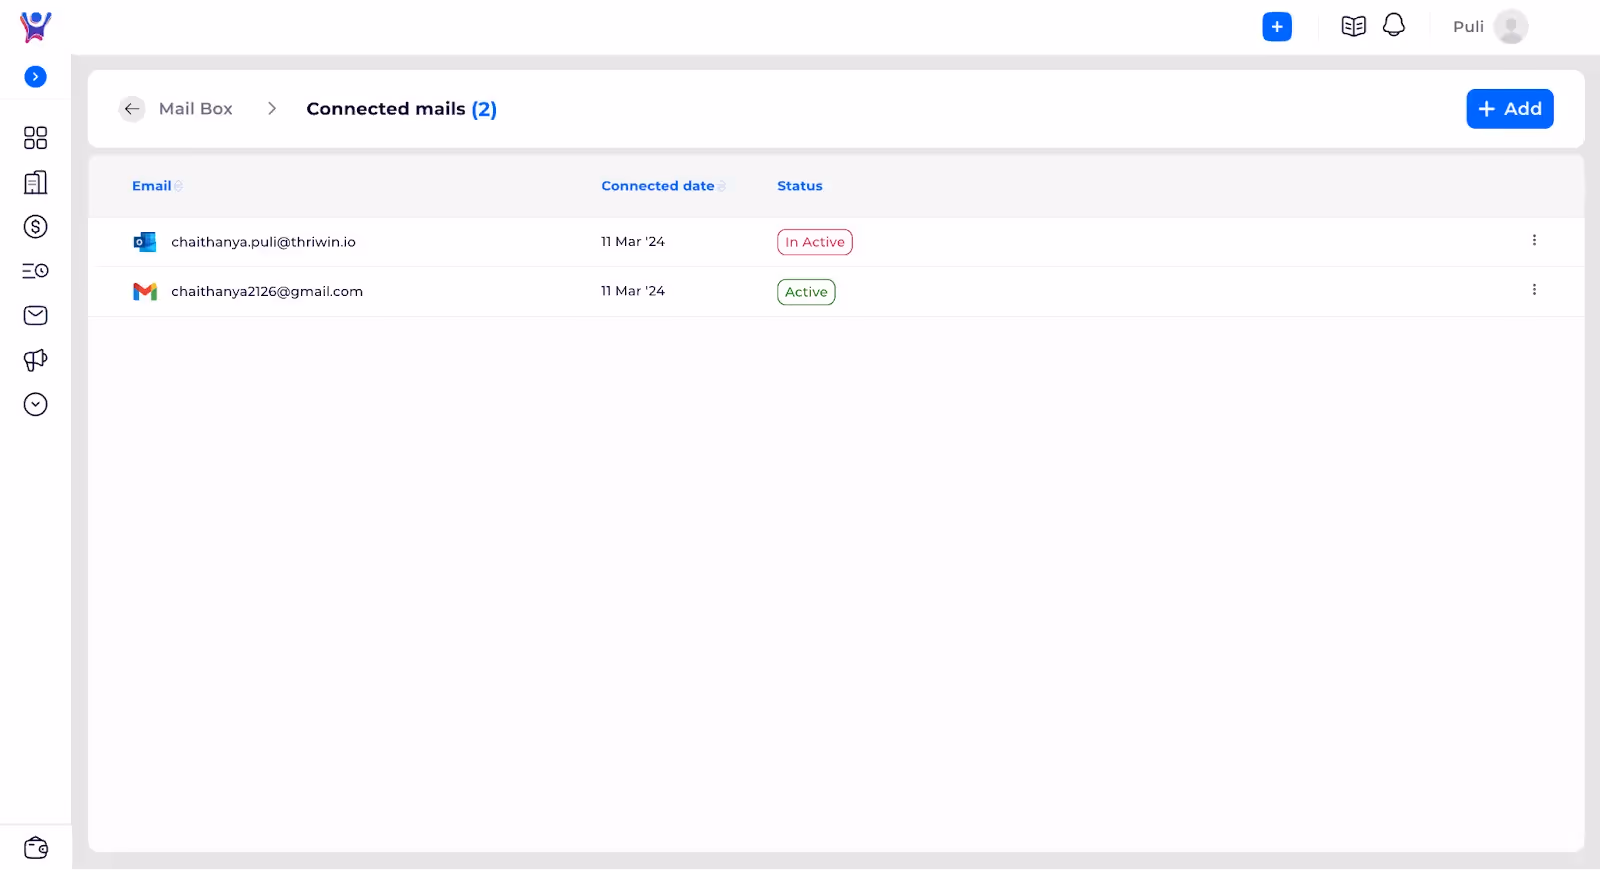
Mail box Settings
Configure your mail box-Clear Step by Step guide
Mailbox Addition
Connect your primary mail-box to view your sales email.
- Purpose: This is a step by step explanation on how to connect your primary mailbox to view all your sales mail in Thriwin.
Step-by-Step Instructions
Navigating to mails
- You can navigate to the mails page by clicking on Sales CRM then mails.


Selecting email provider
- Description: Select the provider of your email and login to give Thriwin access to your emails so that they can be logged and viewed in the system.

- Eg:- For instance if your email provider is outlook click on the outlook option as shown above.
Viewing connected mail
- Description: After completing the login process your mailbox will be added and any new mail from your leads or users will show up from now onwards.

- As seen in the above screenshot you can click the icon and view which email was connected. The connected email is displayed as in the screenshot below.

Alternative option of connecting “Others”
- Description: Alternatively if you want to connect any email not from the available providers you can click on the “Others” option as shown below.

- Description: It should open up a form as shown below.
- Image(1):
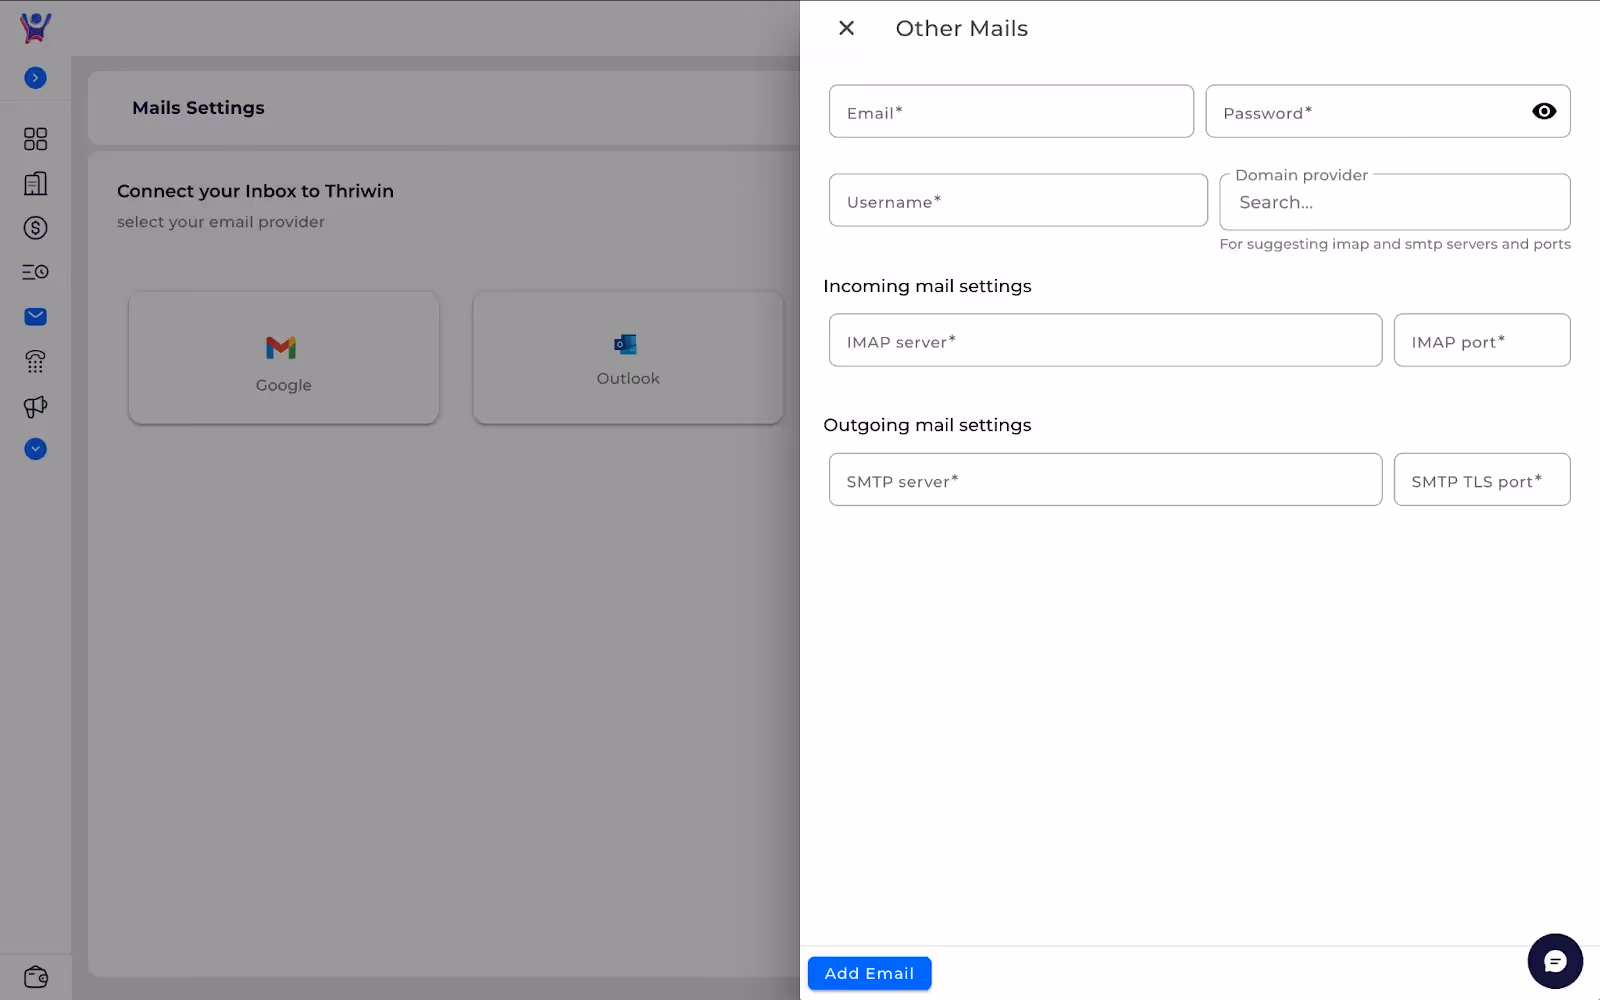
- Image(2):

- Description: The form fields in the above forms are respectively:-some text
- Email - The email which you wish to connect
- Password - The IMAP password generated for the above email.
- Username - The user’s name.
- Domain Provider(optional) - In Image(2) you can choose any of the popular Other domain providers if applicable to you, it will automatically fill the remaining fields for you.
- IMAP Server - The IMAP server details for your email provider.(eg: - for Yahoo it is imap.mail.yahoo.com)
- IMAP port - Port number for your IMAP server. (Most commonly 993)
- SMTP Server - The SMTP server details for your email provider.(eg: - for Yahoo it is smtp.mail.yahoo.com)
- SMTP TLS port - TLS port number for your SMTP server.(Most commonly 587)
FAQs
- Question 1: How can I disconnect my email?
- Answer: Click on Profile Icon > Disconnect as shown in screenshot below.
- Answer: Click on Profile Icon > Disconnect as shown in screenshot below.

Need More Help?
- Contact Support: For further queries, reach out to our Support Team.
Mailbox Addition
Step by Step guide to add mailbox
How to Sync Mails
- You can use the sync option as shown in the screenshot below to sync the contents of the mailbox immediately. Although there is a default sync for every 15 mins you can do this operation to sync your mailbox immediately.
- When you click on sync mail you will receive all the replies, messages from the mails you connected. Any incoming emails will show up as an unread email with a blue dot to the right of the email.

What messages will be pulled?
- Replies for emails that you have sent.
- Emails you have sent to your contacts or users across the tenant from the respective email client.
- Emails that any of your contact or user across the tenant has sent you and you are part of the message, i.e. recipient, Cc or Bcc.
How to Sync Mails
step by step guide to sync mails
Following a thread
- Below screen is the default look of your mailbox.
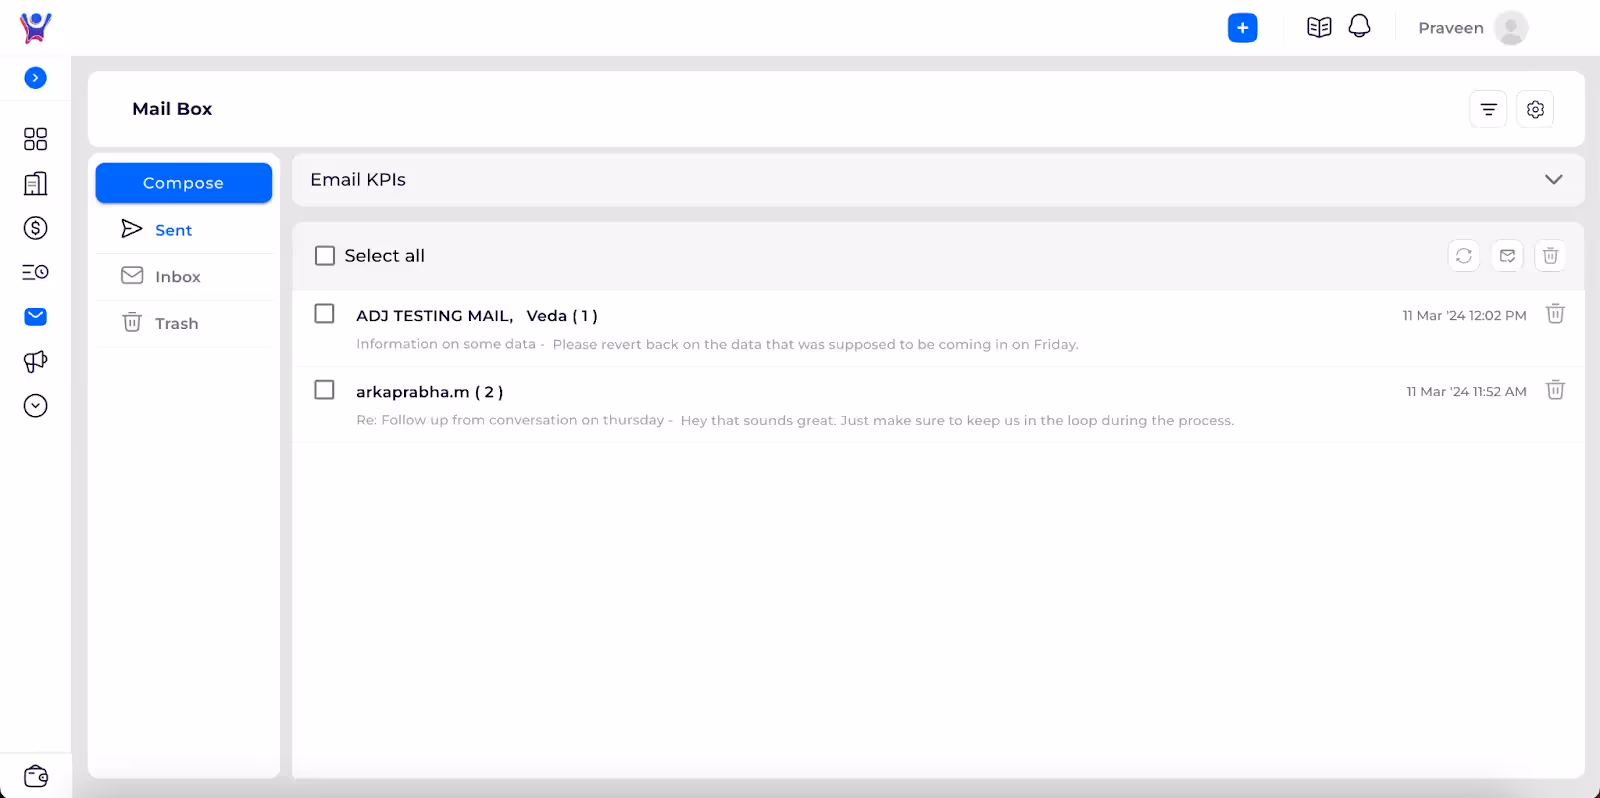
-

- The options in this screen are as follows.
- Sent - All the emails that you have sent will show up in this tab, the unread emails will be denoted with a blue indicator on the right.
- Inbox - All the emails that you have received will show up in this tab, the unread emails will be denoted with a blue indicator on the right.
- Trash - The emails that you have manually moved to trash in the CRM portal will display in the trash tab.
- Sync - The refresh icon to the right of the screen is used to sync the mailboxes, which will pull any new email you might’ve received and send you a notification.
- Mark Read - The icon next to sync can be used to mark any email as read. You can check any number of emails and click this button to mark them as read.
- Trash - The icon next to mark read can be used to move emails to trash. You can check any number of emails and click this button to move them to Trash.
- Filter - The filter on the top right corner of the screen can be used to filter the emails based on your connected mailboxes.
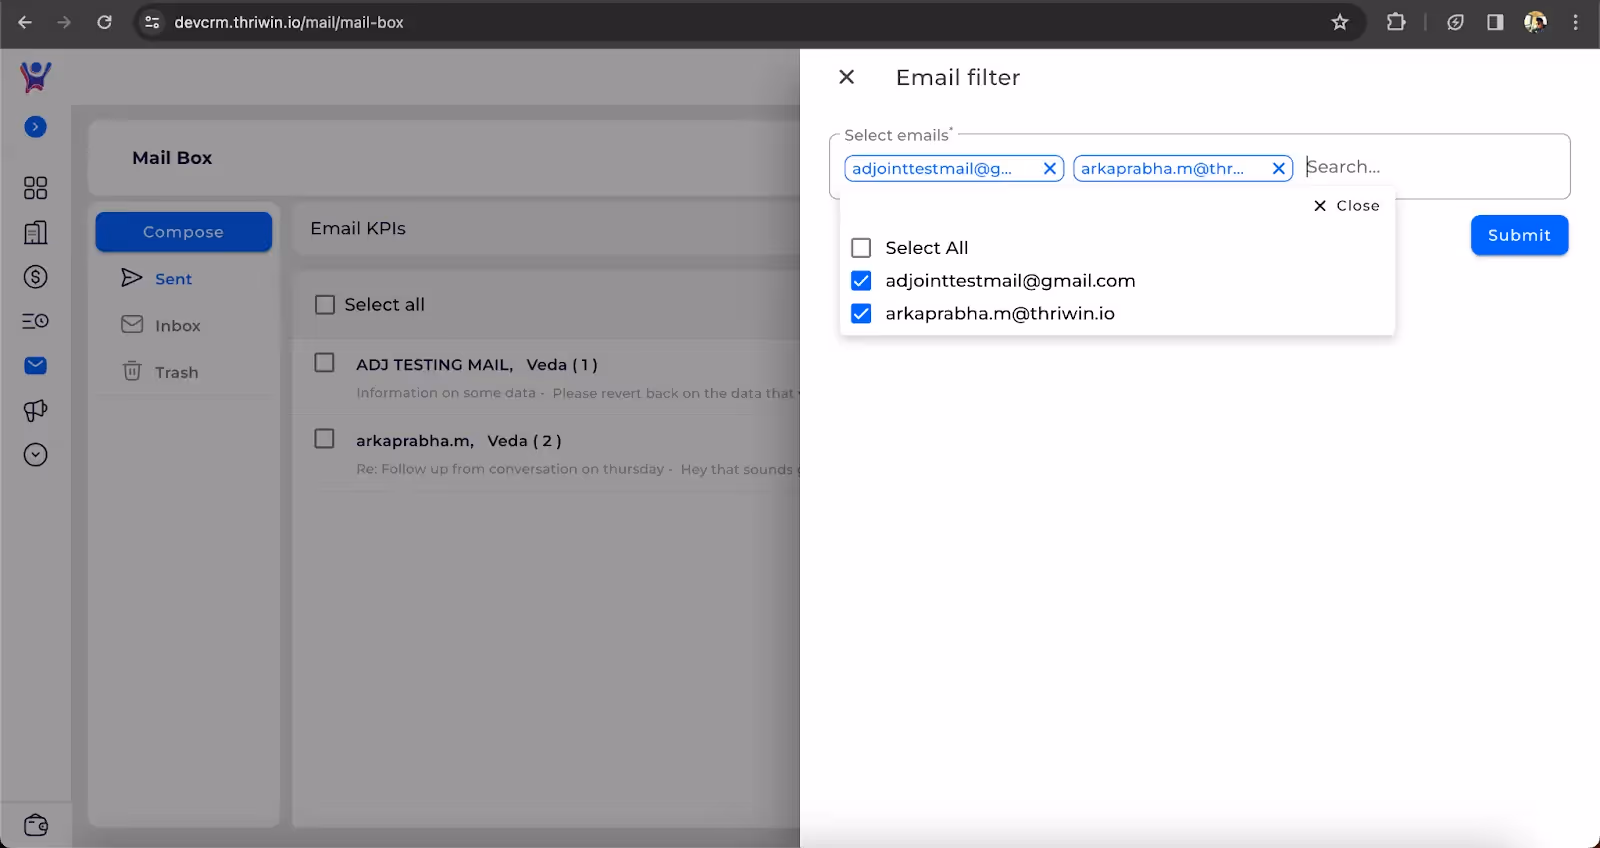
- Settings - The mail settings button is just next to the filter icon will open the settings page which has been discussed in detail here.
Reply to a Mail
- Now let’s look at the message details in a thread as shown in the screenshot below.
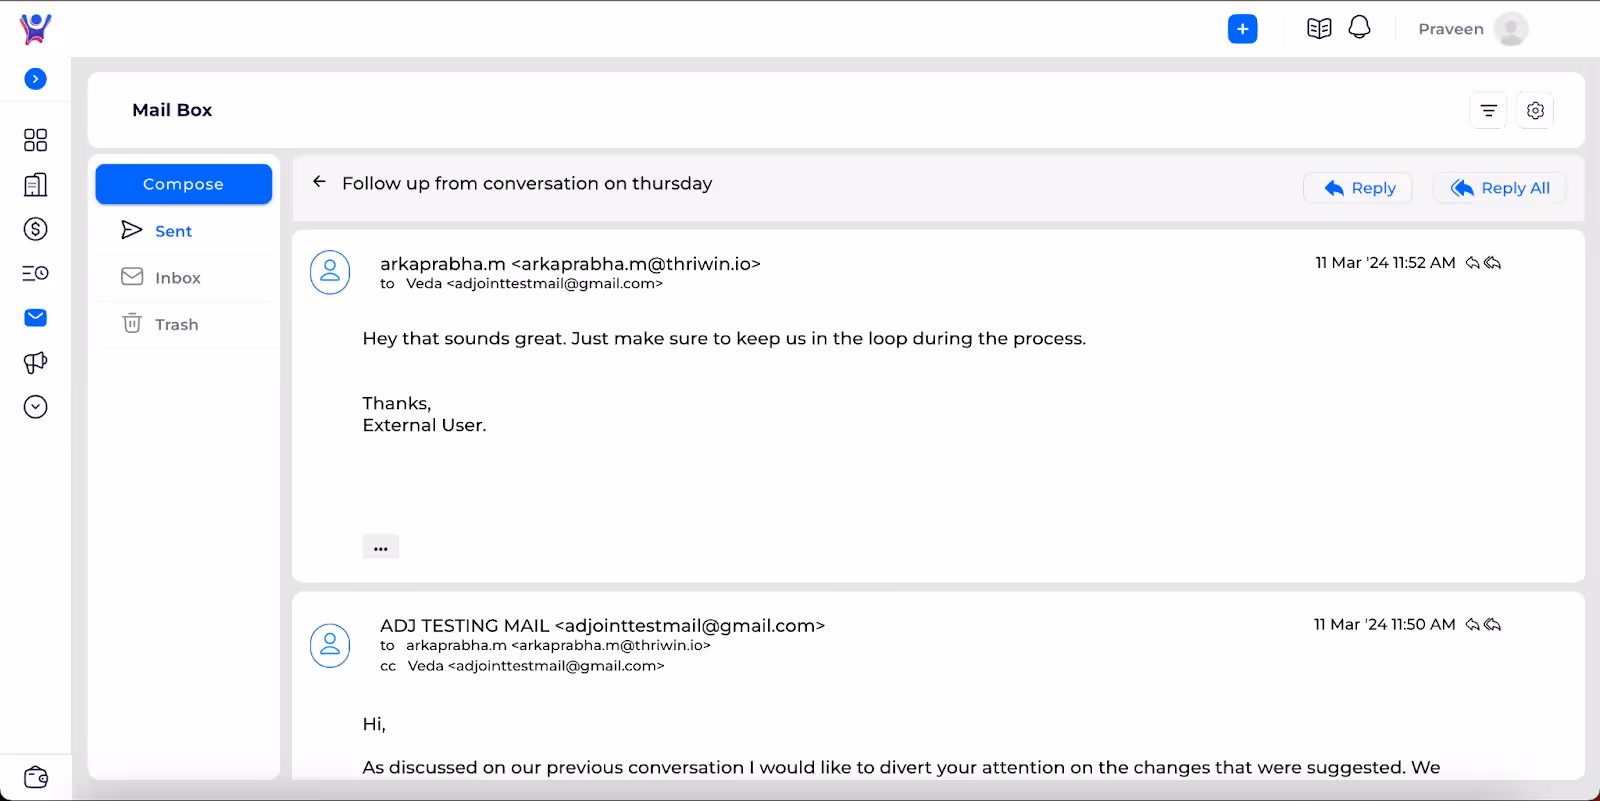
- The mails in a thread appear in descending order, that is the recent mail is shown on top followed by older mails. The “Subject” of the email is shown on top and next to it you can reply or reply all to the last mail by clicking on the arrow buttons in blue. Alternatively you can reply or reply all to individual mails by clicking the arrow icons next to the email.

- Reply - Replying to only the sender of an email.
- Reply All - Replying to all participants including Cc users but not Bcc users.
Following a Thread
from navigation to replying a mail-we got you covered everything
How to Compose an Email
Compose an email and send it to contacts and users for sales.
- Purpose: This is a step by step explanation on how to compose an email and send it to the respective contact or users in Thriwin.
Step-by-Step Instructions
Start Composing
- There are multiple ways to start composing an email as shown in the screenshots below.

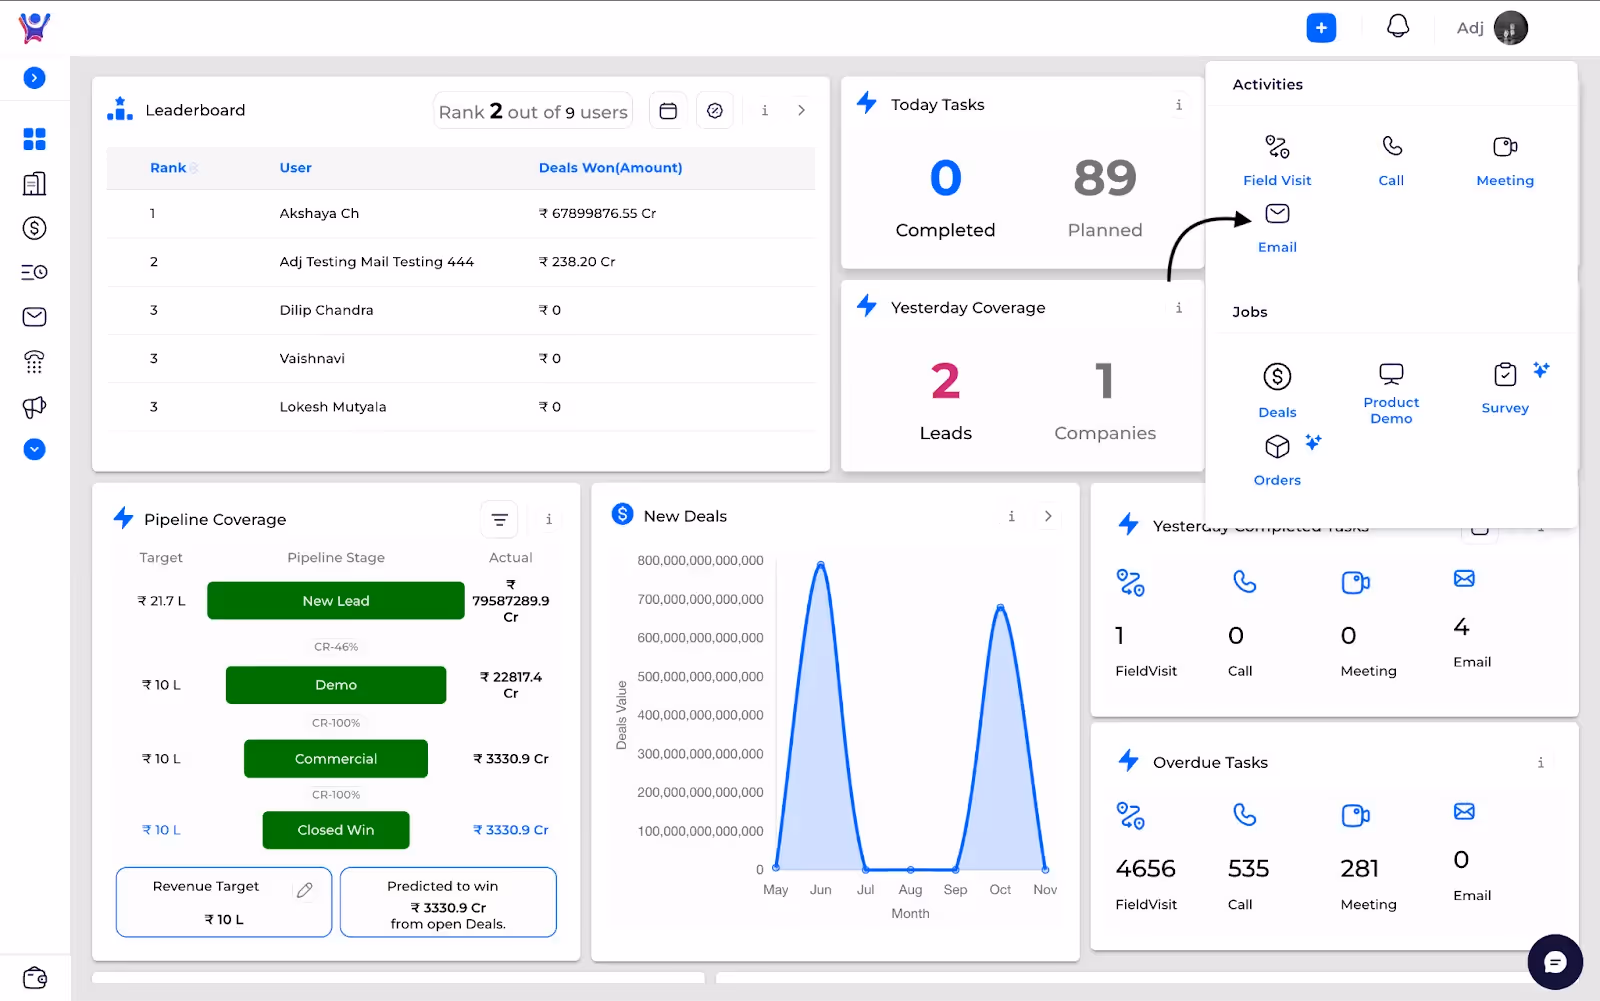
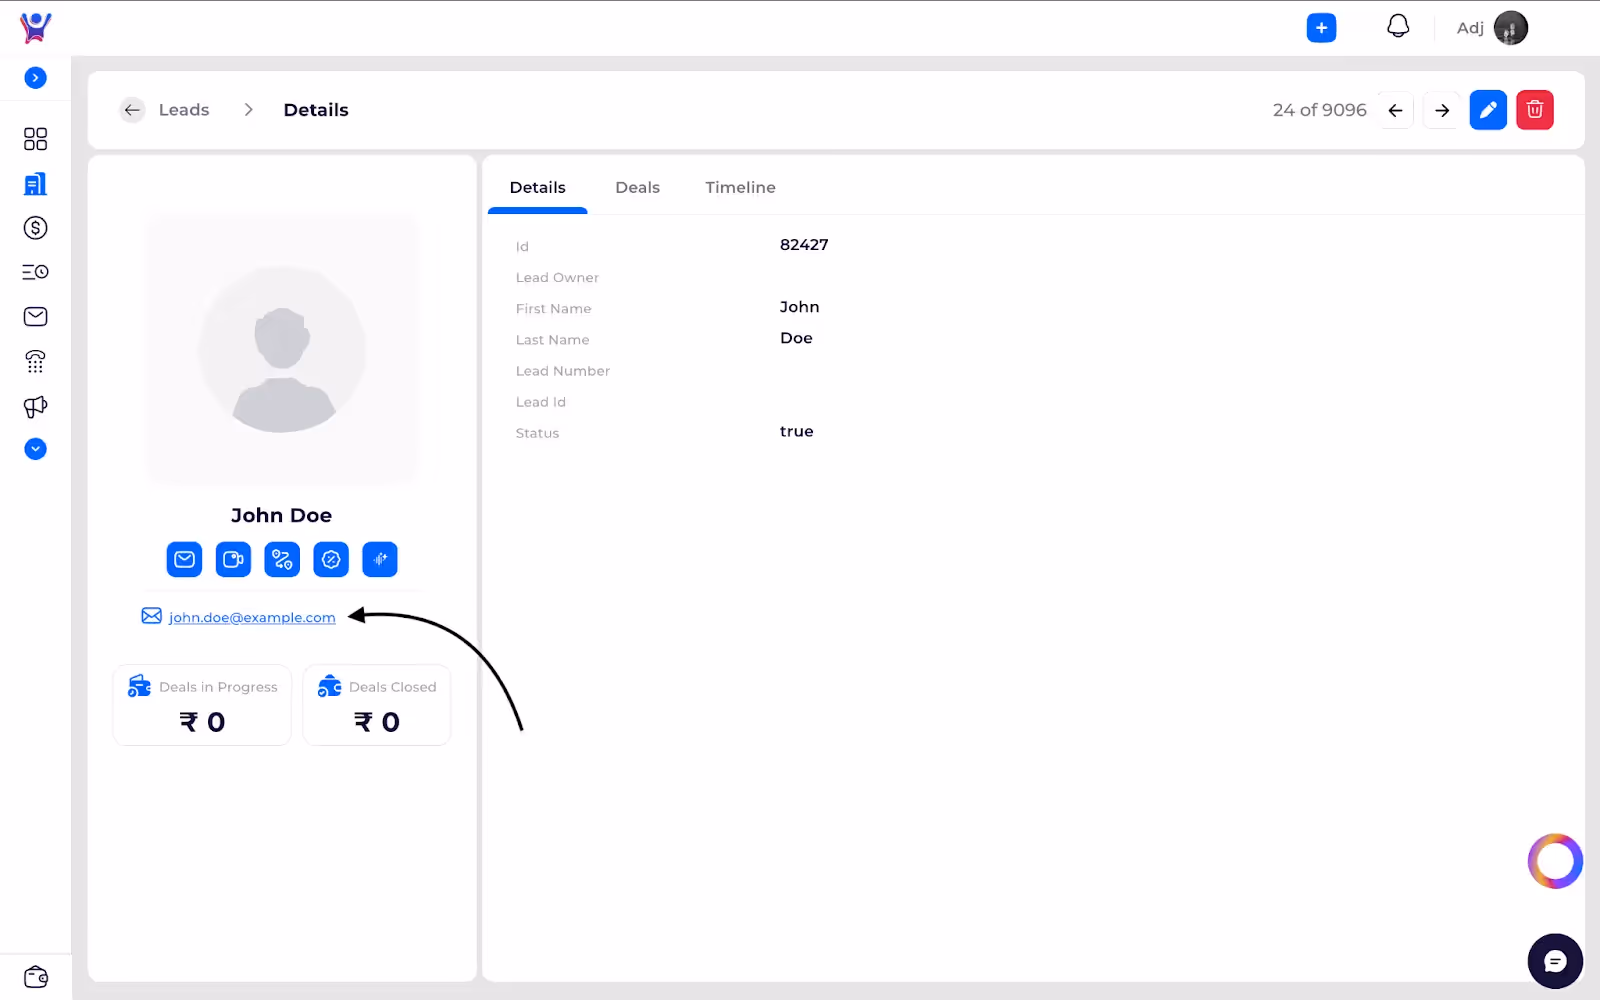
Email Form
- On starting to compose it should show the email creation form as shown in the below screenshot

Email fields
This is a description of all the fields in the above email form.
- From - The email you have connected and the email-id from which mail will be sent from.
- To - Search with the user name and email across all contacts and users and select whom you want to send the mail to.
- Cc(optional) - Search with the user name and email across all contacts and users and select whom you want to send the mail as cc.
- Bcc(optional) - Search with the user name and email across all contacts and users and select whom you want to send the mail as bcc.
- Subject - Here you can enter the subject of the email. Please note it is a mandatory field.
- Body - Here you can enter the body of the email and can also use formatting accordingly.
- Paperclip Icon - To insert attachments to your email. Added attachment is shown as below and can be removed by clicking the close at the end of the attachment.

.
- Mail suggestions icon - The icon after the paper clip icon shows a popup that shows AI generated mail suggestions as seen in the image below. You can update the Email Objective, Tones and emotions and Reply Length from a set of options to generate a response. You can use the generated response by clicking insert response or regenerate another response if it is not to your liking

- Signatures Icon - The signatures icon shows the set of signatures available for the connected email in Thriwin. For example in the below screenshot Thriwin Signature is selected and is seen in the body.
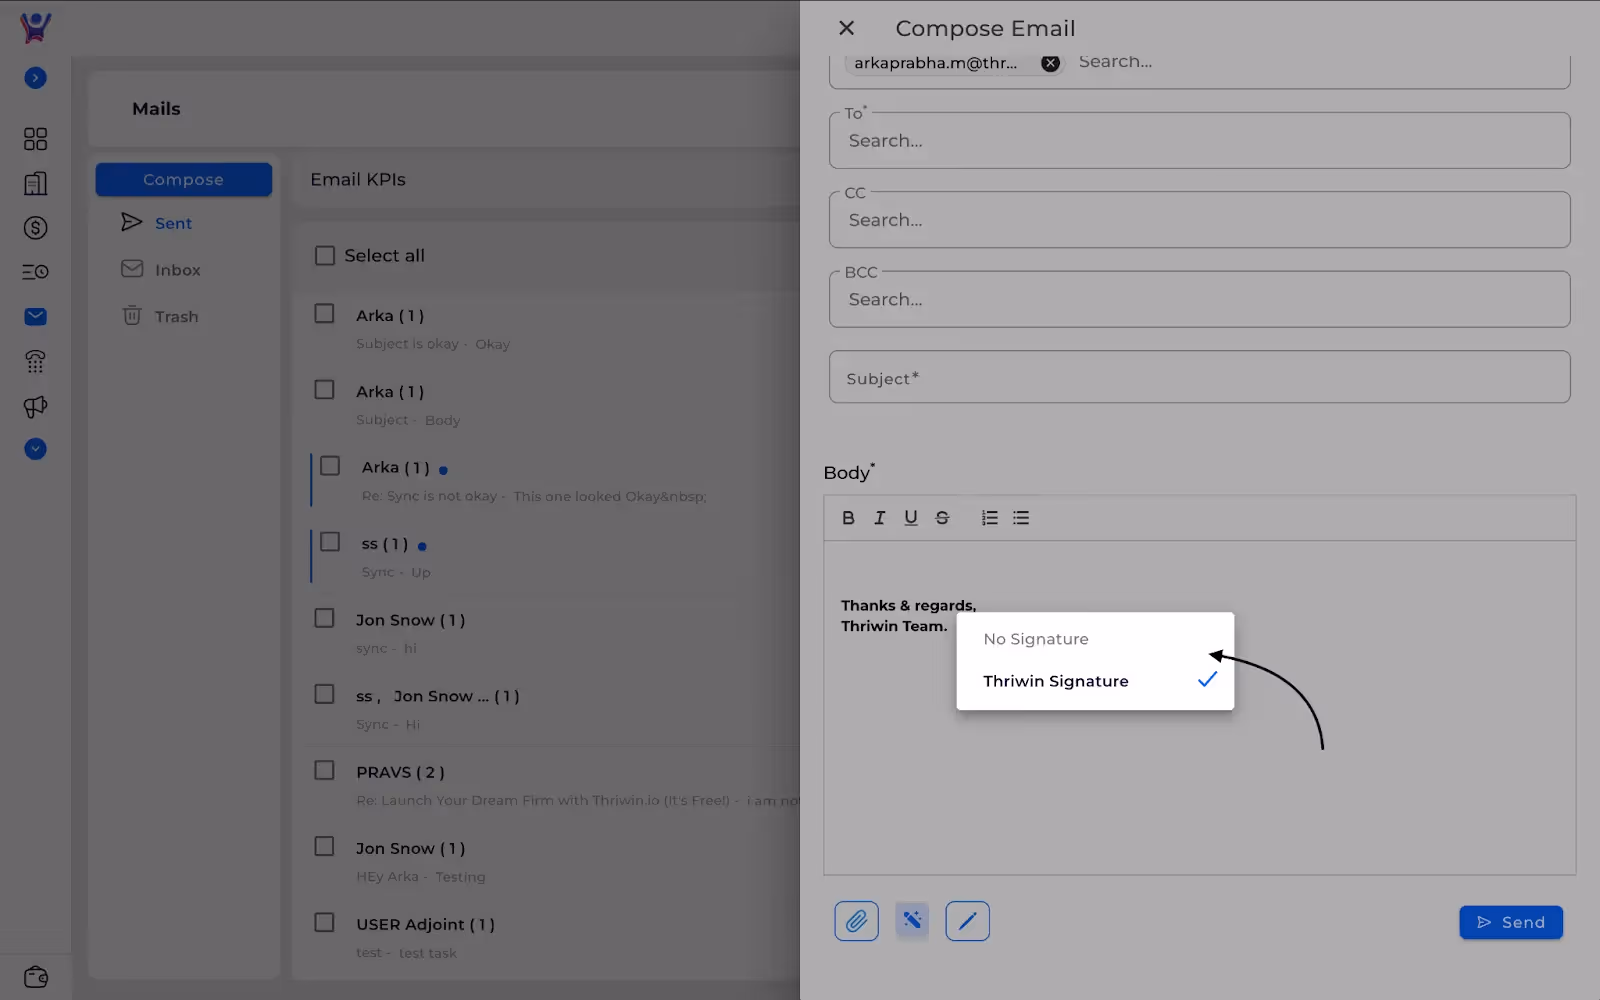
- Send Button - This button will send the email based on the fields you have entered.
FAQs
- Question 1: Can I send an email to someone who is not a contact or a user in Thriwin?
- Answer: Yes, just type the email-id of the person in the “To” field and press enter the email will be auto selected.
- Question 2: Why can I not see any signatures?
- Answer: Signatures are by default shown from Thriwin platform and needs to be added in Thriwin separately. We do not import existing signatures that have been added to your mail provider on their website.
Need More Help?
- Contact Support: For further queries, reach out to our Support Team.
How to Compose an Email
Step by Step Guide
Apply Filter
- Click on the filter icon, which is present at top, right side.

- Now, fill the fields with which you want to filter the list.
- Click on Apply.
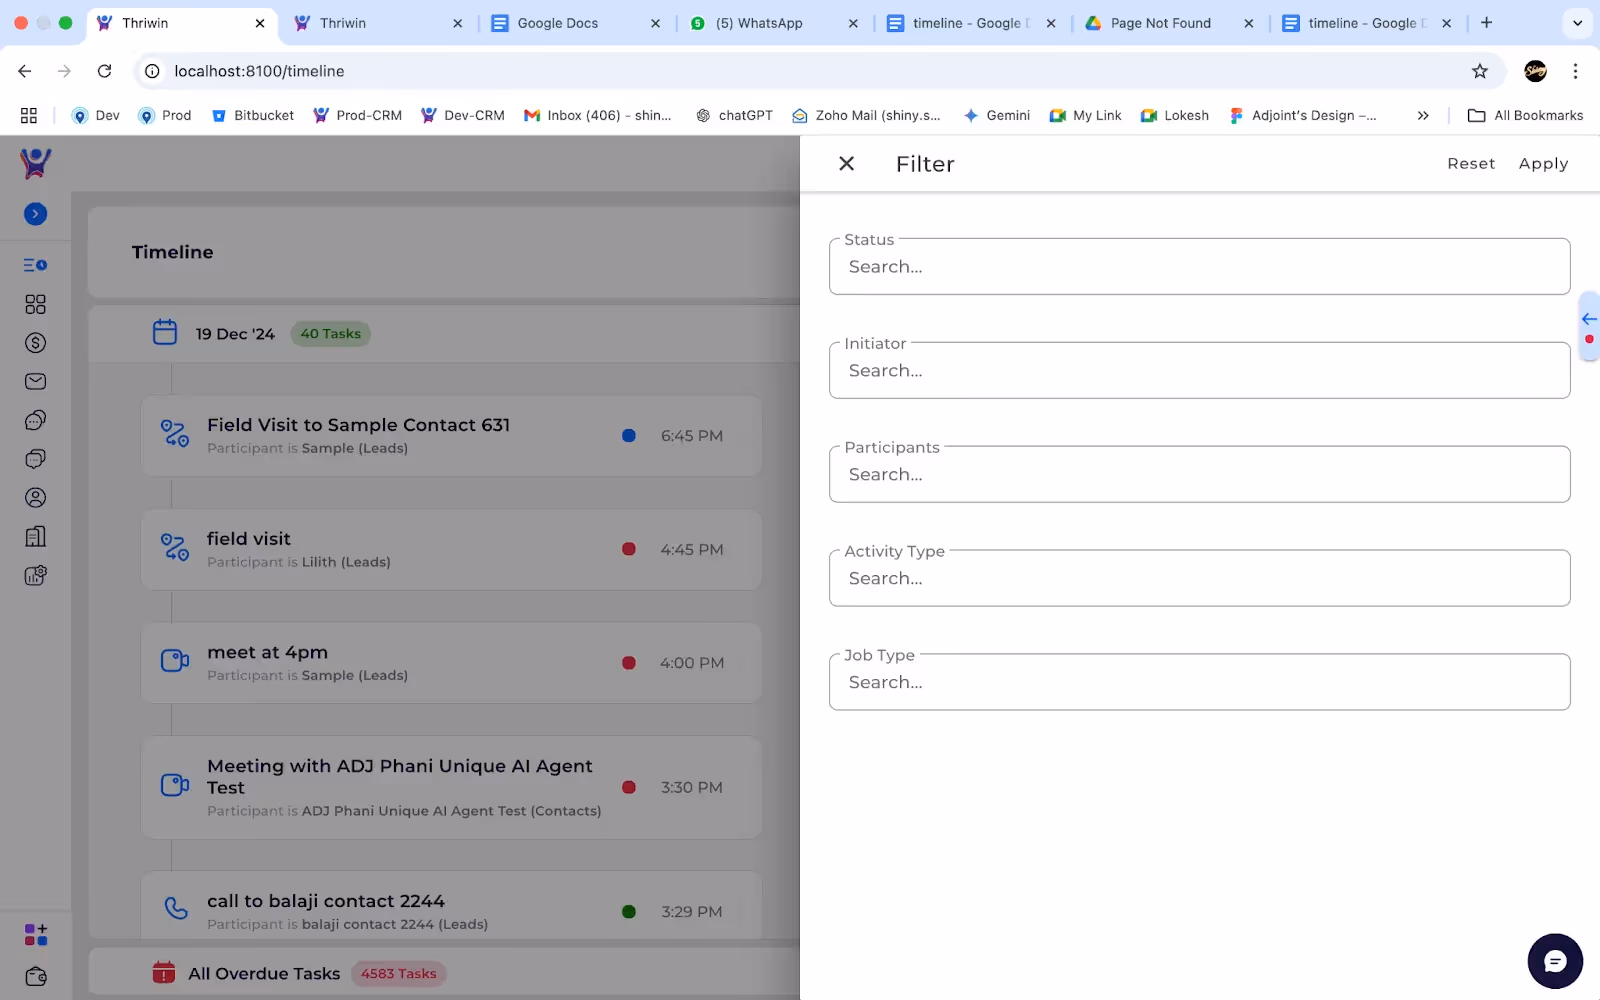
Filter Timeline
viewing specific data made easy
Timeline Overview
This article explains the Timeline feature, which provides a comprehensive view of all platform activities and their current status. It is designed for users who need to track and manage their tasks efficiently.
Today's Tasks Section
The primary section displays all tasks scheduled for the current day, organized chronologically by their scheduled or completion time.
- Tasks are displayed regardless of their status.
- Chronological organization based on scheduling and completion times.
- Real-time status updates for all activities.
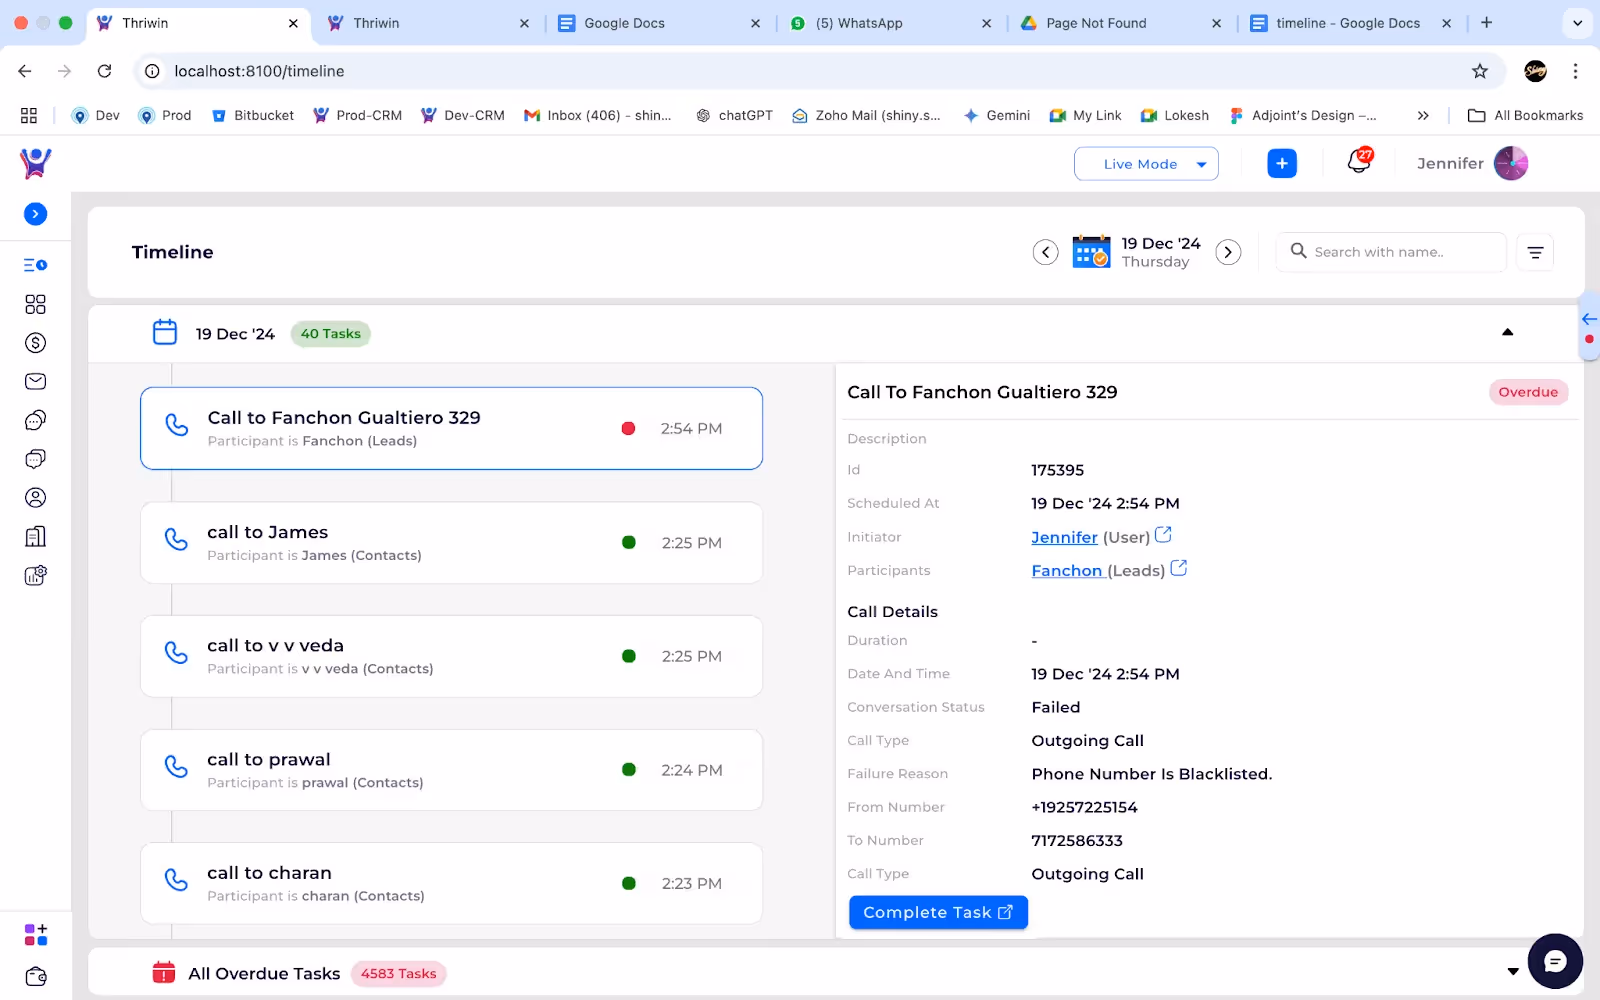
Overdue Tasks Section
This section maintains a comprehensive record of all overdue tasks since the user's platform enrollment.
- Chronological display of incomplete tasks.
- Historical tracking from user's registration date.
- Automatic categorization of pending tasks.
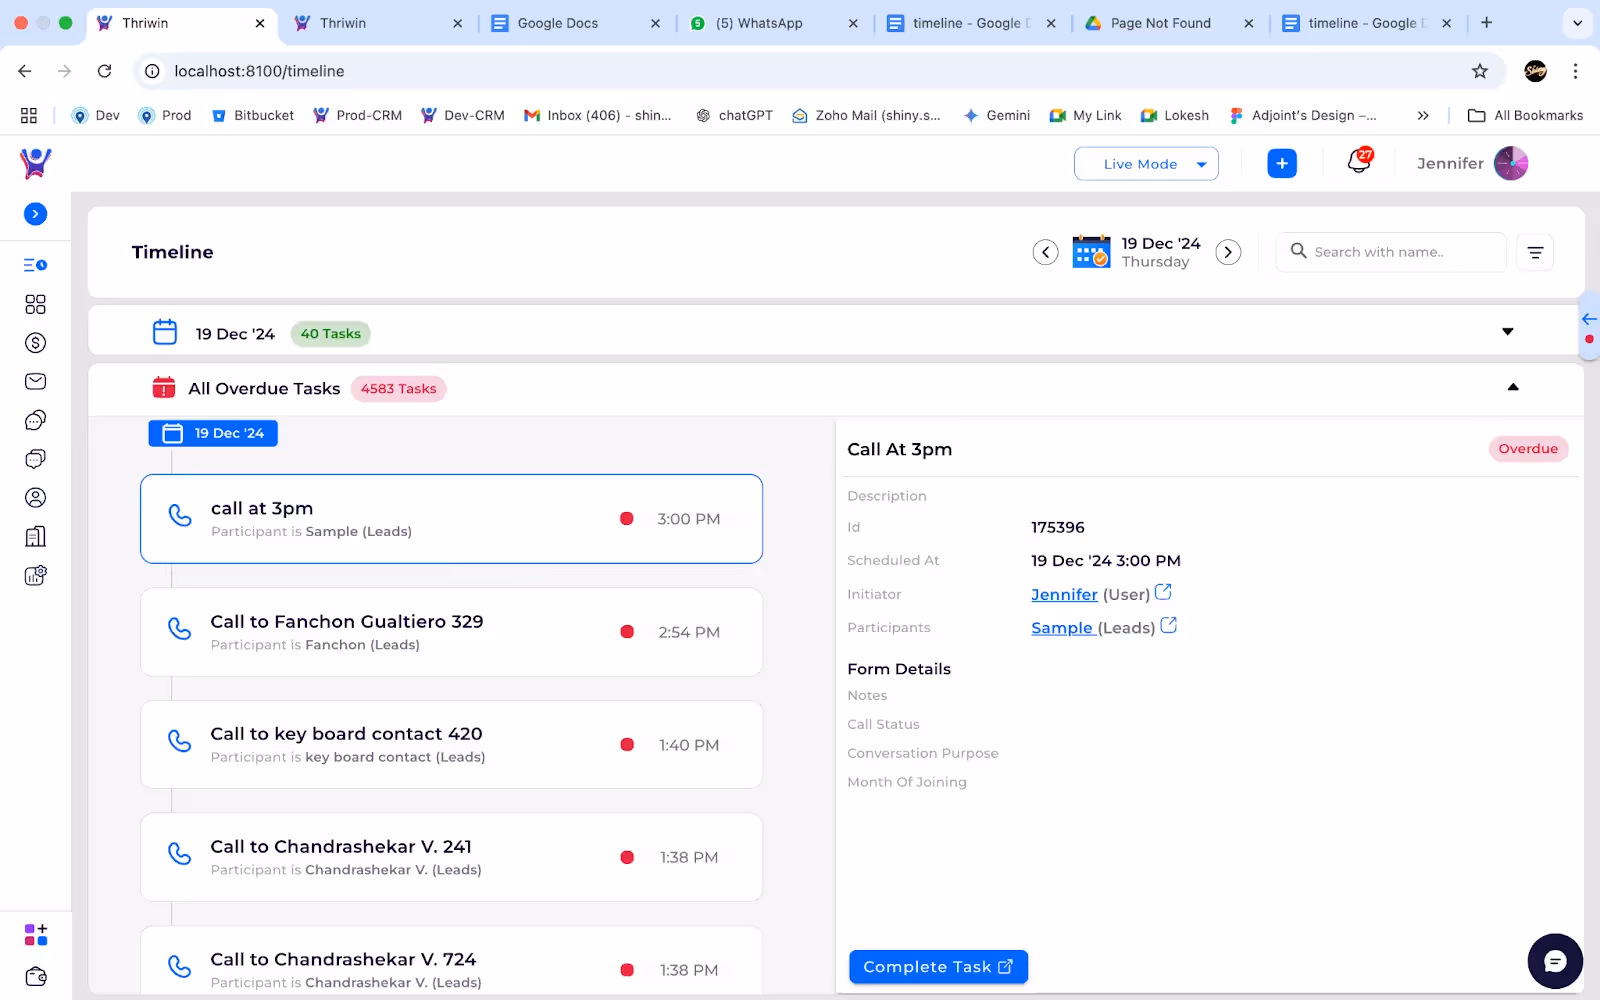
Navigation and Filtering
Calendar Navigation
Users can utilize the integrated calendar feature to view tasks for specific dates.
- Calendar selection affects only the Today's Tasks section.
- Overdue section remains unchanged by calendar navigation.
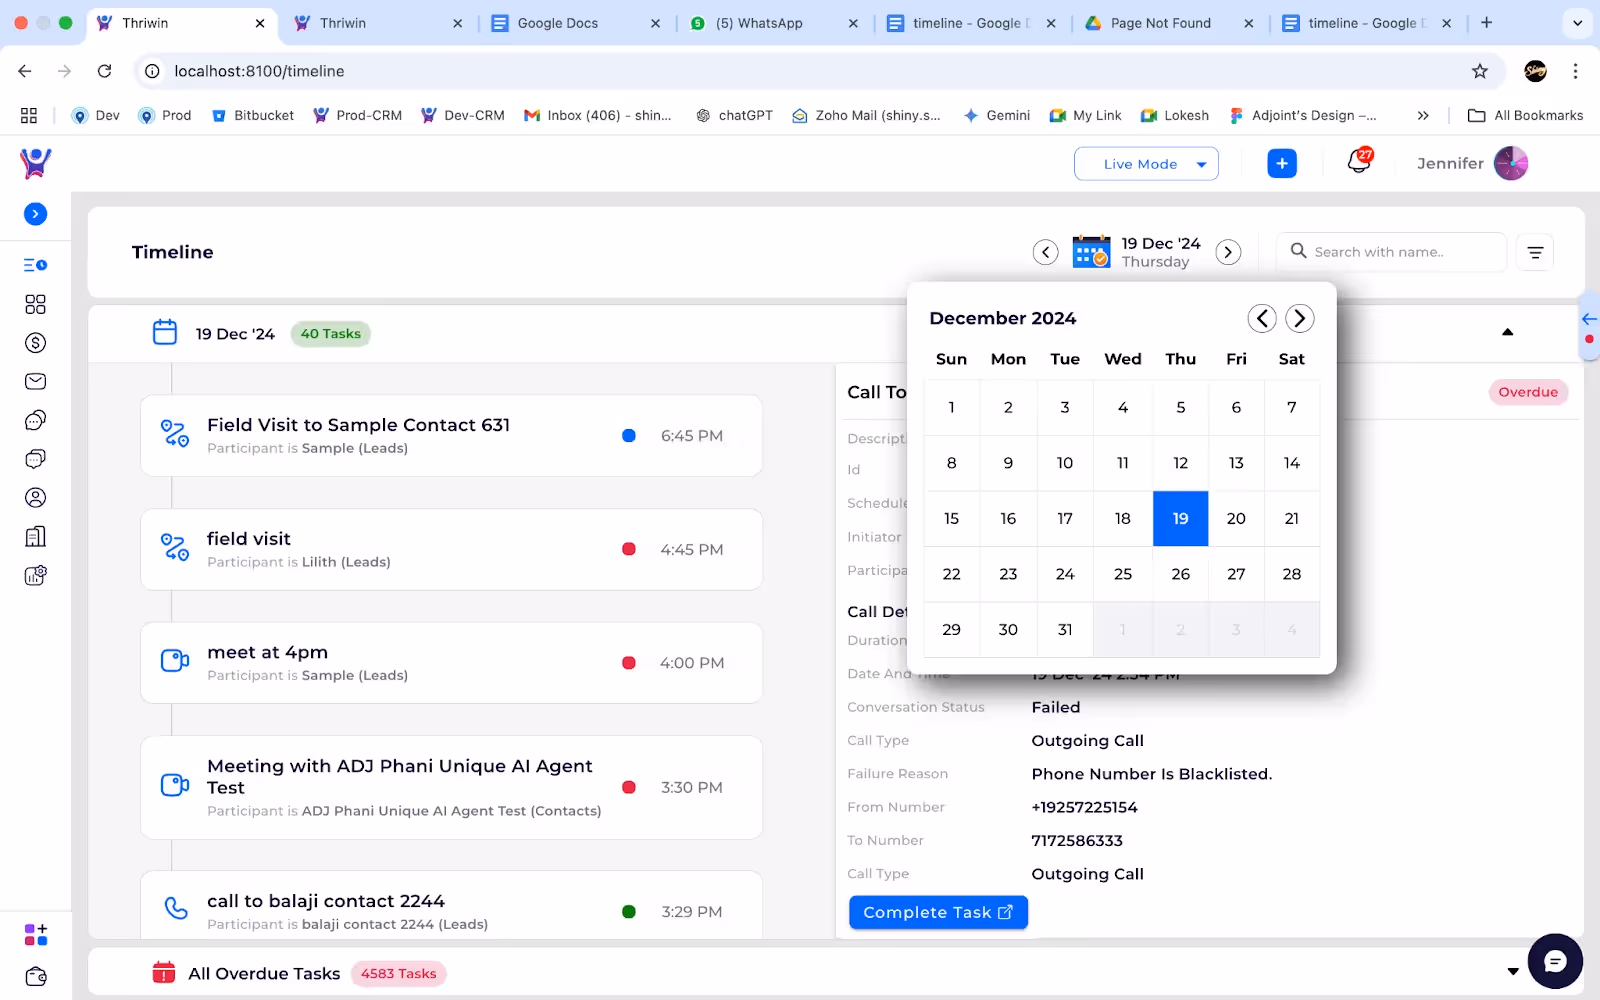
Using Filters
Access advanced filtering options to refine task views. Locate and click the filter icon in the top-right corner
- Configure desired filter parameters in the popup window.
- Click "Apply" to implement the selected filters.
Need More Help?
- For additional assistance or questions about the Timeline feature, please contact our support team through the Help Center.
Overview Of Timeline
Step by Step Guide to leverage Timeline
How to Filter
- We provide various ways to filter the deals as per your convenience .
- Click on the filter icon beside the search bar.
- Fields you can filter upon are
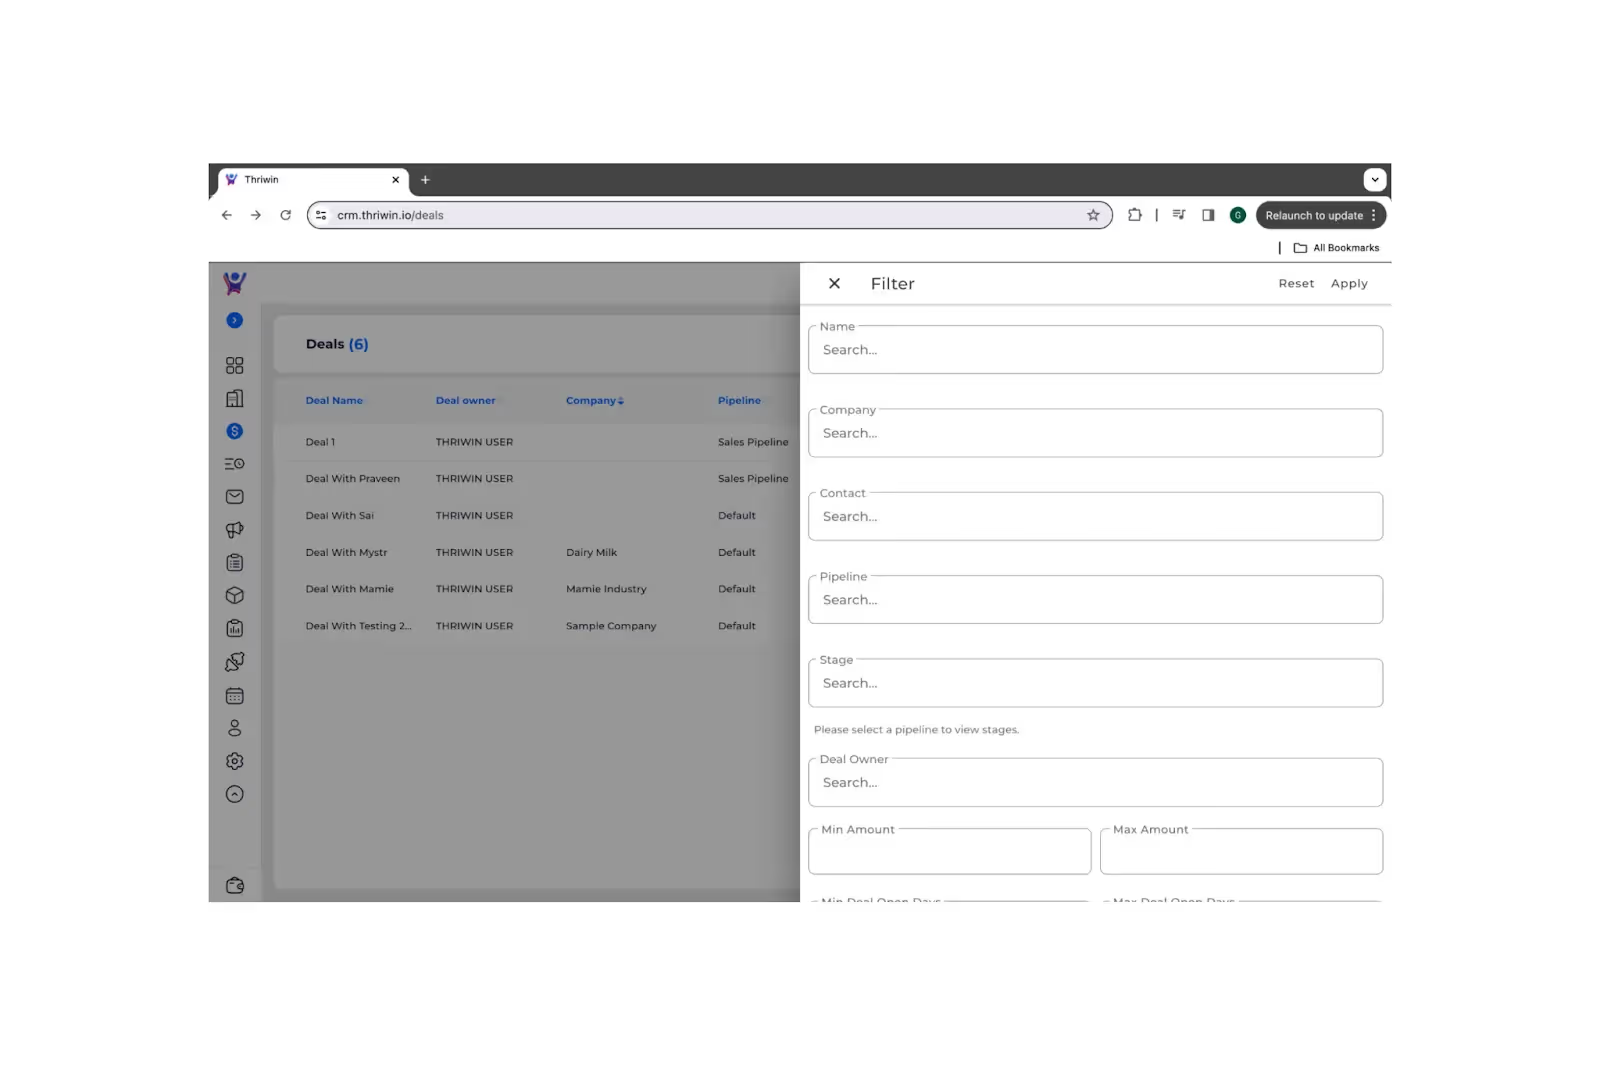
- Now you can filter deals on name , pipeline , stage etc
- Let's quickly try to filter deals that are in commercial stage of default pipeline ,
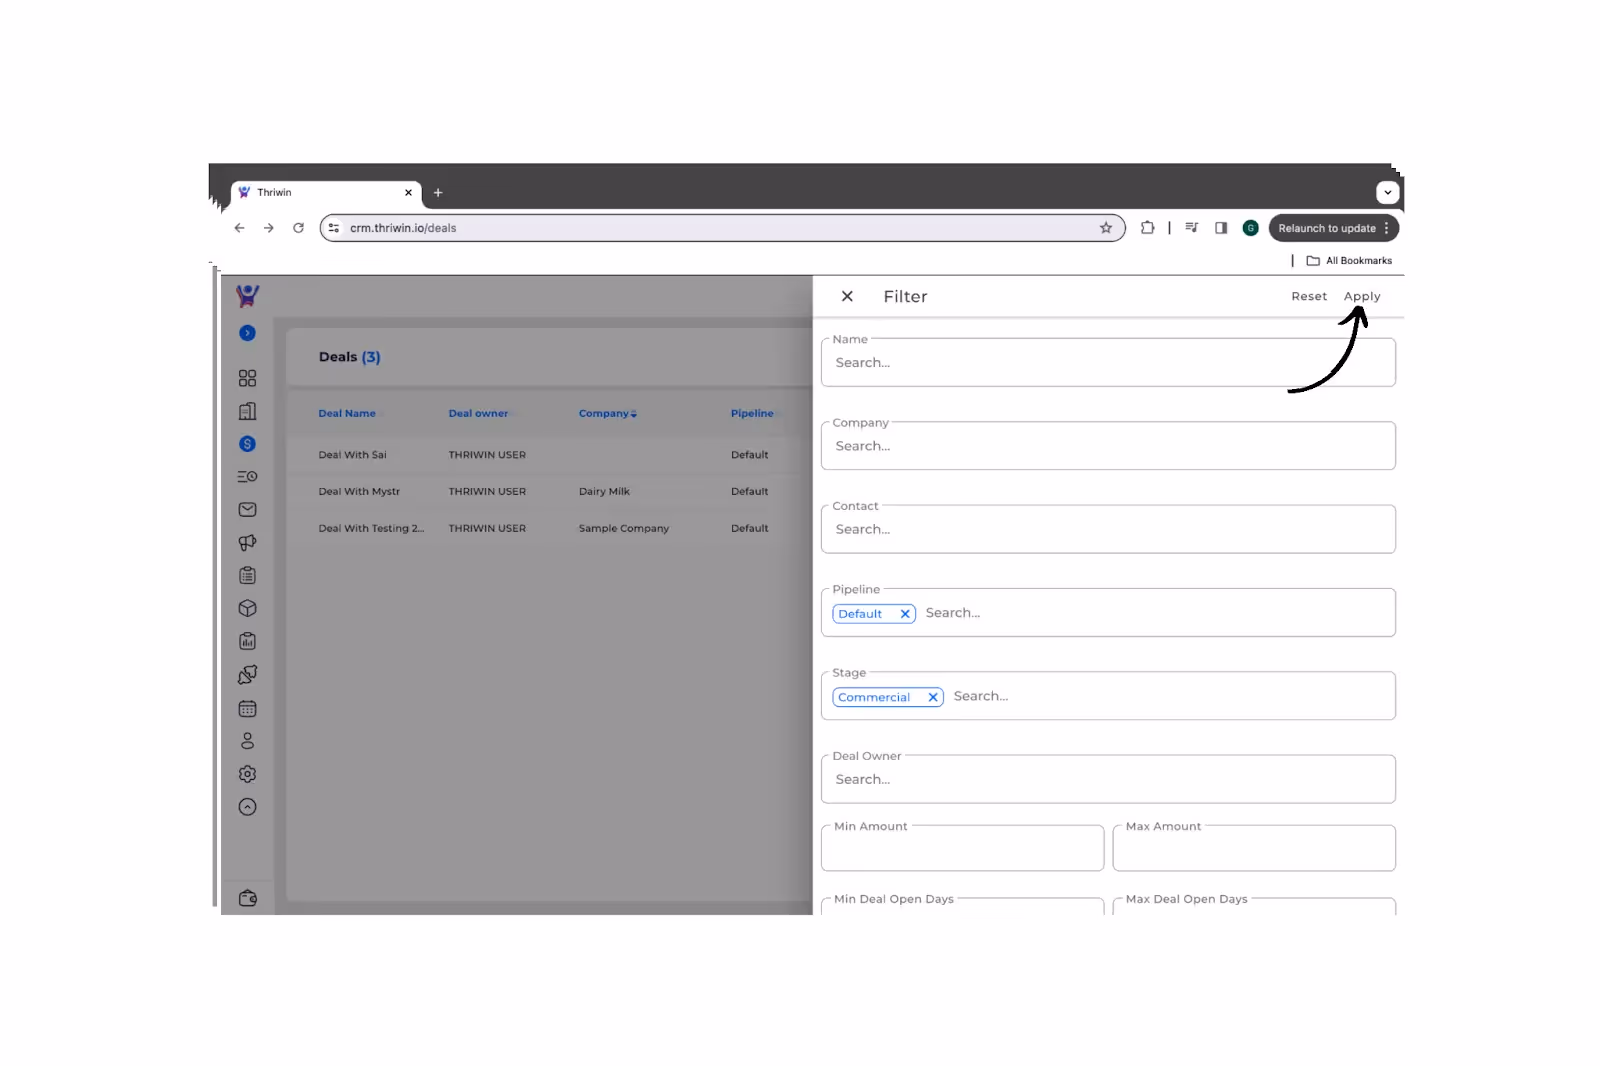
- Click on apply on the top right , to apply the filter.
- Here you go , now you are viewing the deals that are in commercial stage of default pipeline.
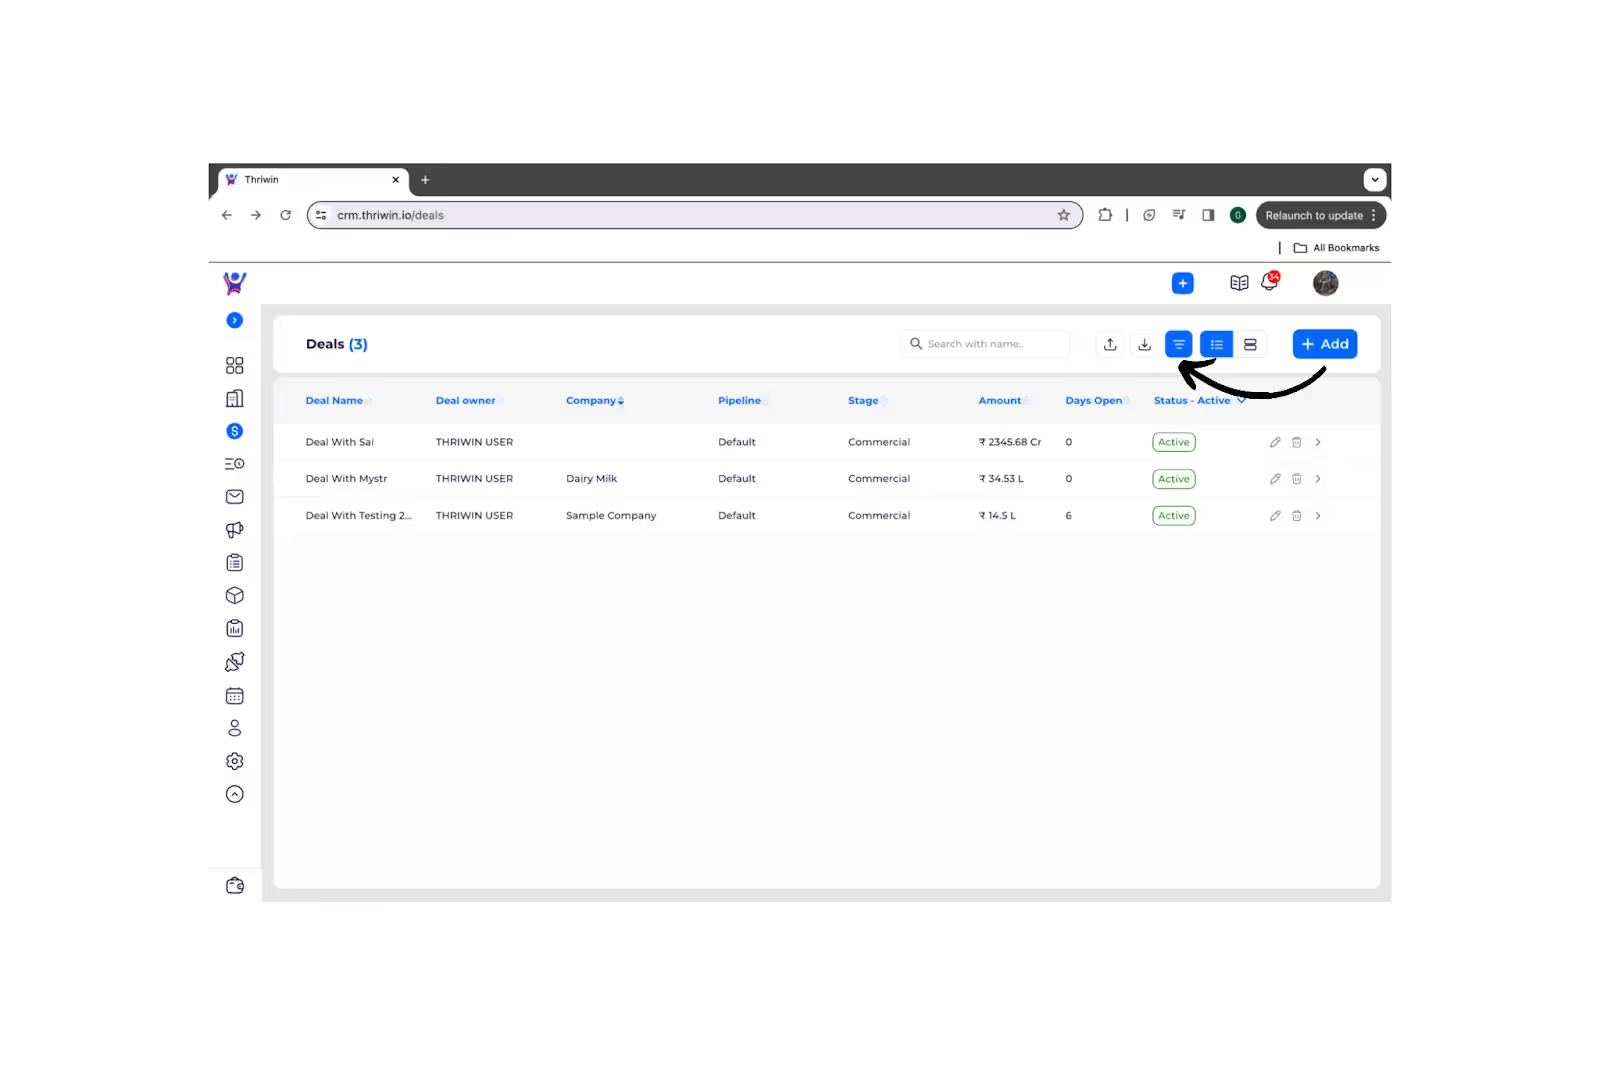
How to Filter the Deals
Apply filters to see the specific deals data of your choice
How to Sort
- There is a sorting icon , you can see after every field name in the header

- When you click on that , you could see the whole list is sorted based on that specific field.
- Remember at any given point of time , you can only sort the list based on a single field.

- Again clicking on the button , sorts the list in reverse order.
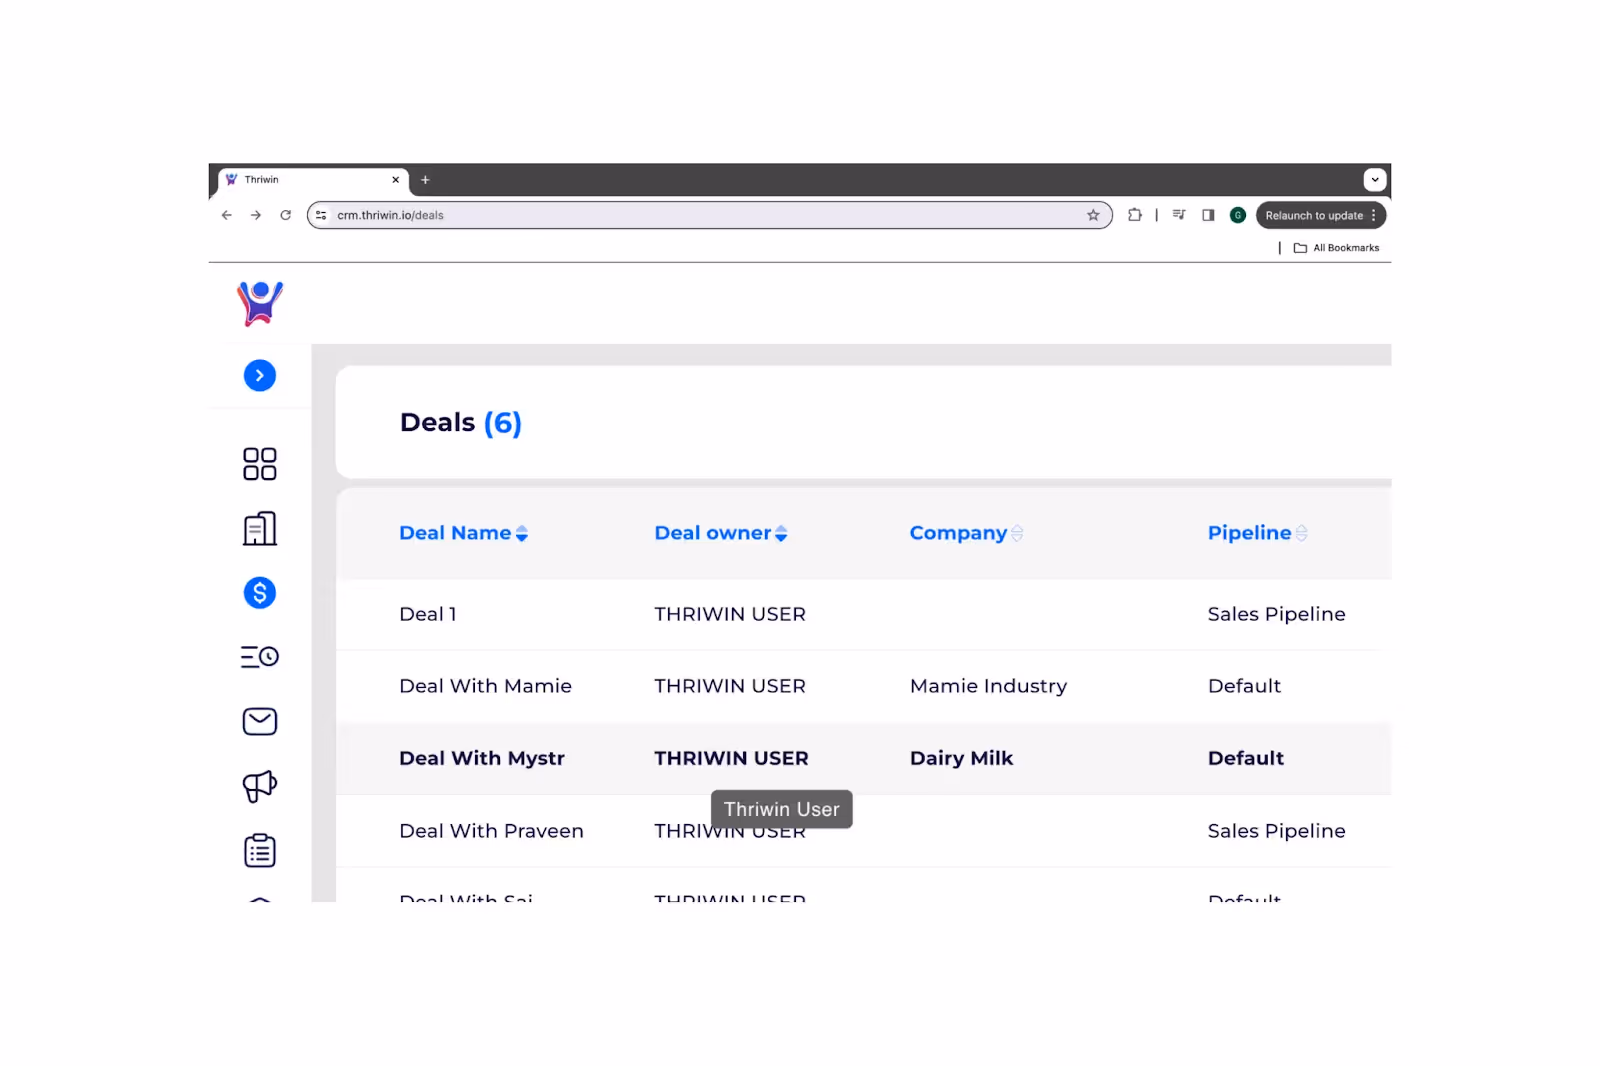
How to Search
- On the top of the list , you can see a search bar - Enter the deal name , while you enter we precise the list according to the value in the search bar.
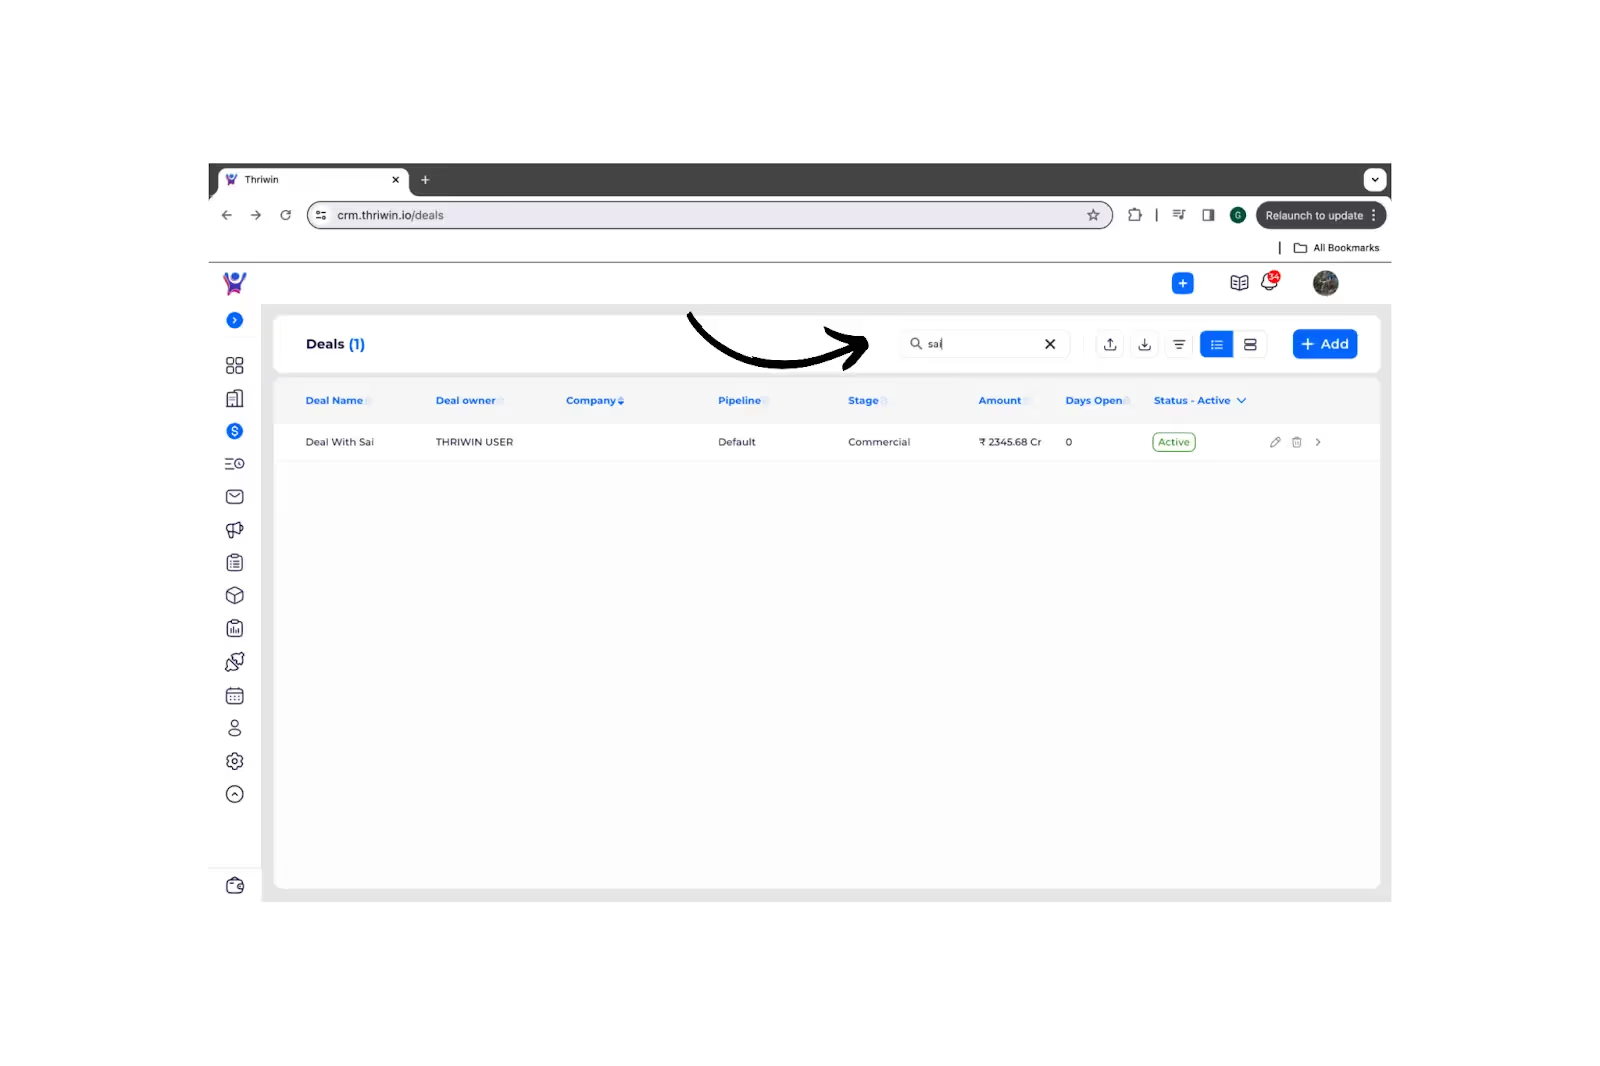
How to Search, Sort the Deals List
Exploring the Deals with Search and Sort Operations
Kanban View
Implementing Kanban for deals involves visualizing and managing your sales opportunities through a Kanban board. This board typically consists of columns representing different stages in your sales process, and each deal is represented by a card that moves across these columns as it progresses.
You can
- Move deal cards between columns with a simple drag-and-drop action as they advance through the sales stages.
- Easily visualize the overall progress of deals and identify potential bottlenecks or areas for improvement.
- Clicking on a deal card reveals more detailed information, allowing users to access crucial data without navigating away.
On the top left corner , you can find a toggle that toggles the view between list and kanban of the deals.
By default , we show all deals’ progress according to the default pipeline , if you want to view the progress through the custom pipeline , you can click on the default & custom pipeline toggle .
You can still apply the filters in the kanban view as shown above.

Leverage Deals with KanbanView
Manage deals like a pro!
A pipeline is a visual representation of the stages a potential deal progresses through in the sales process.
Add Pipeline
Note : Only Admins can add a pipeline.
- Go to admin settings , you can find it in the sidebar . Click on the pipeline card.
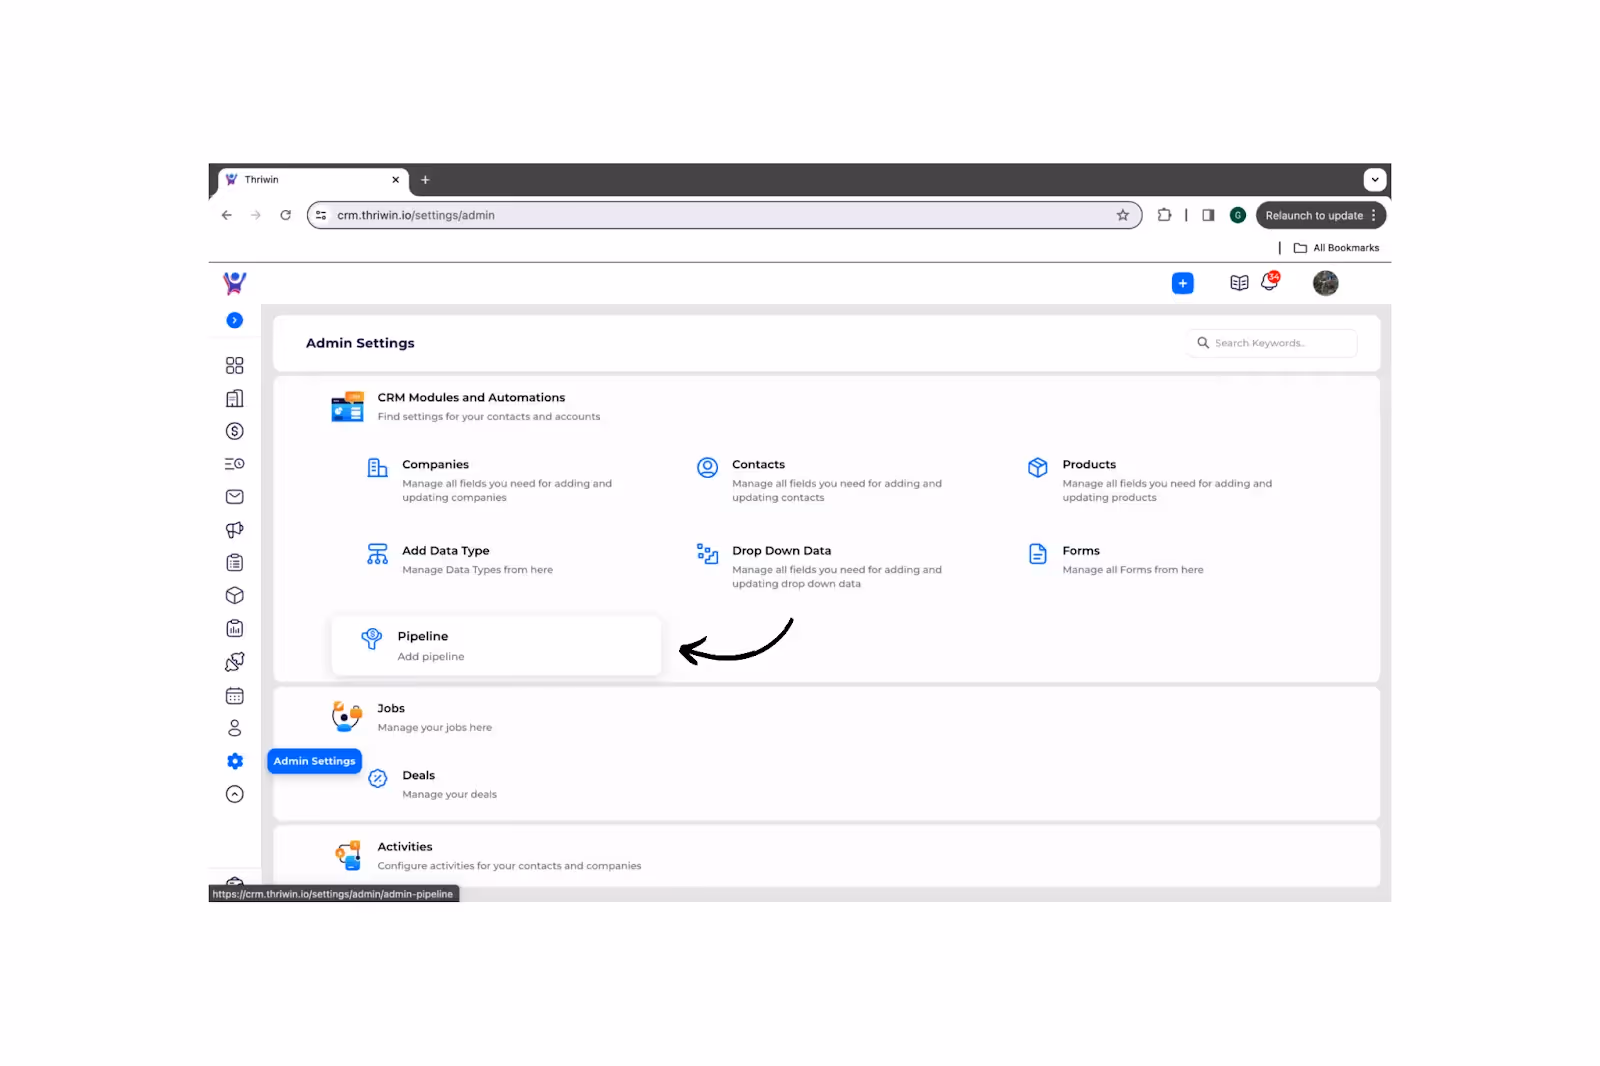
- You can click on the ADD in the interface , click on it.
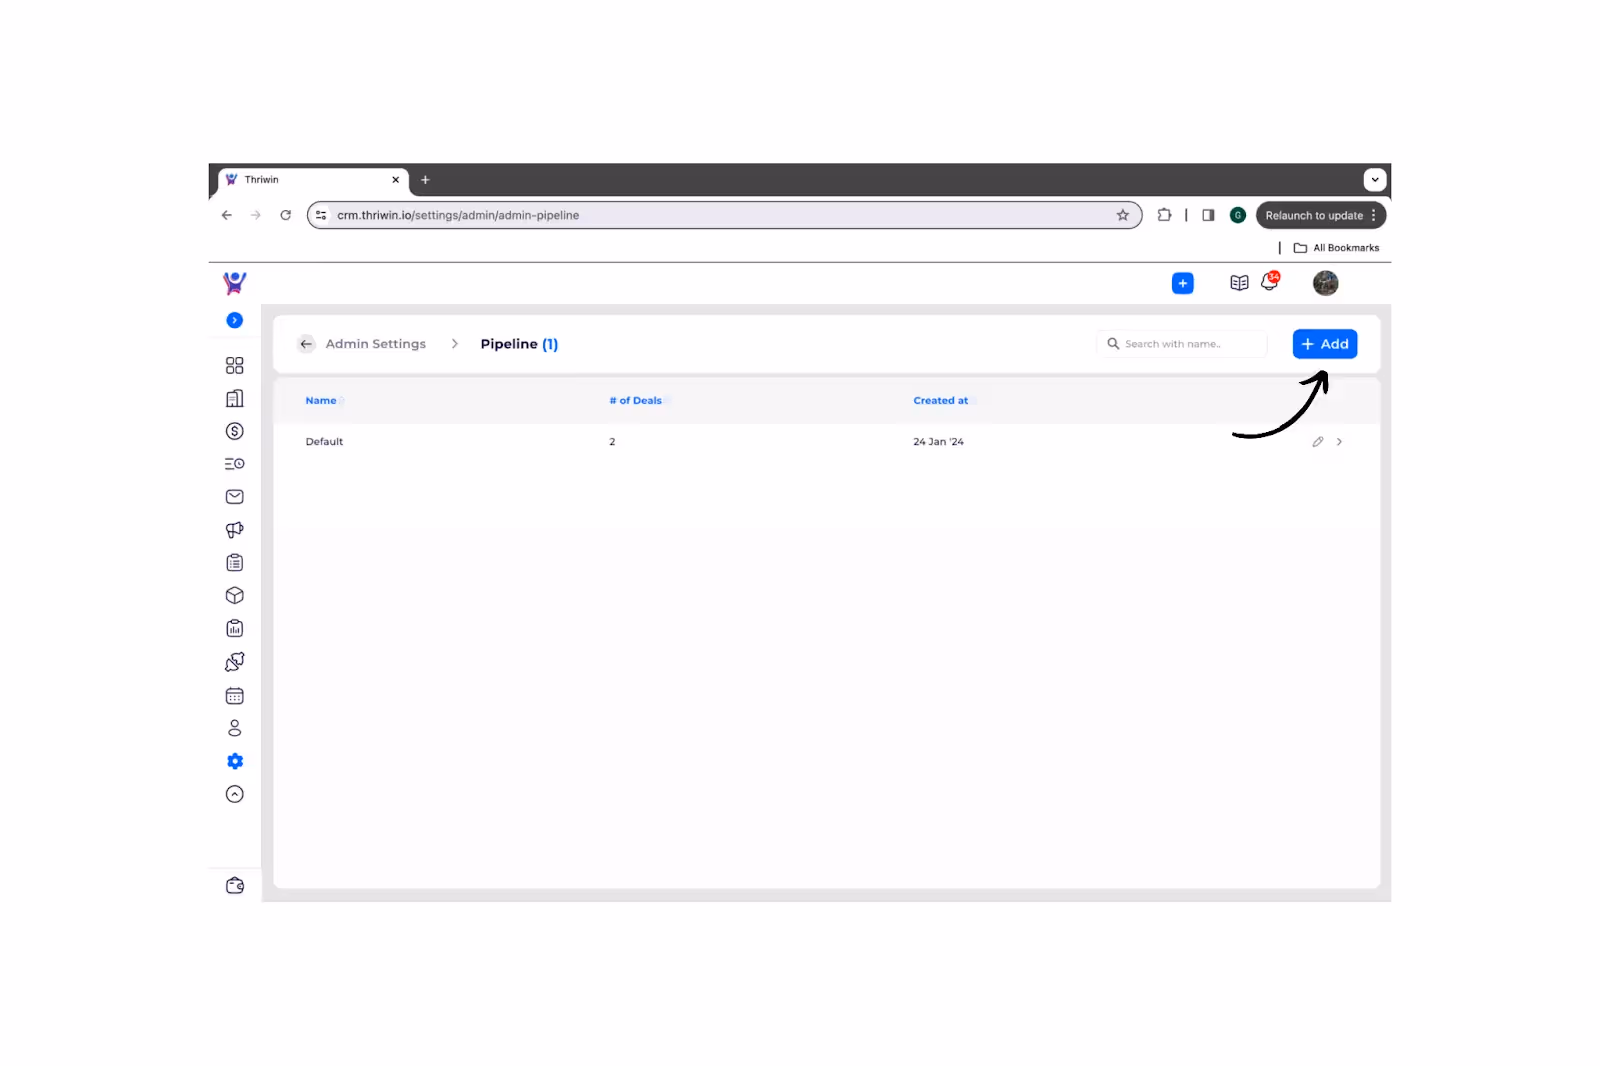
- Here is the interface for creating the pipeline , you have a input box where you enter the pipeline name and using ADD STAGE button to add new stages .

- We made it mandatory to mark ( any 2 ) stages in your custom pipeline as ‘demo’ & ‘commercial’ , so that we can still view its progress in our default pipeline.
- Enter deal stages , hit the ‘submit’ button . That's it ! We have created a pipeline.
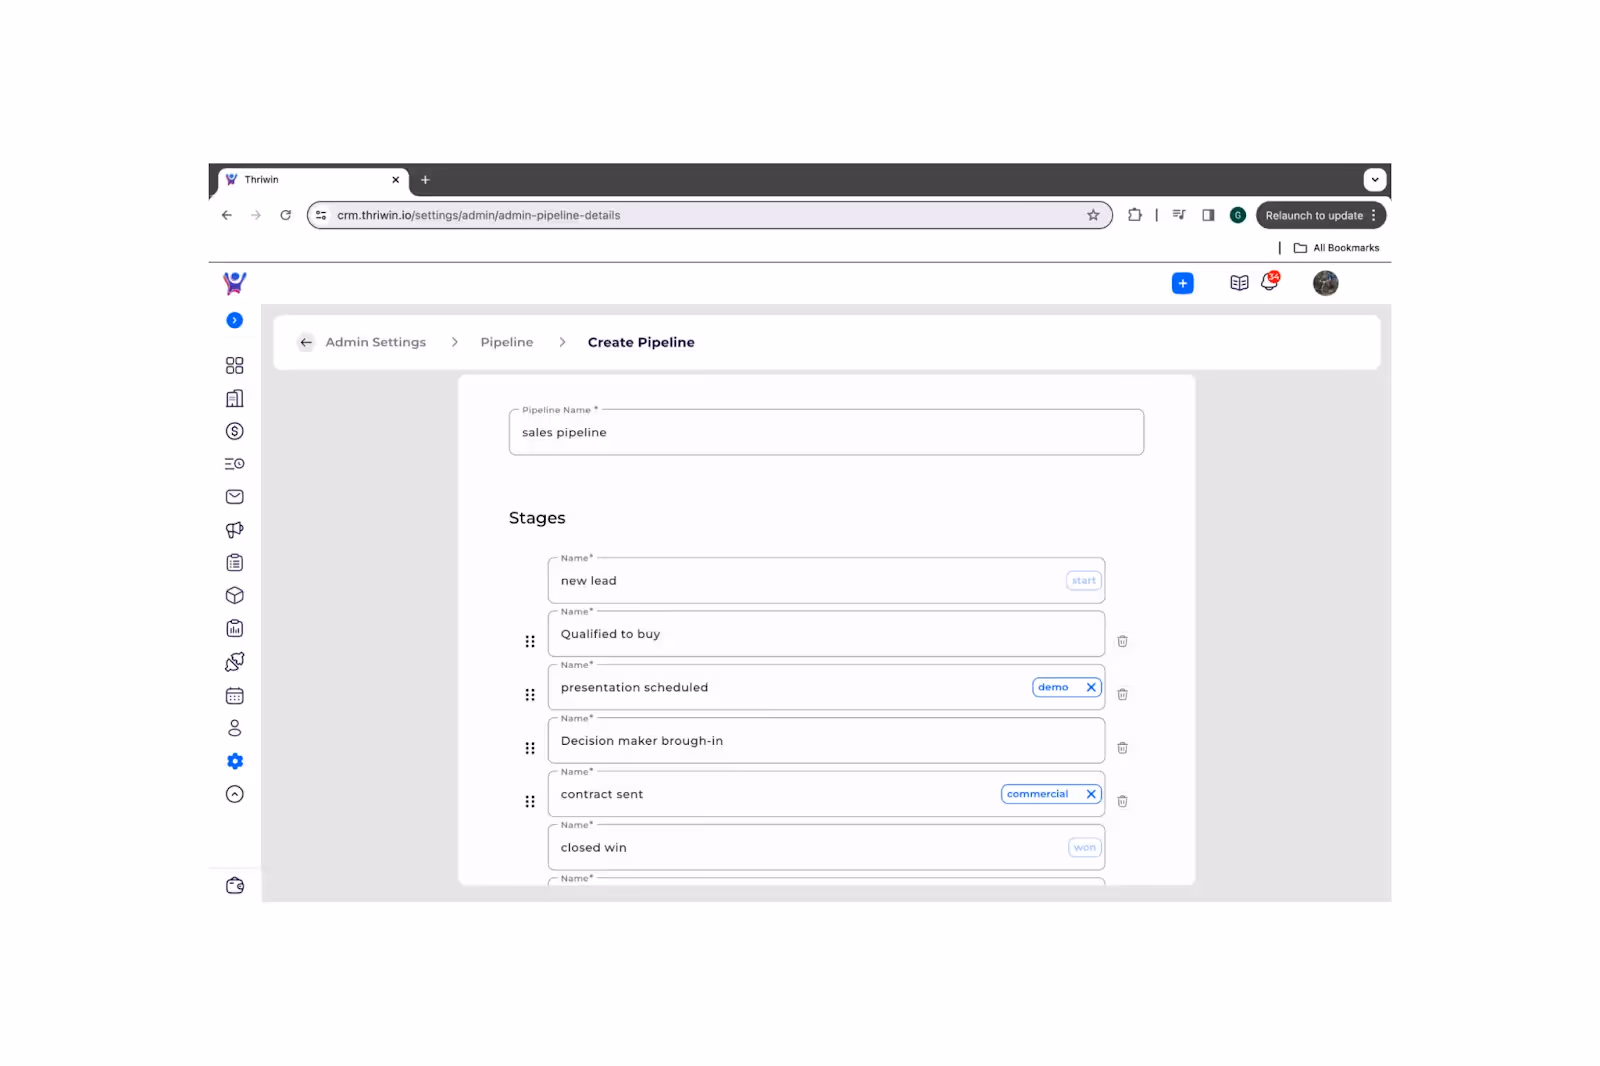
- You can still edit ,deactivate the pipeline after you have hit the submit button .

- Now that we have created new ‘Sales pipeline’ pipeline , we will try adding a deal in this pipeline.
- Here you can the pipeline you have created earlier Sales Pipeline’.
- You can create a deal , as mentioned above.
Note :
- Consider the pipeline carefully before creating a deal, as once it's created, you won't be able to edit the pipeline. Choose the appropriate pipeline for the deal from the outset.
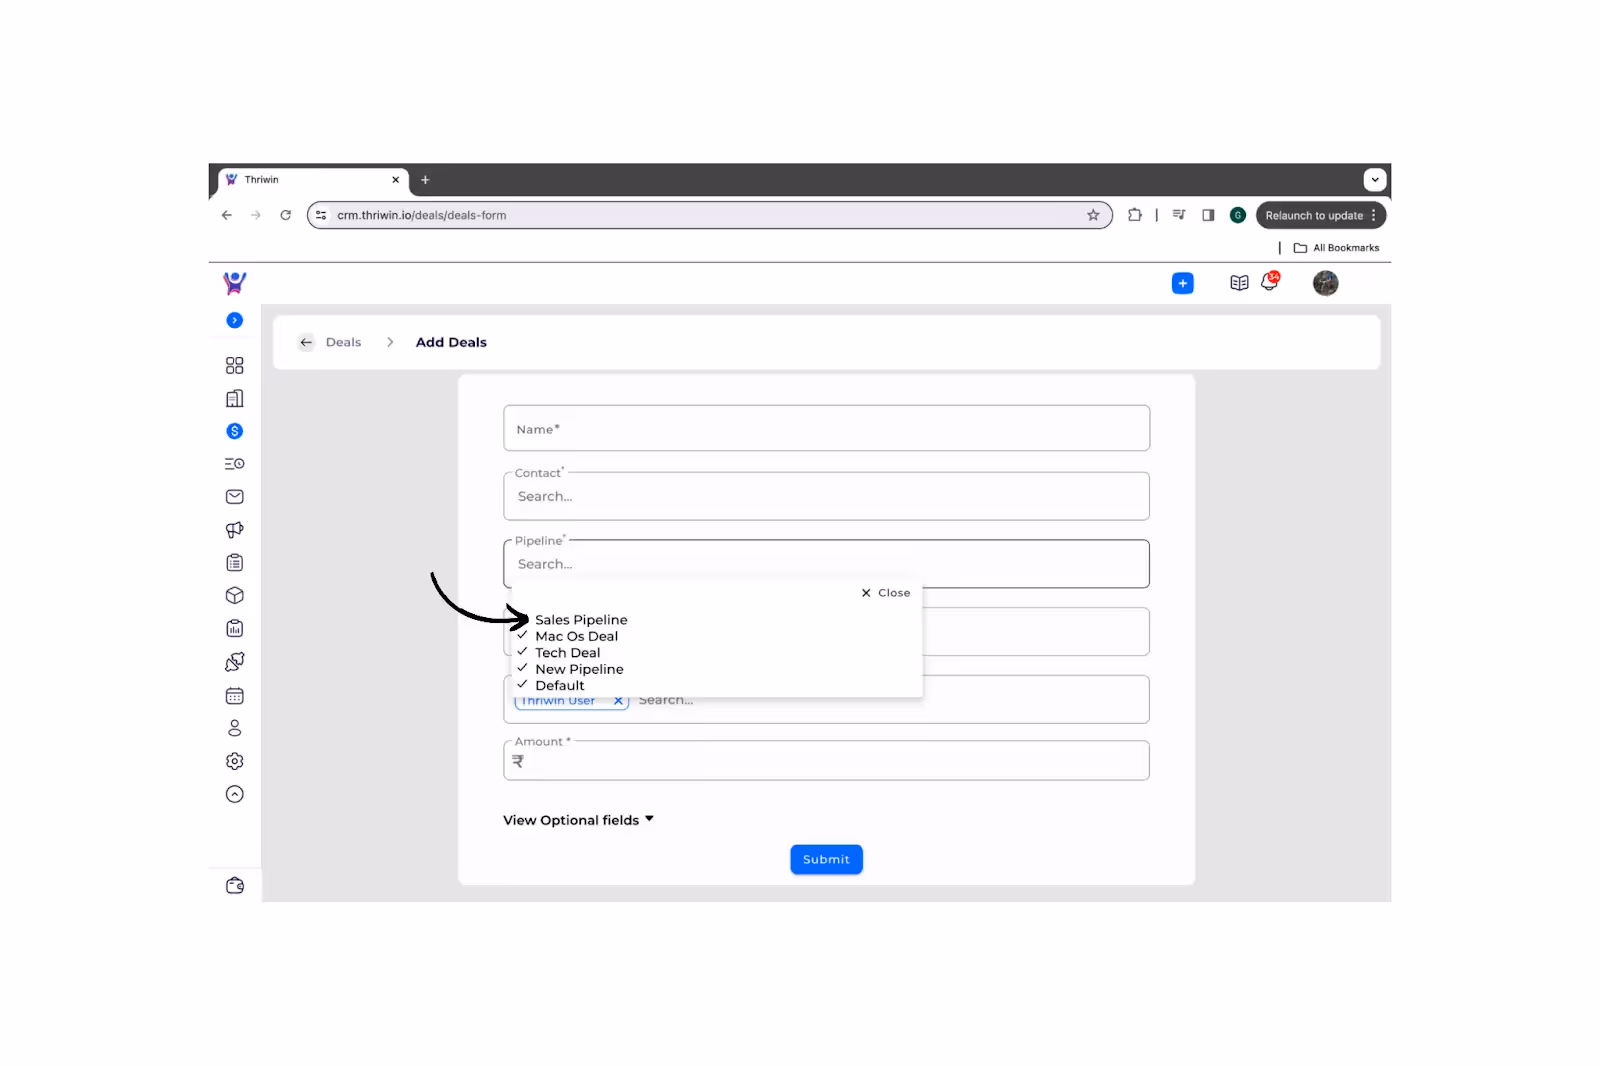
- Let's get back to deals list and explore searching , sorting deals & apply filters on deals.
Pipeline Management-complete guide
Step by step guide to manage pipeline
Create a deal

- Navigate to deals through the icon in the sidebar, you will find the +ADD button in the interface to create new deals . Click on the button to create a new deal .
- While few details are optional to create a deal , we've hidden them for your ease of use. you can still see the optional fields by clicking on the view optional fields as shown below .

- Enter deal details
- Once you are done entering the details, hit the "Submit" button.
- Don't stress over uncertain details—we've got you covered. You can edit a deal anytime before it reaches the closed state. Keep in mind, if you are trying to edit company , clear the contact first, as they are dependent fields. You can also find the guide for editing a deal in this documentation.

- Now that you have entered deal details and submitted , you have created a new brand deal and you can see it in your deal list as shown below.
View Deal Details
- To view deal details , click on the deal.

- You will now view a screen similar to below mentioned one, which has all the details associated with deal.
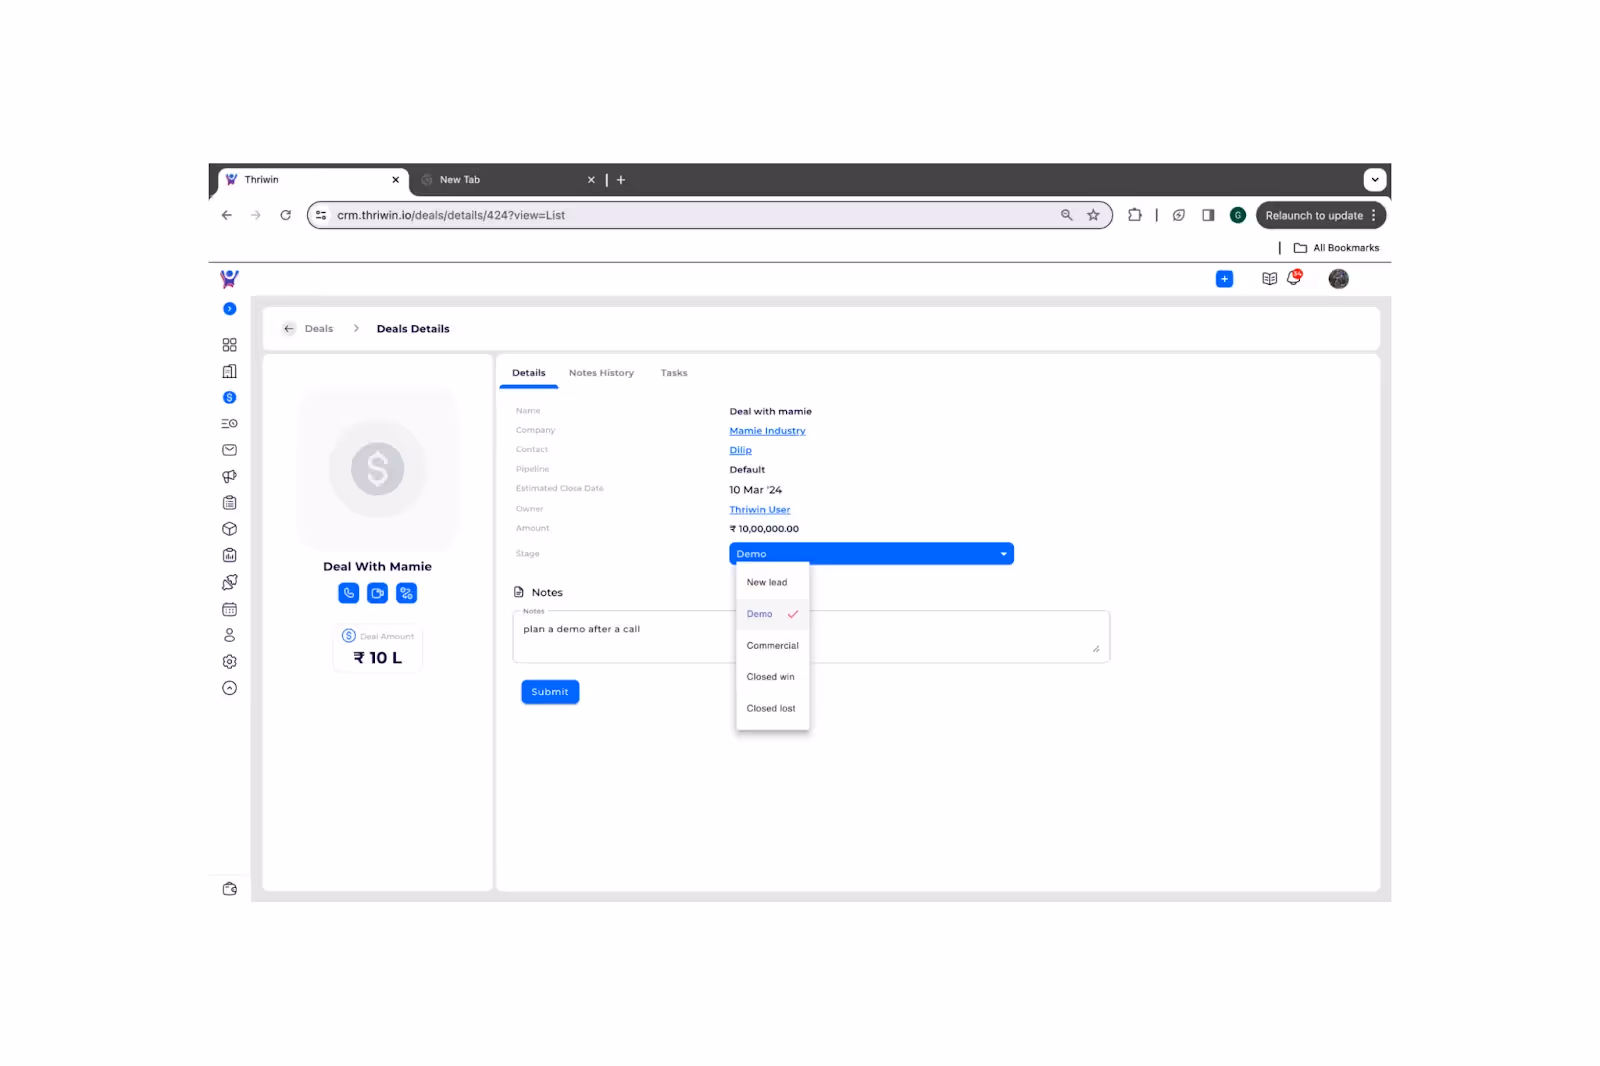
- Feel free to check out deal specifics, adjust the stage, and note down notes if there's something noteworthy about the deal like when you're making a stage change.
- We have a track of your notes history, you can check it out from here
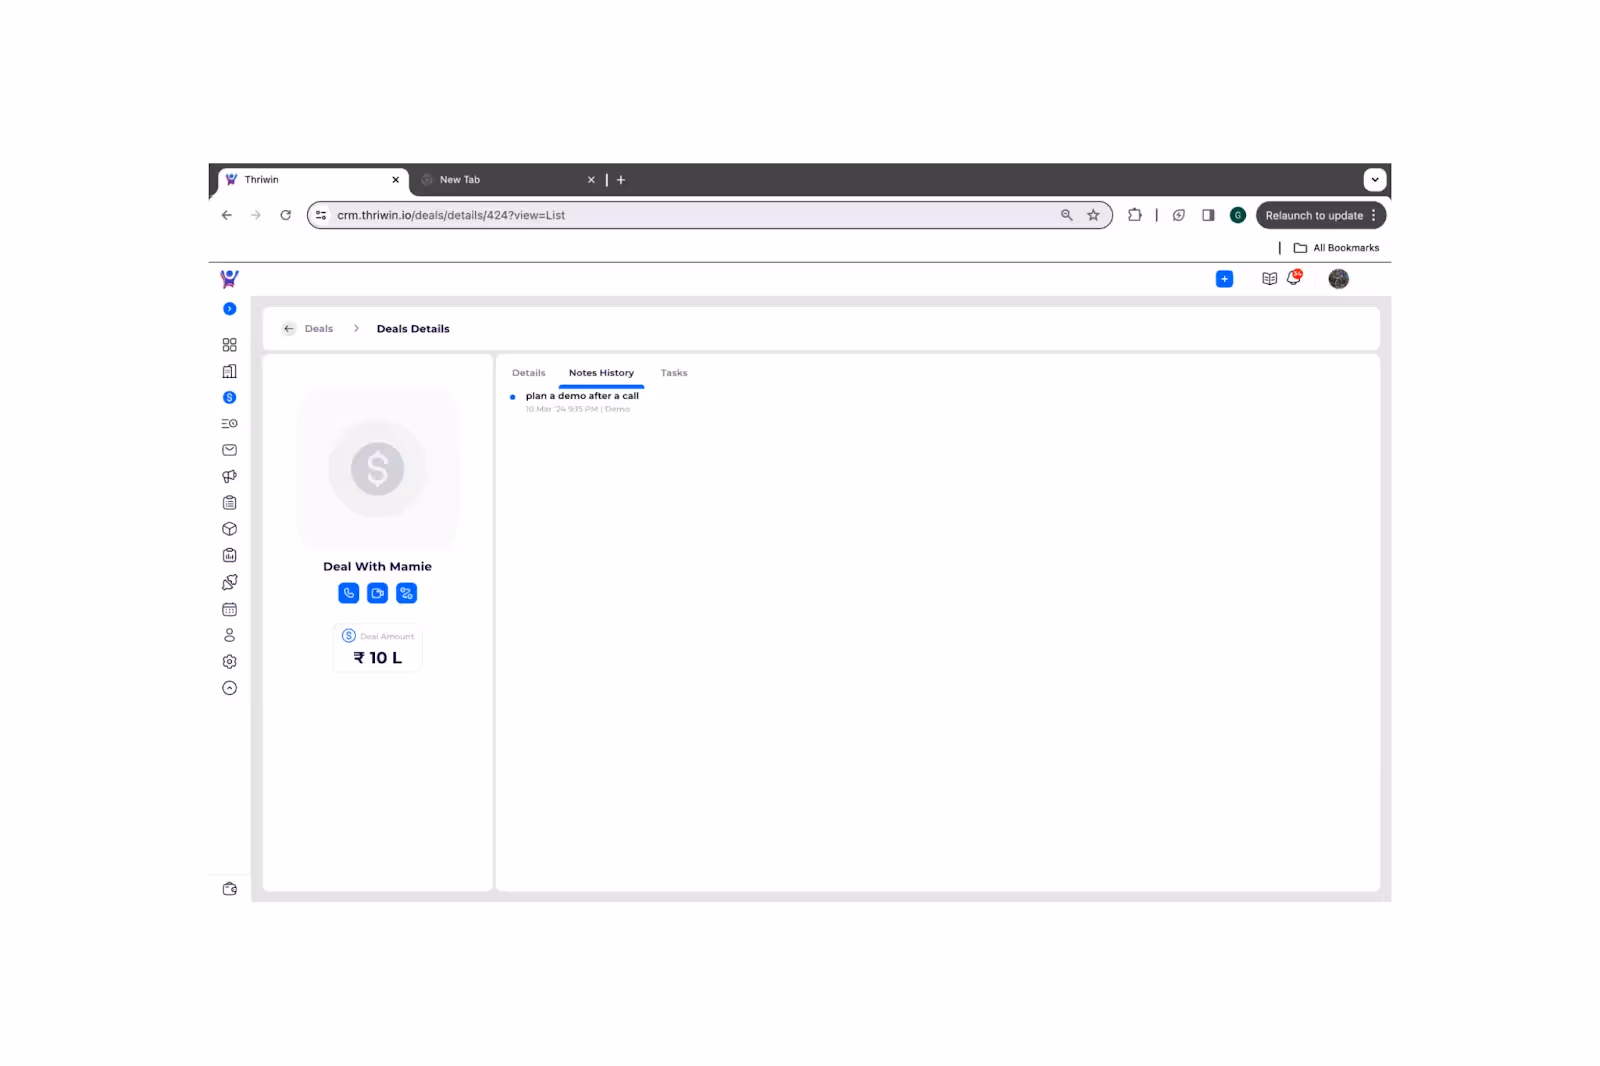
- You can schedule a call , meeting or field visit with the contact dealing the specific deal , just click on the activity you want to do with the contact.

- And we fill the specific details for you . Just tell us when you want to schedule the activity , we take the pleasure of reminding you.
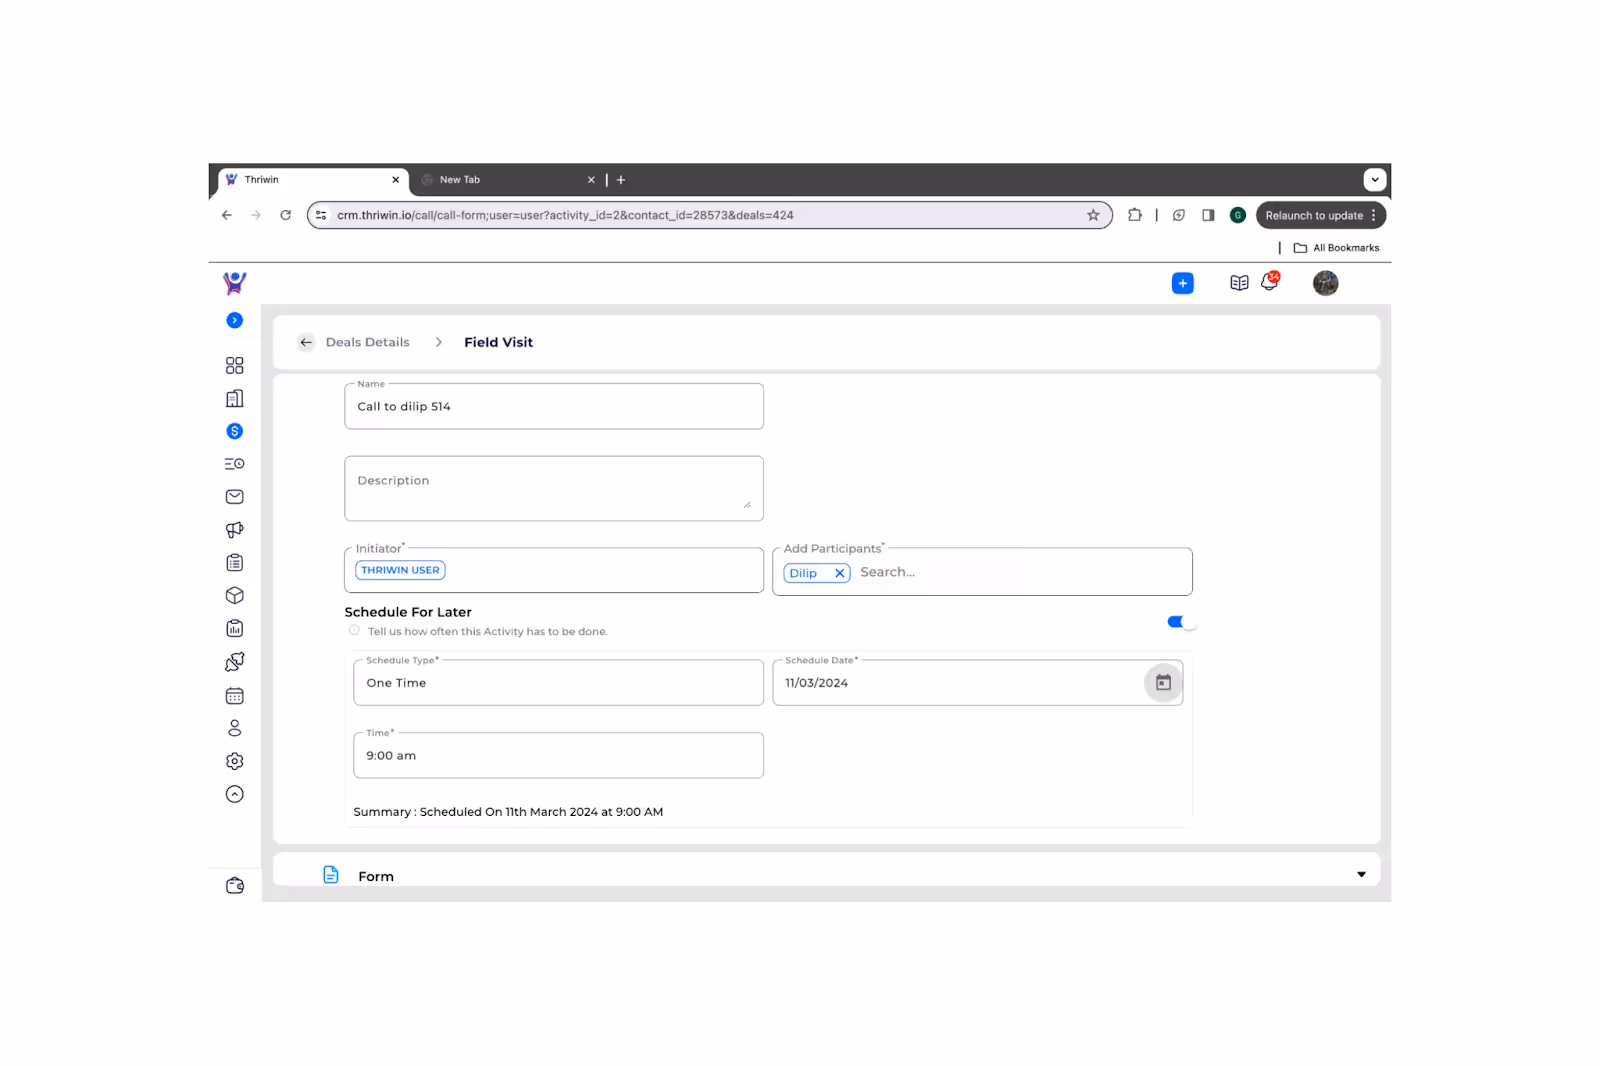
- We show the deal jobs here.

Edit Deal Details
- To edit more details of a deal , go to deals list & click on the edit button as shown below

Thereby , we will redirect you to deal details page where you can edit details Few things before you proceed to edit:
- As we mentioned before if you are trying to edit company , clear the contact first as they are dependent fields.
- We can't let you change the pipeline of the deal , once it's created
Possible Reasons if you are unable to edit a deal :
- Check the status of company & contact ( we can't let you submit the deal with inactive contact or inactive company ).
- Check for the stage ( And you can’t edit a deal in its closed stage ( closed win or closed lost ) , for that you need to edit its stage first ).
- We dont let you edit a deal if the owner of the deal is inactive.
Once you are done updating the deal details satisfying the above mentioned points , hit on ‘submit’ . Congratulations ! Now you have successfully updated the deal.
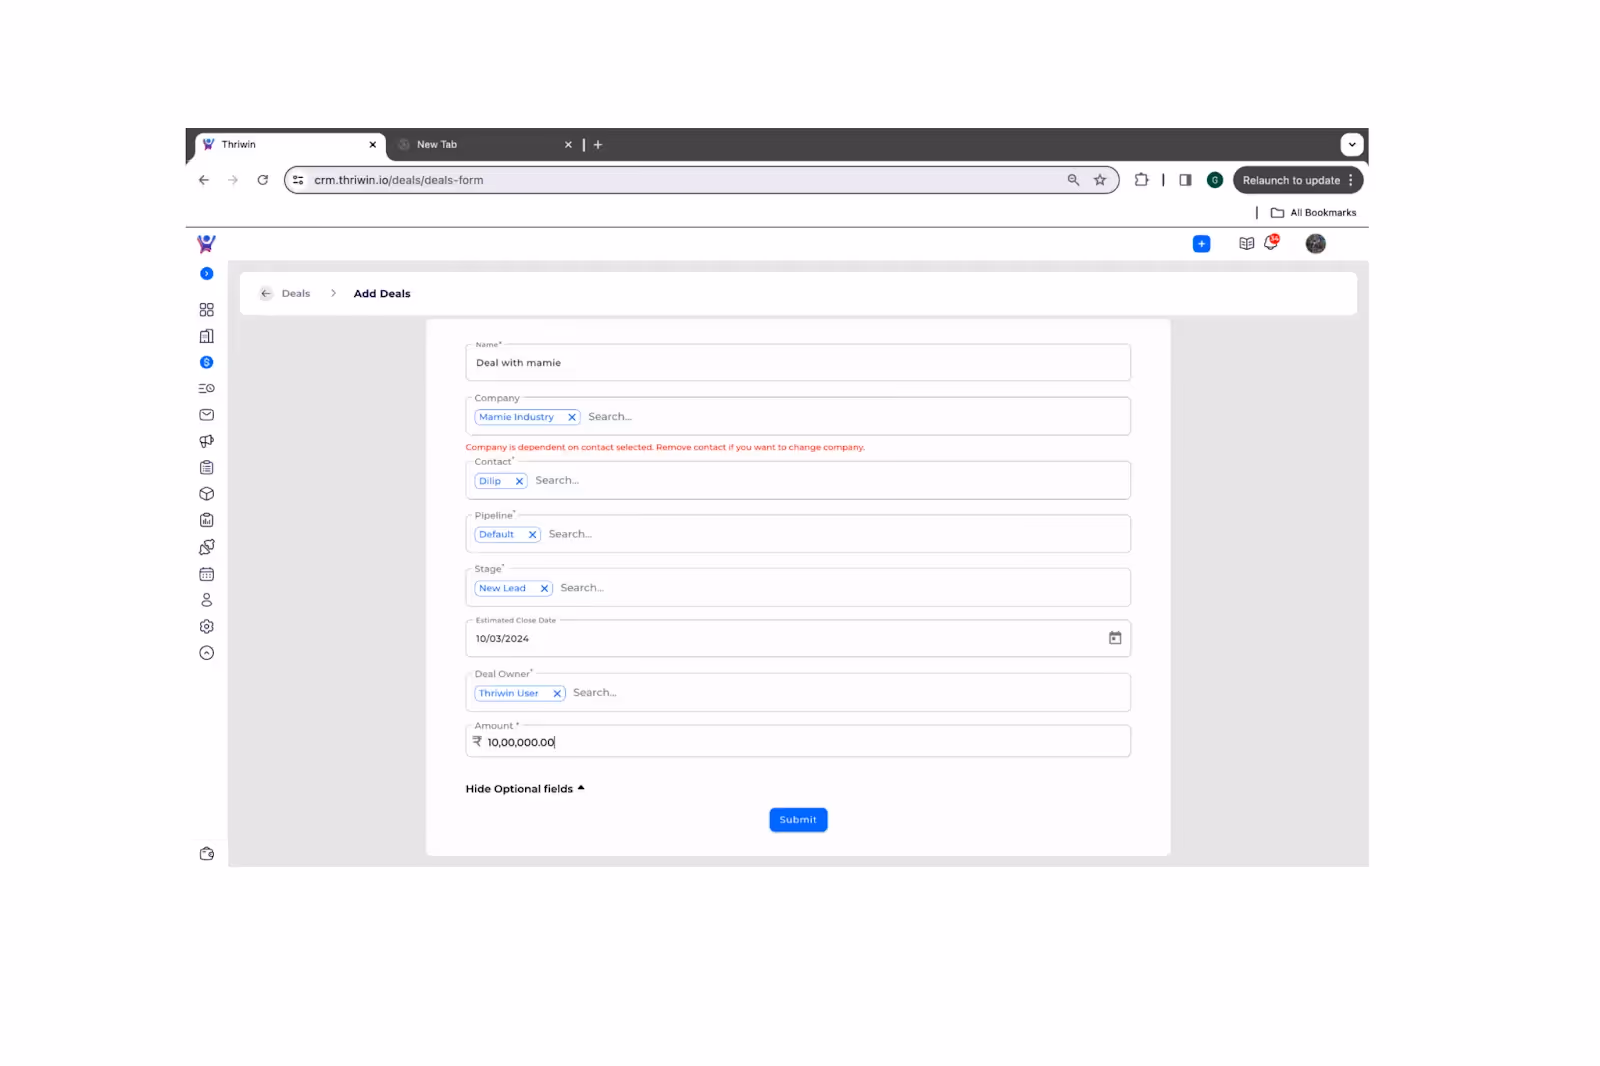
Deal Deactivation & Reactivation
- For some reason , you may want to deactivate a deal.
- To do that you can just go to the deals list and click on the deactivate button as shown below.
Note : You can't deactivate a deal in it’s closed stage ( closed win or closed lost )
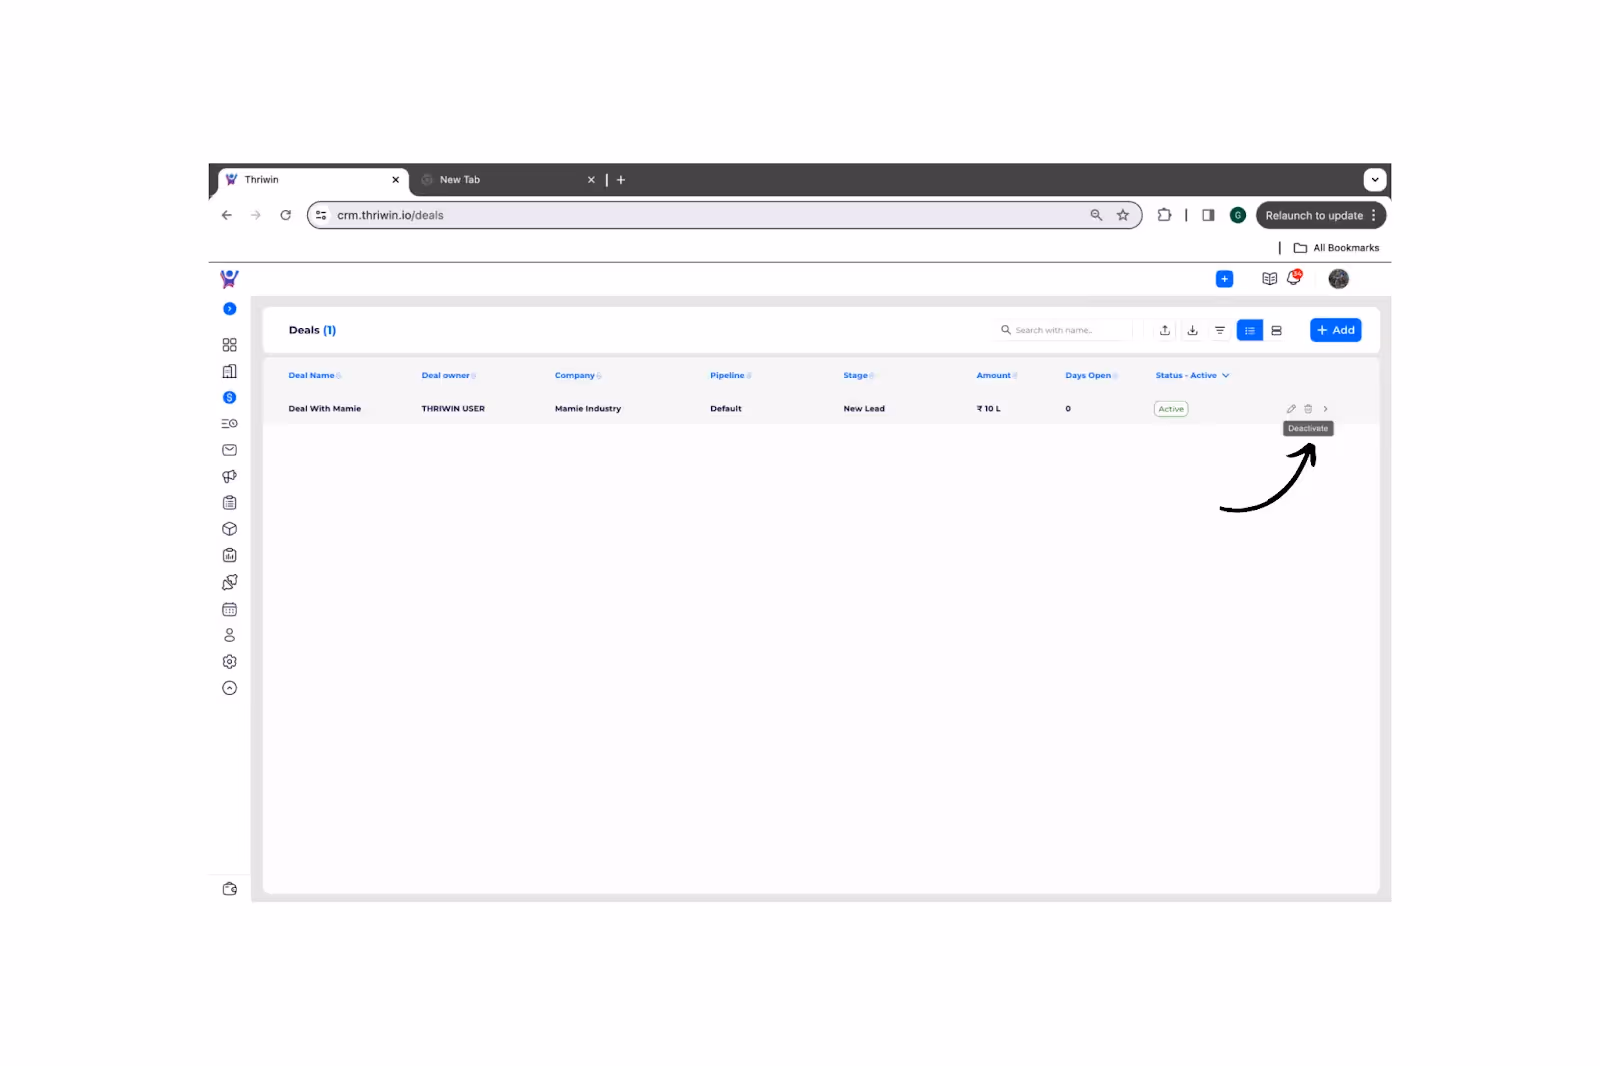
- You can view the inactive deals by setting the status to ‘Inactive’.
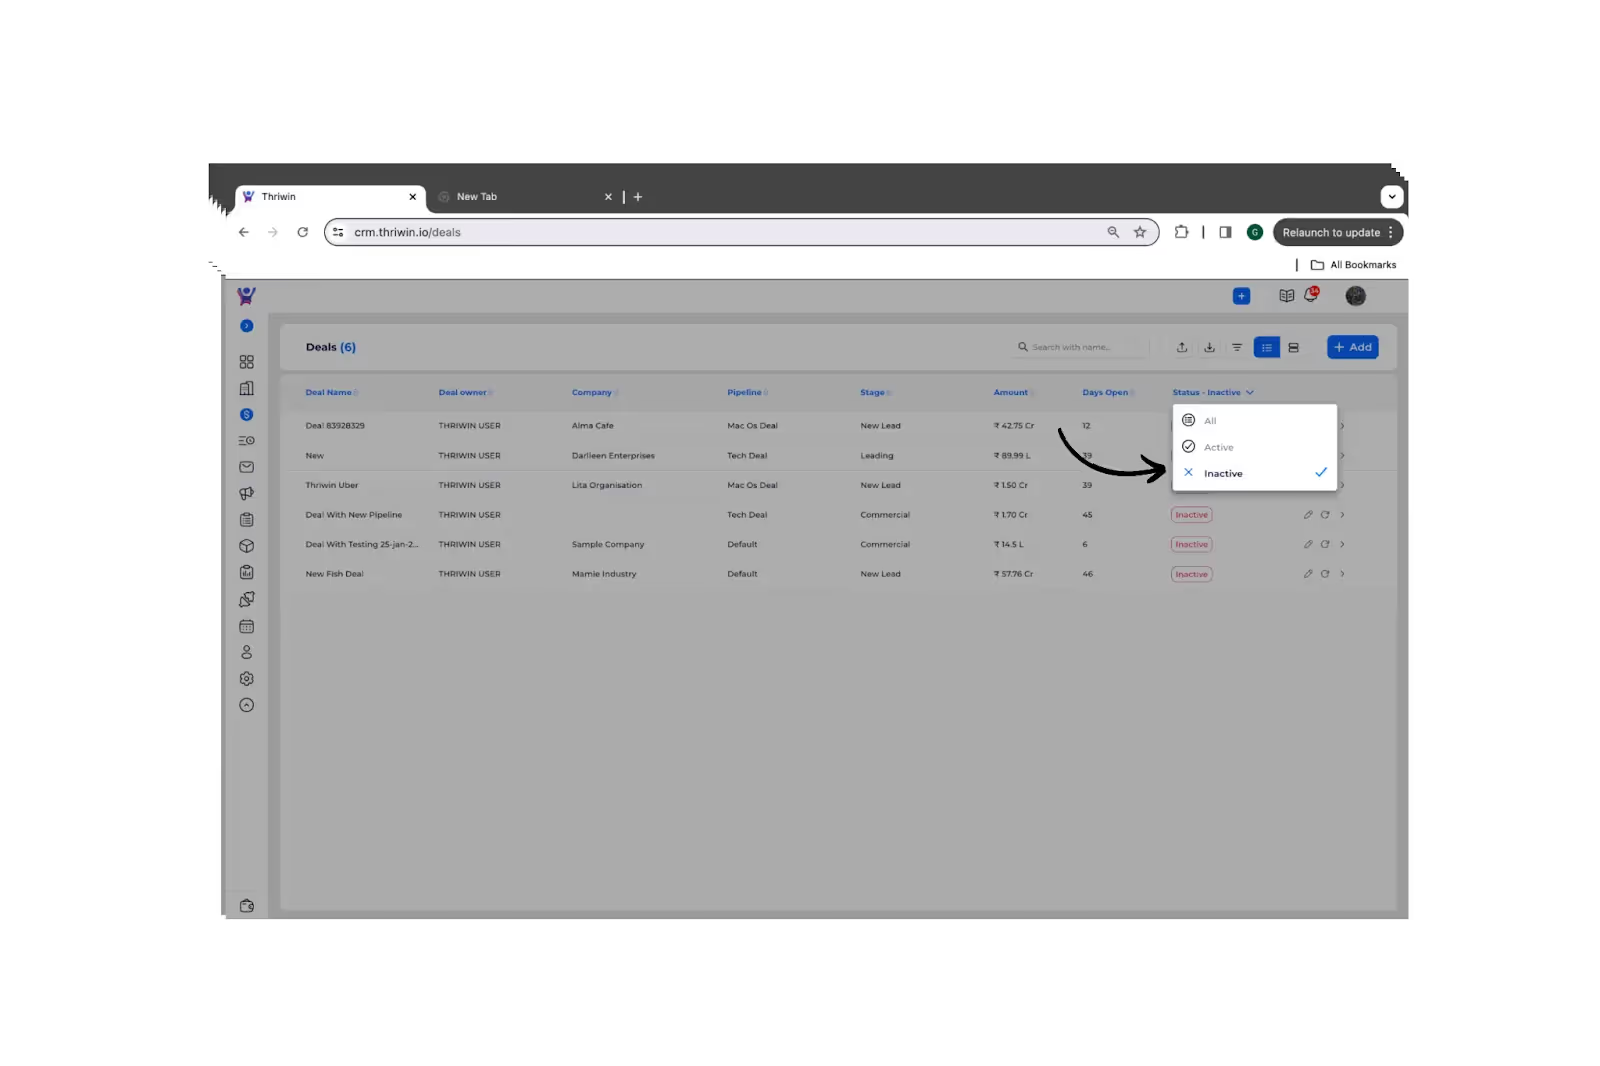
- We store the deactivated deals for you , in case if you want to reactivate the deal you can do it from here .

How to Access, Create and Edit Deal
Manage deals like pro!
Form Fields Customization of Leads
creation of new fields or update the form configuration of existing fields with various data types.
Here’s an explanation of each data type:
- Text Field: A single-line field used to enter short text, such as names or titles.
- Text Area: A multi-line field for longer text input, such as descriptions or comments.
- Number: A field that only accepts numeric values, used for entering quantities, prices, or any numeric data.
- Phone Number: A field designed specifically for phone numbers, typically formatted to handle country codes, area codes, and digits.
- Date: A field that allows users to select a date from a calendar or manually enter a date.
- Radio: A group of mutually exclusive options where the user can select only one value from the list.
- Checkbox: A field that allows users to select one or more options from a list of choices.
- Toggle: A binary field that can be switched between two states, such as “On” or “Off.”
- Range Slider: A slider that allows users to select a value within a specified range, useful for inputs like price ranges or ratings.
- Email: A field specifically for email addresses, with validation to ensure the input matches the format of an email.
- File: A field that allows users to upload files, such as documents, images, or other media.
- Dropdown: A field where users can select one option from a predefined list, presented as a dropdown menu.
Preview and Save Configuration
- Preview Form: You can preview the form to see how it will appear after applying the changes.
- Save Configuration: Once you’ve created or edited the field configurations, use the respective actions to save your changes, ensuring the updates are applied to the form.
- You can change the order of the fields on the form by adjusting their sequence to suit your preferences.
Step 1: Click on Form field
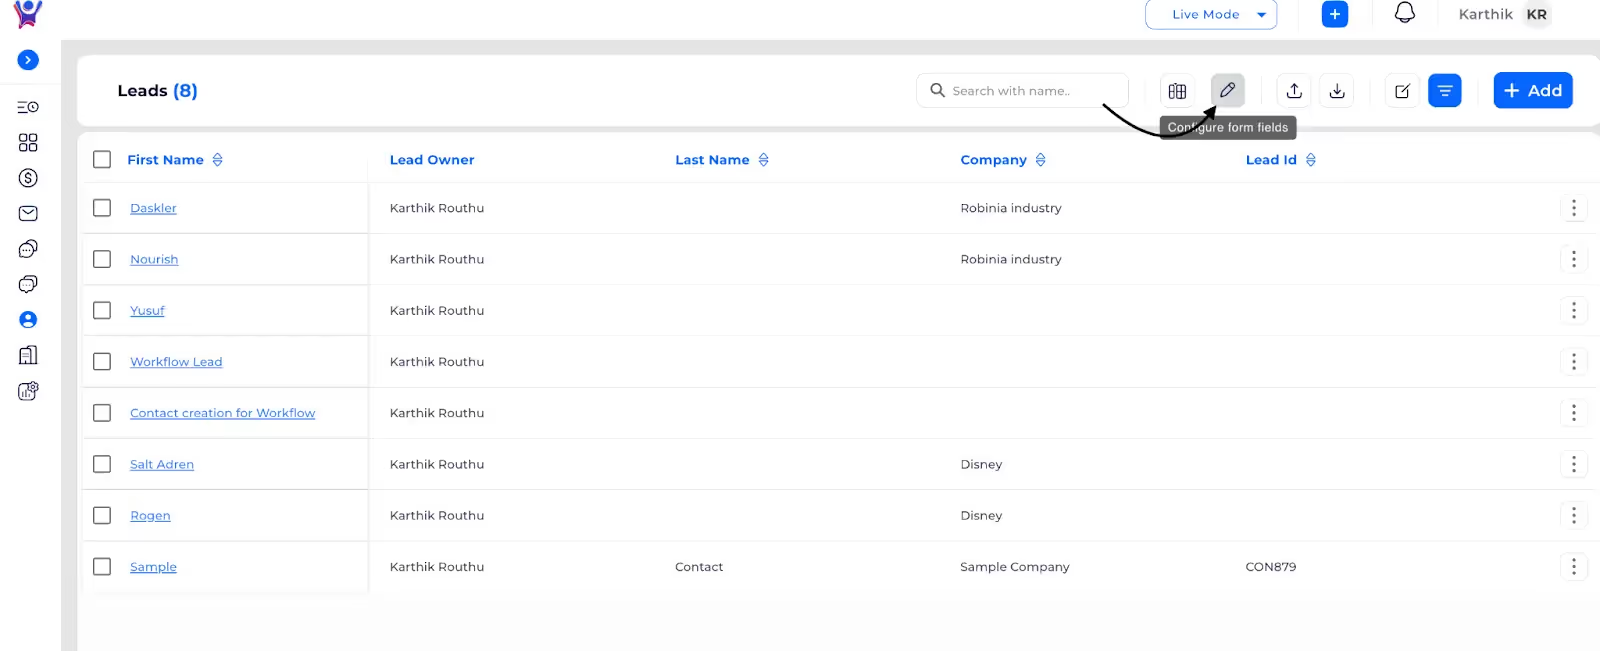
Step 2: Click on Edit icon to edit field
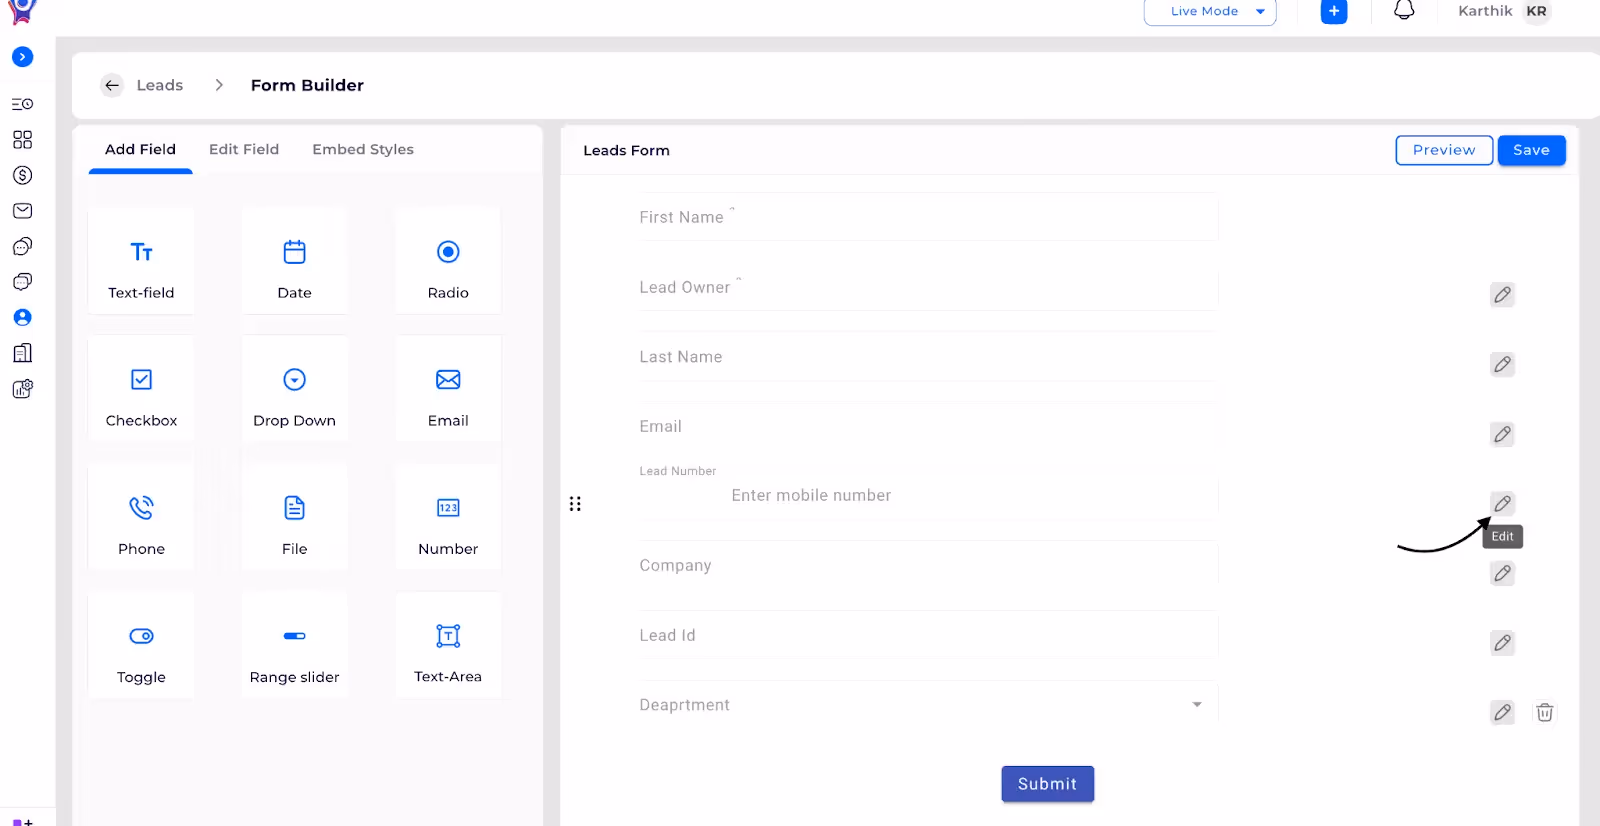
Step 3: Drag and change the sequence of the order of fields

Step 4: Click on delete icon to delete form field

Step 5: Click on preview to preview the form
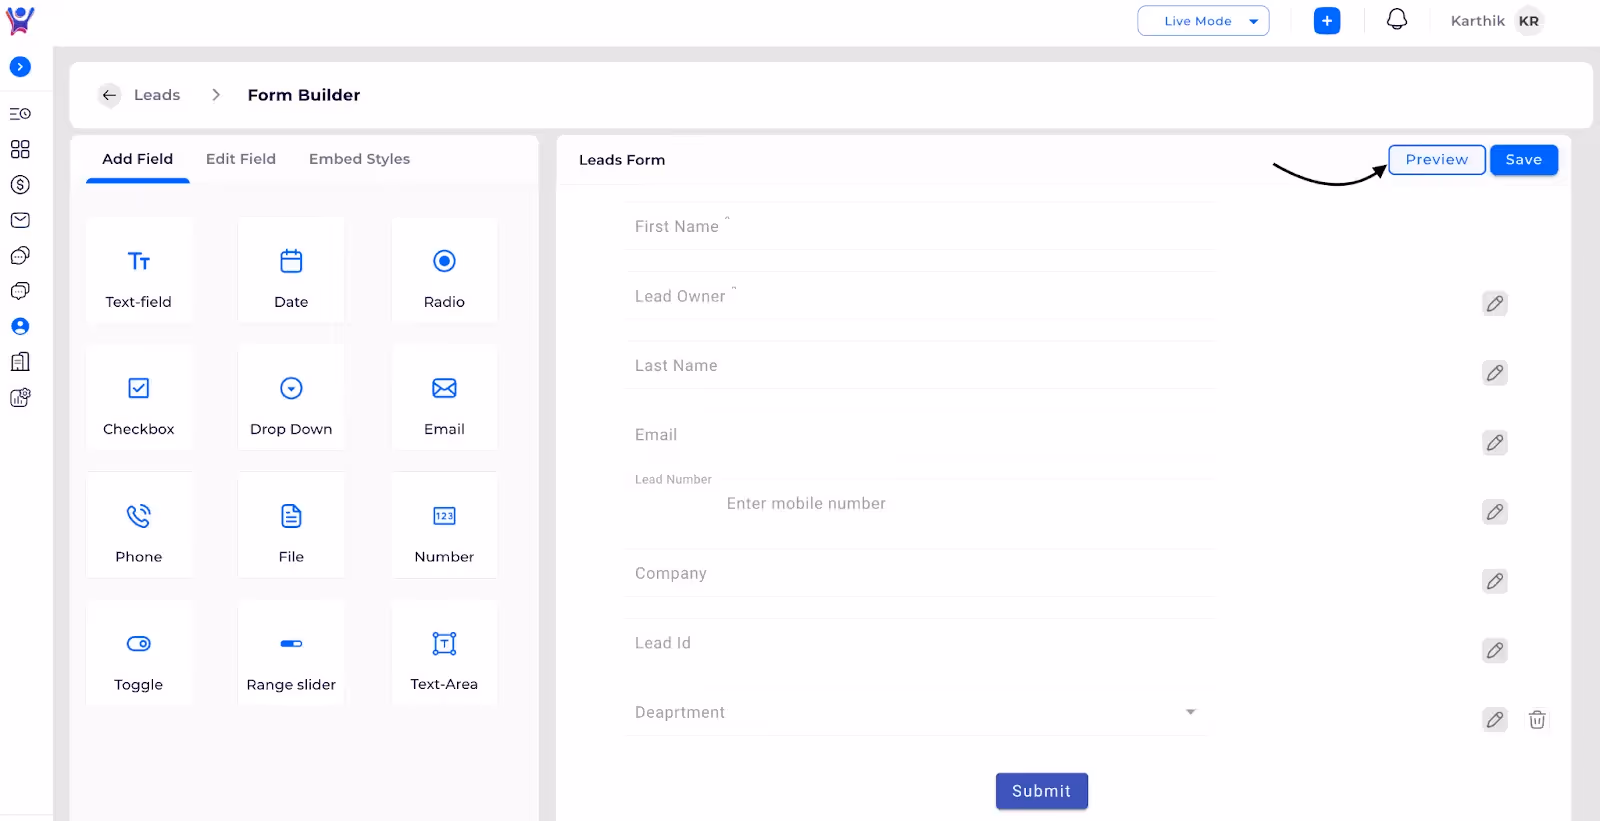
Step 6: Click any one of the icon under add field to create respective field
For example:

Step 7: After making essential changes, click on save
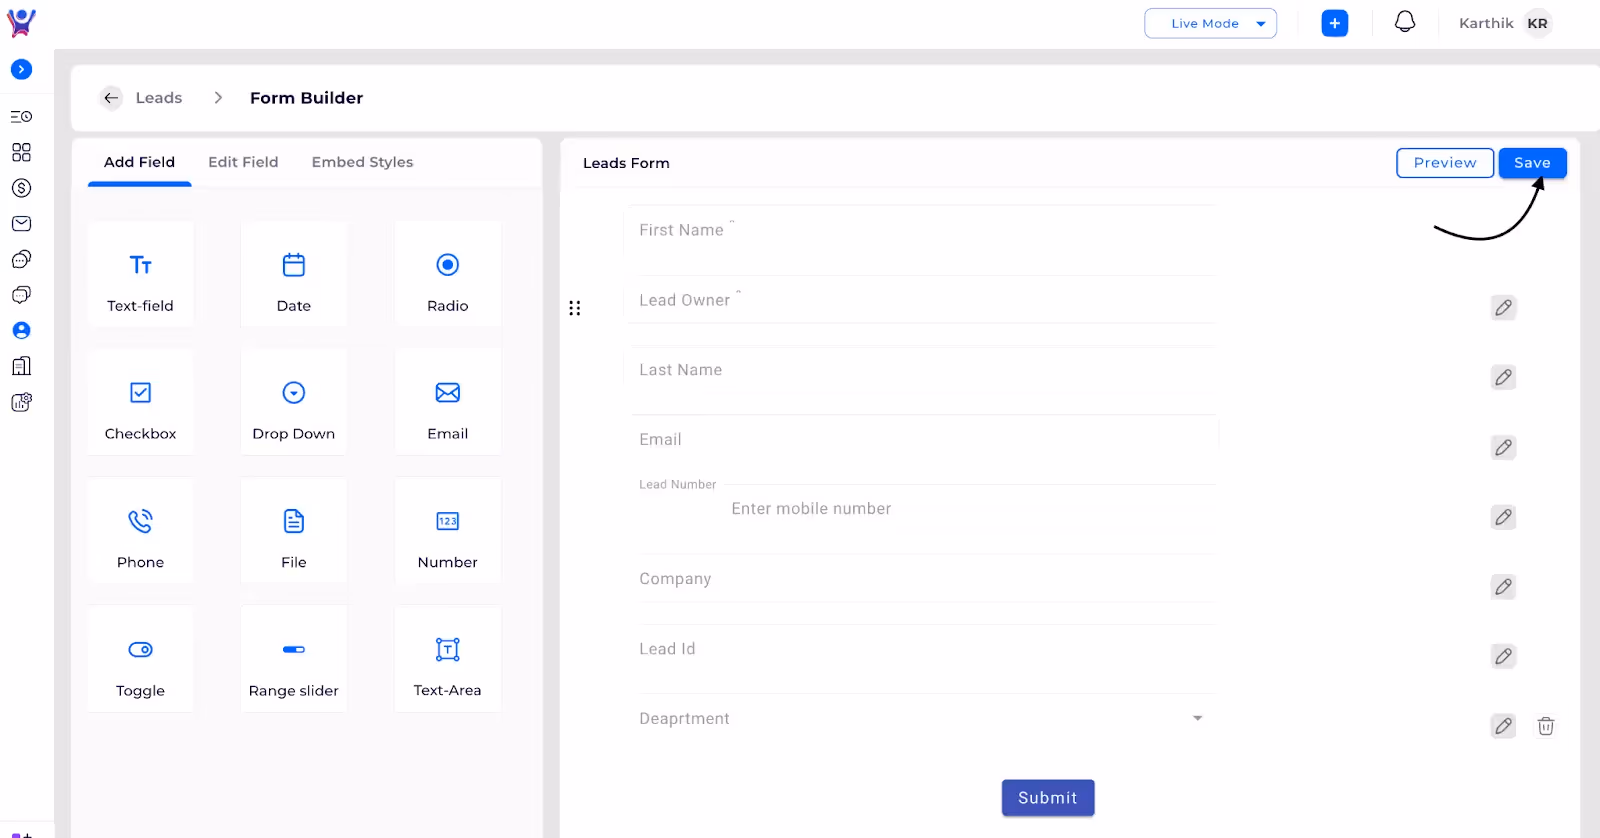
Customizing Leads Form fields
Step-by-Step Guide to Customize Leads Form fields
Steps for Applying Filters
This allows you to include or exclude specific field values as needed. You can apply the filters or reset them using the respective actions.
Click on Filters
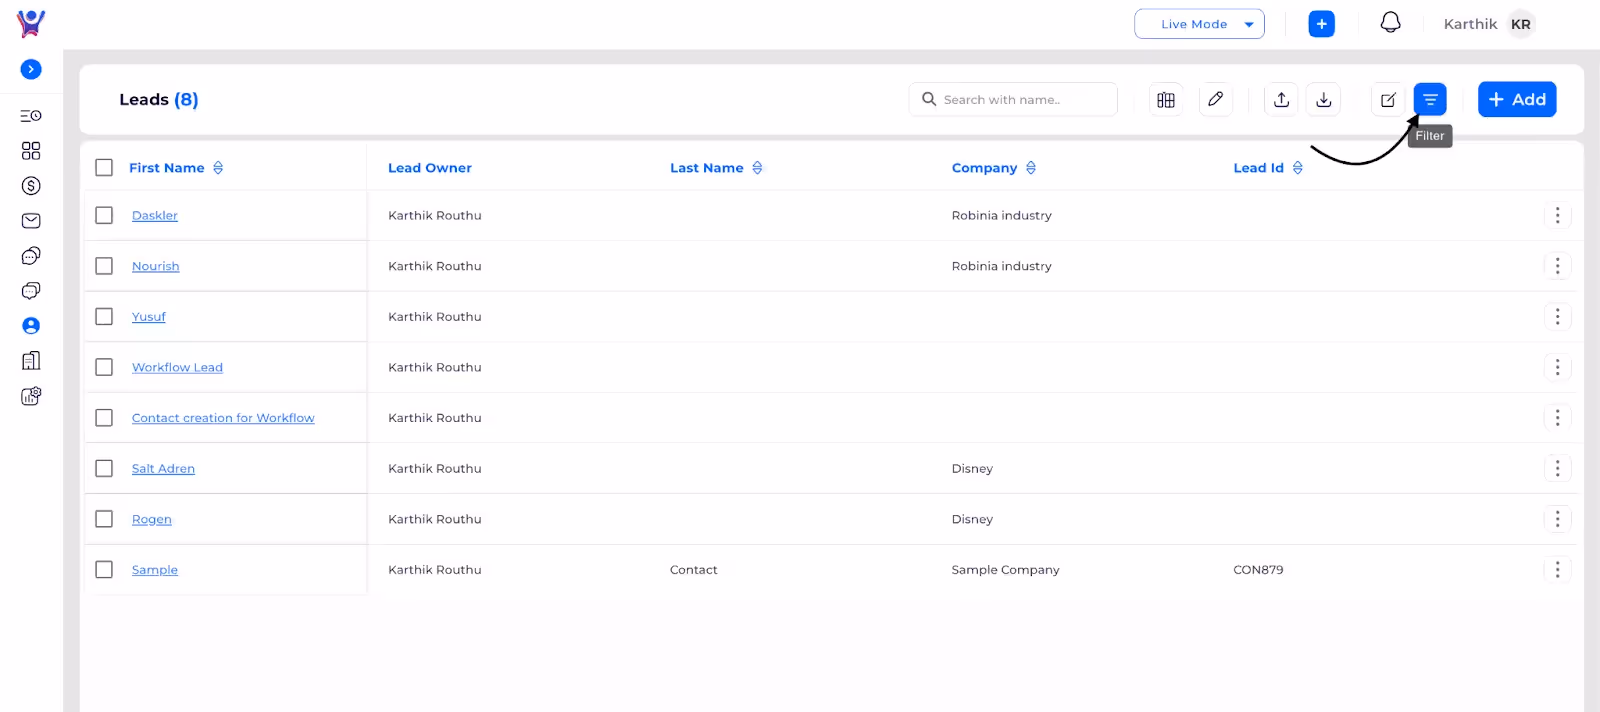
Select include /exclude of fields which you want filter
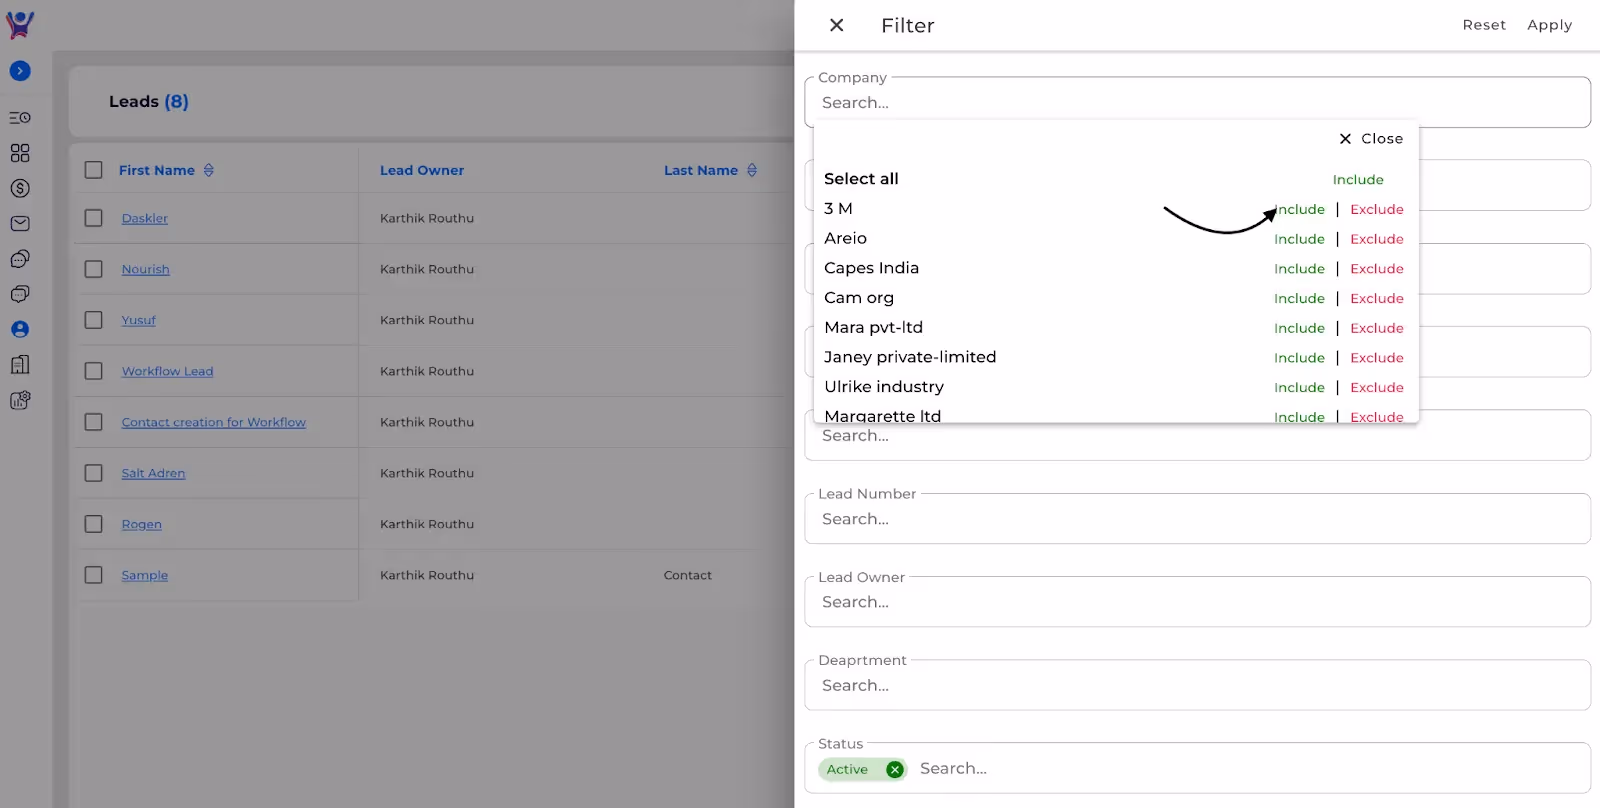

Apply filter
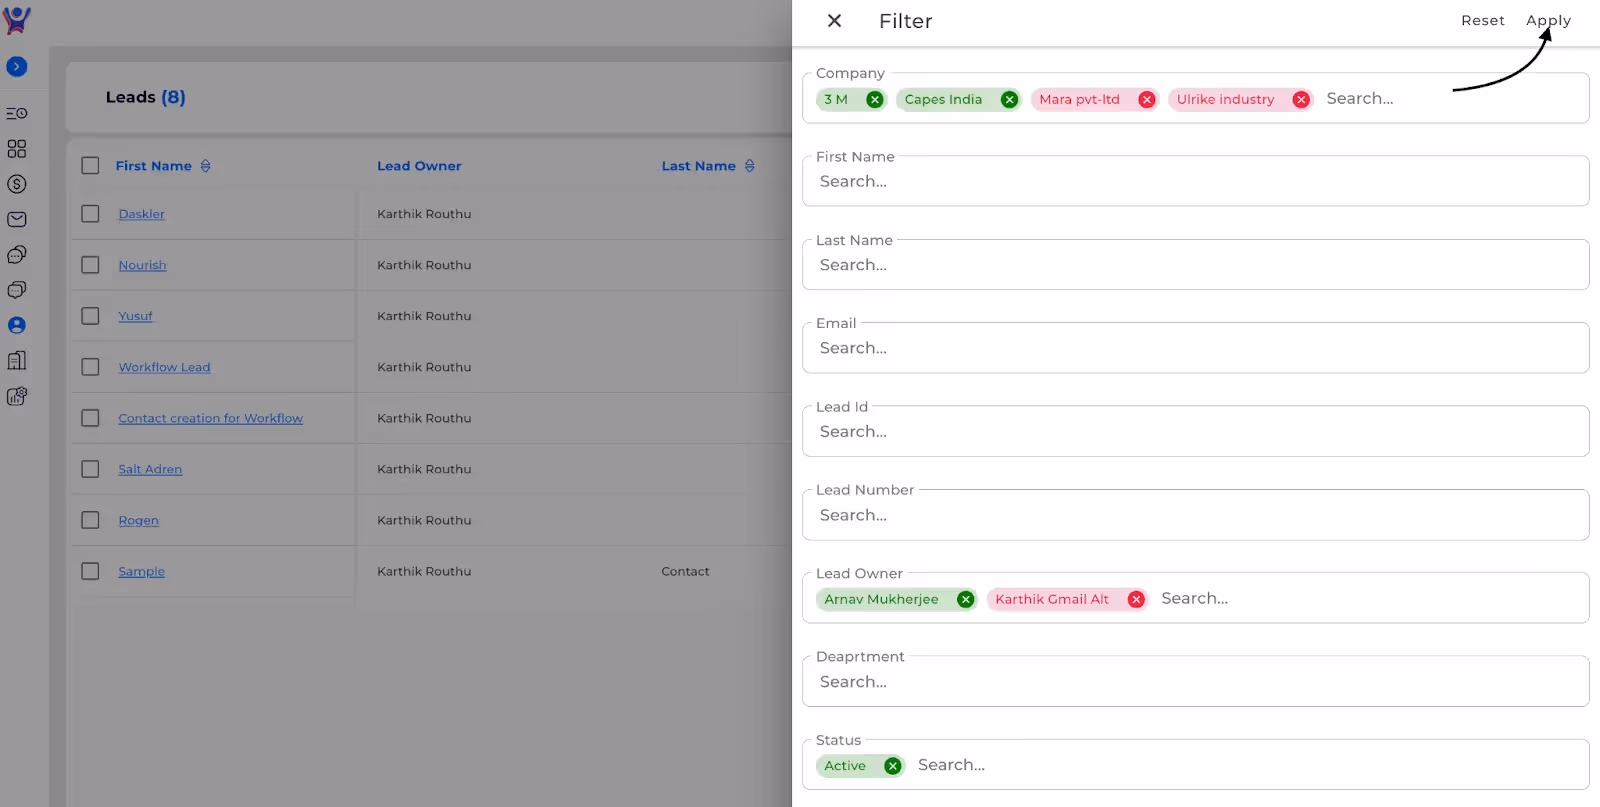
Reset Filters
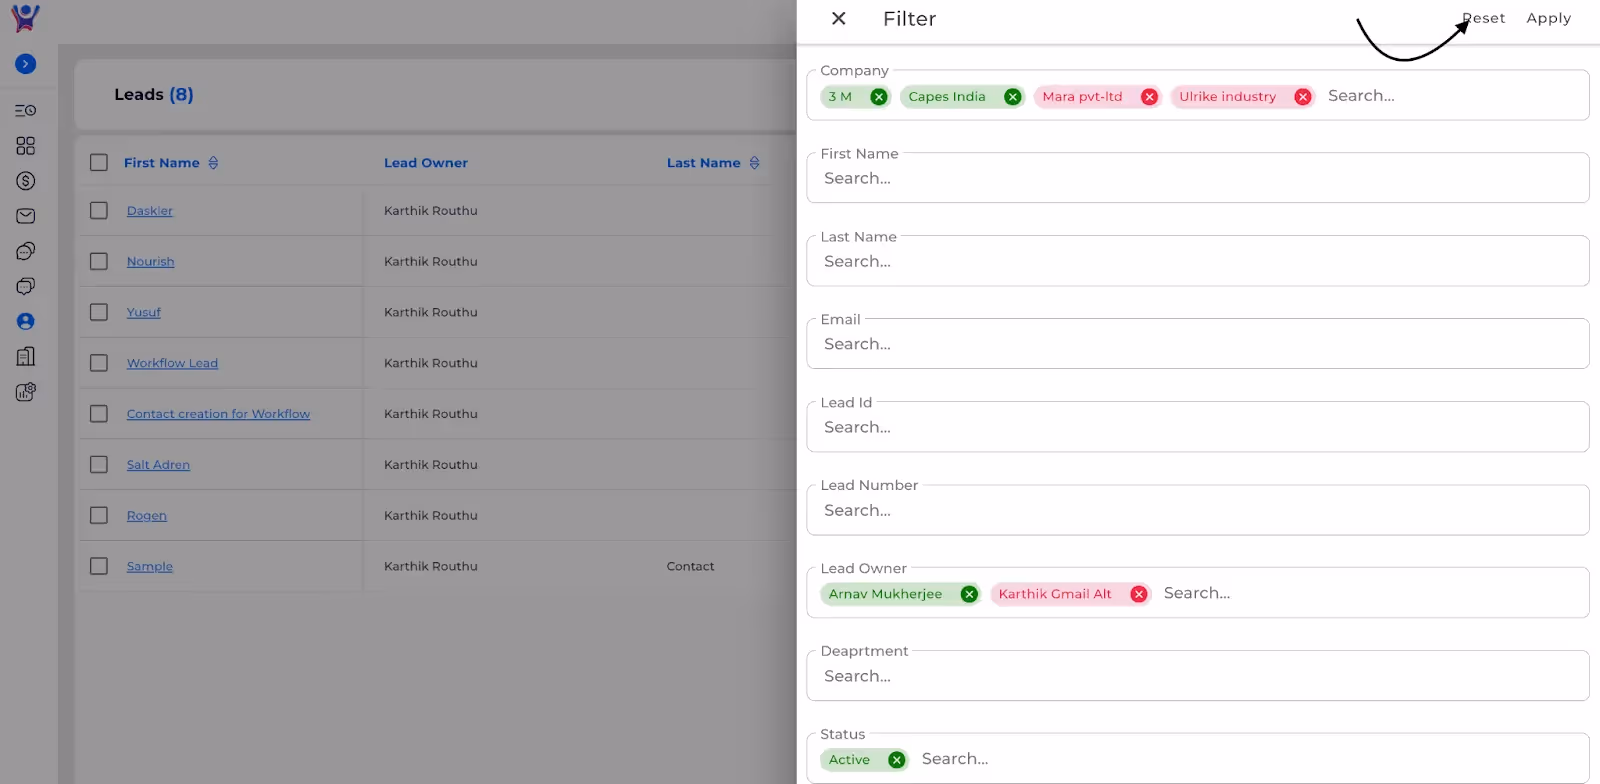
How to Apply Filters on Leads
Apply filters to see the specific lead data of your choice
Search a Contact
After creating the contact, you can view the contact in the company list ,you can search the contact with its name as shown below.
.avif)
Sort the Contacts List
Note: You can sort the contact list with respective one column at a time. If sorting is set on one column, then if you try to sort using another column, you will find that sorting gets applied on the latest picked column and sorting that has been previously applied on another column, gets removed.
- In the header, you can see the arrow marks, you can sort the list with respective to the column chosen. If either of the arrows are not highlighted, that means no sort order is applied on the column.
.avif)
- In the header, you can see the upper arrow mark is highlighted, that means sort order is set in descending order.
.avif)
- In the header, you can see the downward arrow mark is highlighted, that means sort order is set in ascending order.
How to perform Search, Sort Operations on Leads
Exploring the Contact List with Search and Sort Operations
View Contact Details
- To view contact details , click on the contact. You will see details screen just like mentioned below.
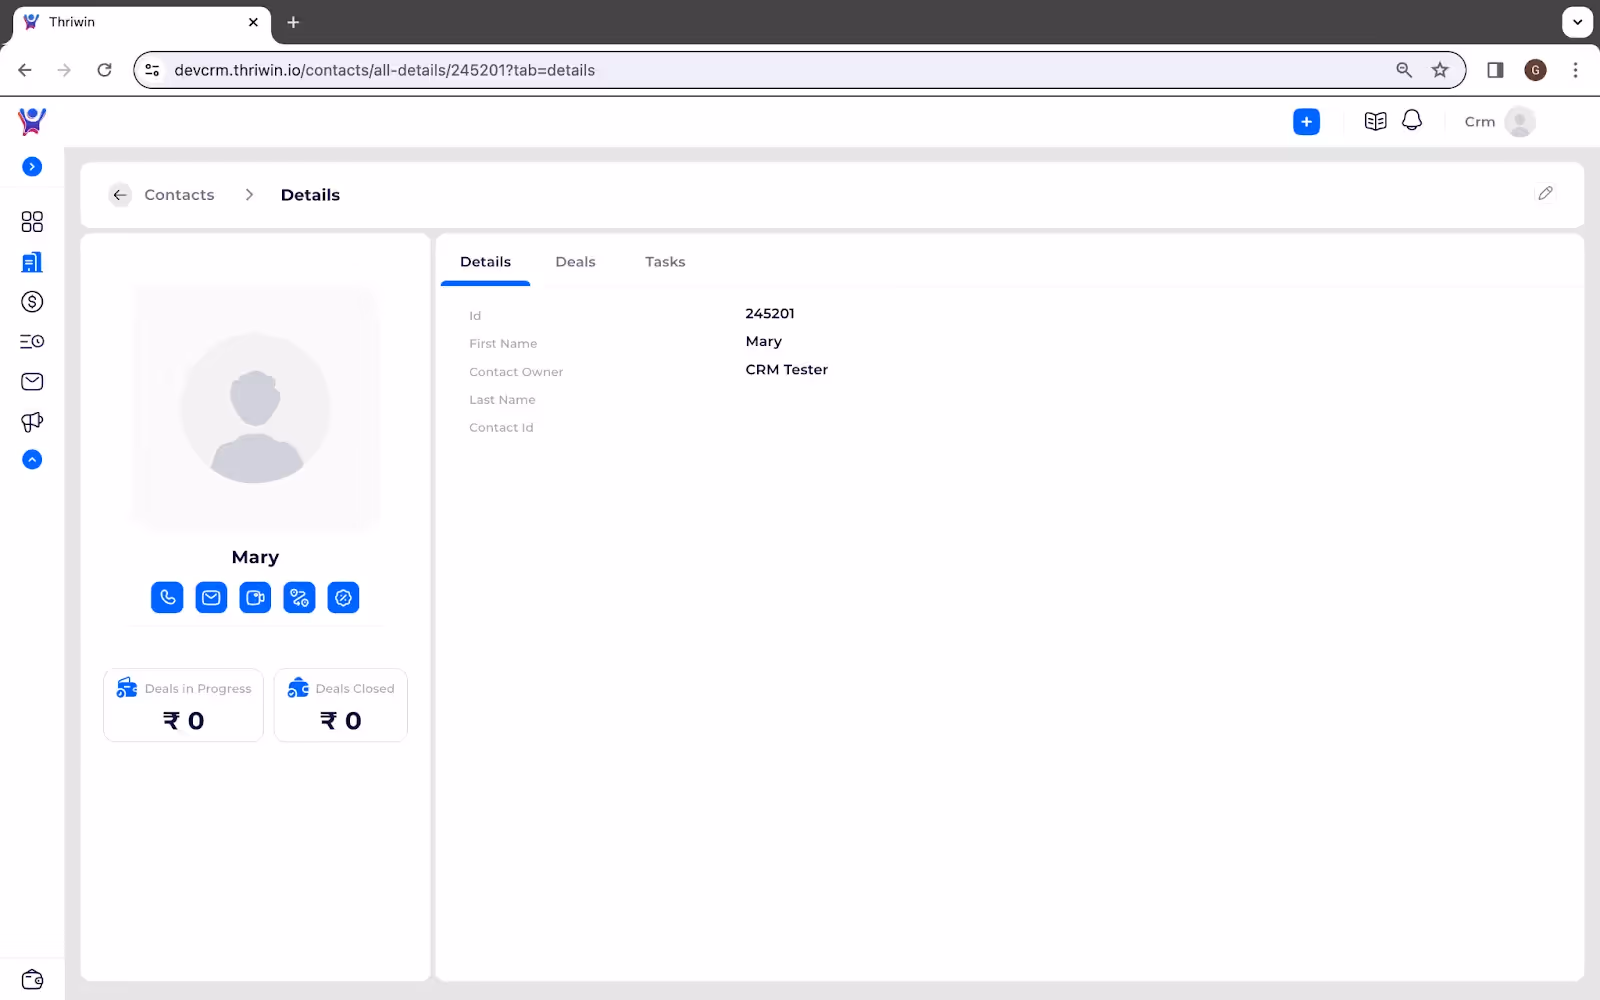
Configure a activity with Contact
- Various activities that can be scheduled with the contact are located on the left side of the page. Just click on the activity you want to do with the contact.
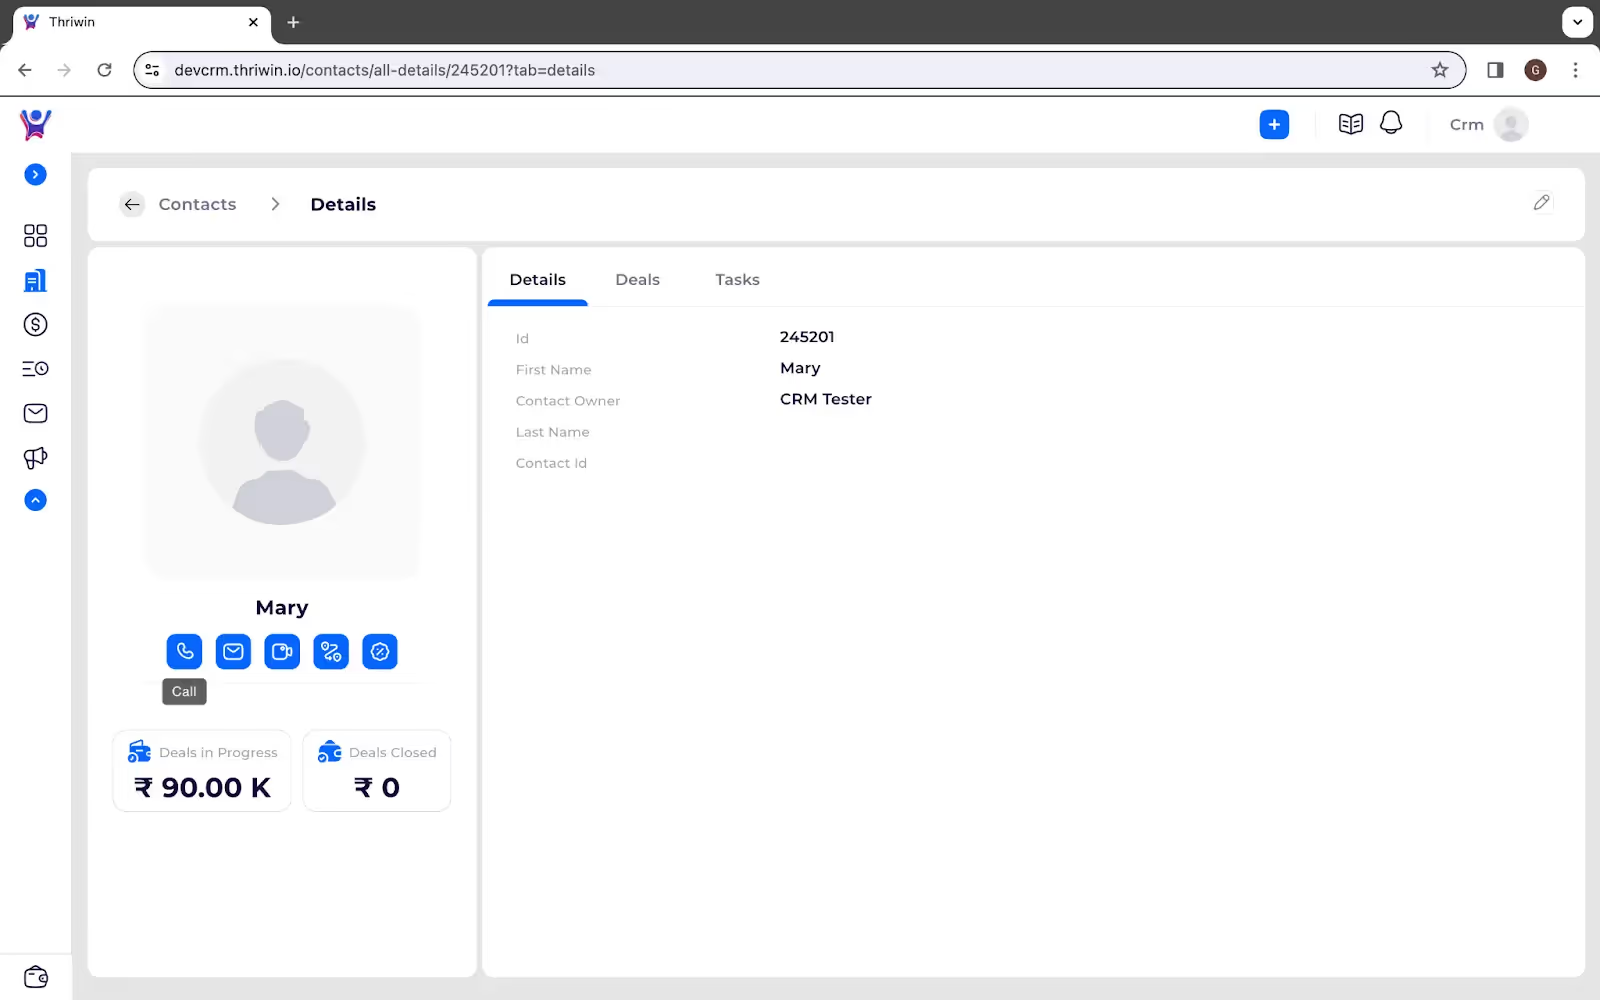
- By default we fill the specific details for you. Just tell us when you want to schedule the activity , we take the pleasure of reminding you.

- Such completed and scheduled tasks are shown in the tasks tab of the same contact details page.
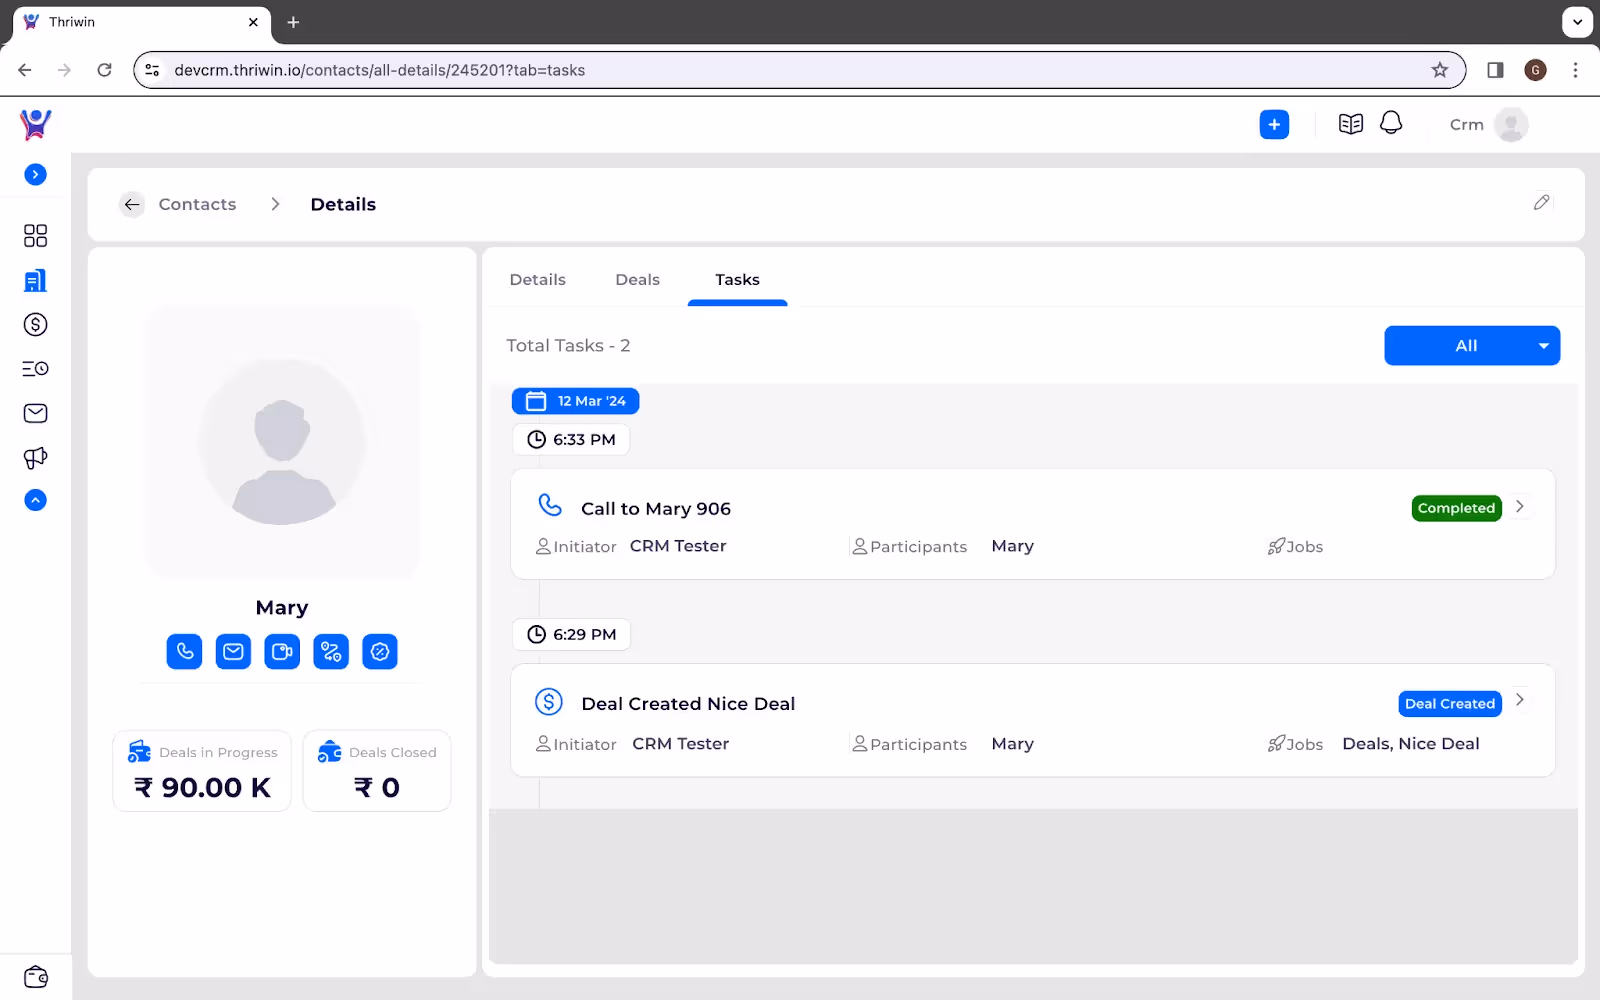
View Deals associated with Contact
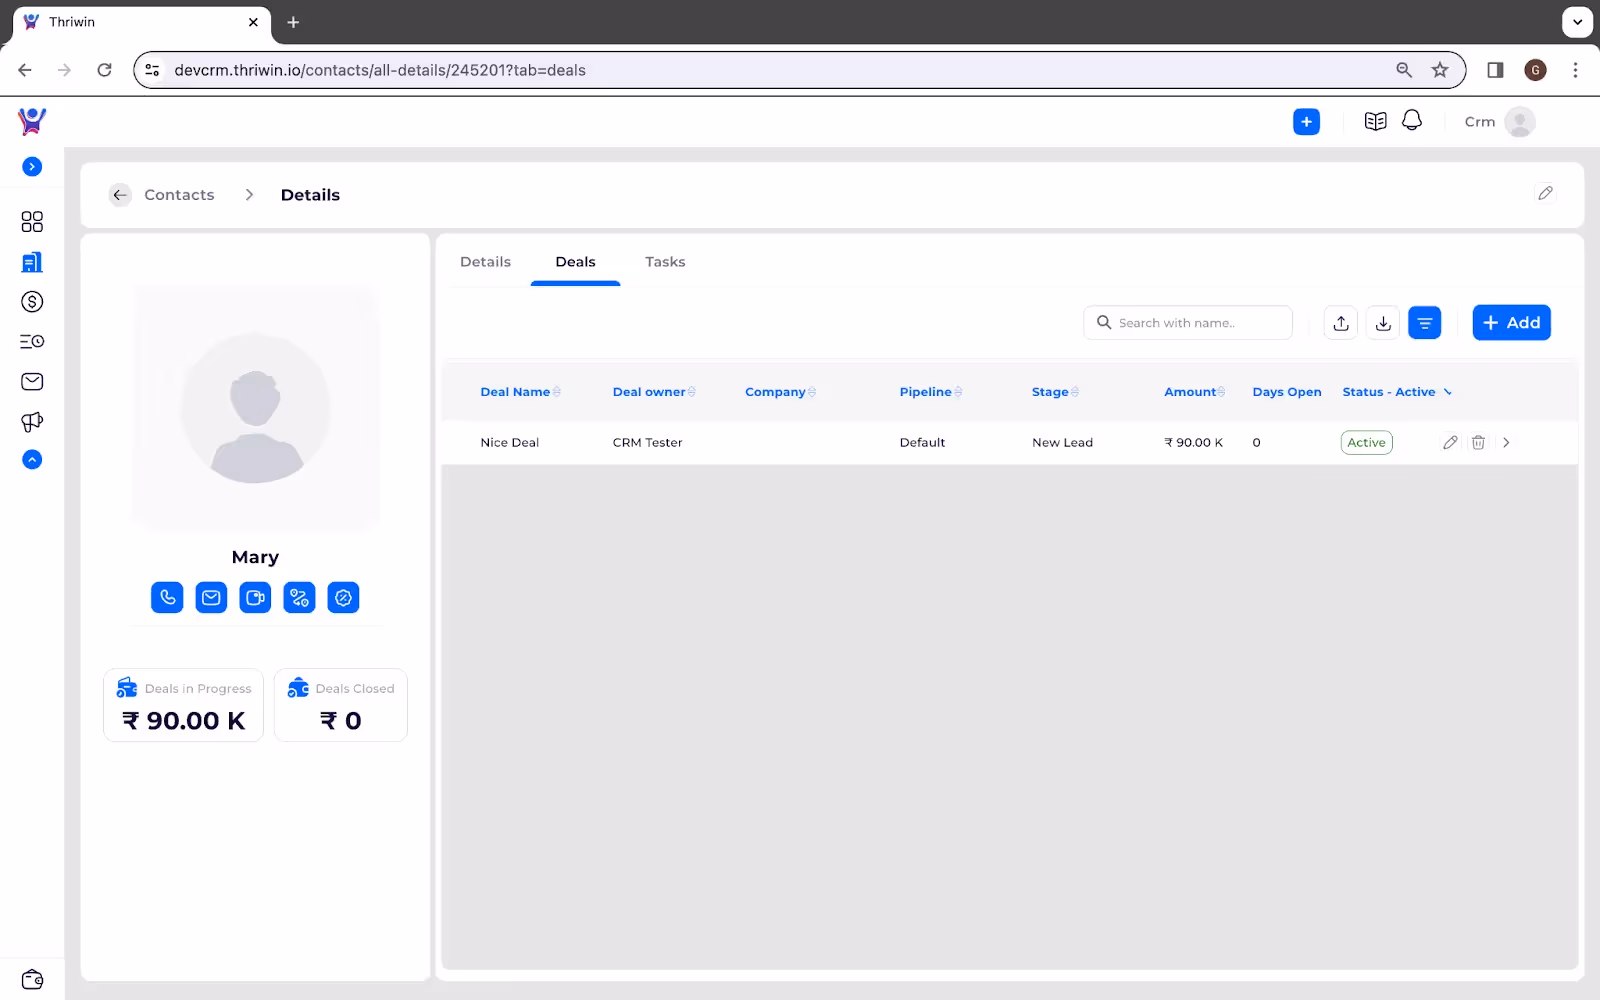
- To edit details of a contact , go to contacts list & click on the edit button as shown.
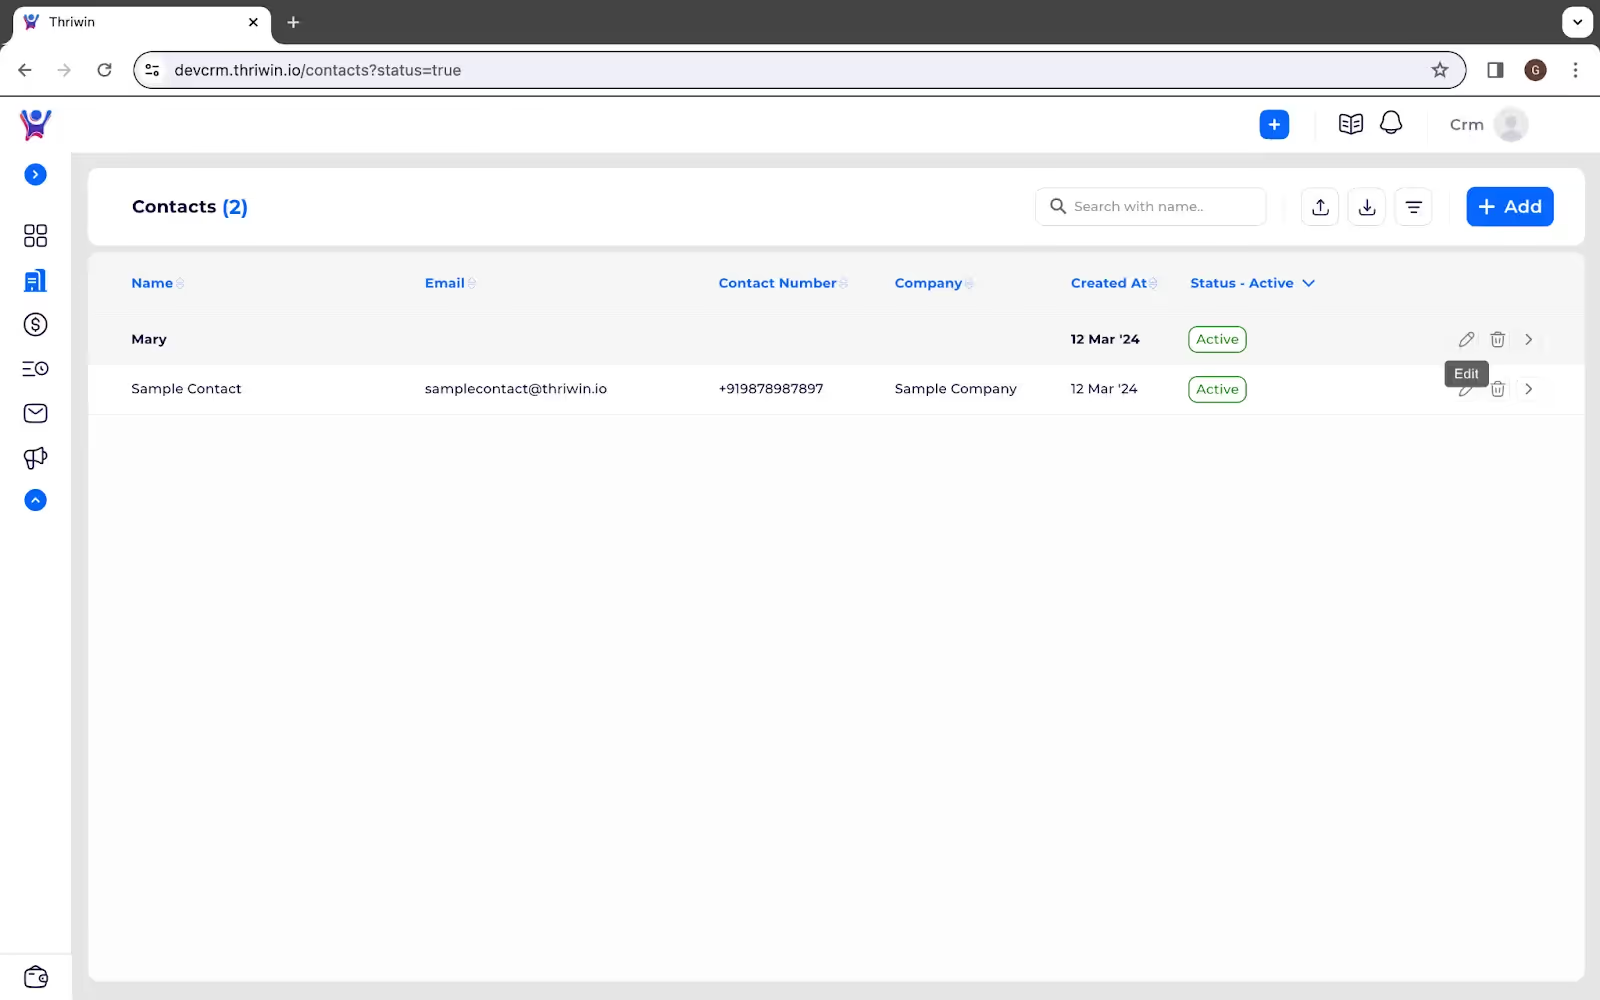
- Thereby , we will redirect you to contact details page where you can contact details.
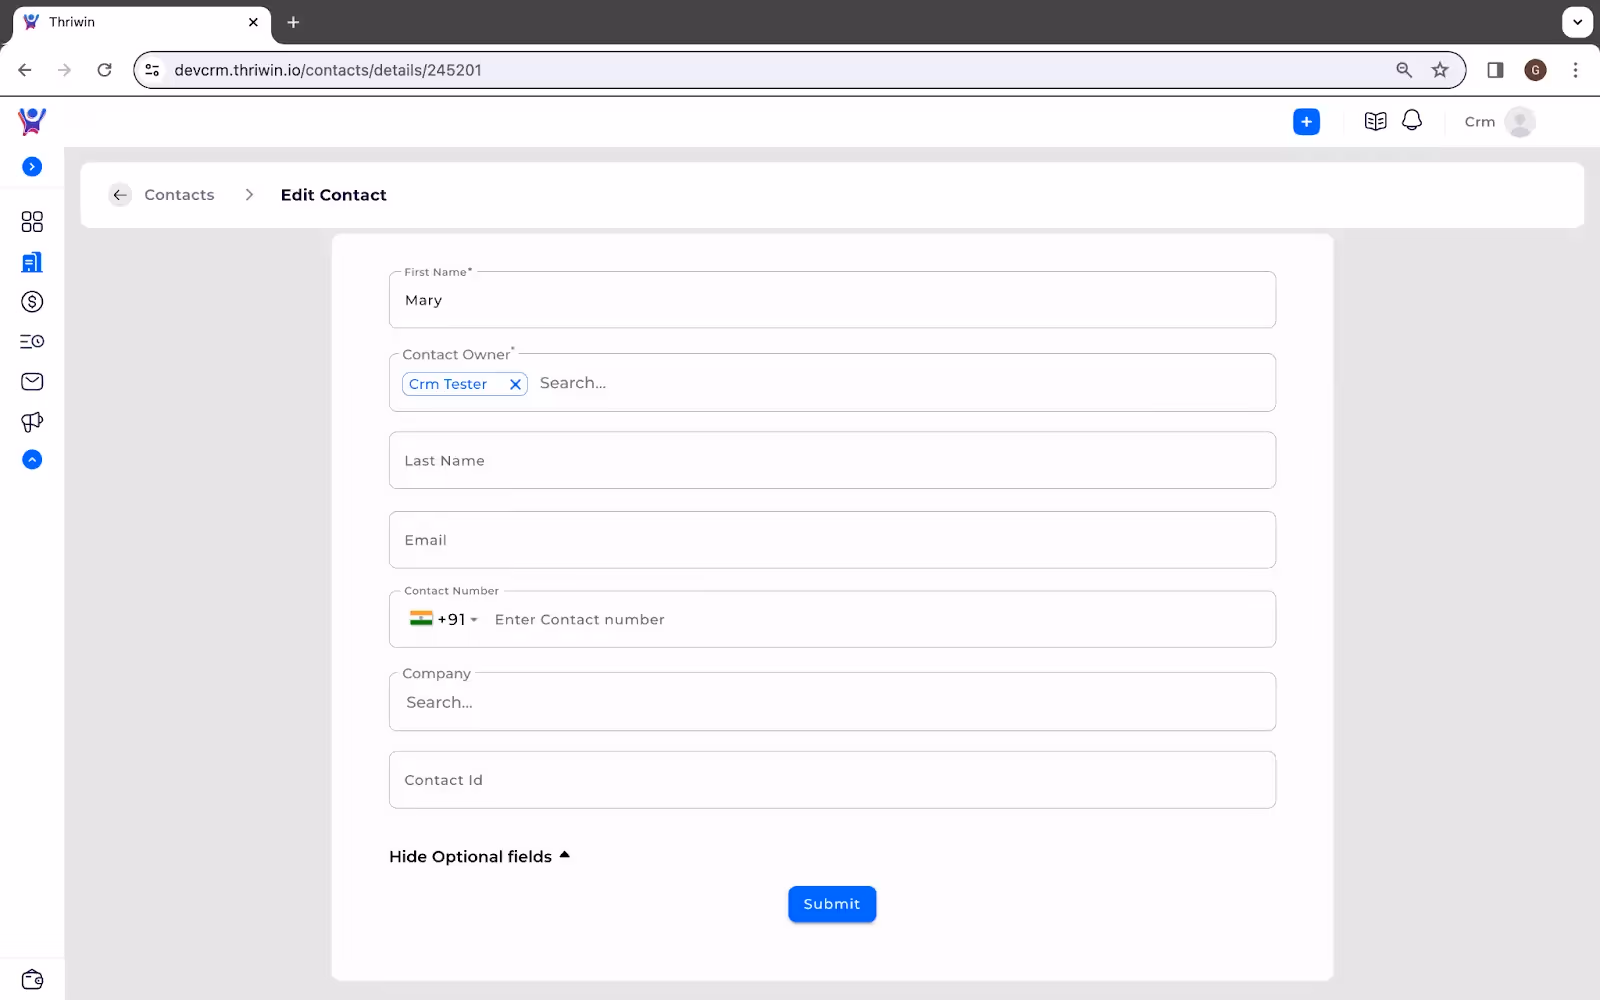
- Once you are updating the contact details , hit on ‘submit’ and you could see the updated contact information in contacts list.
Note : If you are unable to edit , check for the status of the contact owner . we cant let you submit a contact whose contact owner is inactive .

Incase , if you are no longer using the contact you can deactivate the contact as shown.

We will have a list of your inactive contacts too , if incase you want to reactivate it.

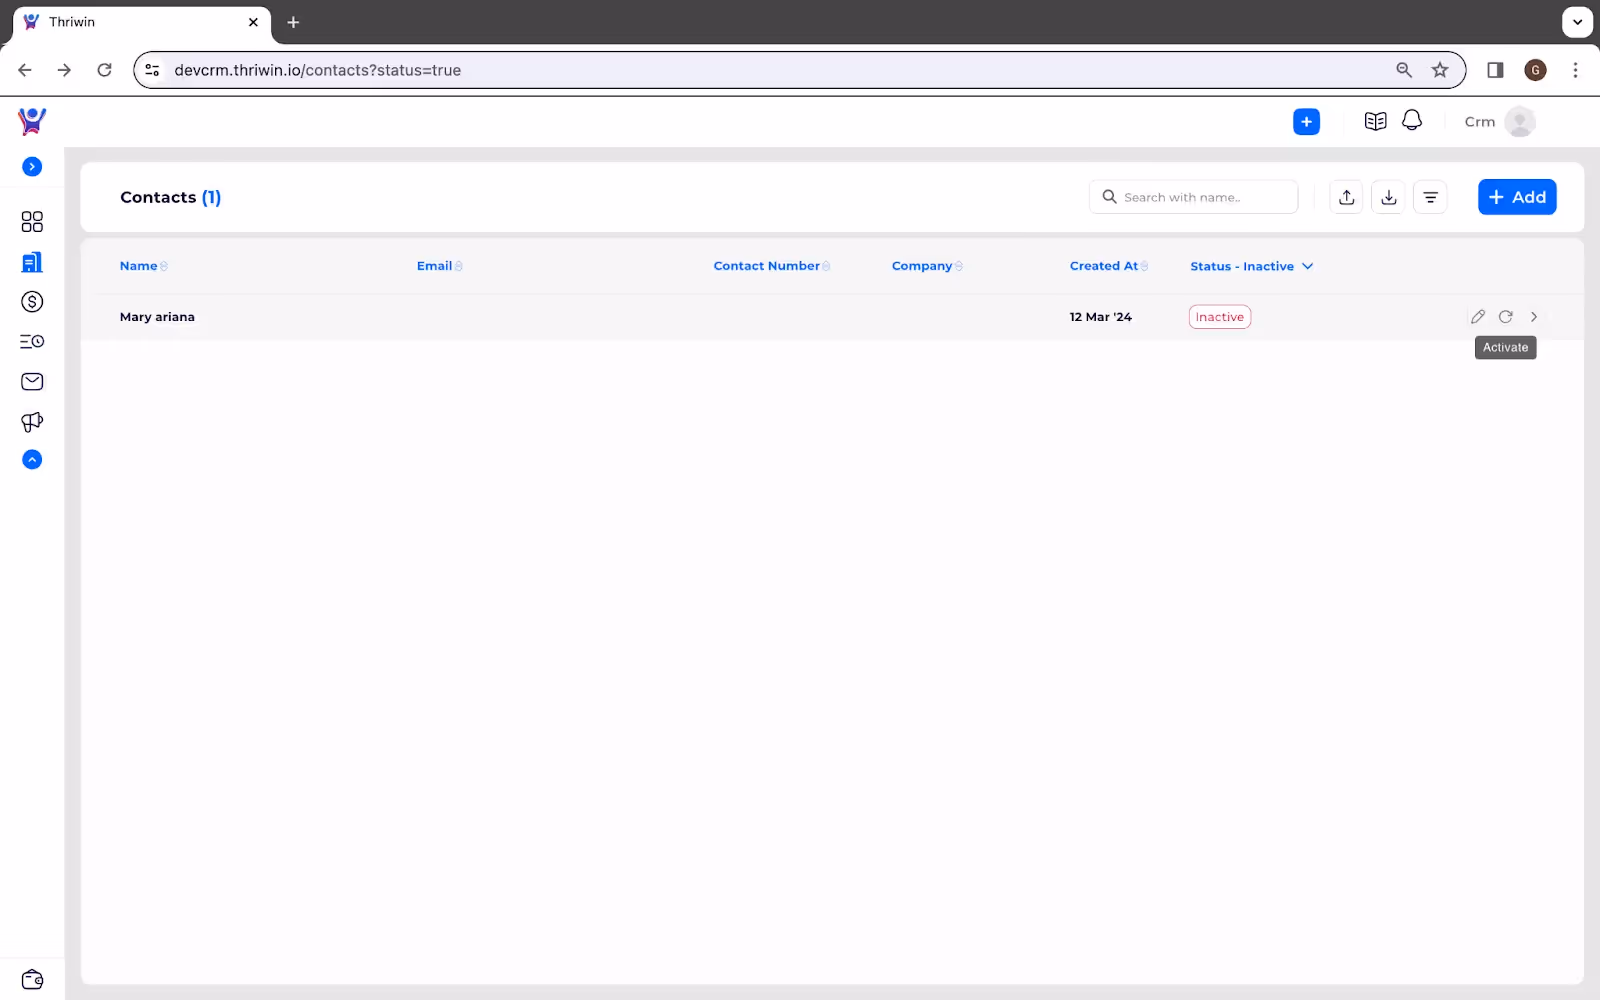
VIew Lead Details
step by step guide to view Contacts: In depth guide
Navigation to Leads
From the homepage to the "Sales CRM" section, then proceed to the "Leads" page.
Step 1:
Step 2:
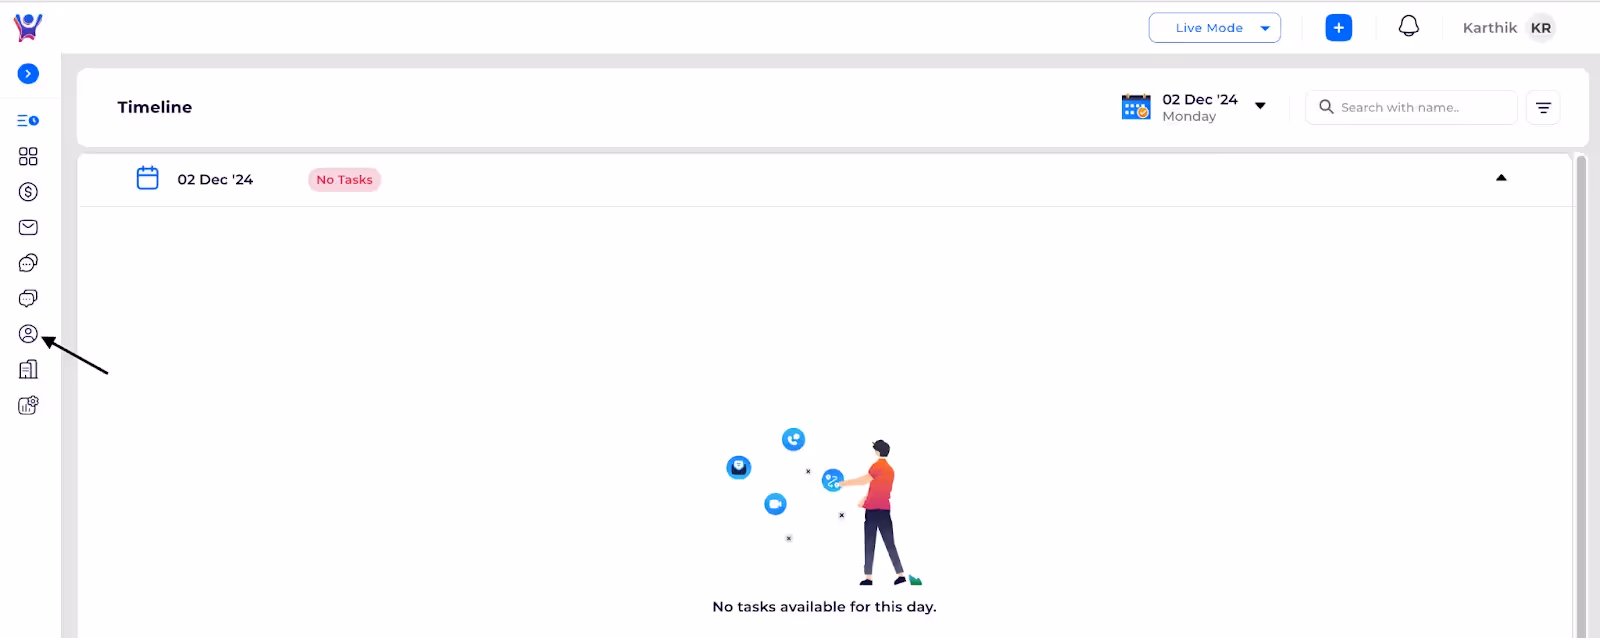
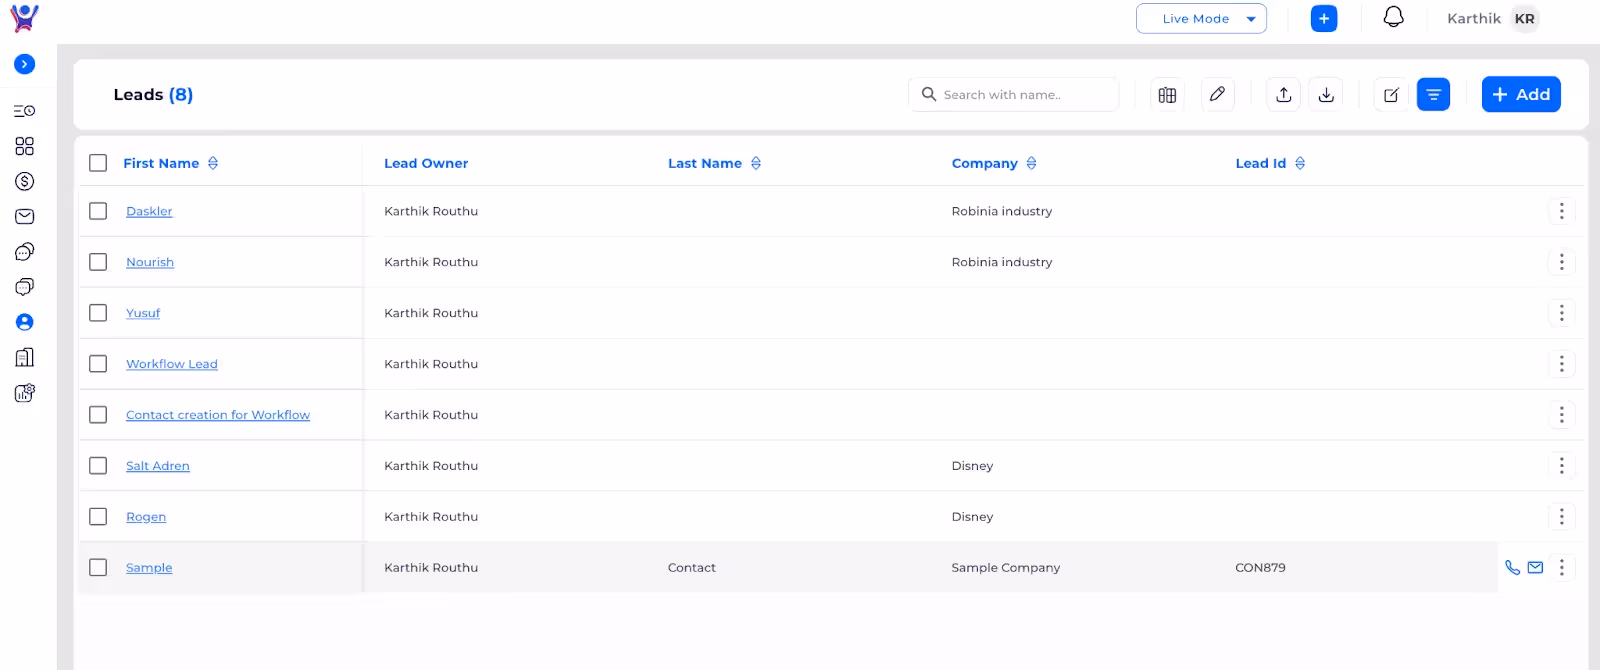
Addition of Lead
Addition of a single Company
To add contact, click the "Add" button. Fill in the mandatory data fields. To access optional data fields, click on "View Optional." You can then choose to either "Submit" or select the "Save and Add New" option.
Step 1: Click on add

Step 2: Initial form after clicking on add
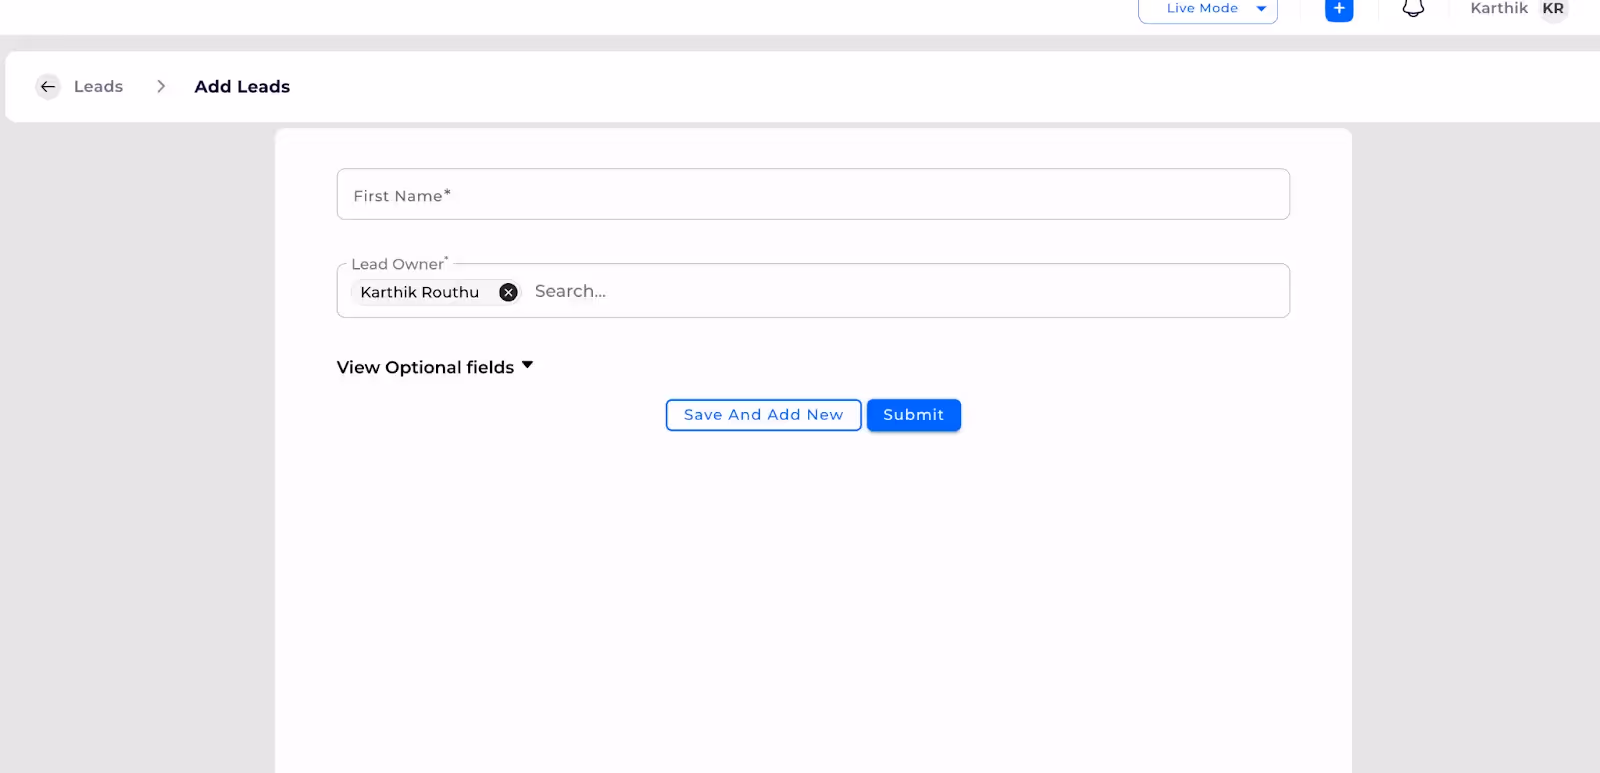
Step 3: To view optional fields

Step 4: Click on Submit
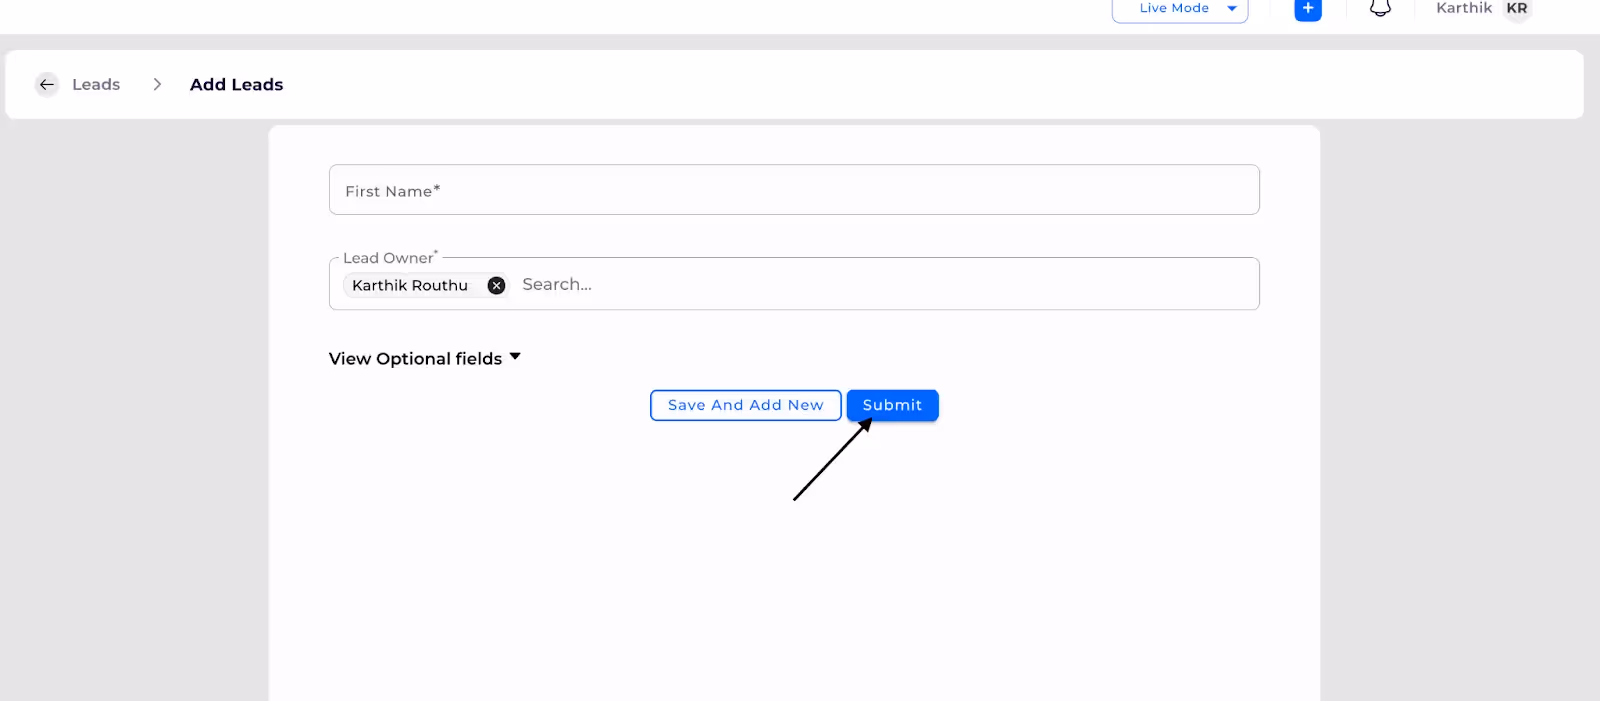
Step 5.Click on Submit
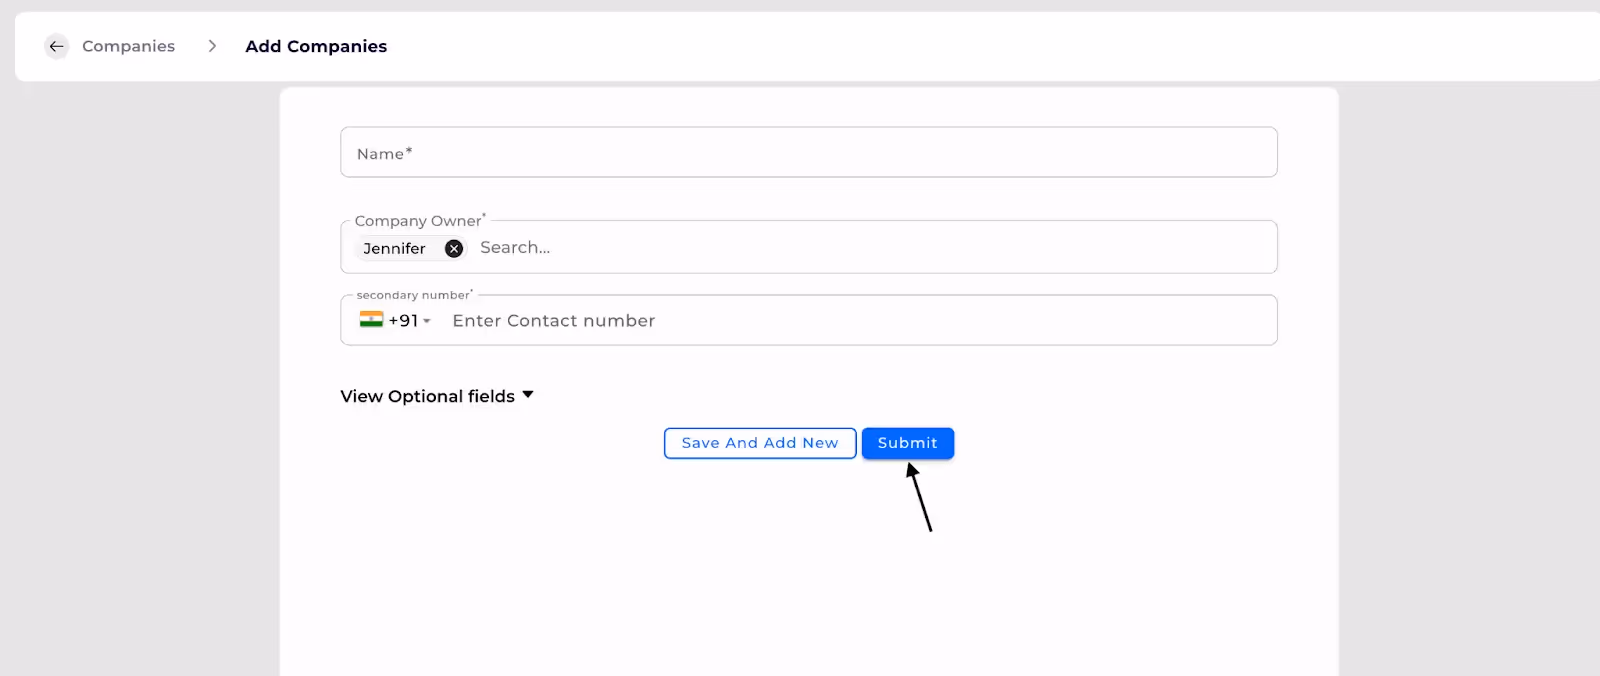
Step 6:Click on save and add new if you want add more

Bulk addition of companies through imports
Scope: To import leads using Excel or CSV files.
Steps:
- Select the "Import" option.
- Choose the "Create" mode.
- Map the columns in your file to the corresponding system fields.
- Click "Submit" to initiate the import process.
- Wait for the acknowledgment email, as this is a background task and may take some time.
- Check the email for any error messages. Rows with errors will include specific error details and will be highlighted in orange
Step 1: Click Import Icon
Step 2: Choose file
Step 3Select Import type as create

Step 4: Map File columns to system fields

Step 5: Click on Import to start creation of Leads
How to add a New Lead
Step by step guide to add a contact
Form Fields Customization
Scope:create new fields or update the form configuration of existing fields with various data types.
Here’s an explanation of each data type:
- Text Field: A single-line field used to enter short text, such as names or titles.
- Text Area: A multi-line field for longer text input, such as descriptions or comments.
- Number: A field that only accepts numeric values, used for entering quantities, prices, or any numeric data.
- Phone Number: A field designed specifically for phone numbers, typically formatted to handle country codes, area codes, and digits.
- Date: A field that allows users to select a date from a calendar or manually enter a date.
- Radio: A group of mutually exclusive options where the user can select only one value from the list.
- Checkbox: A field that allows users to select one or more options from a list of choices.
- Toggle: A binary field that can be switched between two states, such as “On” or “Off.”
- Range Slider: A slider that allows users to select a value within a specified range, useful for inputs like price ranges or ratings.
- Email: A field specifically for email addresses, with validation to ensure the input matches the format of an email.
- File: A field that allows users to upload files, such as documents, images, or other media.
- Dropdown: A field where users can select one option from a predefined list, presented as a dropdown menu.
Preview and Save Configuration
- Preview Form: You can preview the form to see how it will appear after applying the changes.
- Save Configuration: Once you’ve created or edited the field configurations, use the respective actions to save your changes, ensuring the updates are applied to the form.
- You can change the order of the fields on the form by adjusting their sequence to suit your preferences.
CLick on configure form fields

Add fields into the form

You can drag and replace form fields sequence
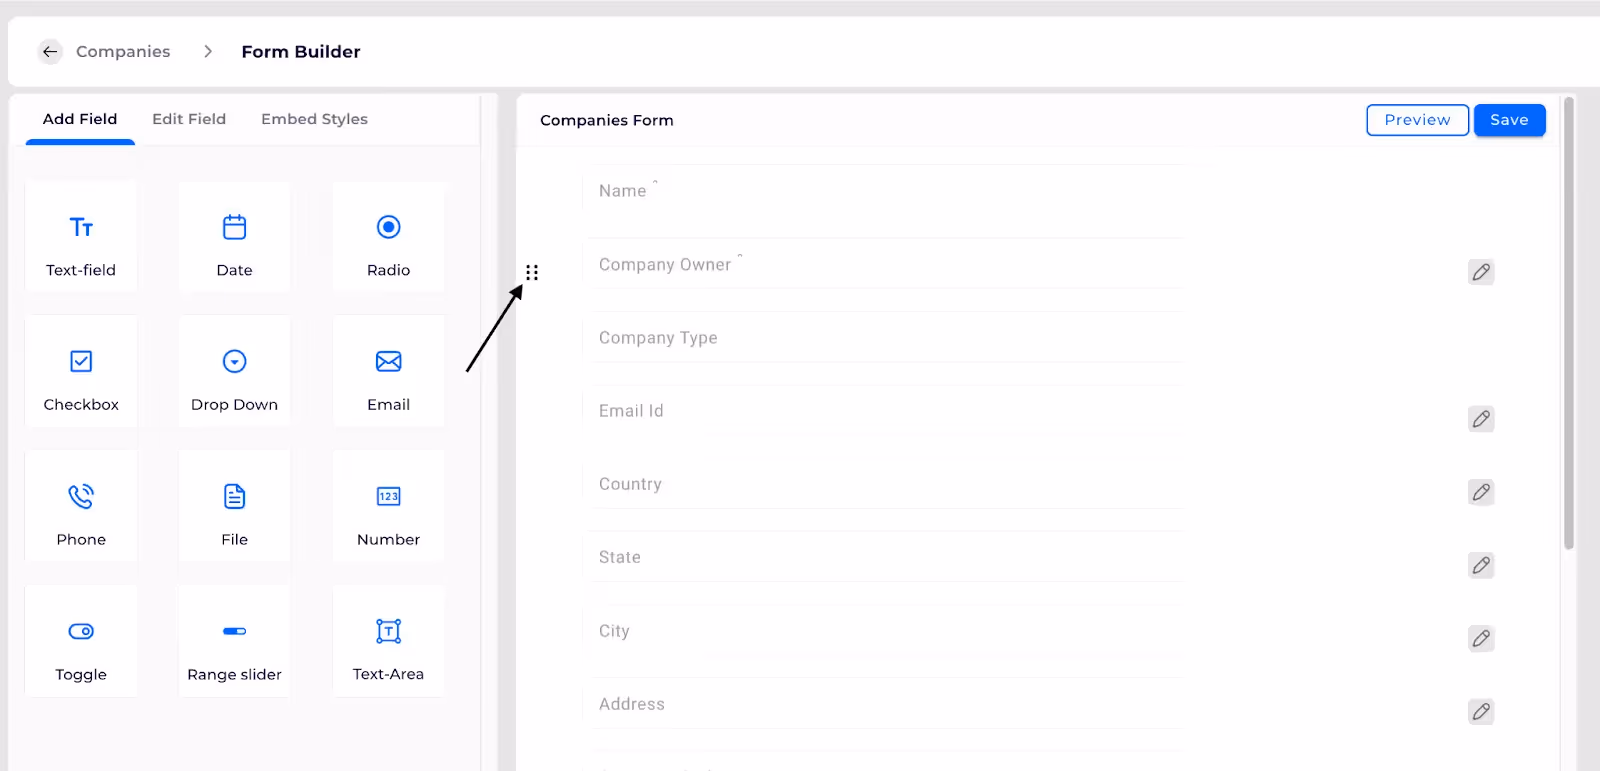
Click any icon to create

Click on Preview
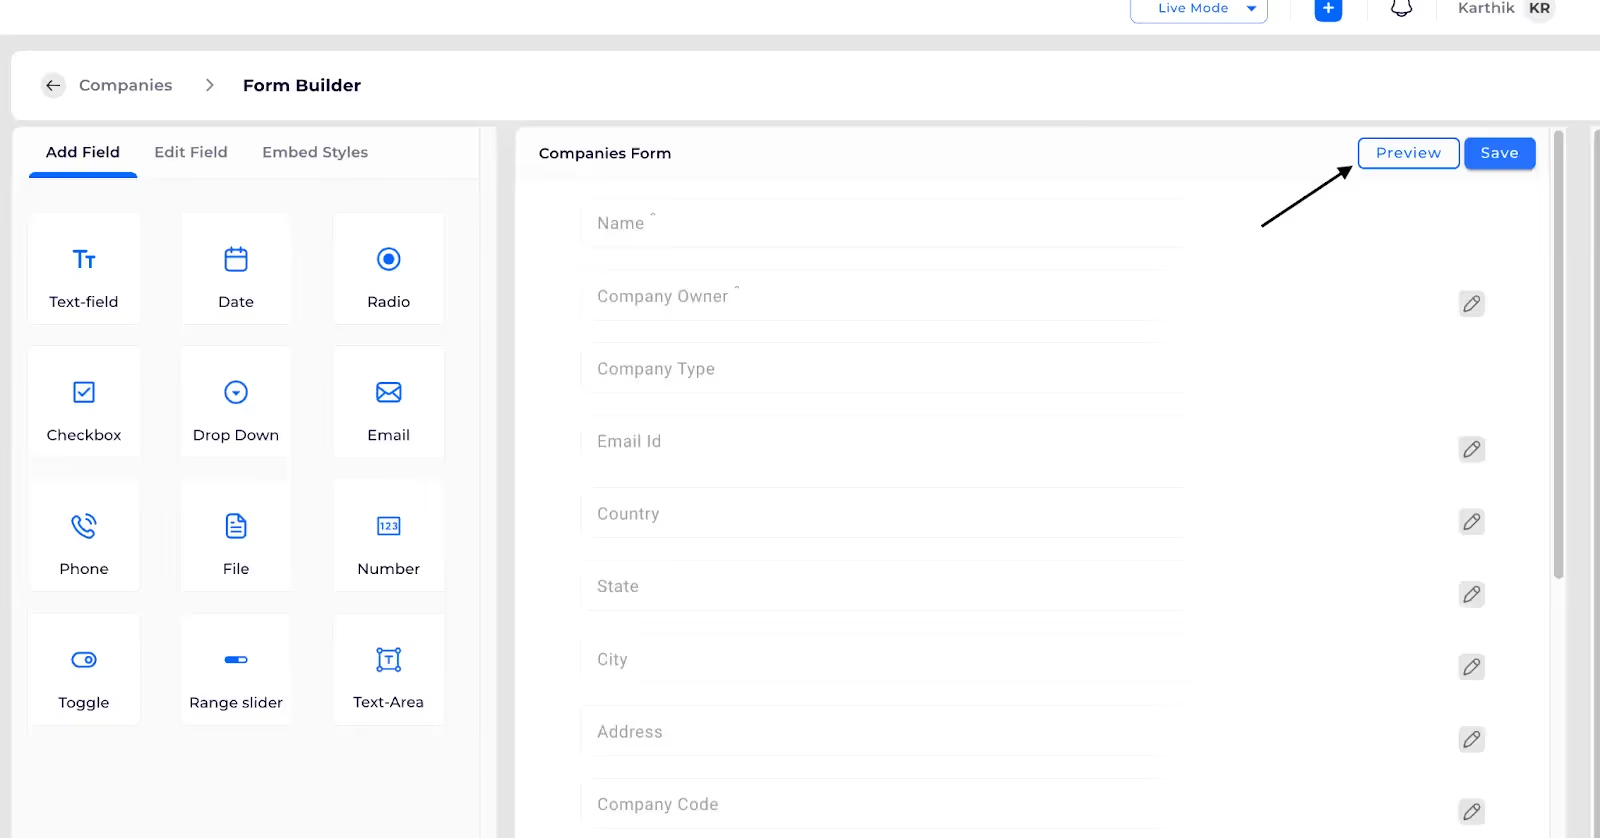
CLick on save to save configuration changes made
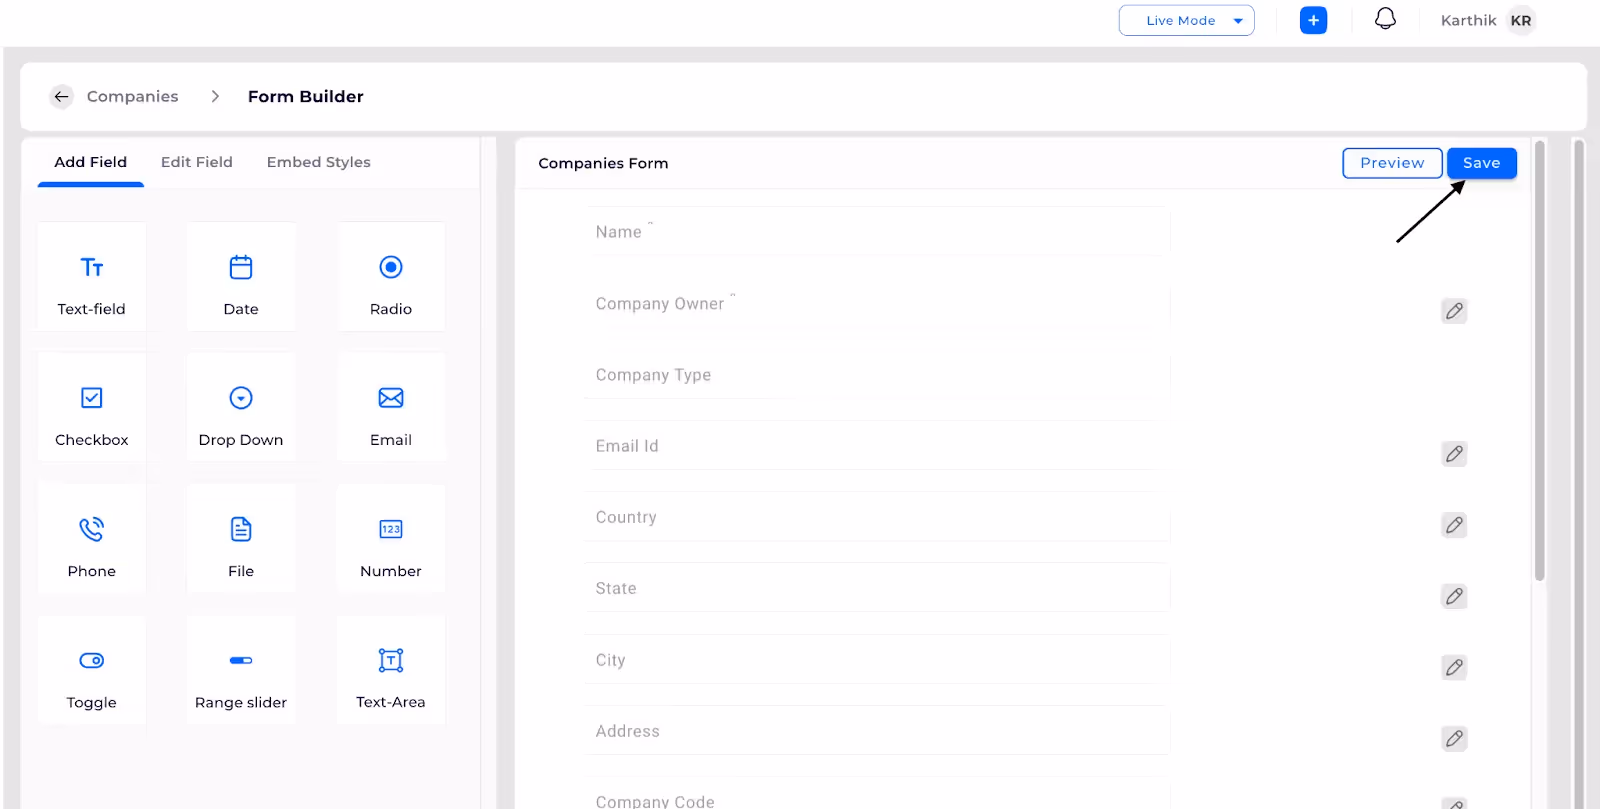
Customizing Company Data points
Step-by-Step Guide to Customize Company Data Fields
How to filter the Companies
- You can access the companies filters section by clicking on the icon shown below.
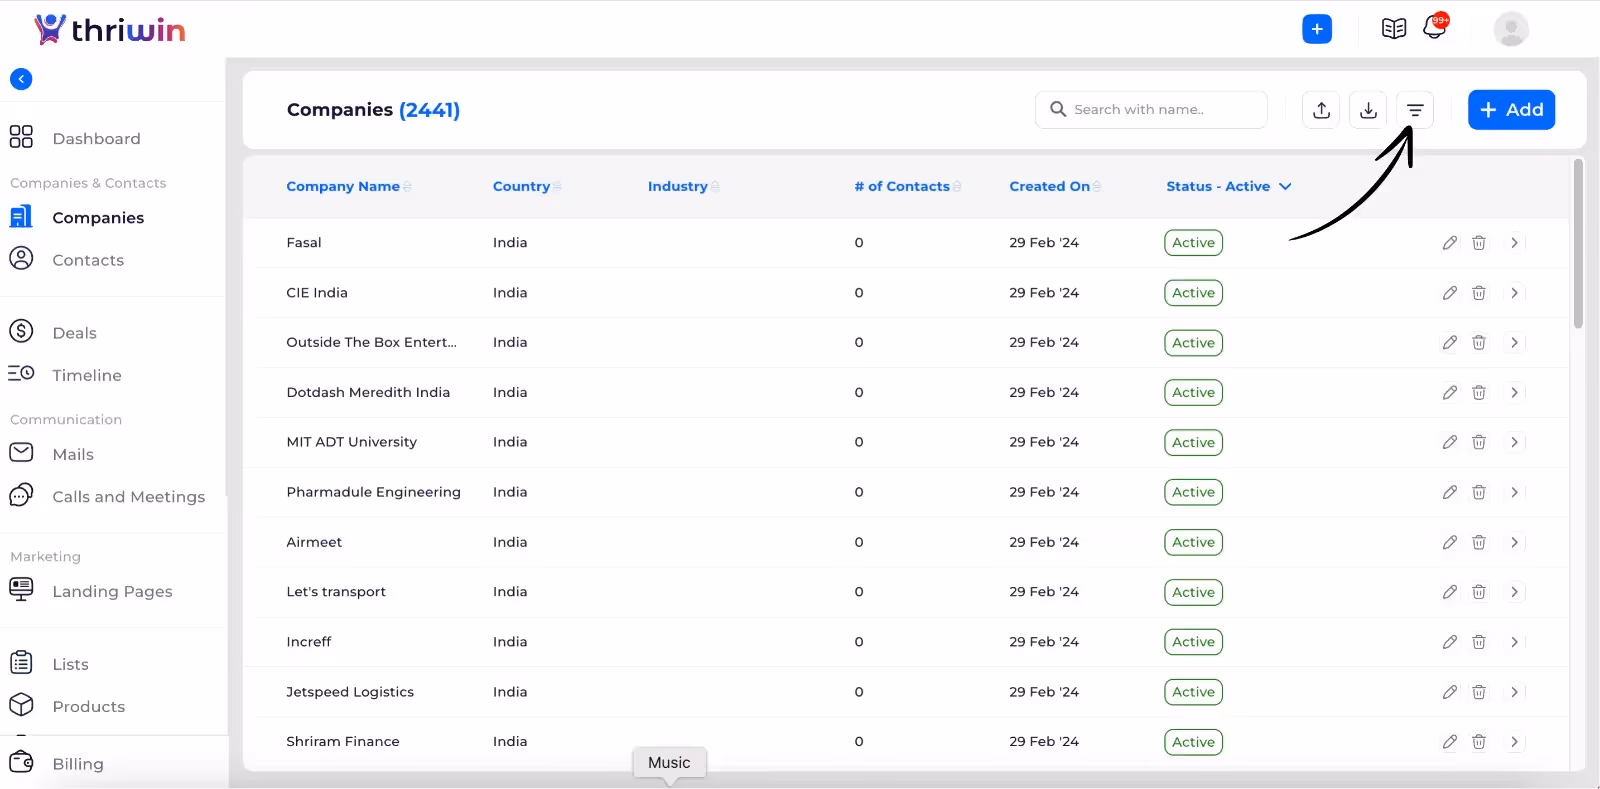
- You can filter companies by including or excluding specific field values as needed. You can apply the filters or reset them using the respective actions.
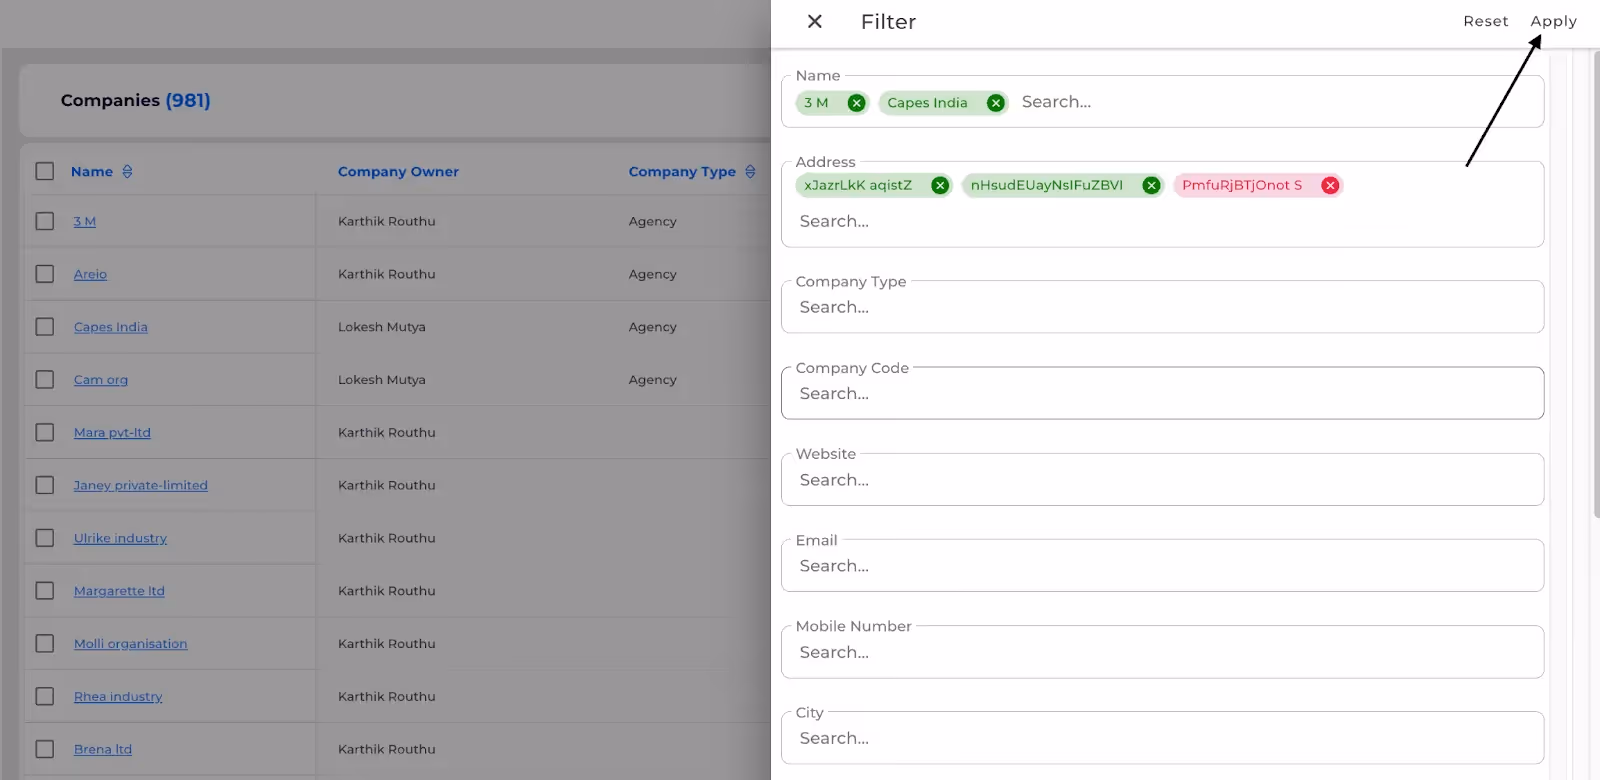
- After applying the filters the companies list will be changed and the filter icon will be highlighted as shown below.
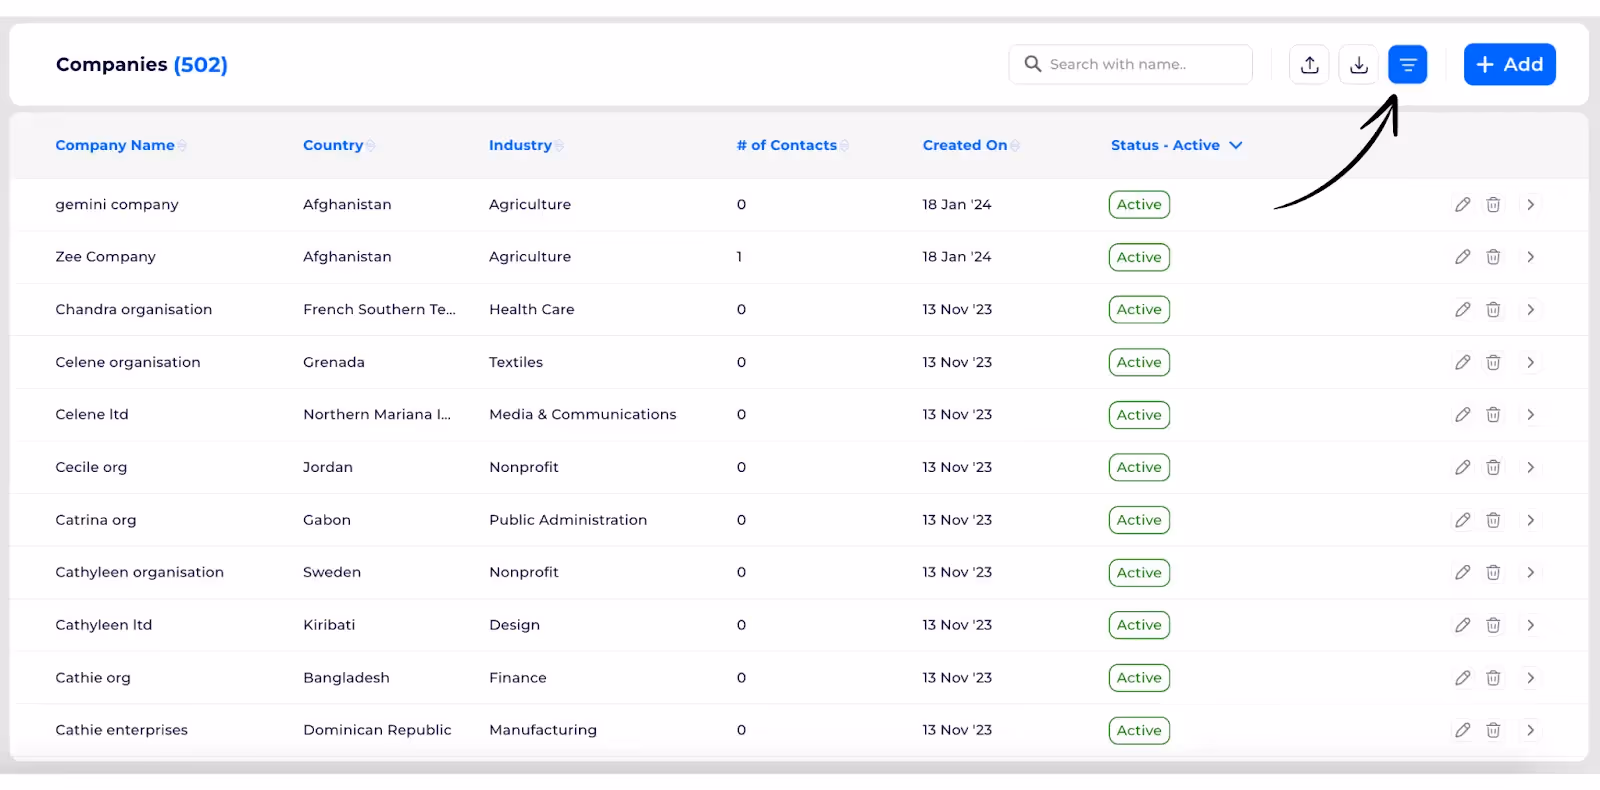
Filter Companies based on different parameter values
Apply Comprehensive Filters to Company Lists
After creating the company ,you can view the company in the company list ,you can search the company with its name as shown below.

Sort the Companies List
Note: You can sort the companies list with respective one column at a time. If sorting is set on one column , then if you try to sort using another column, you will find that sorting gets applied on the latest picked column and sorting that has been previously applied on another column, gets removed.
.avif)
- In the header, you can see the arrow marks, you can sort the list with respective to the column chosen. If either of the arrows are not highlighted, that means no sort order is applied on the column.
.avif)
- In the header, you can see the upper arrow mark is highlighted, that means sort order is set in descending order.
.avif)
- In the header, you can see the downward arrow mark is highlighted, that means sort order is set in ascending order.
How to perform Search and Sort Operations
Exploring the Company List with Search and Sort Operations
Navigation to Companies
From the homepage to the "Sales CRM" section, then proceed to the "Companies" page.
Step 1:
Step 2:
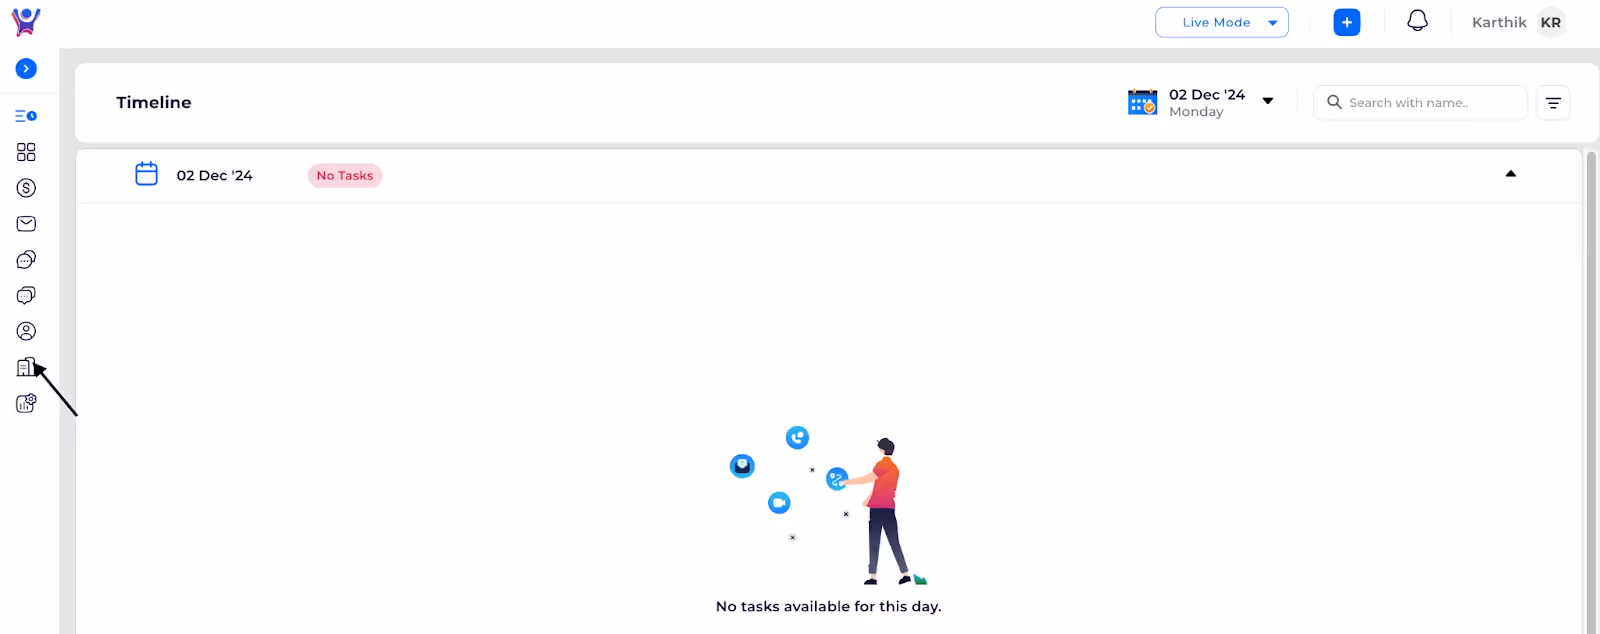

Addition of company
Addition of a single Company
To add companies, click the "Add" button. Fill in the mandatory data fields. To access optional data fields, click on "View Optional." You can then choose to either "Submit" or select the "Save and Add New" option.
Step 1: Click on add

Step 2: Initial form after clicking on add

Step 3: To view optional fields

Step 4: All form fields of company

Step 5.Click on Submit
Bulk addition of companies through imports
Scope:To import companies using Excel or CSV files:
Steps:
- Select the "Import" option.
- Choose the "Create" mode.
- Map the columns in your file to the corresponding system fields.
- Click "Import" to initiate the import process.
- Wait for the acknowledgment email, as this is a background task and may take some time.
- Check the email for any error messages. Rows with errors will include specific error details and will be highlighted in orange.
Step 1: Click Import Icon
Step 2: Choose file
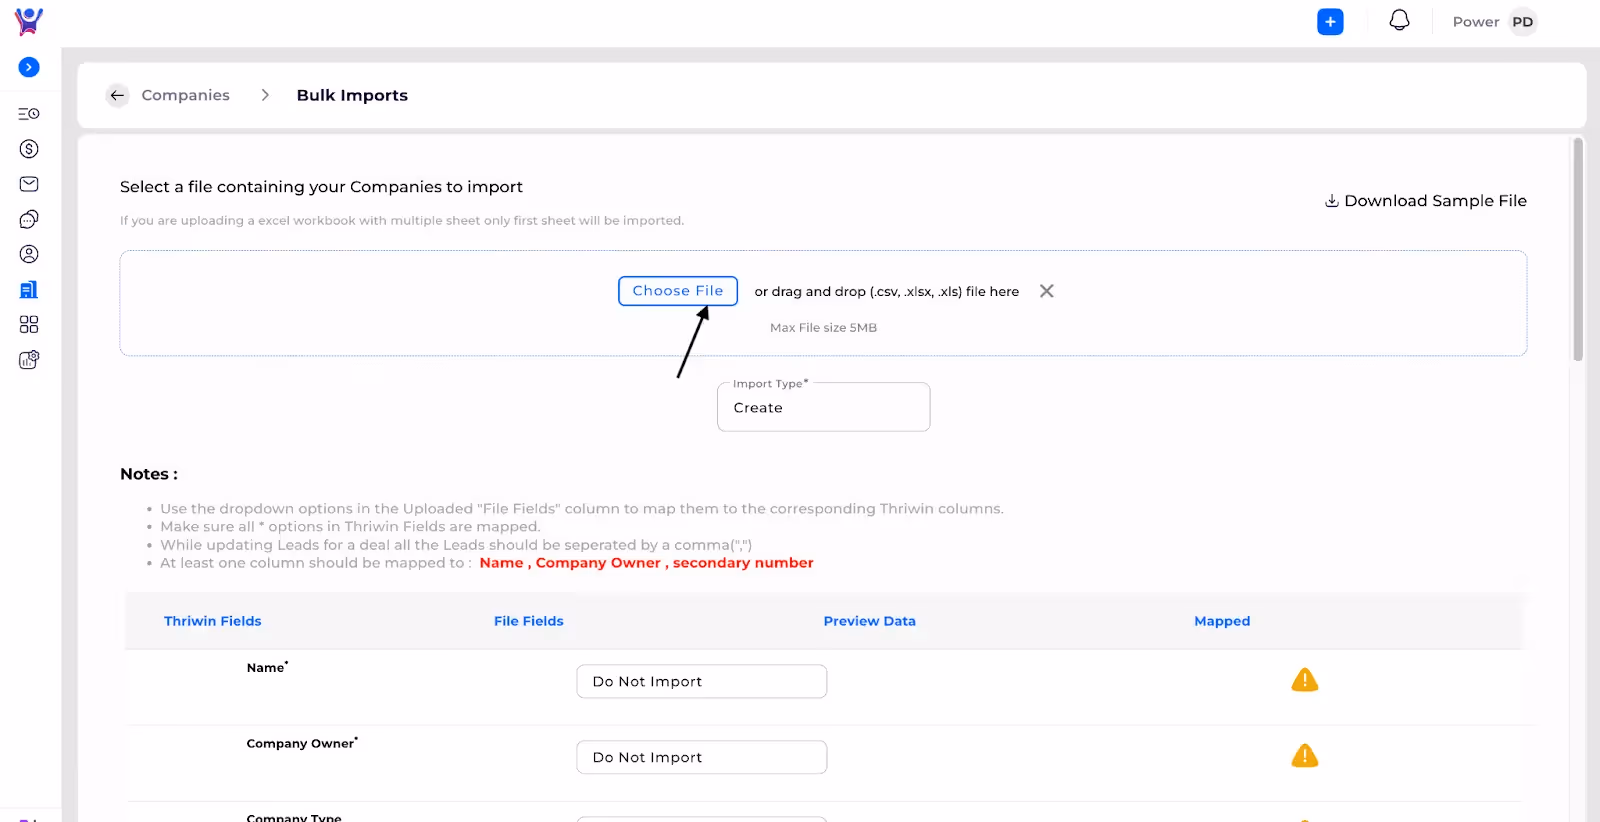
Step 3: Select Create
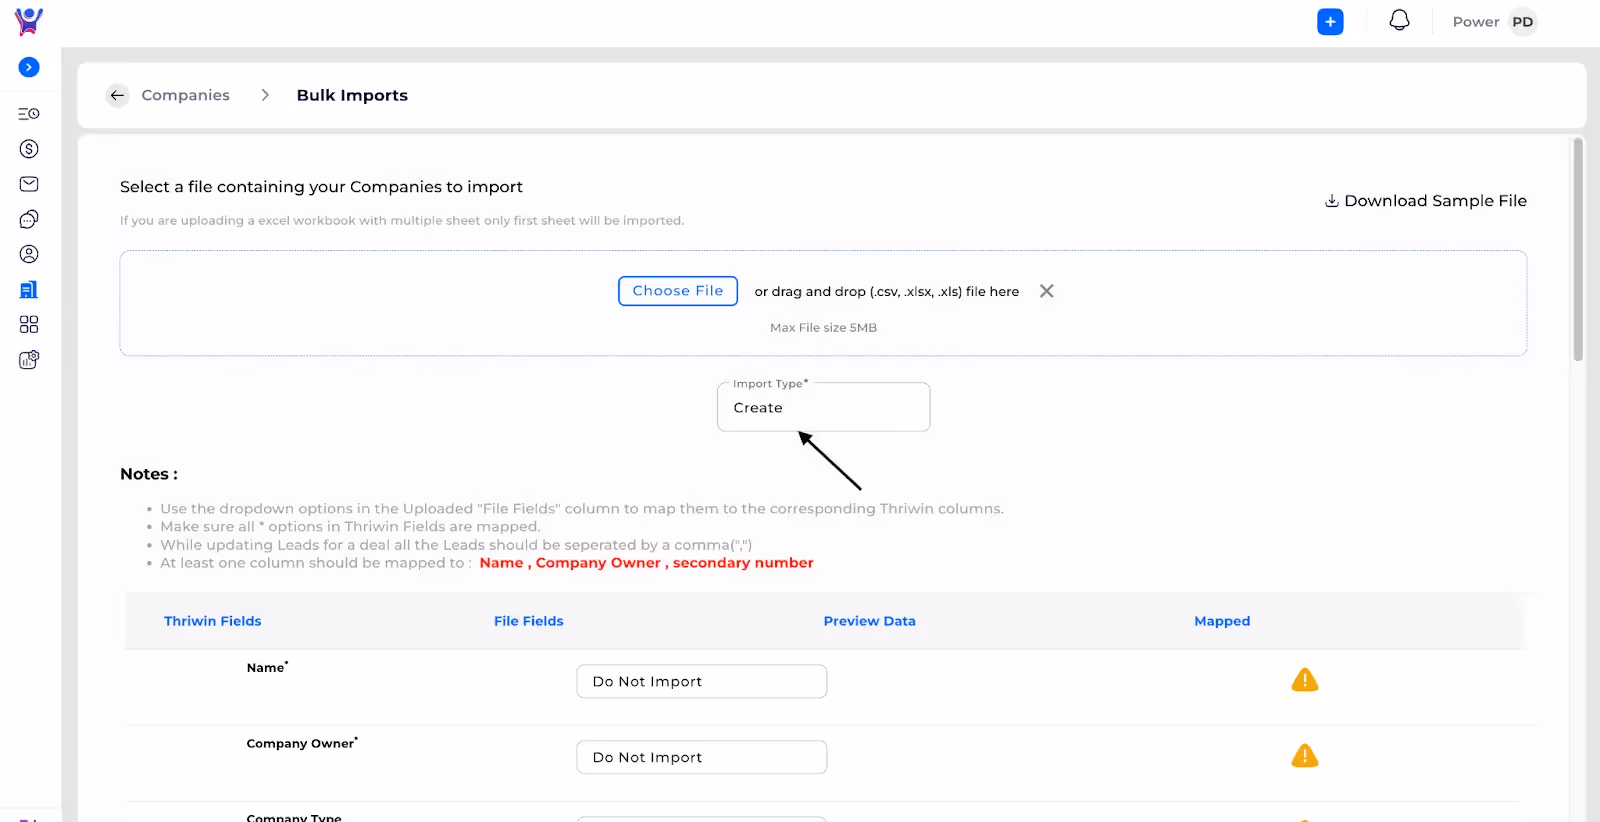
Step 4: Map File fields(column names) with System fields

Step 5: After mapping Click on Import to start creation of companies
How to Add a New Company
Step-by-Step Guide to Creating a Company
How to navigate to Companies
From the homepage to the "Sales CRM" section, then proceed to the "Companies" page.
Step 1:
Step 2: To access companies head over to the menu and click on the companies section as shown below.
- This will give the list of companies that are present in the organization. We can add new companies or do actions on the existing companies from this screen.
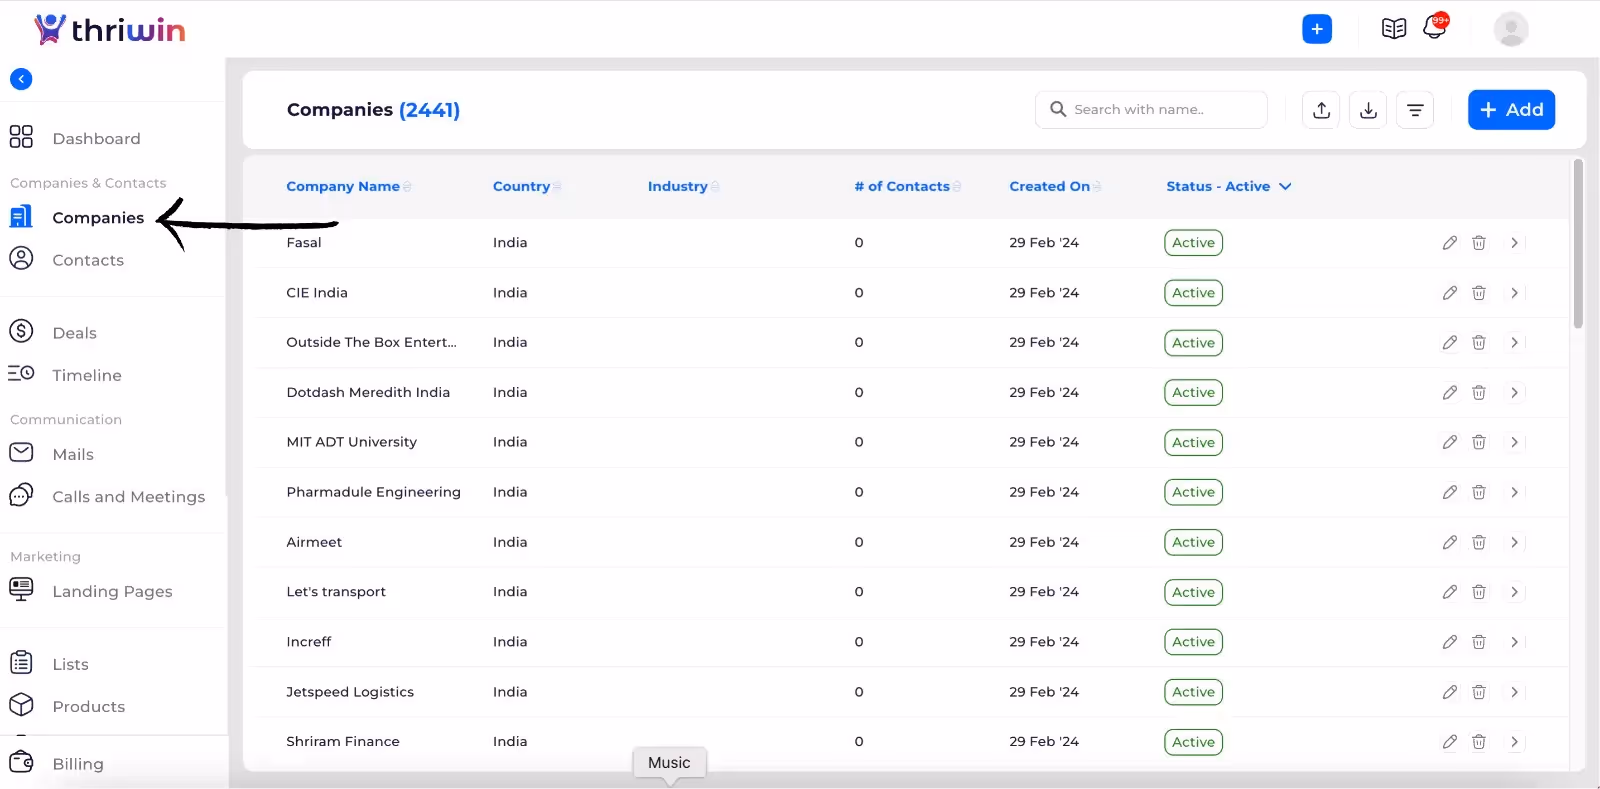
Detailed View of Companies
- Company Detail view can be seen by clicking on the company otherwise clicking on the view icon on each company.
- This will take you to the company detail section in which detailed information like basic details, contacts, etc. can be viewed.
- In Basic Details all the company fields as well as custom fields can also be viewed.
- In the company's details view ,you can view the contacts associated with this company ,by clicking on the contacts as shown below.

- The contacts list will appear as shown below and you can apply filters and you can search contact by its name ,you can add contact to this company.

- You can view the deals associated with the single company by clicking on the deals as shown below.
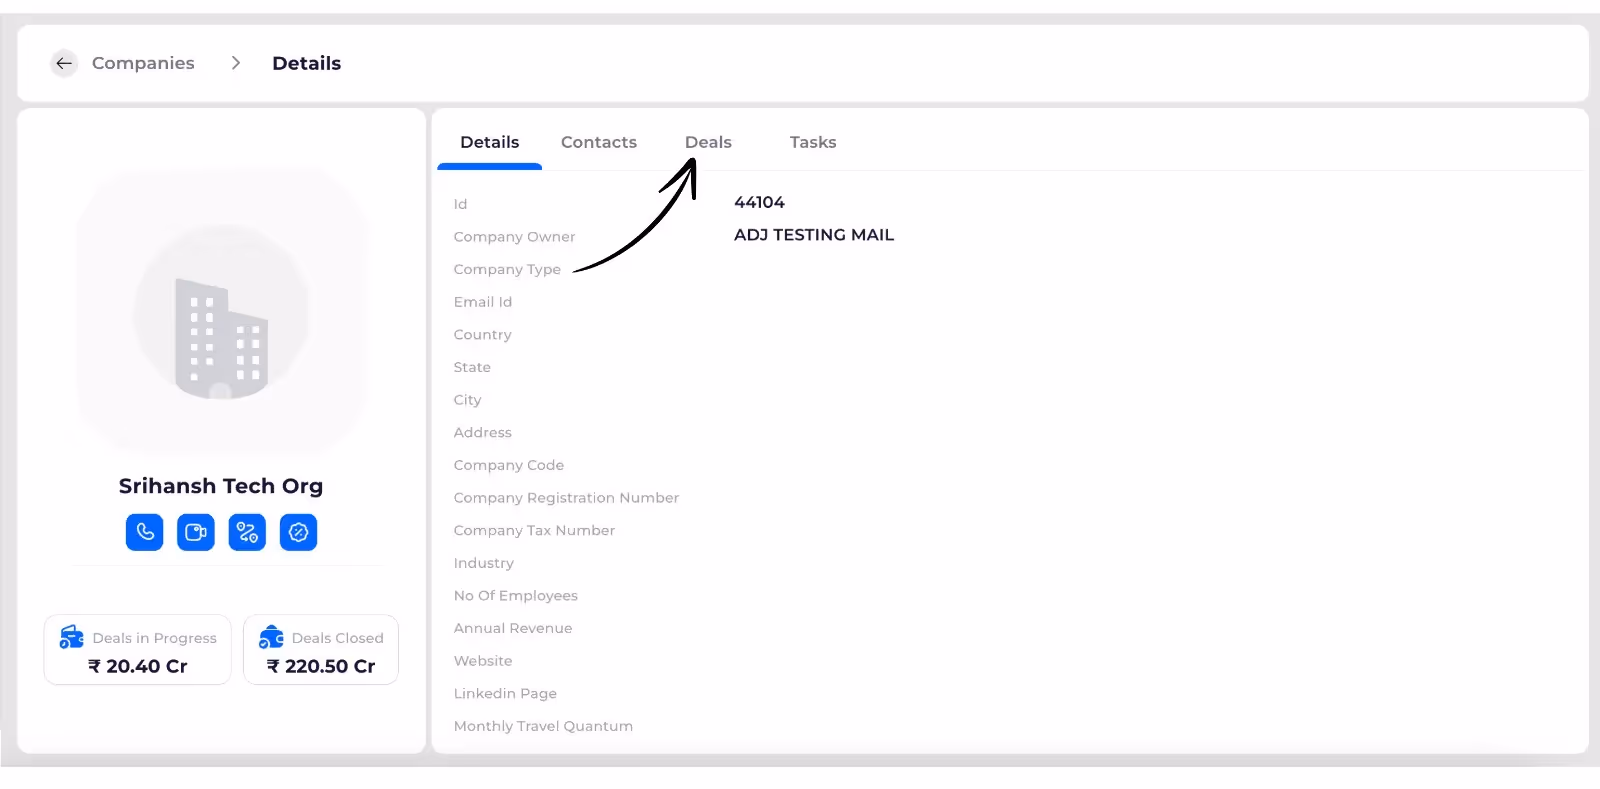
- You can view deals list view associated with this company, you can create a deal and can search deals with its name and apply deal filters.

- You can view the tasks associated with the company by clicking on the tasks as shown below.

- You can view tasks and apply filters like ALL,COMPLETED,OVERDUE on tasks.
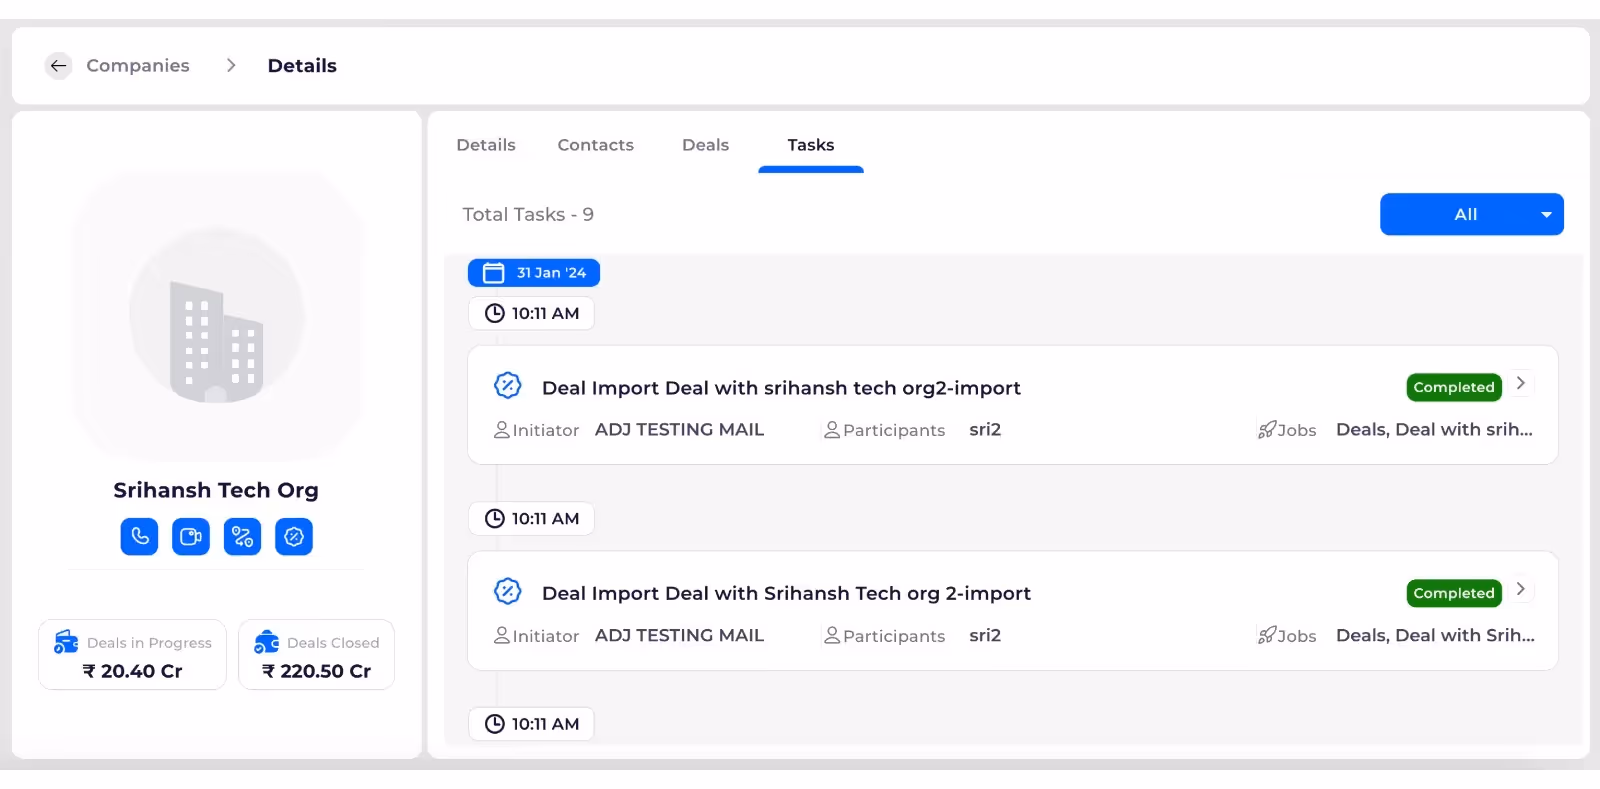
Access Companies and detailed view of Company
Access Detailed Company Information
This comprehensive guide explains the Activities feature in Thriwin CRM, designed for users looking to effectively manage and track their interactions.
Understanding Activity Types
- Thriwin CRM offers four primary activity types:
- Field Visits: Direct meetings with participants
- Calls: Instant or scheduled communication with a single participant
- Meetings: Instant or scheduled discussions with multiple participants
- Emails: Communication method (details to be elaborated)
Accessing Activity Forms
- Users can open activity forms through multiple sources in the Thriwin portal:
- Toolbar '+' Iconsome text
- Click the '+' icon
- Select 'Activities' dropdown
- Choose from Field Visit, Call, Meeting, Email
- Entity Details Pagessome text
- Navigate to Company, Lead, Deal, or Marketing Contact pages
- Click corresponding activity icons
- Note: Participant details are often pre-filled
- Admin Settingssome text
- Open activity form directly from admin settings
- No pre-filled information
- Secondary Contact Numberssome text
- Click secondary numbers in entity details
- Call form opens with pre-filled data
- Timelinesome text
- Click 'Complete Task' for scheduled tasks
- Corresponding task form opens
- Toolbar '+' Iconsome text
Scheduling and Completing Activities
- Activities in Thriwin CRM can be:some text
- Scheduled for future dates
- Completed instantly
- Reflected in the timeline on corresponding scheduled dates
Common Issues and Troubleshooting
- Issue 1: Unable to find activity form
- Solution: Check toolbar, entity pages, or admin settings
- Issue 2: Pre-filled information incorrects
- Solution: Manually edit participant details before submitting
FAQs
- Question 1: Can I schedule activities for multiple participants?some text
- Answer: Yes, Field Visits and Meetings support multiple participants. Calls are limited to one participant.
- Question 2: How are scheduled activities tracked?some text
- Answer: Scheduled activities appear in the timeline on their respective dates.
Need More Help?
- Contact Support: Reach out to Thriwin CRM support team for additional assistance with activity management.
Activity Overview
Efficiently Manage Tasks and Engagements
Stay informed with our Notifications! It's your go-to destination for updates and important messages.
Accessing Notifications
- Bell icon located in top right corner of toolbar
- Indicates number of unread notifications
- Screenshot: (Screenshot 1: Toolbar with Bell icon and notification count)

- Key Points:
- Quick access to system notifications
- Real-time notification tracking
Notification Pop-up
- Click on bell icon
- Notifications pop-up opens
- Screenshot: (Screenshot 2: Notifications pop-up window)

- Key Features:
- Displays recent notifications
- Provides quick overview of system updates
Notification Interaction
Individual Notification
- Click on specific notification
- Corresponding activity form opens
- Notification details pre-filled
- Key Points:
- Notification count decreases
- Provides direct access to related activity
- Screenshot: (Screenshot 3: Pre-filled activity form from notification)

Show All Notifications
- Click 'Show All Notifications'
- Redirected to full Notifications page
- Screenshot: (Screenshot 4: 'Show All Notifications' option)
- Key Features:
- Comprehensive notification management
- Multiple view options
- Screenshot: (Screenshot 5: Full Notifications page)
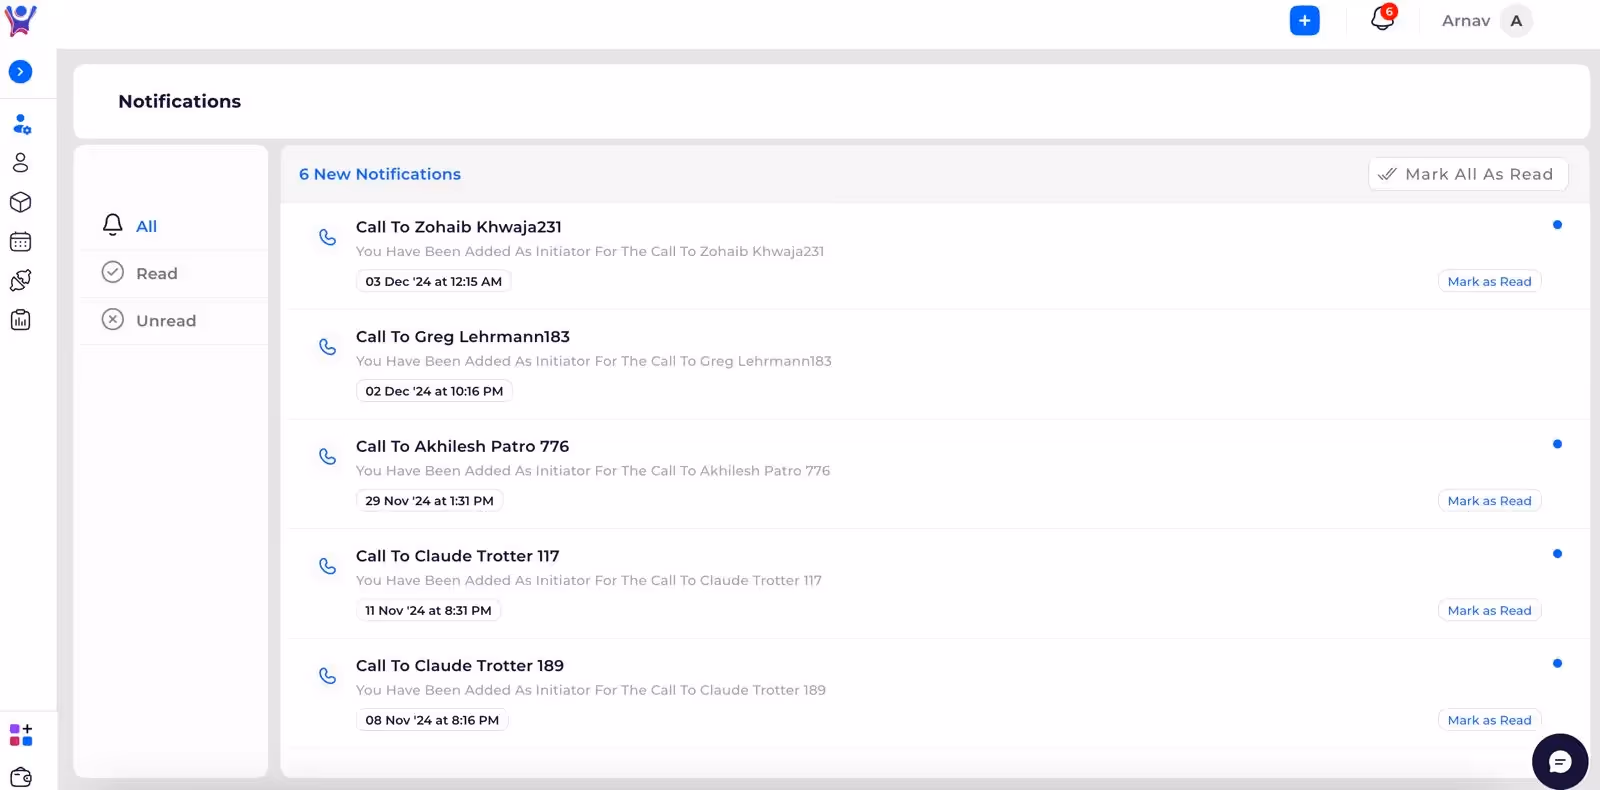
Notification Management
Notification Filtering
- View options: All, Read, Unread notifications
- Screenshot: (Screenshot 6: Notification filtering options)

- Key Features:
- Customizable notification view
- Easy tracking of important updates
- Screenshot: (Screenshot 7: Filtered notification view)
Mark All as Read
- Option located in top right corner
- Instantly mark all notifications as read
- Screenshot: (Screenshot 8: 'Mark All as Read' button)
- Key Points:
- Quick notification management
- Clears notification clutter
- Screenshot: (Screenshot 9: Notifications cleared after marking read)
Common Issues and Troubleshooting
- Issue 1: Notifications not updatingsome text
- Solution: Refresh page or check internet connection
- Issue 2: Unable to open notificationsome text
- Solution: Ensure proper system permissions
FAQs
- Question 1: How long are notifications stored?some text
- Answer: Typically stored for a limited period, varies by system configuration
- Question 2: Can I customize notification settings?some text
- Answer: Notification preferences can be managed in user settings
Important Considerations
- Notifications provide critical system updates
- Offers multiple interaction methods
- Helps users stay informed about tasks and activities
Need More Help?
- Contact Support: Reach out to Thriwin support team team for detailed assistance with Notification functionality.
Complete guide to Access and understand Notifications
Stay Informed and Organized
Your user profile is your personalized space where you can manage your account settings, preferences, and more. Follow these steps to access and make the most out of your user profile:
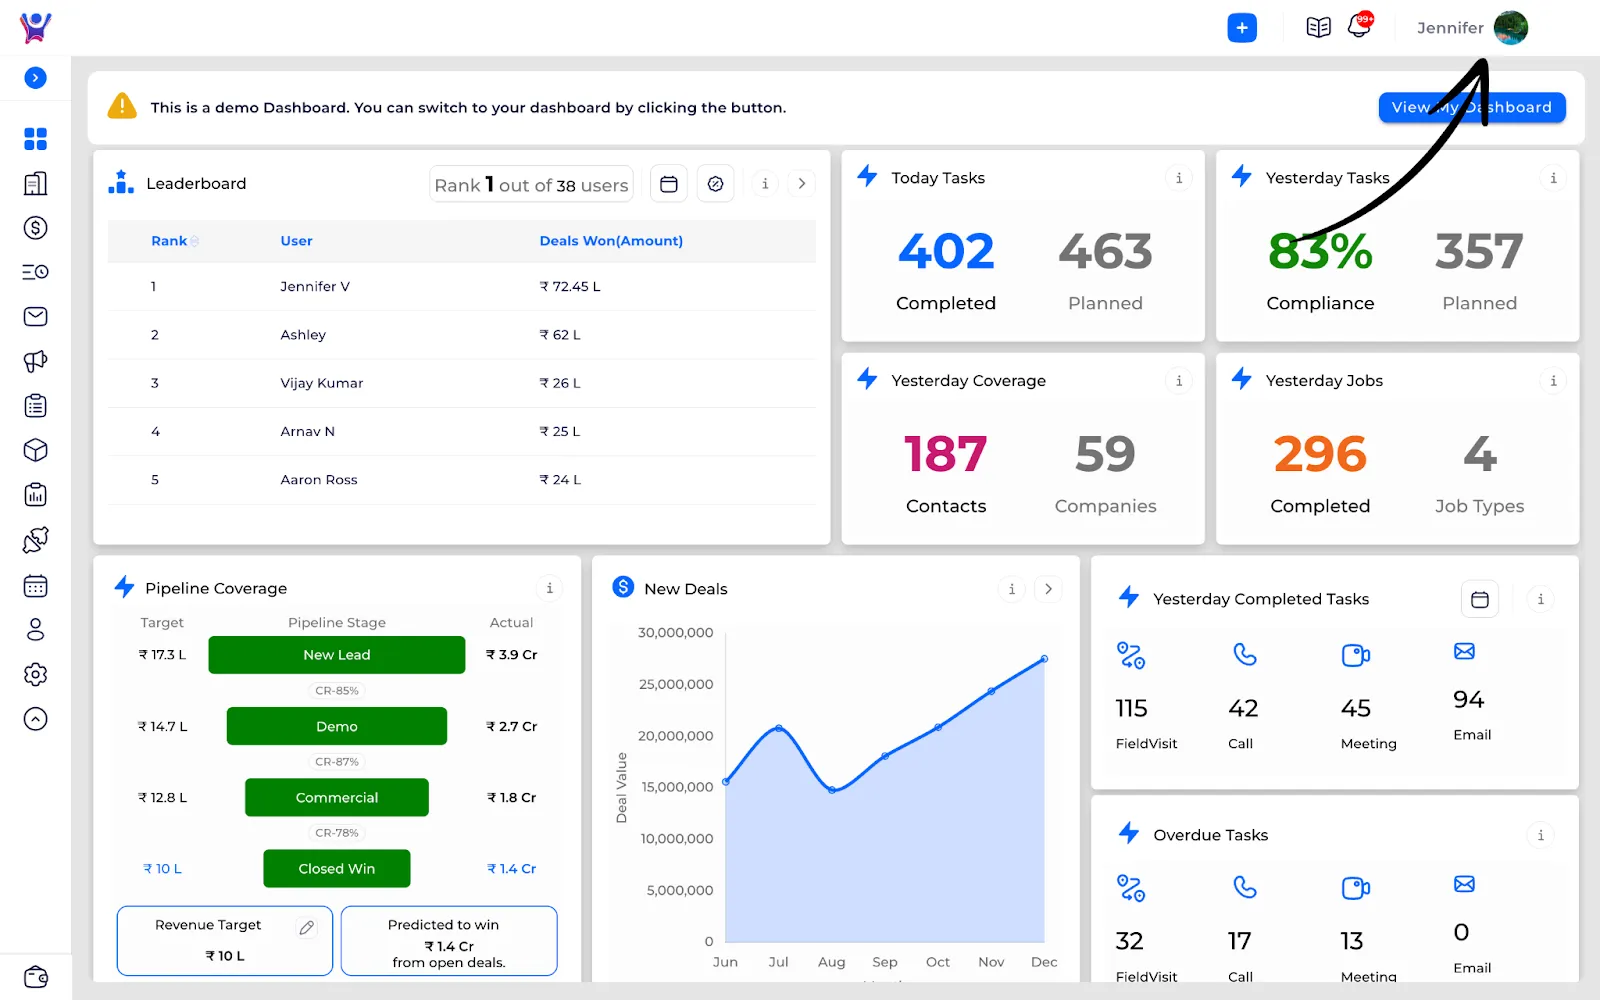
Locate the User Profile Icon
Look for the user icon or your profile picture, typically located in the top-right corner of the screen. It might be represented by an avatar and your initials.
Click on the User Profile Icon: Once you've found the User Profile icon, click on it to open your personalized profile menu. Here you can see basic information about your email ,name
And Organization Information. You will be provided with an option to go to the Support section. Logout button will be provided at the bottom of the profile section.
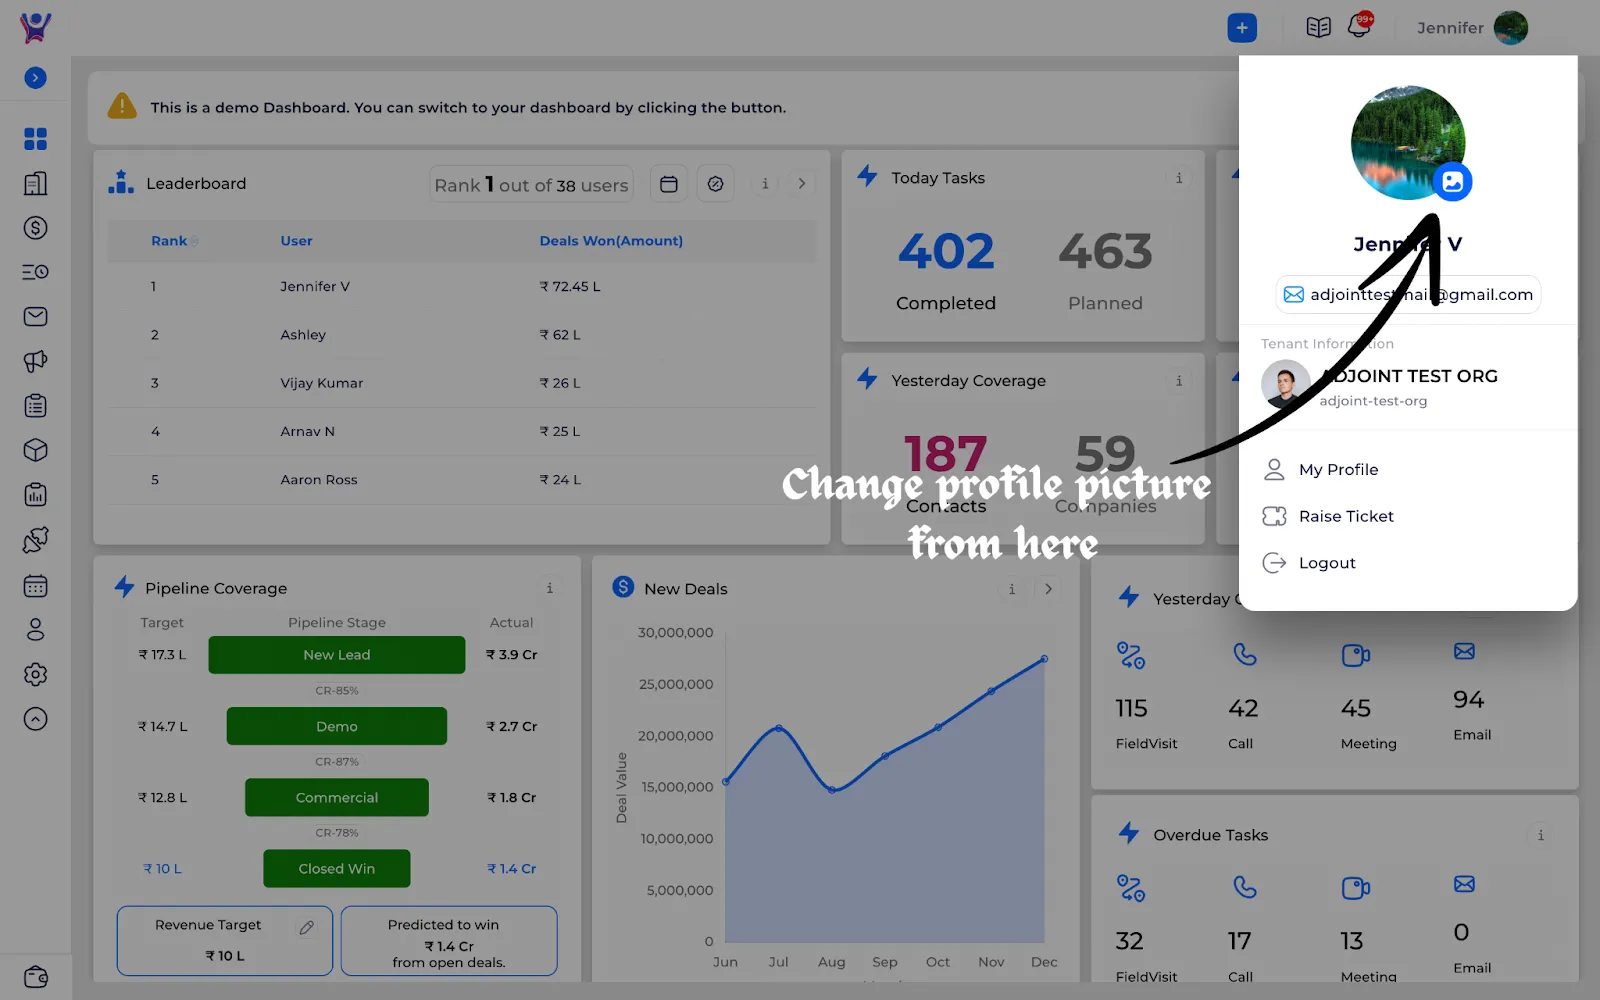
Navigating Your User Profile
Profile Information: View your basic profile information such as your name, email address ,profile picture and other details. If you want to edit details you can click on the edit icon at the top it will redirect to the edit section you can update details from there.
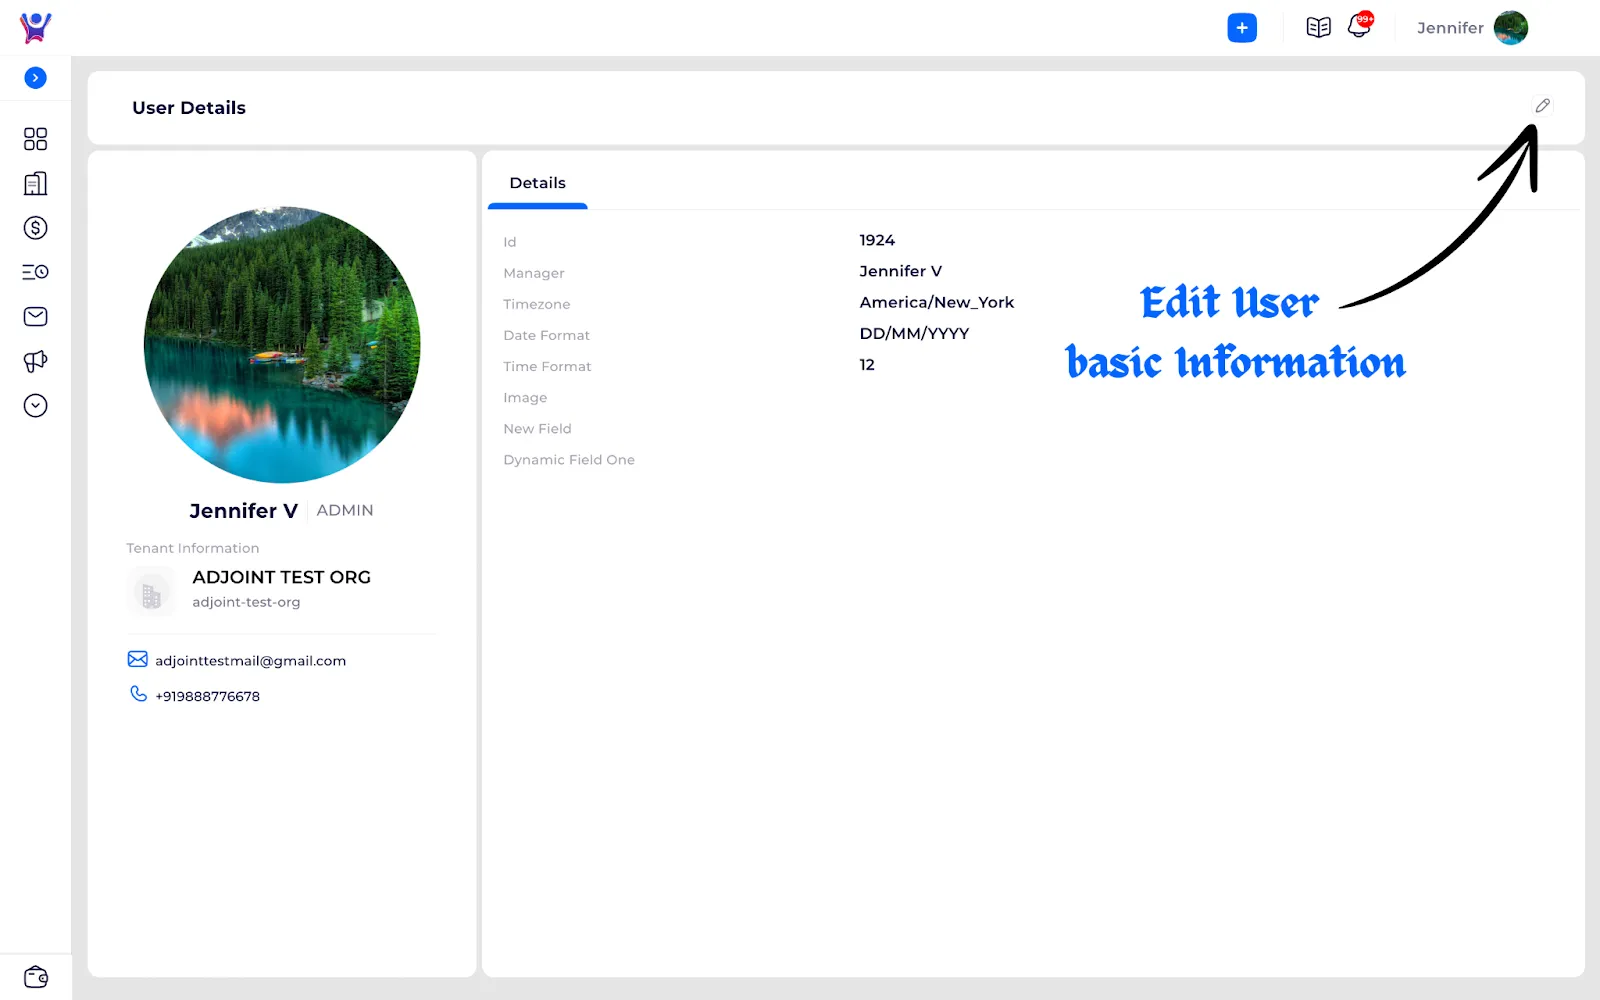
How to Access User profile
User Profile: Access and Manage effortlessly
Menu Bar
- Menu bar is a place where all the features of the system are listed out.
- Here it is placed at the left side of the website, which has two modes.
- One is a collapsed view of all the features, on hovering a feature its child features are shown if it has any.
- Another one is an expanded view where all the features are visible with their names and also their sub features.
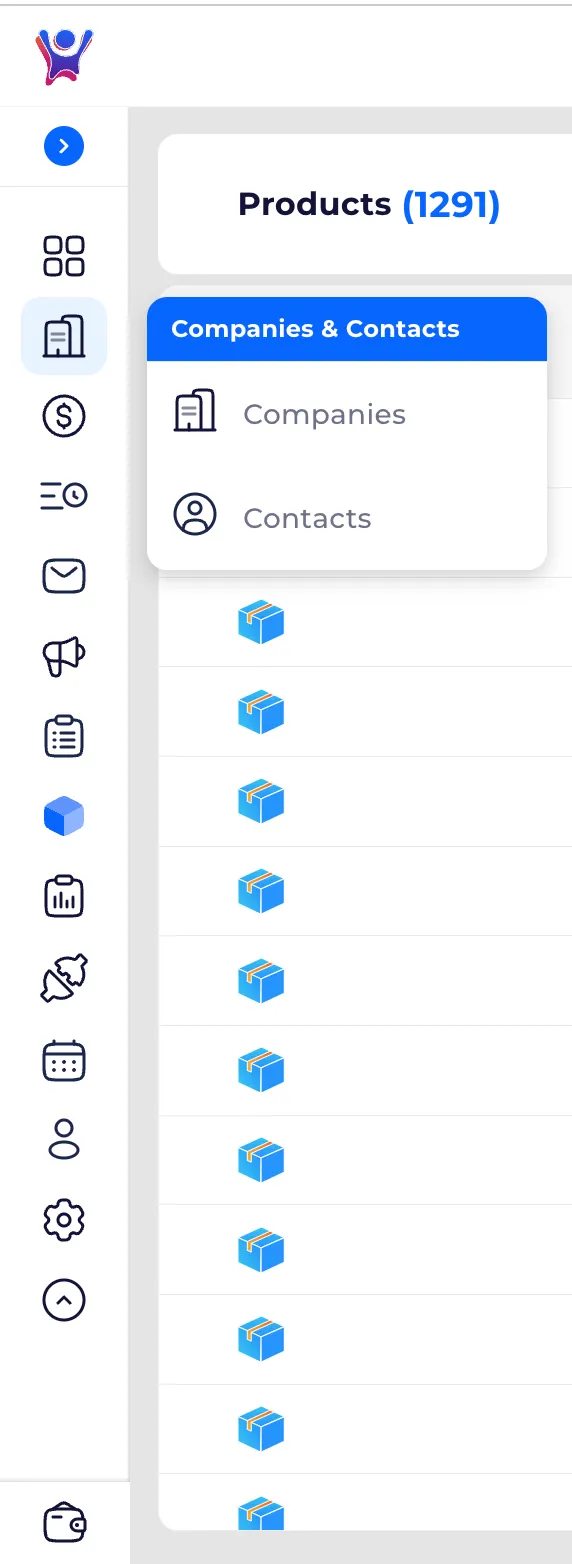
Navigate using Menu-Complete Guide
Explore features effortlessly with our menu
Pipeline Coverage

Click on edit.
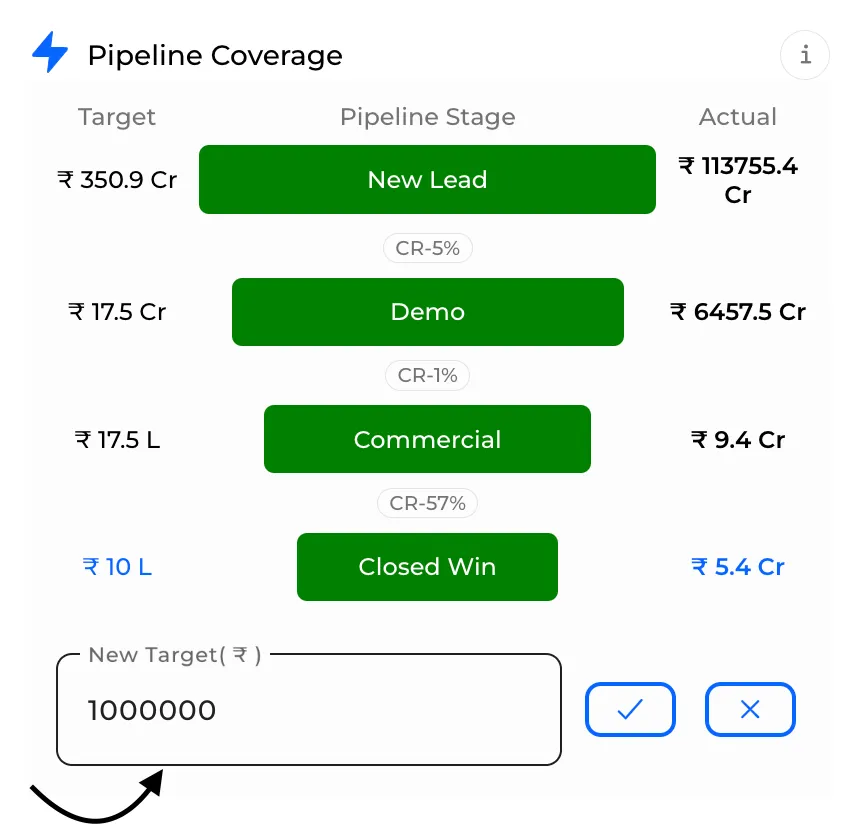
Give Target Value.

Click on the tick mark.
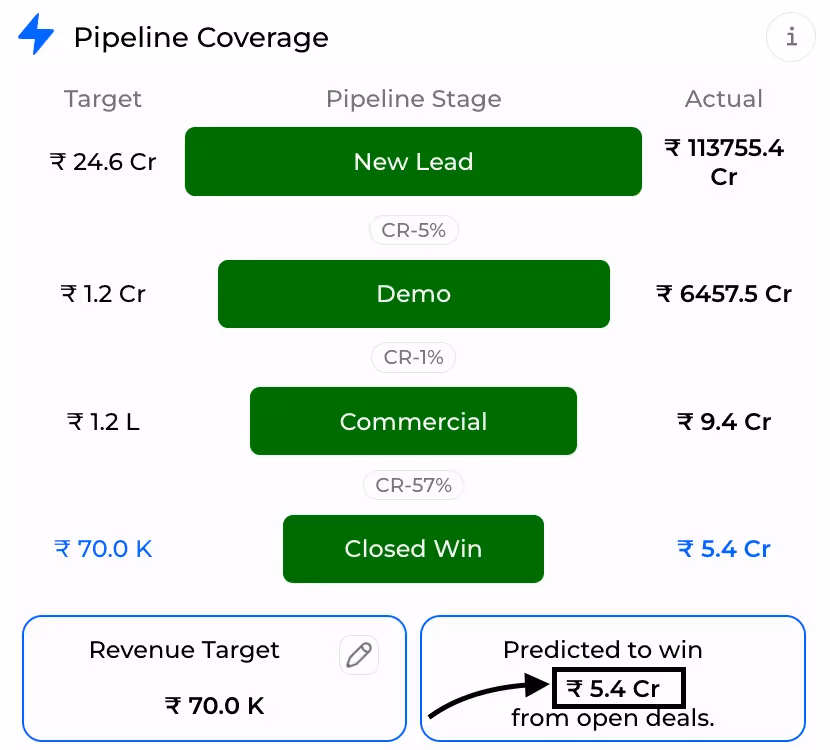
5.4 cr is the projected revenue for revenue target of 70 k using history % of win conversion.
As actual new lead is more than target value of predicted so we achieved new lead so it is green.same in rest other cases.

5.4 cr is the projected revenue for revenue target of 7 cr using history % of win conversion.
As actual new lead is more than target value of predicted so we achieved new lead so it is green.same in demo stage case as well. But in commercial we need 12.3 cr as per history actual amount is 9.4 cr so here it is red as it is not achieved.
- Predicted to win: according to your history prediction of winning deal is calculated and displayed.
- When you give target revenue it will predict according to your history it will predict to win.
- Target is calculated on history %.
- Actual is current value at that time only win will be calculated on the basis of current stages with respect to history.
Pipeline Coverage
Pipeline Precision: Actual vs. Target Revenue Analysis
Leader-Board and KPIs
- It gives a quick summary about how many deals were made by the user , how much deal amount and who is leading in the leaderboard with respect to deals won, deals amount won, total no of deals made.
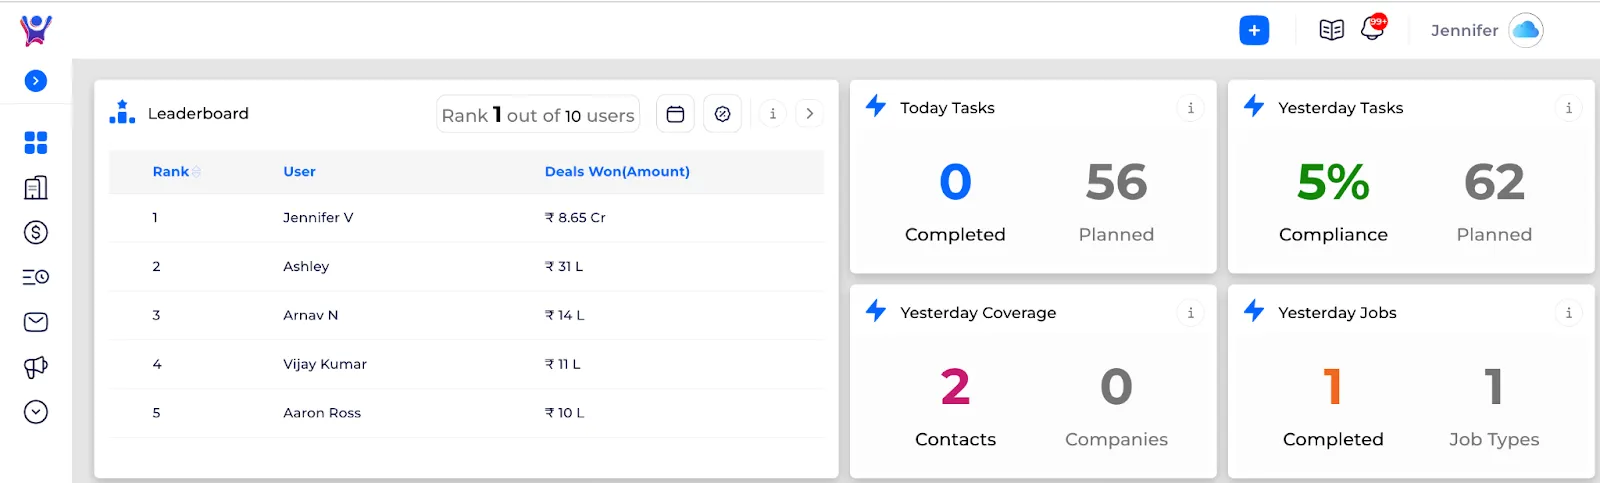
KPIS:
- In my dashboard every KPI/ Card is related to his performance , compliance.
- Today's task- here total tasks scheduled for today and completed will be shown.
- Yesterdays tasks-here total tasks scheduled yesterday and completed will be shown.
- New contacts - contacts added -shown month wise.
- New companies - companies added -shown month wise.
- New Deals - No of deals created -month wise.
- Top Deals - list of top 5 companies which won most deals.
- Hot Deals - List of deals which were open for so long.
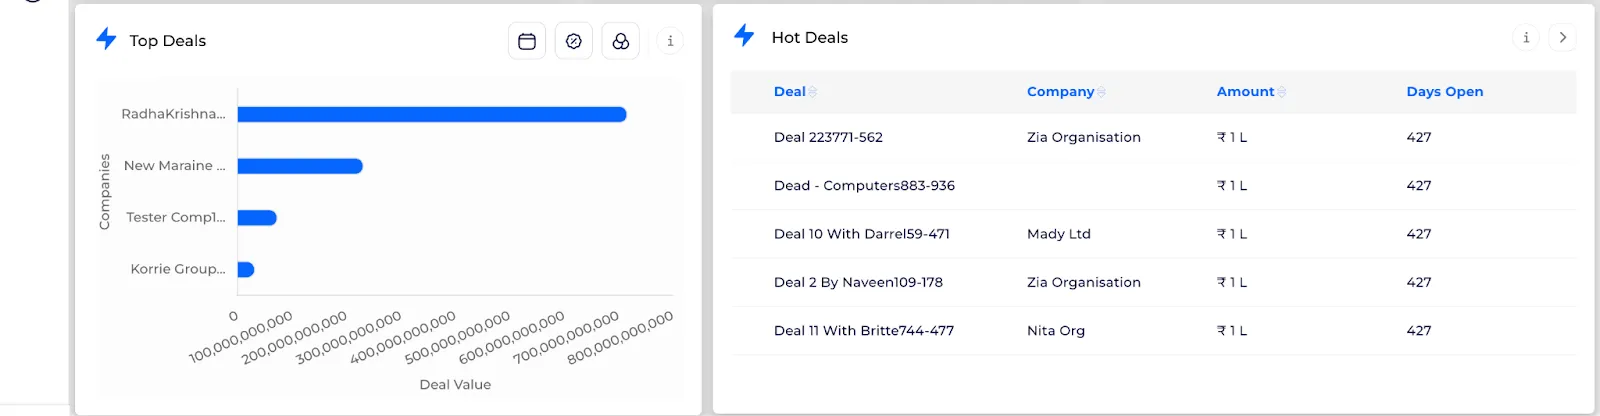
Leaderboard and KPIS
Empower Performance with Leaderboards and KPIs
Dashboard
- Which shows the progress or the current status of all the activities taking place like, field visits, calls , meetings , deals , company and contact generation and few of the summarized analysis on deals.
- All these are categorized into Key Performance Indicators(KPI’s) and tables which are visualized in the form of charts, graphs and tables.
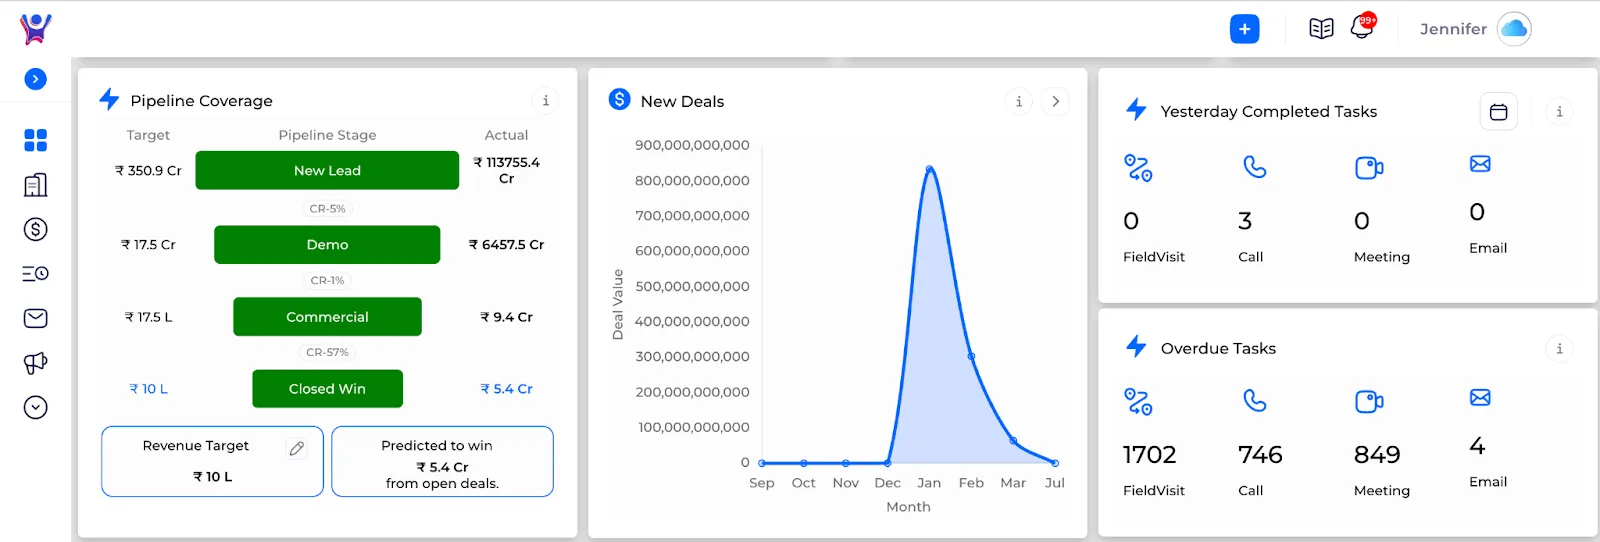
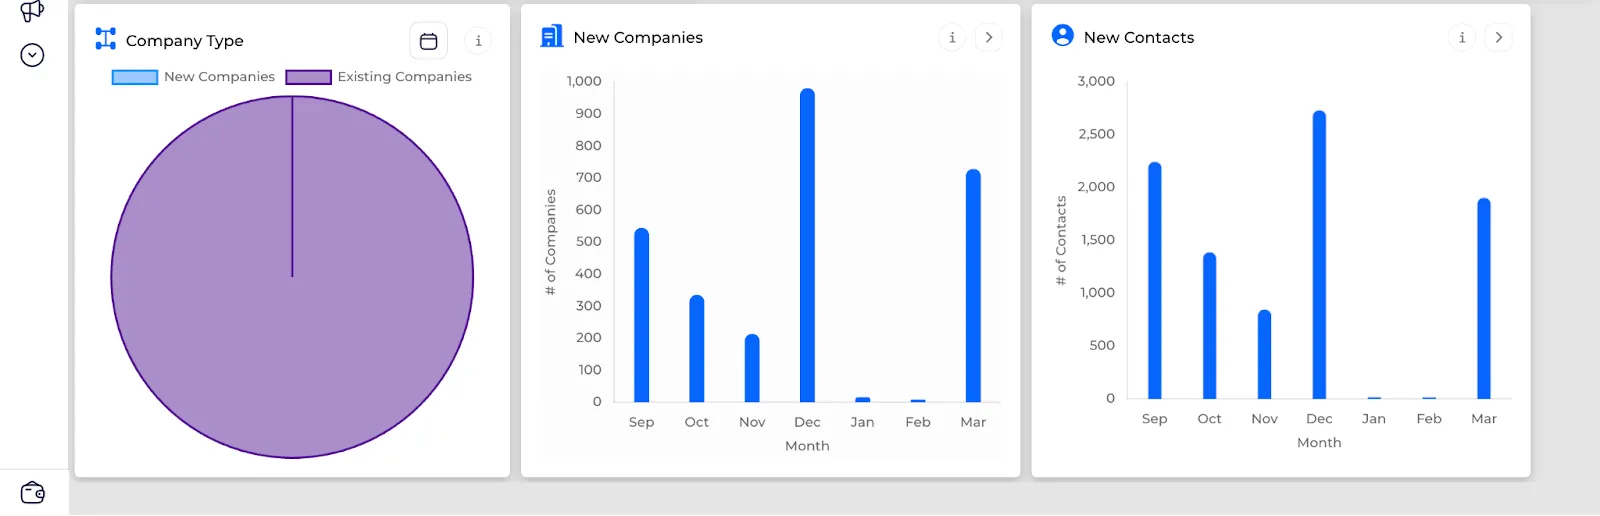
My DashBoard
In my dashboard every KPI/ Card is related to his performance , compliance.
- Today's task- here total tasks scheduled for today and completed will be shown.
- Yesterdays tasks-here total tasks scheduled yesterday and completed will be shown.
- New contacts - contacts added -shown month wise.
- New companies - companies added -shown month wise.
- New Deals - No of deals created -month wise.
- Top Deals - list of top 5 companies which won most deals.
- Hot Deals - List of deals which were open for so long
Demo Dashboard
- Initially a demo dashboard is shown which consists of static or fixed data to show the look of all the kpis, charts and tables when they have enough data.
- Both demo and original dashboard looks the same where only difference is demo dashboard is generated with fixed data and original dashboard is generated with original and updated data of the user.
- On clicking View My Dashboard, the user dashboard will be shown.
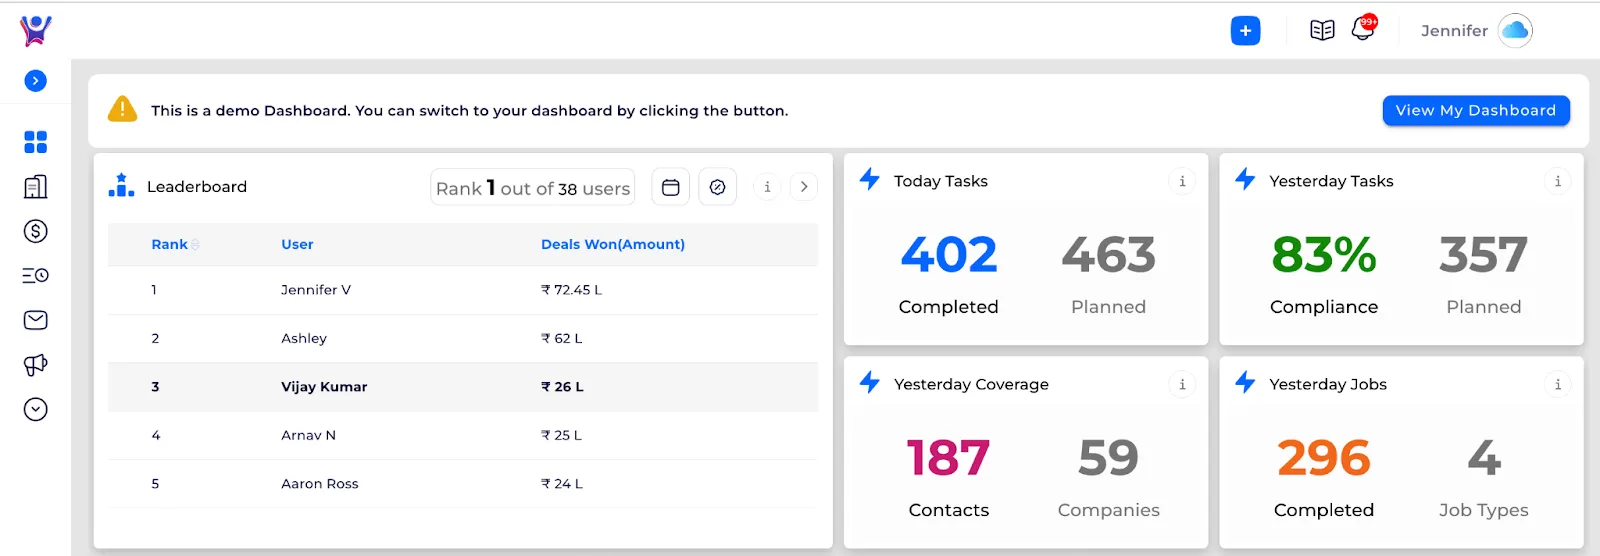


.svg)


.svg)


.svg)
.svg)